Creating a texture with Deep Paint 2.0 By Realmling
|
|
|
- Shana Singleton
- 5 years ago
- Views:
Transcription
 Photoshop/PSP/similar (cause there s a few clean up things DP can t do) Poser Optional requirements: Britta figure (free from Sixus1) My Sundress for Britta (free from me) Or just")
1 Creating a texture with Deep Paint 2.0 By Realmling What you need to do this tutorial: Deep Paint 2.0 (it s free now) Photoshop/PSP/similar (cause there s a few clean up things DP can t do) Poser Optional requirements: Britta figure (free from Sixus1) My Sundress for Britta (free from me) Or just grab your favorite model and a piece of their clothing (make sure you have the template) and follow along. ~~~~~~~~ NOTE: Deep Paint is very good at giving auto reminders to save as you go I have to say this is the best feature of this program. Every so often the little box will pop up to remind you to save your project. (this will be in DP2 format) Open Deep Paint and load the texture template it doesn t matter what format the template is in, as Deep Paint will just make it a DP2 project. We will have to do some final clean up in another program. (I use Photoshop but I ll try to keep everything generalized as much as possible) Once your template is loaded, we need to zoom in a little to see things better. Select the zoom tool and then go over to the area above the control panel and decide how much you d like to zoom in. You can select from presets by clicking the little arrow next to the %, or enter in your own value.

2 Now you ll notice that DP does not give you scroll bars to move around your image area like other programs. To move your view around to see areas that are off the main screen, you ll need to use the Pan tool. Select the Pan tool while you move it around. then simply left click once and hold down on the image You ll probably get very well acquainted with Pan and Zoom if you use DP a lot. Now, we don t want to paint directly on our template layer, so head over to the layer tab and create a new one. Now we re ready to start painting. Click on the Presets tab to bring up our brush menu. Since the sundress template is divided into a bodice and skirt area, I m going to leave the top rather simple and go a little crazy on the skirt part. I just want the top to have a plain color, but I ll go ahead and do a flood fill for all of Layer 2. Doing a flood fill in Deep Paint is undoable hence always working with multiple layers. If I find I don t like the light dusty purple color I picked out, I can always delete the layer and do another one. I also turn down the opacity of my fill layer so I can still see my template as I work. Just make sure the layer you want is selected and move the opacity slider until you can see the layer underneath while still retaining a bit of your fill color/texture. You can also change the order of your layers by left clicking, hold down, and drag above or below other layers.


3 I m ready now to create the texture that will go on the skirt portion of the dress. This naturally means I need another new layer to work on. Now the fun begins going through your brush options to find something to create your texture with. =) Don t forget you have the option for painting with the bump channel in place this will play a factor in your texture for Poser. Poser 5 and 6 will have no problem using the final image with the bump channel but Poser 4 will need it s own separate bump map. If you re wanting to make sure your texture will work with Poser 4, I would suggest painting with just the color channel. Then make yourself a new document within DP the same size as your template, fill the new document with gray and use the same brush with only the bump channel selected to create your bump map. To select/deselect a channel, simply click on the letter. The shine channel is tied into the Deep Paint lighting but well get into that here in a bit.


4 Back to my texture. I decided to use the Ivy Rainbow brush under the Texture Paints preset and make a nice little belt. For this one, I had all three channels selected. I have also gone in and changed some of the light setting to get the look you see here. The green arrow indicates which spot is the chosen default. That wasn t giving me quite what I wanted, so I selected the bottom most spot light. Since all the other default settings worked fine for me, I left them alone. But you are free to experiment with the angle of your spot light, and the ambient and spot values to get the look you want. If you save out of DP as a jpeg, tiff or other such format, it will tell you that layers cannot be saved, but that the lighting data will be included. If you choose to save out as a Photoshop.psd format, it will save your layers but not your lighting so it s all up to you as to how you want to save your file. If you have the shine channel selected it will give you a bit of your lighting if you save as a.psd file. (and it really will keep all your layers intact great for fixing seams and the like)

5 Just to show, on the left is a DP screenshot over the top of the copy I saved as a Photoshop file I really can t see that I lost anything that I wanted with this texture. The lighting is just slightly different between the two, but everything still looks like I want it so I m a happy little texture maker.
 I added some lace to the bottom of the dress.")
6 But I think I still want to add some stuff in DP so I ll come back to Photoshop later. Using the Old Bathhouse brush (with some adjustments to hue and saturation values) I added some lace to the bottom of the dress. On the left is how things turned out but that s a little too much so I turned down the opacity in DP to see of that would make a difference, and the part on the right is much more to my liking. Please note however, that any opacity changes made in Deep Paint will not carry over, so you ll have to make those adjustments again with your other image editor. Now I think I m ready to take my texture into Photoshop for the final steps. I m going to make sure I save my dp2 project file just in case I want (or need) to do anything else or make any adjustments, and then I ll save out my.psd copy.

7 With my file now in Photoshop, I can clean up the seams and make any other adjustments I might feel like. I ll also select around the outside of the template layer and delete what I don t need from the others, keeping a 5 pixel area beyond the boundaries of the template so that when I render, no funny little white lines will show around the edges or seams of the mesh. I can see though, that I m going to have to do something about the leaves because they re not going to match up along the back. I made a copy of the leaf layer, rotated the other horizontally, and then matched them up back to back and merged them back into one layer. I then matched up the center of the leaves with the center of the dress template. Now it s time to do a preview render and see if anything needs to be adjusted or changed.
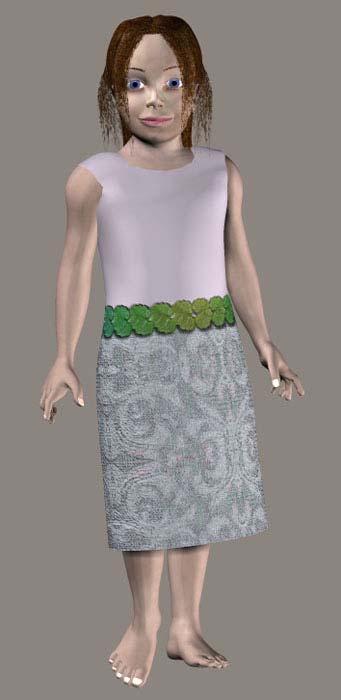
8 For test renders, I load just the clothing model I ve made the texture for that way it doesn t take as long for Poser to render. I also use the Firefly to render in production mode with shadows turned off. This gives me a nice clean render without having to wait for poser to work up the shadow map part and it honestly doesn t take that long unless it s a poly intensive model. With the dress loaded in P5, I add the texture map. I ve attached the image map to the bump node and put the bump setting at 0.5 for this first test run. (I also zoom my camera in close to the model to see things better and then render it from a few different angles to see how everything looks)

9 You can see that the lace matched up rather well, and just a little bit of funky overlap on the leaves that needs some attention. I may want to play with the bump settings a little more, or even use a displacement map instead, but all in all it didn t turn out too bad. And that s a look into creating a texture with Deep Paint 2.0 the best part is just experimenting and just seeing what you can come up with.
10
Clipping Masks And Type Placing An Image In Text With Photoshop
 Clipping Masks And Type Placing An Image In Text With Photoshop Written by Steve Patterson. In a previous tutorial, we learned the basics and essentials of using clipping masks in Photoshop to hide unwanted
The original photo. The final result.
 giving a photo painted edges In this Adobe Photoshop tutorial, we re going to combine a couple of different effects. First, we ll give the photo easy-tocreate painted edges, and then we ll make it look
INTERMEDIATE PHOTOSHOP: FAMILY PHOTOS
 INTERMEDIATE PHOTOSHOP: FAMILY PHOTOS What is Photoshop Elements? Photoshop Elements is a streamlined version of Adobe Photoshop CC. Despite missing some more advanced features, it is a robust piece of
Introduction to Photoshop Elements
 John W. Jacobs Technology Center 450 Exton Square Parkway Exton, PA 19341 610.280.2666 ccljtc@ccls.org www.ccls.org Facebook.com/ChesterCountyLibrary Introduction to Photoshop Elements Chester County Library
Lightroom- Creative Cloud Tips with NIK
 Lightroom- Creative Cloud Tips with NIK Motion Sequence Make several images in your camera on burst mode without following the subject. Let them move past your field. It is best to use a tripod, but not
Tricky Transparency, Part One Complex Photo Mask Potential
 Tricky Transparency, Part One Complex Photo Mask Potential digitalscrapper.com/blog/qt-tricky-transparency-1 Jen White Tricky Transparency, Part One Complex Photo Mask Potential by Jen White Train your
Create A Starry Night Sky In Photoshop
 Create A Starry Night Sky In Photoshop Written by Steve Patterson. In this Photoshop effects tutorial, we ll learn how to easily add a star-filled sky to a night time photo. I ll be using Photoshop CS5
Now we ve had a look at the basics of using layers, I thought we d have a look at a few ways that we can use them.
 Stone Creek Textiles stonecreektextiles.co.uk Layers Part 2 Now we ve had a look at the basics of using layers, I thought we d have a look at a few ways that we can use them. In Layers part 1 we had a
Photoshop Elements Hints by Steve Miller
 2015 Elements 13 A brief tutorial for basic photo file processing To begin, click on the Elements 13 icon, click on Photo Editor in the first box that appears. We will not be discussing the Organizer portion
4 PHOTOSHOP SPECIAL EFFECTS HACKS FROM SCOTT KELBY
 4 PHOTOSHOP SPECIAL EFFECTS HACKS FROM SCOTT KELBY You can do some pretty cool stuff in Photoshop, with most tiny tweaks taking no time at all. However, for some of us (myself included) it s hard to know
Photo One Digital Photo Shoots and Edits
 Photo One Digital Photo Shoots and Edits You will submit photo shoots, unedited and you will submit selected edited images. The shoots will be explained first and the edits will be explained later on this
BRUSHES AND LAYERS We will learn how to use brushes and illustration tools to make a simple composition. Introduction to using layers.
 Brushes BRUSHES AND LAYERS We will learn how to use brushes and illustration tools to make a simple composition. Introduction to using layers. WHAT IS A BRUSH? A brush is a type of tool in Photoshop used
SAVING, LOADING AND REUSING LAYER STYLES
 SAVING, LOADING AND REUSING LAYER STYLES In this Photoshop tutorial, we re going to learn how to save, load and reuse layer styles! Layer styles are a great way to create fun and interesting photo effects
ITNP80: Multimedia Adobe Photoshop Practical Weeks commencing 26 January and 2 February 2015.
 ITNP80: Multimedia Adobe Photoshop Practical Weeks commencing 26 January and 2 February 2015. The aims and objectives of this practical are four-fold: To give you some practical experience of some of the
Using Adobe Photoshop
 Using Adobe Photoshop 6 One of the most useful features of applications like Photoshop is the ability to work with layers. allow you to have several pieces of images in the same file, which can be arranged
WORN, TORN PHOTO EDGES EFFECT
 Photo Effects: CC - Worn, Torn Photo Edges Effect WORN, TORN PHOTO EDGES EFFECT In this Photoshop tutorial, we ll learn how to take the normally sharp, straight edges of an image and make them look all
Adobe Photoshop. How To Get Started With Adobe InDesign CC: 10 Things Beginners Want To Know How To Do TO START: 1) ZOOM, MOVE, RETOUCH (05:11)
 ZOOM, MOVE, RETOUCH (05:11)") Adobe Photoshop How To Get Started With Adobe InDesign CC: 10 Things Beginners Want To Know How To Do Video By Terry White Tutorial Sheet by Juliet Davis TO START: Open the tutorial in YouTube, download
Adobe Photoshop How To Get Started With Adobe InDesign CC: 10 Things Beginners Want To Know How To Do Video By Terry White Tutorial Sheet by Juliet Davis TO START: Open the tutorial in YouTube, download
UNDERSTANDING LAYER MASKS IN PHOTOSHOP
 UNDERSTANDING LAYER MASKS IN PHOTOSHOP In this Adobe Photoshop tutorial, we re going to look at one of the most essential features in all of Photoshop - layer masks. We ll cover exactly what layer masks
SIMPLE POP ART EFFECT
 SIMPLE POP ART EFFECT In this Photoshop tutorial, we re going to see how to turn a photo into a simple 1950 s and 60 s pop art-style effect. If you can make a selection with the Lasso tool and you understand
PHOTOSHOP PUZZLE EFFECT
 PHOTOSHOP PUZZLE EFFECT In this Photoshop tutorial, we re going to look at how to easily create a puzzle effect, allowing us to turn any photo into a jigsaw puzzle! Or at least, we ll be creating the illusion
Challenge Image: Blur the Background
 Challenge Image: Blur the Background Challenge Image: Blur the Background In this lesson, we re going to work on a challenge image that was submitted by a Masters Academy member. The image features a little
ADD A REALISTIC WATER REFLECTION
 ADD A REALISTIC WATER REFLECTION In this Photoshop photo effects tutorial, we re going to learn how to easily add a realistic water reflection to any photo. It s a very easy effect to create and you can
Realistic Skin Smoothing
 TIP SHEET #7 Realistic Skin Smoothing I think it s fair to say when it comes to retouching techniques, the number of different ways to smooth skin is seemingly endless. From blurring techniques through
Car Ad Photoshop Tutorial Miss Van Lenten Tools: Paint brush, Eraser, Quick Selection/Magic Wand, Quick Mask, Layer Mask
 Car Ad Photoshop Tutorial Miss Van Lenten Tools: Paint brush, Eraser, Quick Selection/Magic Wand, Quick Mask, Layer Mask Part One: Google image search for a car of your choosing. Make sure you go to tools
Blend Photos With Apply Image In Photoshop
 Blend Photos With Apply Image In Photoshop Written by Steve Patterson. In this Photoshop tutorial, we re going to learn how easy it is to blend photostogether using Photoshop s Apply Image command to give
SIMPLY TIFFANY STUDIOS SCRAPANEERS.COM
 Get Prepped Organize & Prepare The tips I want to share with you today will help you prepare tomorrow for Scanning Day and increase your scanning speed. Tip 1: Divide & Conquer Arrange your photos into
The original image. The final rainbow effect.
 ADD A realistic rainbow to a photo In this Photoshop photo effects tutorial, we re going to learn how to easily add a rainbow, even a double rainbow, to a photo. Of course, as with most photo effects,
Photoshop CC: Essentials
 Photoshop CC: Essentials Summary Workspace Overview... 2 Exercise Files... 2 Selection Tools... 3 Select All, Deselect, And Reselect... 3 Adding, Subtracting, and Intersecting... 3 Working with Layers...
The original image. Let s get started! The final light rays effect. Photoshop adds a new layer named Layer 1 above the Background layer.
 Add Rays Of Light To A Photo In this photo effects tutorial, we ll learn how to quickly and easily add rays of sunlight to an image with Photoshop! I ll be using Photoshop CS5 throughout this tutorial
Using layer masks to remove backgrounds with Photoshop CS5 and CS6
 Using layer masks to remove backgrounds with Photoshop CS5 and CS6 Use layer masks to combine these pictures into this You will learn: 1. Layers and layer masks 2. Brushes 3. Layer styles 4. Type tool
Digital Design and Communication Teaching (DiDACT) University of Sheffield Department of Landscape. Adobe Photoshop CS5 INTRODUCTION WORKSHOPS
 University of Sheffield Department of Landscape. Adobe Photoshop CS5 INTRODUCTION WORKSHOPS") Adobe INTRODUCTION WORKSHOPS WORKSHOP 1 - what is Photoshop + what does it do? Outcomes: What is Photoshop? Opening, importing and creating images. Basic knowledge of Photoshop tools. Examples of work.
Adobe INTRODUCTION WORKSHOPS WORKSHOP 1 - what is Photoshop + what does it do? Outcomes: What is Photoshop? Opening, importing and creating images. Basic knowledge of Photoshop tools. Examples of work.
Photo Editing in Mac and ipad and iphone
 Page 1 Photo Editing in Mac and ipad and iphone Switching to Edit mode in Photos for Mac To edit a photo you ll first need to double-click its thumbnail to open it for viewing, and then click the Edit
Image Editor. Opening Image Editor. Click here to expand Table of Contents...
 Image Editor Click here to expand Table of Contents... Opening Image Editor Image Editor Sorting and Filtering Using the Image Editor Source Tab Image Type Color Space Alpha Channel Interlace Mipmapping
Photoshop CS6 automatically places a crop box and handles around the image. Click and drag the handles to resize the crop box.
 CROPPING IMAGES In Photoshop CS6 One of the great new features in Photoshop CS6 is the improved and enhanced Crop Tool. If you ve been using earlier versions of Photoshop to crop your photos, you ll find
Adobe PhotoShop Elements
 Adobe PhotoShop Elements North Lake College DCCCD 2006 1 When you open Adobe PhotoShop Elements, you will see this welcome screen. You can open any of the specialized areas. We will talk about 4 of them:
METAL TEXT EFFECT. Step 1: Create A New Document. Step 2: Fill The Background With Black
 METAL TEXT EFFECT In this text effects tutorial, we ll learn how to easily create metal text, a popular effect widely used in video games and movie posters! It may seem like there s a lot of steps involved,
People In Spaces A Workshop on using Photoshop to introduce Entourage Elements into existing work.
 People In Spaces A Workshop on using Photoshop to introduce Entourage Elements into existing work. Peter M. Gruhn peter.gruhn@the-bac.edu Sponsored by Atelier and the Learning Resource Center 1 Layers
How to make non-destructive textured maps in Photoshop
 How to make non-destructive textured maps in Photoshop This tutorial assumes that you are reasonably familiar with using photoshop. E.g. You know how to create layers, layer styles, masks etc. After you
Photoshop CS part 2. Workshop Objective. Getting Started Quit all open applications Single click Adobe Photoshop from the Dock
 pg. 1 Photoshop CS part 2 Photoshop is the premier digital photo editor application used for photo retouching, creating web images, film/video compositing, and other pixel/vector-based imagery. Workshop
Quickstart for Backdrop Designer
 Design your own backgrounds. Quickstart for Backdrop Designer 12 easy steps for creating a digital backdrop. [ from: Digital Anarchy] f/x tools for revolutionaries www.digitalanarchy.com The Basics of
Combine Black-and-White and Color
 Combine Black-and-White and Color Contributor: Seán Duggan n Specialty: Fine Art Primary Tool Used: Smart Objects Combining color and black-and-white in the same image is a technique that has been around
SURREALISM IN PHOTOSHOP
 SURREALISM IN PHOTOSHOP In this tutorial your aim is to create a surrealist inspired image using Photoshop. You will combine a selection of images in an illogical, non realistic manner. Set up a folder
Photoshop CC Editing Images
 Photoshop CC Editing Images Rotate a Canvas A canvas can be rotated 90 degrees Clockwise, 90 degrees Counter Clockwise, or rotated 180 degrees. Navigate to the Image Menu, select Image Rotation and then
Introduction to Layers
 Introduction to Layers By Anna Castano A layer is an image or text that is piled on top of another. There are many things you can do with layer and it is easy to understand how it works. Through the introduction
Workflow. Sample Project
 Workflow Sample Project In this tutorial, we will walk you through a sample project, step-by-step, to help you become more familiar with the Clean program focusing on using a combination of presets and
Module All You Ever Need to Know About The Displace Filter
 Module 02-05 All You Ever Need to Know About The Displace Filter 02-05 All You Ever Need to Know About The Displace Filter [00:00:00] In this video, we're going to talk about the Displace Filter in Photoshop.
Topic: Photoshop and Digital Painting
 Let there be color! Photoshop is as much an artistic tool as it is for digitally altering images. But let s face it most people only relate the Adobe powerhouse program to the later category, hell it is
Photoshop Pop Art Selfie
 Photoshop Pop Art Selfie Pop art was an art movement that began in the 1950 s and used the designs of daily life with all of the bright colors and patterns found in thing like cartoons, comics and advertisements.
Rendering a perspective drawing using Adobe Photoshop
 Rendering a perspective drawing using Adobe Photoshop This hand-out will take you through the steps to render a perspective line drawing using Adobe Photoshop. The first important element in this process
The original image. Let s get started! The final rainbow effect. The photo sits on the Background layer in the Layers panel.
 Add A Realistic Rainbow To A Photo In this Photoshop photo effects tutorial, we ll learn how to easily add a rainbow, and even a double rainbow, to a photo! As we ll see, Photoshop ships with a ready-made
COLORIZE A PHOTO WITH MULTIPLE COLORS
 COLORIZE A PHOTO WITH MULTIPLE COLORS In this Photoshop photo effects tutorial, we re going to learn how to colorize a photo using multiple colors. It s an effect I ve seen used quite a bit in ads for
by Natascha Roeoesli digital painting tutorial series Subjects: The elements series is a guide to basic 2D Digital painting and can be
 by Natascha Roeoesli digital painting tutorial series The elements series is a guide to basic 2D Digital painting and can be followed in most software packages supporting paintbrushes and layers. Each
Managing images with NewZapp
 Managing images with NewZapp This guide is for anyone using the NewZapp Fixed editor as opposed to the Drag and Drop editor. The Image Manager is where images are uploaded and stored in your NewZapp account
The horse image used for this tutorial comes from Capgros at the Stock Exchange. The rest are mine.
 First off, sorry to those of you that are on the mailing list or RSS that get this twice. I m finally moved over to a dedicated server, and in doing so, this post was lost. So, I m republishing it. This
Colorizing A Photo With Multiple Colors In Photoshop
 Colorizing A Photo With Multiple Colors In Photoshop Written by Steve Patterson. In this Photoshop Effects tutorial, we re going to learn how to colorize a photo using multiple colors. It s an effect I
Your texture pattern may be slightly different, but should now resemble the sample shown here to the right.
 YOU RE BUSTED! For this project you are going to make a statue of your bust. First you will need to have a classmate take your picture, or use the built in computer camera. The statue you re going to make
Students will be able to create movement through the use of line or implied line and repetition.
 Title of Unit Digital Imaging Title of Lesson Self Portrait Montage in Photoshop Course Graphic Design 1 Instructor Heidi Stachulak hstachulak@hf233.org Objectives: Composition Students will be able to
Creating Pastel Images and other effects in Photoshop
 Creating Pastel Images and other effects in Photoshop Martin Addison 2015 Creating pastel images Page 1 Martin Addison FRPS Using White Layers in Photoshop 1. Create a new empty Layer 2. Edit> Fill 3.
Painting Special Effects on Photographs
 TUTORIAL 7 Painting Special Effects on Photographs In this tutorial you will learn how to transform a photo into a striking color composition with paintbrushes, masks, blending modes, color, and paper
PHOTOSHOP BASICS: VINTAGE PHOTO FIXES
 PHOTOSHOP BASICS: VINTAGE PHOTO FIXES Course Topics: Photo Adjustments Photo Editing Tools Layers What is Photoshop Elements? Photoshop Elements is a streamlined version of Adobe Photoshop CC. Despite
Photoshop 1. click Create.
 Photoshop 1 Step 1: Create a new file Open Adobe Photoshop. Create a new file: File->New On the right side, create a new file of size 600x600 pixels at a resolution of 300 pixels per inch. Name the file
Optional extras. Varying the basic technique. Making a parchment that is other than square
 Optional extras Varying the basic technique CTRL + Z is your friend. This is the undo button, and I use it all the time. This handy keyboard shortcut makes experimentation so much more rewarding. Varying
HOW TO CREATE A SUPER SHINY PENCIL ICON
 HOW TO CREATE A SUPER SHINY PENCIL ICON Tutorial from http://psd.tutsplus.com/ Compiled by INTRODUCTION The Pencil is one of the visual metaphors most used to express creativity. In this tutorial,
Introduction.
 Introduction At Photobooks Express, it s our aim to go that extra mile to deliver excellent service, products and quality. Our fresh, dynamic and flexible culture enables us to stand above the rest and
The original image. Let s get started! The final result.
 Miniature Effect With Tilt-Shift In Photoshop CS6 In this tutorial, we ll learn how to create a miniature effect in Photoshop CS6 using its brand new Tilt-Shift blur filter. Tilt-shift camera lenses are
ADJUSTMENT LAYERS TUTORIAL
 ADJUSTMENT LAYERS TUTORIAL I briefly showed layers in the original layers tutorial but there is a lot more to layers than discussed there. First let us recap the premise behind layers. Layers are like
XXXX - MAKING A FLYER BOOKLET COVER 1 N/08/08
 INTRODUCTION TO GRAPHICS Making a flyer booklet cover Information Sheet No. XXXX Create a new document with these settings. Note that you will be using 300 dpi because this will be made for print. Keepit
Easily Smooth And Soften Skin In A Photo With Photoshop
 Easily Smooth And Soften Skin In A Photo With Photoshop Written by Steve Patterson OPEN THE START FILE BY RIGHT CLICKING THE.JPG FILE AND CHOOSING OPEN WITH ADOBE PHOTOSHOP. SAVE AS: X_lastname_firstname_Smooth_Soft
Retouching Portraits in Photoshop
 Retouching Portraits in Photoshop I Removing Blemishes When removing blemishes, acne or other imperfections on the skin, our goal is to maintain as much of the original skin texture as possible. That way,
Creating Photo Borders With Photoshop Brushes
 Creating Photo Borders With Photoshop Brushes Written by Steve Patterson. In this Photoshop photo effects tutorial, we ll learn how to create interesting photo border effects using Photoshop s brushes.
Miniature Effect With Tilt-Shift In Photoshop CS6
 Miniature Effect With Tilt-Shift In Photoshop CS6 This effect works best with a photo taken from high overhead and looking down on your subject at an angle. You ll also want a photo where everything is
The Layer Blend Modes drop-down box in the top left corner of the Layers palette.
 Photoshop s Five Essential Blend Modes For Photo Editing When it comes to learning Photoshop, believe it or not, there's really only a handful of things you absolutely, positively need to know. Sure, Photoshop
2809 CAD TRAINING: Part 1 Sketching and Making 3D Parts. Contents
 Contents Getting Started... 2 Lesson 1:... 3 Lesson 2:... 13 Lesson 3:... 19 Lesson 4:... 23 Lesson 5:... 25 Final Project:... 28 Getting Started Get Autodesk Inventor Go to http://students.autodesk.com/
FLAMING HOT FIRE TEXT
 FLAMING HOT FIRE TEXT In this Photoshop text effects tutorial, we re going to learn how to create a fire text effect, engulfing our letters in burning hot flames. We ll be using Photoshop s powerful Liquify
ADDING A RAINBOW TO A PHOTOGRAPH
 ADDING A RAINBOW TO A PHOTOGRAPH This assignment will cover how to add a simple rainbow (or if you want to go crazy, a double rainbow) to any photograph. This will give us some great work with gradients,
Digital Painting from Poser Renders
 Página 1 de 12 Digital Painting from Poser Renders Author: momodot Printable Version Step 1: Setting-up Step 2: "Drawing" Step 3: Simplify Step 4: "Painting" Step 5: Glaze Step 6: Flatten Step 7: Texture
LESSON 04: ORGANIZE IT FOR PSE USERS COMPANION BOOK. Digital Scrapbook Academy. April 2018: Lesson 04 Organize It for Elements Users
 Digital Scrapbook Academy April 2018: Lesson 04 LESSON 04: ORGANIZE IT FOR PSE USERS COMPANION BOOK Page 1 of 15 Table of Contents Table of Contents 2 Welcome to Lesson 04 for Elements Users 3 1: Add Photos,
BOOK BUILDING. for beginners. Lightroom Tutorial by Mark Galer
 BOOK BUILDING for beginners Lightroom Tutorial by Mark Galer Contents Part One: Preparing the Book Part Two: Page Layout Design Ideas Create a Collection Choose your Images Sequence your Images Title your
How to Create Fake Shadows
 TIP SHEET #8 How to Create Fake Shadows As well as the colour, it s the shadows in a picture that help to give it mood and atmosphere so in this tutorial I want to show you how you can add in extra shadows.
Creating a Slide Show with Background Music in Adobe Lightroom January 2017 Maryann Flick
 Creating a Slide Show with Background Music in Adobe Lightroom January 2017 Maryann Flick Adobe Lightroom is widely used by many photographers for image organization and editing. If you are already using
The original image. As I said, we ll be looking at a few different variations on the effect. Here s the first one we ll be working towards:
 DIGITAL PIXEL EFFECT In this Photoshop tutorial, we re going to look at how to create a digital pixel effect, which is often used in ads that sell anything to do with digital. We re going to first pixelate
ITEC185 INTRODUCTION TO DIGITAL MEDIA
 1 ITEC185 INTRODUCTION TO DIGITAL MEDIA ADOBE PHOTOSHOP ITEC185 - Introduction to Digital Media ITEC185 - Introduction to Digital Media 2 What is Adobe Photoshop? Photoshop is the leading professional
Why Do We Need Selections In Photoshop?
 Why Do We Need Selections In Photoshop? Written by Steve Patterson. As you may have already discovered on your own if you ve read through any of our other Photoshop tutorials here at Photoshop Essentials,
prepared by Allison Hwang for T. Purdy 2011
 This tutorial shows you how to create a basic screen display on a product in Adobe Photoshop. Creating details, such as shadows and reflections, can help make your product more realistic and convincing
COLORIZING IMAGES WITH GRADIENT MAPS
 COLORIZING IMAGES WITH GRADIENT MAPS In this Photoshop tutorial, we ll learn how to add complex colorizing effects to images using custom gradients! Specifically, we ll look at the Gradient Map image adjustment
Photoshop. Make a Spooky Halloween Pumpkin Text Effect in Photoshop - Photoshop tutorial PSDDude
 Photoshop October 4th,2017 1 2 Image size: 7 in wide x 3 in high 300 dpi Start with a simple black gradient background layer. Radial Gradiant, black to gray. Install the CREEPSVILLE font. Center and Type
INTRO TO LAYERS (PART 2)
") Adobe Photoshop Elements INTRO TO LAYERS (PART 2) By Dave Cross In Part 1, we talked about the main concept behind layers and why they re so important. Now we ll take it a step further and show how to
Adobe Photoshop Elements INTRO TO LAYERS (PART 2) By Dave Cross In Part 1, we talked about the main concept behind layers and why they re so important. Now we ll take it a step further and show how to
Mod Kit Instructions
 Mod Kit Instructions So you ve decided to build your own Hot Lava Level Mod. Congratulations! You ve taken the first step in building a hotter, more magmatic world. So what now? Hot Lava Tip: First off,
Teach Yourself Adobe Photoshop Topic 9: Photo Retouching Part 2
 http://www.gerrykruyer.com Teach Yourself Adobe Photoshop Topic 9: Photo Retouching Part 2 In the last week s lesson, you repaired damaged areas of an image, removed unwanted parts of an image, cloned
Exploring Photoshop Tutorial
 Exploring Photoshop Tutorial Objective: In this tutorial we will create a poster composed of three distinct elements: a Bokeh, an image and title text. The Bokeh is an effect which is sometimes seen in
Compiled by <<coldbing>> FIRE EFFECTS
 FIRE EFFECTS Compiled by Step 1 - New Document Make a new document. Fill it with black. Then make a new layer, and type out (or whatever) you want to set on fire in white. Step 2 - Windy Go
In this Adobe Photoshop tutorial, we re going to look at a way to give a photo a more ghostly appearance.
 GHOSTING AN IMAGE In this Adobe Photoshop tutorial, we re going to look at a way to give a photo a more ghostly appearance. I m a fan of horror films, but I admit I m a bit shallow in that I usually just
Adobe Photoshop CS5 Layers and Masks
 Adobe Photoshop CS5 Layers and Masks Email: training@health.ufl.edu Web Page: http://training.health.ufl.edu Adobe Photoshop CS5: Layers and Masks 2.0 Hours The workshop will cover creating and manipulating
Make a Trendy Double Exposure Effect in Adobe Photoshop by Yulia Sokolova6 days ago
 Make a Trendy Double Exposure Effect in Adobe Photoshop by Yulia Sokolova6 days ago Difficulty:IntermediateLength:LongLanguages: Photo ManipulationAdobe PhotoshopPhoto EffectsDouble ExposureClipping Mask
How to create beautiful B&W images with Adobe Photoshop Elements 12
 How to create beautiful B&W images with Adobe Photoshop Elements 12 Whether it s an Instagram snap or a film portrait, black and white photography is never out of style. Today, there are a number of ways
SURREALISM IN PHOTOSHOP
 SURREALISM IN PHOTOSHOP In this tutorial your aim is to create a surrealist inspired image using Photoshop. You will combine a selection of images in an illogical, non realistic manner. Set up a folder
TOPAZ LENS EFFECTS QUICK START GUIDE
 TOPAZ LENS EFFECTS QUICK START GUIDE Introduction Topaz Lens Effects is designed to give you the power to direct and focus your viewer s eyes where you want them. With Lens Effects, you get advanced technology
Essential Post Processing
 Essential Post Processing By Ian Cran Preamble Getting to grips with Photoshop and Lightroom could be described in three stages. One is always learning and going through stages but there are three main
A quick note: We hope that you will find something from the Tips and Tricks that will add a little pizazz to your yearbook pages!
 A quick note: The following pages are tips and tricks for Basic Photoshop users. You may notice that some instructions indicate that non-awpc fonts were used, and that some colors were created using the
Using Adobe Photoshop
 Using Adobe Photoshop 4 Colour is important in most art forms. For example, a painter needs to know how to select and mix colours to produce the right tones in a picture. A Photographer needs to understand