"Fiberglass!", "Why does it always have to be Fiberglass?"
|
|
|
- Abigayle Glenn
- 6 years ago
- Views:
Transcription

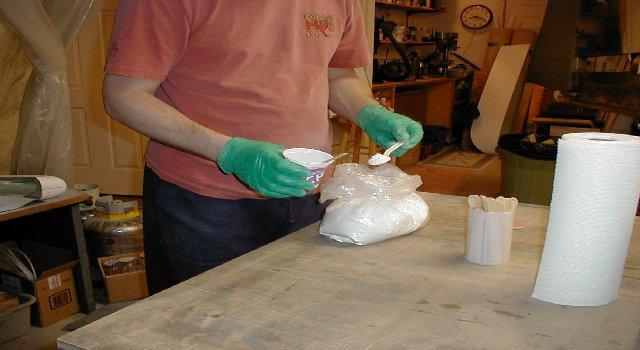
1 "Fiberglass!", "Why does it always have to be Fiberglass?" I hate working with fiberglass! This is one of the big reasons that I decided on a metal airplane. The RV however has a fair amount of glass work to be done so like it or not you have to become proficient at it if you want to end up with a plane you can be proud of. I have a friend ( Rick Smith RV-6 owner ) who is building a Long EZ composite plane that gave me the benefit of his experience. Below are the details of his one night tutorial as I attempt to make a small modification to the FAB airbox. Fiberglass work in seven easy steps. STEP 1 Get the right materials and tools! You have to face the facts. This is like every other part of your RV project. Without the right tools for the job your pretty much out of luck. If you don't believe me just take a look in your tool drawer lately. If your anything like
2 me you have accumulated quite a collection by now. All good stuff that really makes a difference in the finished product. Sooooooo... Time to crack open the Aircraft Spruce catalog and place your order. What follows is a list of materials that I have had recommended from other builders as well as RV List members. I tried using materials that I picked up at the local Home Depot for resin and cloth ( old habits are hard to break ) but they just were not ready for prime time. The results were not even close to the finished product I ended up with by using the materials below. You can use whatever you like but this is what worked best for me. Resin : West Systems Epoxy This is the good stuff. A gallon will do your entire plane unless you're a perfectionist ( like me ) and you need more. Be sure and order the ez pump options. These little pumps screw right on to the cans of resin and catalyst and give you the right ratio every time. Just one pump of each and you're off and running. ( ) WEST SYSTEM EPOXY KIT B-2 SLOW This kit contains... One gallon of the resin - (105-1G) One quart of the catalyst - (206-QT) Also order the pumps. (301-B/C) WEST SYSTEM PUMP It's also a good idea to pick up some cotton fiber and glass bubbles. This is good for build-up in areas where you either need a structural filler ( cotton fiber ) or just a cosmetic filler ( glass bubbles ). It is mixed into the resin at whatever consistency you like. It works like magic to repair boo boos ( ask me how I know :-) ( ) GLASS BUBBLES 1LB ( ) FLOCKED COTTON FIBER 1 LB. The cloth I used is an 8.8 Oz. Rutan Bi-directional cloth ( this is the stuff the expert composite builders use ). I have been able to use this for my entire RV project. It's particularly useful for the windscreen fairing since it conforms really well to compound curves. This also worked well for cowling repairs and lay-ups. Keep in mind that there are hundreds of types of glass that you can use. Everything from kevlar to carbon fiber so you have lots of choices. I just decided on a good all purpose cloth that would work well for my given application. I purchased five yards and it was more than enough.
3 (RA7725) BID FIBERGLASS 38" You will also need a rotary cutter. Below is the part number for the Aircraft Spruce cutter but I purchased mine from Cleaveland Tools ( FISKARS ROTARY CUTTER ) for $12 ( I need to save wherever I can ). (RTY-2) ROTARY CUTTER Good idea to get some peal-ply. This stuff is pure magic. It will wick all the unneeded resin away from your work. Less sanding work for you. Extra resin means extra weight. ( ) SURFACE TAPE DACRON 2" SMOOTH A plastic squeegee. This can be something as simple as what you use to apply bondo with ( I have several that I picked up at an auto parts store ) or something as cool as the rubber squeegee I purchased from Wicks Aircraft supply ( Wicks ) part number SP. Also pick up some single edge razor blades and a 2 mil plastic drop cloth that you can pick up at any hardware store. Some mixing cups ( I used leftover lemon chill cups ) and some popsicle sticks for mixing ( I purchased a box of tongue depressors from Wicks Aircraft that work great ). Also you will need some foam rubber ( the stuff that cushions are stuffed with ) that you can pick up at a hobby store. This is used to apply the resin with. A yard stick and some rubber gloves. STEP 2 Size your job. Try and decide how much cloth you are going to need going in. This will cut down on the amount of resin that you will have to waste trying to saturate cloth that will eventually just end up in the dumpster. This repair job was small so I decided I needed 1.5 inch by 4 inch strips. Just use your rotary cutter to cut some over sized strips of glass for working stock. I usually give myself a half an inch extra in all directions. STEP 3
. A yard stick. Slice off a piece of your clear plastic drop cloth ( the circle cutter is great for this ) that is at least 2.")
4 It's important that you have everything you need when you start, so... Lay out your tools. Cut 2 two inch squares of foam from your hunk of foam rubber. Get out your circle cuter. A larger marker ( black Sharpie works well ). A yard stick. Slice off a piece of your clear plastic drop cloth ( the circle cutter is great for this ) that is at least 2.5 times the size of the cloth you sized in STEP 2. Your rubber gloves. Your fiber glass cloth. Your peal-ply. A roll of paper towels. One of your single edge razor blades. Your plastic squeegee. STEP 4 Spread out your piece of cut plastic drop cloth on a table or piece of plywood that you can cut against. This needs to be a table or surface that you don't mind getting resin on.

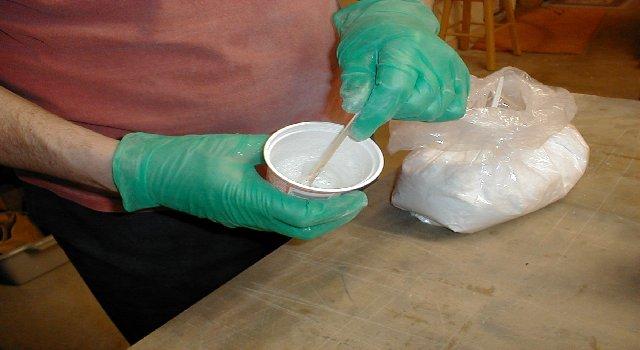
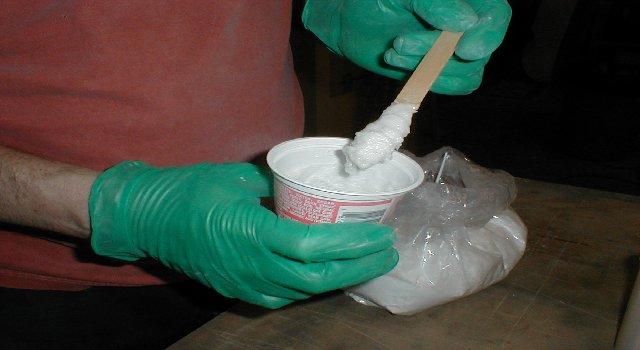
5 Place your fiberglass cloth on one half of the drop cloth so that you can easily fold the other half of the drop cloth over on top of your work. Put on your rubber gloves. Mix up a batch of resin in your mixing cup. This process involves one or two pumps of your resin pump and an equal number of pumps of the catalyst depending on the size of your job. You should mix the resin with your mixing stick for two minutes making sure to scrape the sides of your mixing container to get all the resin in solution. Use one of your two inch foam rubber sponges to dip in the resin and dab this on the cloth until it's completely saturated with the resin. The fiberglass cloth should actually start turning clear when it's saturated with resin.


6 STEP 5 Fold the other half of the plastic drop cloth over on top of your resin saturated cloth to form an envelope with the fiberglass trapped inside. Now use your squeegee to work the resin around until all of the fiberglass cloth is completely clear and saturated with resin. Next use the squeegee to work all the extra resin away from the cloth so that only the minimum amount of resin is in the cloth. Just work it off to the side until it's sitting in a blob in the drop cloth away from the fiberglass cloth.
 across the top of your saturated fiberglass cloth.")


7 Now get out your yard stick and your sharpie and make a reference line ( on the plastic drop cloth ) across the top of your saturated fiberglass cloth. Now use this reference line to mark out the strips of fiberglass cloth that you want to apply to your work. STEP 6 If you have enough resin left use your saturated foam rubber to dab some of the resin on the area where you want to apply the cloth. In my case this was the side of the air box. Sometimes it takes so much resin to saturate the


8 fiberglass cloth that you need to mix some more at this point. If you have to then go ahead. You have time. Now use your circle cutter to slice along the lines that you have drawn on your plastic drop cloth. Next use the razor blade to separate the top layer of drop cloth from one of your cut out strips. Strip the top layer of drop cloth away and pick up your resin saturated glass strip and apply it to your work. The really nice thing about this process is the lower layer of plastic is keeping your cloth from stretching while you apply it to your work. This is not so important for little pieces like I show here but you can imagine what it's like when your doing the windscreen fairing and the strips are 40 inches long.


9 Once the cloth is in place use your razor blade to remove the remaining layer of plastic from the fiberglass cloth. STEP 7 Use one of your fresh ( has no resin on it ) foam rubber squares to tamp down the fiberglass you just laid on your work to make sure that it's well attached to the surface of your work.


10 Now cut a few strips of the peal-ply that are large enough to cover the glass you just applied to your work and place them on top of your glass using the foam rubber to tamp them down. The extra resin from the cloth will be absorbed into the peal-ply and will hold it in place for later removal. Finish applying all remaining glass to your work.
 and can be filled for finish with Superfil or resin and glass bubbles.")

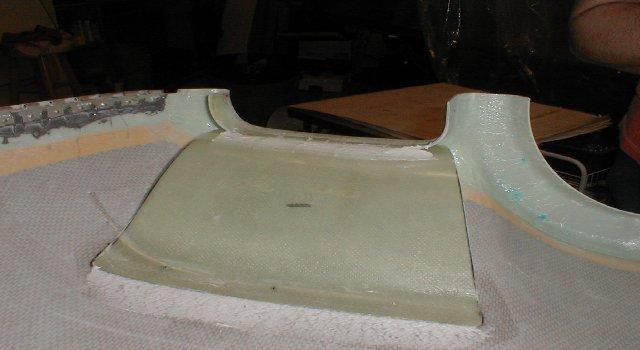
11 Wait 24 hours. Now pull the peal-ply from your finished work. TA-DA! You now have a surface that has the minimum amount of resin ( weight ) and can be filled for finish with Superfil or resin and glass bubbles. Well, actually, I did not have any photos of the finished glass work but this is what it looked like after filling the under side gap with resin and cotton fibers, laying another layer of glass on the inside and priming. I did mention that fiberglassing was a lot of work, oh yes :-) And finally the finished product with Van's heat muff attachment installed...


12 The paint is High Heat Rust-oleum purchased from Home Depot. Good to 1200 degrees F. White of course. I plan on painting everything I can in the engine compartment white. This makes problems easy to spot in a hurry.
13

14
15
Chapter # 002 : Creating Threaded Metal Anchoring Points in Fiberglass Foam Structures
 Chapter # 002 : Creating Threaded Metal Anchoring Points in Fiberglass Foam Structures The following is a method of creating permanent, threaded, metal anchor point in a foam & fiberglass structure. The
AranaMuerta.com. Molding Skulls with Dragon Skin
 AranaMuerta.com http://aranamuerta.com/2008/09/10/molding-skulls-with-dragon-skin#more-70 Molding Skulls with Dragon Skin Sep 10th, 2008 by DeadSpider Making your own skull mold isn t as hard as you might
Above are the offsets for the plywood panels.
 DinkyDink Plans Bottom Panel Half Station X Y X2 Y2 1 1/4 3/4 0 11 5/16 2 4 9/16 4 12 9/16 3 11 11/16 1/4 11 7/16 14 1/2 4 18 5/8 1/16 18 5/8 15 11/16 5 25 3/4 0 25 3/4 16 5/16 6 32 13/16 0 32 13/16 16
Repairing Sheet-Molded Compound (SMC) With Epoxy
 With Epoxy") Repairing Sheet-Molded Compound (SMC) With Epoxy 1. Properties: A. It does not dent. B. It does not rust C. Panels are formed using a flat sheet or compound that is heat molded in a press. 2. Preparation
Repairing Sheet-Molded Compound (SMC) With Epoxy 1. Properties: A. It does not dent. B. It does not rust C. Panels are formed using a flat sheet or compound that is heat molded in a press. 2. Preparation
Making your Rudder Cassette
 Making your Rudder Cassette A list of the stuff you ll need The row of materials below is laid out in the order of application. The foam blank shown on the right is available from Bob at www.flyingfoam.com
Cowper From Steve Wolverton on the T&TTT forum, Feb 2005 For Reference Only Do not use to build a trailer. Check on Teardrop and Tiny Travel Trailers
 Cowper From Steve Wolverton on the T&TTT forum, Feb 2005 For Reference Only Do not use to build a trailer. Check on Teardrop and Tiny Travel Trailers for up to date building information; http://www.mikenchell.com/forums
COMPOSITES LAB MANUAL
 COMPOSITES LAB MANUAL Version 1 Lab 3: Surface Preparation, Wet Layup, and Vacuum Bagging The original version of this manual was a one student senior design project written by Katherine White, the Composite
REVISION LIST CHAPTER 25: AFT WINDOWS. The following list of revisions will allow you to update the Legacy construction manual chapter listed above.
 REVISION LIST CHAPTER 25: The following list of revisions will allow you to update the Legacy construction manual chapter listed above. Under the Action column, R&R directs you to remove and replace the
#70 grit sand Putty knives, sized as needed #1 fine gray sand Corner tools Milestone acrylic liquid
 Countertops Supplies Tools White and/or gray Milestone cement 12 inch steel trowel #70 grit sand Putty knives, sized as needed #1 fine gray sand Corner tools Milestone acrylic liquid Hock Universal tints
After the canopy hinge is square with the firewall and the nut plates are installed you can set up the hinge mounts. Start by clamping a 1/16 tongue
 Written by: Sean Cole September 19, 2008 When fitting the stiffener use 3/32 clecos to hold it in place, it makes a smaller hole and is easier to work with. Only use the amount needed to hold the stiffener
15 - Interior. Interior. February GGG Page 15-1
 Interior February 2003 15-GGG Page 15-1 15 - Interior This Page Intentionally Left Blank Page 15-2 15-GGG February 2003 Contents 15.0 - Chapter Preface...15-4 15.0.1 - Parts List...15-4 15.0.2 - Tools
through all your theme fabrics. So I told you you needed four half yards: the dark, the two mediums, and the light. Now that you have the dark in your
 Hey everybody, it s Rob from Man Sewing. And I cannot believe I get to present this quilt to you today. That s right. This is the very first quilt I ever made. My first pattern I ever designed, originally
Instructions for Making Repairs to 3M 8681HS Blade Tapes Installed on Enstrom Helicopter Blades.
 REPORT NO: TITLE: Instructions for Making Repairs to 3M 8681HS Blade Tapes Installed on Enstrom Helicopter Blades. MODEL NO: All PREPAIRED BY: P.B. dupont CHECKED BY: APPROVED BY: 1. SCOPE This specification
Canopy Gluing Procedure for the RV-8/8A. Eric Wolf RV-8A (Finish Kit at time of writing) (262) February 3, 2006
 (262) February 3, 2006") Canopy Gluing Procedure for the RV-8/8A Eric Wolf RV-8A (Finish Kit at time of writing) wolfe@msoe.edu (262)-989-9653 February 3, 2006 Introduction I decided to glue on the canopy because I have heard
Canopy Gluing Procedure for the RV-8/8A Eric Wolf RV-8A (Finish Kit at time of writing) wolfe@msoe.edu (262)-989-9653 February 3, 2006 Introduction I decided to glue on the canopy because I have heard
Step by Step Wing Bagging
 Step by Step Wing Bagging By Evan Shaw 073 589 9339 evanevshaw@gmail.com Preparing the Leading Edge 1. Cut cores. (Cutting of wing cores is covered in another article elsewhere) 2. Sand the LE to a nice
our strips. So it made really good use of this roll up. So we hope you enjoyed this tutorial on the Stair Step block from the MSQC.
 Hi I m Jenny from the MSQC. And I ve got a really fun project for you today. Take a look at this quilt behind me. Isn t this gorgeous? I love these fabrics. I love the blues. It just makes me feel like
How to build a Javelin Skiff
 How to build a Javelin Skiff This is not your grandfather s plywood boat! The Javelin involves a high-tech type construction, called composite. The hull can be constructed with foam or plywood; these materials
No-Sew Lap Desk. Materials and Tools: Step #1. Free Plans to build a DIY Lap Desk
 Materials and Tools: Materials: 1/4 foam core board Poly Foam 3 x 15 x 17 Burlap fabric, 1 yard PureBond plywood Edge tape Stencil (or make your own) Epoxy glue Tools: Measuring tape Pencil Box cutter
Steps and Resources for Composite Construction Mark Westlake
 Steps and Resources for Composite Construction Mark Westlake Hopefully the following information will help you avoid some of the learning curve that comes with a project of this complexity. Plug Construction
Front Clip Mold. a 20 pound-or-less front clip, a savings of 38 pounds off the nose of the car.
 Front Clip Mold Those of us that have lightened our cars for racing learn quickly how much easier it is to get weight out of the back of the 928 as opposed to the front. Our front clip project last year
50 TIPS TO HELP YOU BE BETTER WITH RESIN. By Katherine Swift
 50 TIPS TO HELP YOU BE BETTER WITH RESIN By Katherine Swift 2016 Resin Obsession, LLC, all rights reserved Gainesville, FL 32606 www.resinobsession.com May not be shared in any form without permission
How to Build an Advanced Composite Clipboard
 How to Build an Advanced Composite Clipboard Tools and Equipment Measuring Tape Black Sharpie Silver Sharpie Rivet Puller Tile Saw or Hacksaw Drill and Drill Bits (5/32) Scissors Utility Knife Straight
Tips & Tricks using Part 24
 Tips & Tricks using Part 24 Finishing the River Sections... 2 Making Tentacles... 4 Making Fish... 6 Adding the Water... 8 Making the Plank Bridge... 13 Making Crystal Piles... 15 Finishing Various Accessories...
Construction Guide for Quick Build F-22 Raptor Design by Tomas Hellberg
 Construction Guide for Quick Build F-22 Raptor Design by Tomas Hellberg This kit is very simple to put together. The biggest danger in messing up this kit is gluing the pieces to your work bench. But before
This Manual Covers The Construction Of A Hood Scoop Plug From The Drawing Board. Through Construction. To Final Fitting.
 1 This Manual Covers The Construction Of A Hood Scoop Plug From The Drawing Board. Through Construction To Final Fitting. 2 TABLE OF CONTENTS: INTRODUCTION: 3 MAKING A PLUG FOR A CUSTOMIZED PRODUCT. 4
How to install Magic Metal
 How to install Magic Metal First you need the following tools: Glue: Indoor Out Door Carpet Glue 3 gallon pail. A few rollers (the thinner nap the better) a pan with liner. A good utility knife with extra
Page 1. Trophy Oar Blade Finishing and Care Manual
 Page 1 Trophy Oar Blade Finishing and Care Manual Page 2 I. Finishing with Paint Materials Needed for Painting: Krylon Fusion Spray Paint (or other plastics Instructions for Painting: spray paint) Primer
Restoring the Bouyancy Tanks on 6878
 Restoring the Bouyancy Tanks on 6878 On March 31, 2001 I became the proud owner of Albacore 6878, a Skeene built in 1980. The boat was in pretty good shape, but like many Skeene and Ontario Yachts (non-foam
T-Top Headliner Repair Guide With detailed instructions
 T-Top Headliner Repair Guide With detailed instructions Supplies: Fabric: 1 ¼ yards will do -You can use any kind of fabric you want. Some fabrics will be harder to install than others. I d highly recommend
One Piece Fiberglass Mold Construction
 One Piece Fiberglass Mold Construction (This is just a SAMPLE of the Main Manual) Simple Fiberglass Molds Can Be Used For Making Duplicate Parts For Many Applications Including Hobby & Automotive. This
Paper Flowers , Sonia C. Jensen
 Paper Flowers - 2016, Sonia C. Jensen These little paper flowers are so versatile! They can be used as place-markers at the table, for luncheon table centerpieces, as favours at a bridal shower using the
Construction Guide for Quick Build MIG-29 Design by Tomas Hellberg
 Construction Guide for Quick Build MIG-29 Design by Tomas Hellberg This kit is very simple to put together. The biggest danger in messing up this kit is gluing the pieces to your work bench. But before
Bedtime for Bondo MERA Training
 Bedtime for Bondo 2002 MERA Training Section 1: Making the Plug/Model This section will show the process of building a plug/model for a plaster mold.this will represent what the final fiberglass part
LAPORTE COUNTY 4-H MODEL PROJECT
 LAPORTE COUNTY 4-H MODEL PROJECT I. PURPOSE This project is designed to provide members with an opportunity to be creative and to familiarize them with the techniques of assembly, construction and painting.
construction? I use a lot of construction terms. Hips and valleys comes from roofing actually. And there we go, just like that. Nice and easy, right?
 Hey everybody, welcome back to Man Sewing. I m so glad you re following along. I ve got another fantastic quilt tutorial for you today. Now the reason I say it s fantastic is because I think I came up
So what we re going to do, we re going to prepare to put these together right sides. So right now the interfacing is on my cutting mat. And it is faci
 This has got to be one of the all time happiest quilts I have ever made. I mean look at these amazing colors, right? This, we are calling the Tutti Fruitti quilt and that s just because of the movement
Engineering Directive
 Thing-a-ma-Jig Finishing To Finish a model means to apply paint and other decorations to complete the look of your model. Meaning to apply a finish. That is what we will discuss in this section. Applying
Delfini. 19x6 Console Semi Flat Hull. Study Plans
 Delfini 19x6 Console Semi Flat Hull Study Plans Contents 3 Introduction 4 Specification 6 List of Materials 7 Glue, Resin and Fixings 8 Tools 9 Construction Sequence 2 Introduction This is the 19' x 6'
Mini-HowTo - Make Your own Booms by Dave Hill
 Mini-HowTo - Make Your own Booms by Dave Hill http://www.rcgroups.com/forums/showthread.php?t=1000547&highlight=wrap+your+o wn+booms OK, here we go... I think its best that we start with the main item.
Eerie Halloween by Nunn Design
 Eerie Halloween by Nunn Design Approximate finished length: 20 inches Beads and other products needed for necklaces: 1 - Pewter Itsy Square Bezel Pendant with Flat Loop by Nunn Design - Antique Gold -
Covering with Quarter Mil Mylar: One Way To Do It.
 Covering with Quarter Mil Mylar: One Way To Do It. By Derek McGuckin Fall 2007 Revised Feb. 2008 I do not consider myself an expert on covering with mylar. I am comfortable with how I do it and the results
14401 NE Keil Road, Aurora, Oregon, USA PHONE FAX
 VAN S AIRCRAFT, INC. 14401 NE Keil Road, Aurora, Oregon, USA 97002 PHONE 503-678-6545 FAX 503-678-6560 www.vansaircraft.com info@vansaircraft.com FF-1207 Cooling Shroud Modification 11-19-10 Background:
BLADE REPAIR INSTRUCTION BOOKLET
 BLADE REPAIR INSTRUCTION BOOKLET Contents Section I: Section II: Section III: Section IV: Section V: Section VI: Removing a Blade Refer to this section if you need to remove the blade from an oar shaft.
Type 316SS Backed Conveyor Strip Brush Nylon Bristles, 6" O'all HT, 2' Lg, 3/16" Backing
 How to modify your MK101. First off, the MK101 tile saw is a fantastic tile saw, without any modifications what so ever. That being said, all tile saws tend to have a significant amount of overspray which
With Deb Wood E X P L O R E
 Resin Eyes With Deb Wood Excerpt from A Face to Remember Learn to make resin eyes from 2 part resin. S y m m e t r y E X P L O R E D e t a i l P a i n t i n g Sculpture A n a t o m y C o r r e c t P r
Precut Wingola Kit Instructions
 Precut Wingola Kit Instructions Below is the precut option. Battery compartment, Receiver and Servo Trays are cut for mini radio gear. This is the uncut version. It has the placement laid out for the radio,
Antique Trunks: Refinish, Repair, Restore, Revised and Expanded
 15. Patch any holes on the inside of the trunk: There will often be splits or holes on the inside of the trunk that may or may not be visible from the outside. Most often they are holes left by the removal
Redwood strips are tacked to the templates, and edge-glued. Drive brads through into the templates before putting on fiberglass doth.
 1 Make the building form and attach templates to the crosspieces. Nail a strip down the center to hold the stems and templates in position. prototype canoe took about three weekends to build. She's broad
TOOLS & SUPPLIES (Included in ProTops Tool Kit)
") TOOLS & SUPPLIES (Included in ProTops Tool Kit) Clean Paint/Mixing Sticks Graduated Mixing Buckets Standard Mixing Cups Nylon Paint Brush Propane Torch 3M Masking Gun Masking Film & Painter s Tape Disposable
TOOLS & SUPPLIES (Included in ProTops Tool Kit) Clean Paint/Mixing Sticks Graduated Mixing Buckets Standard Mixing Cups Nylon Paint Brush Propane Torch 3M Masking Gun Masking Film & Painter s Tape Disposable
Chapter Six. Getting started inboard. Installing the false deck
 A close look at the thinning down of the bulkhead extensions. They are just 1/16 thick after fairing them. Chapter Six Getting started inboard This next step is one of the last remaining messy tasks to
Metal Aircraft Landing Light Installation Instructions
 Metal Aircraft Landing Light Installation Instructions This landing light kit was designed for the Thorp T-18 as a method of installing a halogen landing light in the leading edge of the outer bay of the
Polyester Resin Casting Tutorial
 Polyester Resin Casting Tutorial By Spitfire At the request of a few members I am going to put together a tutorial on casting call blanks. It will be a work in progress as I have time to complete it. I
TRAVEL TOUGH TRANSLUCENT ROOF REPAIR GUIDE REPAIR KIT FOR SMALL AND LARGE ROOF REPAIRS FOR USE WITH ALL R50T-FIX REPAIR KITS
 TRANSLUCENT ROOF REPAIR GUIDE REPAIR KIT FOR SMALL AND LARGE ROOF REPAIRS FOR USE WITH ALL R50T-FIX REPAIR KITS The Translucent Roof Repair Kit is a technique specifically designed for repairing damage
Basics of Composite Construction
 Page 1 of 25 Basics of Composite Construction About the Author, Ron Alexander This article was written in May of 1999 by Ron Alexander of Alexander SportAir Workshops. Ron has been flying since the age
know you ve got your little three piece where they re all hooked together. I m going to take my next three piece, make sure that I don t have anything
 Hi, I m Jenny from the MSQC. I have a super fun project for you today. Take a look at these darling little Christmas stockings behind them. Christmas is coming. It s never too early to prepare and this
How to make a paper mache skull
 http://www.spookyblue.com/halloween/skulls/paper mache skull.htm How to make a paper mache skull Materials List Resin skull from Anatomical Chart Company What?! Spend $25 on a skull? Hear me out. A good
3M Masking Tapes PRODUCT INFORMATION
 3M Masking Tapes Key Customer Markets: Auto Assembly Aerospace Truck and Bus Recreational Vehicles Marine Parts Manufacturers Printing Manufacturers Paper Manufacturers Electronics 3M offers a complete
So once you get your 12 pieces sewn together, that s going to give you the width for your background fabric. And then I went ahead and sewed 8 half ch
 Hi, I m Jenny from the Missouri Star Quilt Company. Every time I do a trunk show, I show this wall hanging. I ve fallen in love with the Dresden, and I show a lot of different Dresden things, and this
Water Tricks. Dear Presenter,
 Dear Presenter, This activity is 5 to 8 minute HANDS-ON presentation for approximately 500 people. You must do this activity at home BEFORE you attempt to lead the activity during the water festival. Thank
Mamba. Combat Wing Glider
 Mamba Combat Wing Glider Congratulations for your purchase of the Mamba radio-controlled combat glider! The Mamba is a very fast and agile glider and yet it can stay up in very light winds when built correctly.
How to make climbing grips. By,
 How to make climbing grips By, Items needed: * Items may be needed depending on your preference. - Carving Foam - Level Table - Cardboard - Pen - Ruler - Straight Edge - Box cutter - Hot melt glue gun
Mold Release, Break-In, Maintenance and Storage. Linda Bergstrom
 Mold Release, Break-In, Maintenance and Storage Linda Bergstrom Mold Release Requirements Form a barrier between the mold and molded part Provide a lubricating film which allows the molded part to be easily
Cool, Quiet & Comfortable
 installation in a 32 Ford Coupe Cool, Quiet & Comfortable By Mr. Al Knack, Cotter, Arkansas 1. These are the products and suggested tools needed to install Hushmat in any type vehicle. A tape measure,
COMPOSITES LAB MANUAL
 COMPOSITES LAB MANUAL Version 1 Lab 4: Wet Layup of complex shapes The original version of this manual was a one student senior design project written by Katherine White, the Composite lab assistant, during
REVISION LIST CHAPTER 28: FINISHING TECHNIQUES
 REVISION LIST CHAPTER 28: The following list of revisions will allow you to update the Legacy construction manual chapter listed above. Under the Action column, R&R directs you to remove and replace the
In this step-by-step guide we will teach you how to. Your kit includes:
 How to install your SSR speaker refoaming kit (View all of our DIY instructions by visiting www.springfieldspeakerstore.com and clicking on the DIY Instructions tab) In this step-by-step guide we will
4. Instrument Panel Support
 Instrument Panel installation for serial numbers 52 to current Section Objective: Installation of the instrument panel pod. Installation of all the accessories including; vents gas strut supports, engine
Art Supplies. School UNIT OF MEAS. PAINT CHROMACRYL ACRYLIC, COOL YELLOW, 2 OZ. TUBE (75ML). CASCADE. Blick Total. Cascade Total.
. CASCADE. Blick Total. Cascade Total.") ACRYLIC, COOL YELLOW, OZ. (7ML). CASCADE 0 #9 ACRYLIC, WARM RED, OZ. (7ML). CASCADE 0 #7 ACRYLIC, COOL BLUE, OZ. (7 ML). 0 CASCADE # ACRYLIC, COOL RED, / OZ. (7 ML). 0 CASCADE # ACRYLIC, WARM YELLOW, /
ACRYLIC, COOL YELLOW, OZ. (7ML). CASCADE 0 #9 ACRYLIC, WARM RED, OZ. (7ML). CASCADE 0 #7 ACRYLIC, COOL BLUE, OZ. (7 ML). 0 CASCADE # ACRYLIC, COOL RED, / OZ. (7 ML). 0 CASCADE # ACRYLIC, WARM YELLOW, /
Applications Engineering Notes
 Applications Engineering Notes Document Title Document Number Operating Instructions for the US Conec AEN-1408 Revision Number 1.0 Effective Date December 15, 2011 THE USE OF SAFETY GLASSES FOR EYE PROTECTION
E3 UV-30 Resist Film Instructions
 E3 UV-30 Resist Film Instructions For more information or to view instructions in color, visit www.sherrihaab.com Sherri Haab Designs 2016 Supplies needed: Metal plate to etch (copper, brass or silver)
Name; Juliet Kuruwaa Title; Making a windshield fearing for 9G ZAF. Date 14 th of October, 2011
 Name; Juliet Kuruwaa Title; Making a windshield fearing for 9G ZAF. Date 14 th of October, 2011 Time 08 30am Location In front of the boat workshop Aim To make a fiber glass fearing for a windshield. Materials
Building the Bell Tower
 Building the Bell Tower Mold #55 does not contain all of the blocks to build this tower. You will need extra regular blocks (1/2" x 1/2" x 1") and square blocks (1/2" x 1/2" x 1/2"). These blocks can be
SGTalon s Enterprise-A Foamie Build Guide. SGTalon s. Enterprise. Enterprise--A. Assembly Instructions
 SGTalon s Enterprise SGTalon s Enterprise--A Enterprise Assembly Instructions Page 1 4-13-2013 SGTalon s Enterprise *******Recommended Hardware******** 2.6oz 250w Motor and Speed Control with 8x6 prop
Hood stripes Tools needed from AutoZone or any auto parts store: bottle spray, squeegee, a towel that you re using to clean you car up after washing,
 WARNING These following pages are instruction for C5 CE stripes; however, it is the same method applying vinyl. Please spend time to read thru these pages. At the end, it is your C5 ME 1 stripes instruction.
Filling the cracks. Grinding and sanding. velomobiel.nl
 Filling the cracks We have published a manual on how to repair the laminate before, now it's time to smoothen the outside of the repair. This nose damage (picture ) has been repaired from the inside. The
Insta-DE Series Soft- padded Dry- erase Whiteboard Projection Screen
 Insta-DE Series Soft- padded Dry- erase Whiteboard Projection Screen User s Guide Product Features Ø Award winning and GREENGUARD certified VersaWhite material. Ø 1.1 gain with 180 degree wide viewing
Greenhouse Plans_Part Two Cutting & Assembly
 Greenhouse Plans_Part Two Cutting & Assembly When I did drafting for a living, it wasn t a good idea to start out by announcing that I was going to make mistakes because that s a good way to not get the
This little piece here I created is some of the scraps and then samples I was making for today s show. And these are wonderful for doing like
 Hey everybody, welcome back to Man Sewing. This is Rob and today on the show, I m going to teach you how I like to do my curve piecing. Now I can t take all the credit for this. Ricky Tims, a good friend
Building a Scarab 350 Trimaran
 This boat was designed to be built using flat panels. In either foam laminated panels or plywood. 1. The build time is less. Panels are lofted, cut out and joined on the frame. 2. Frame can be simpler.
Sandpaper Product Guide. Premium Automotive Aftermarket Quality Complete Selection of Hand & Power Sanding Accessories Excellent Value
 Sandpaper Product Guide Premium Automotive Aftermarket Quality Complete Selection of Hand & Power Sanding Accessories Excellent Value Index Introduction to Abrasives Abrasive Components... 3 Sandpaper
Motorized Balancing Toy
 Motorized Balancing Toy Category: Physics: Force and Motion, Electricity Type: Make & Take Rough Parts List: 1 Coat hanger 1 Motor 2 Electrical Wire 1 AA battery 1 Wide rubber band 1 Block of wood 1 Plastic
Building the Gothic Church
 Building the Gothic Church Mold #54 does not contain all of the blocks to build this church. You will need extra regular blocks (1/2" x 1/2" x 1") and square blocks (1/2" x 1/2" x 1/2"). These blocks can
Polishing Stainless Steel and Aluminum
 Polishing Stainless Steel and Aluminum Richard Widman One of the advantages of Corvairs and many cars of the 50 s and 60 s is that the shiny trim is made of Stainless Steel and Aluminum rather than Chrome
Baba 30 Butterfly Hatch Repair in 17 or so not-so-easy steps Part I. Rick Beddoe s/v Soñadora
 Baba 30 Butterfly Hatch Repair in 17 or so not-so-easy steps Part I Rick Beddoe s/v Soñadora Introduction Butterfly hatches on any boat are notorious for leaks. However, they are also noted for their attractiveness.
Kalimba Case. Jean Siu.
 Kalimba Case Jean Siu Jeanpsiu@gmail.com Supplies used: Box big enough for the kalimba plus two inches around all the edges of your kalimba, mine came from Hobby Lobby. Paint or Stain Sand paper Modge
Making Double Fold Straight of Grain Quilt Binding
 Making Double Fold Straight of Grain Quilt Binding Tools and Supplies: Cutting mat, rotary cutter with a sharp blade, walking foot, 6x24 ruler, seam allowance guide, pencil, quilting gloves Be sure your
Invisible Clip Tutorial
 Invisible Clip Tutorial I first saw what I call the Invisible Clip in Russ Fairfield s PMG gallery and fell in love with it. I could not figure out how he made them so I sent him an e-mail and he was kind
Hatch Installation For Pygmy Solo and Double Kayaks
 Introduction/Overview Hatch Installation For Pygmy Solo and Double Kayaks The hatch kit consists of several wooden lips, strapping and hardware. The hatch is constructed by cutting a hole in your deck,
Obtained from. Omarshauntedtrail.com
 BORN2HAUNT.COM http://www.born2haunt.com/batsreasy01.html Bats R Easy Here is another way to make bats with foam and wire. The first thing I did was cut a piece of scrap foam to the size I wanted 5" long,
Activity Gluing It All Together
 Activity 5.1.2 Gluing It All Together Introduction The first commercial glue, created around 1750, was made from fish. Other early adhesives used natural rubber, animal bones, blood, starch, and milk protein
Revolution 3D-mini ARF
 Revolution 3D-mini ARF 1 Included Hardware 4 Dubro Micro Control Horns #DUB848 2.32 x 18" Linkage Wire (Music Wire) 1 1.5 x 1.25 x 1/8 Balsa Ply (for motor mount) 1 5" piece of Velcro (Optional recommended,
Filling nail holes in drywall before painting. Filling nail holes in drywall before painting.zip
 Filling nail holes in drywall before painting Filling nail holes in drywall before painting.zip personalized home and spend some extra time before move-out fixing tiny nail Jan 5, 2016 try out a few of
Makin Shavins. Hard to comprehend. A Woodturning Newsletter
 1. O C T O B E R 2 0 1 6 Makin Shavins A Woodturning Newsletter Hard to comprehend. This is a piece from the recent SWAT show in WACO Texas. Just a piece from the gallery, which is free to enter and free
8 x 10 Sandwich Panel
 *Before starting, please read entire manual *Changes can be made in order for this manual to work for you 8 x 10 Sandwich Panel Follow all applicable sections of the attached Manufacturing Plan. Objectives:
RFS Class II Rocket Assembly Instructions
 RFS Class II Rocket Assembly Instructions Instructions by: Loc Precision Photos by: Great Lakes Space Port Sheboygan Education Foundation, Inc. Welcome and thank you for joining the Rockets for Schools
INSTRUCTIONS FOR REFINISHING A UBERTI STOCK.
 INSTRUCTIONS FOR REFINISHING A UBERTI STOCK. I have been refinishing gunstocks for 30 years on and off. Over the past several years I have done quite a few Uberti rifles and handgun grips to get the red
Tape Measure Metal Clippers Screw Bit Set With Extensions
 IMPORTANT: Read through instructions thoroughly before beginning to replace any damaged material. Minor damage can be fixed with a fiberglass repair kit and color matched paint. Tools Required Tape Measure
Materials and Tools: Printer s Triple Console Cabinet. Free Plans to build a Triple Console Cabinet
 Materials and Tools: Materials: 3 sets euro style bottom corner mount drawer slides, 16 length 3 sets inset hinges 24 cup style handles 8 2x2 @ 8 feet long 6 1x3 @ 8 feet long 6 1x2 @ 8 feet long 1 sheet
Bathroom Storage Unit. Wilkerdos.com
 Bathroom Storage Unit Wilkerdos.com Copyright 2015 Material List Quantity Item Notes 1 4 x 8 x 3/4 plywood Construction grade 1 2 x 4 x 1/2 plywood Construction grade 11" 7-1/2" Page 1 Some 1 1/4" brad
The author assumes no liability for damages or accidents from the use of the information contained herein.
 Note: I can t say this enough- but thank you so much for your order on Amazon and for downloading the complimentary ebook of Mod Podge crafts. Having you as a customer means more to me than some may imagine