Mini MEGA Bass Amplifier
|
|
|
- Aron Allison
- 5 years ago
- Views:
Transcription


1 Mini MEGA Bass Amplifier Operating Manual
2 FCC/ICES Compliancy Statement This device complies with Part 15 of the FCC rules and Industry Canada license exempt RSS Standard(s). Operation is subject to the following two conditions: (1) this device may not cause harmful interference, and (2) this device must accept any interference received, that may cause undesired operation. Le présent appareil est conforme aux CNR d lndustrie Canada applicables aux appareils radio exempts de licence. L exploitation est autorisée aux deux conditions suivantes: (1) I appareil ne doit pas produire de brouillage, et (2) I utilisateur de I appareil doit accepter tout brouillage radioélectrique subi, même si le brouillage est susceptible d en compromettre le fonctionnement. Warning: Changes or modifications to the equipment not approved by Peavey Electronics Corp. can void the user s authority to use the equipment. Note This equipment has been tested and found to comply with the limits for a Class B digital device, pursuant to Part 15 of the FCC Rules. These limits are designed to provide reasonable protection against harmful interference in a residential installation. This equipment generates, uses, and can radiate radio frequency energy and, if not installed and used in accordance with the instructions, may cause harmful interference to radio communications. However, there is no guarantee that interference will not occur in a particular installation. If this equipment does cause harmful interference to radio or television reception, which can be determined by turning the equipment off and on, the user is encouraged to try and correct the interference by one or more of the following measures. Reorient or relocate the receiving antenna. Increase the separation between the equipment and receiver. Connect the equipment into an outlet on a circuit different from that to which the receiver is connected. Consult the dealer or an experienced radio/tv technician for help. Caution The equipment complies with FCC radiation exposure limits set forth for an uncontrolled environment.
3 ENGLISH Mini MEGA Bass Amplifier Congratulations on the purchase of your new Peavey MiniMEGA bass head! You have made a wise decision! This compact amplifier will absolutely rattle your teeth! Delivering power and tone not available in any other micro bass head, the MiniMEGA features 1,000 Watts of power and produces incredibly full and rich sound in a compact package. Weighing in at only 9 lbs., the MiniMEGA is the new go-to amplifier for bassists of any style. With a Class-D power section designed specifically for bass amplifiers, the MiniMEGA brings a thundering low-end to your bass mix that you can feel as well as hear. The advantages of this amp, however, go well beyond the power section. Peavey s proprietary KOSMOS bass enhancement, for example, provides increased bass impact, while the exclusive psychoacoustic low end enhancement adds bass without overburdening speakers a testament to Peavey s technology-driven innovation. The MiniMEGA also contains other modern features such as built in compression and a 4-band EQ with quasi-parametric mids. Complete with an effects loop, gain control, crunch button, tuner output, customizable backlighting and more; the MiniMEGA contains everything necessary for today s professional bass player. Ideal for use in any live or studio setting, the back panel of the MiniMEGA has all the connectivity necessary to patch in effects, or connect to a sound reinforcement system. We encourage you to read this manual in order to get the most out of your MiniMega. Included in this manual is a description of the layout and a Quick Start Guide. The Quick Start Guide will help you discover all of the features and possibilities of this amplifier. Features: Gain control with crunch button Built-in optical compressor with defeat switch 4 band EQ with Punch and Bright switches Mid controls feature quasi-parametric control with narrow Q controls Built-in KOSMOS with Psycho and Sub controls Master volume with mute control 1/8" headphone output 2 Speakon outputs Tuner output Effects loop DI output with XLR & 1/4" outs. DI pre-post switch, ground lift and Pad controls MIDI footswitch input Auxillary input User-definable control surface color lighting VENTILATION: For proper ventilation, allow 12" clearance from the nearest combustible surface. All vents should have a minimum of 2" of free air space so air can flow thru the unit freely for proper cooling.
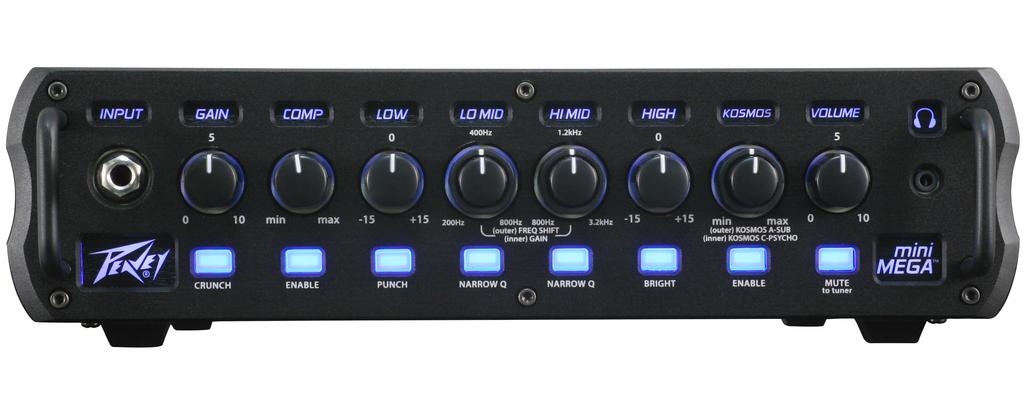
4 Front Panel Layout Hz 1.2kHz min max Hz 800Hz 800Hz 3.2kHz min max 0 10 (outer) FREQ SHIFT (inner) GAIN (outer) KOSMOS A-SUB (inner) KOSMOS C-PSYCHO CRUNCH ENABLE PUNCH NARROW Q NARROW Q BRIGHT ENABLE MUTE to tuner Instrument Input 1/4" input jack-- plug instrument cable into this jack. Gain Control This knob controls input sensitivity of the preamp, whereas the Volume knob controls the output level of the preamp. Optical Compression Control This knob controls the level of compression of the instrument signal (i.e. the farther right you turn the knob, the less dynamic range you will have between your loudest and quietest notes). See Hints section for more info. Low EQ This detented knob provides a shelving tone control for low frequencies and provides cut/boost of +/-15 db. The center point is flat. The center frequency is 40 Hz. -3 db shelf corner frequency is 80Hz. Low Mid Filter The LO MID filter provides +/-15 db of boost/cut to frequency centers between Hz. In general, this filter will be most useful in adjusting the overall tone of your bass and also how you sit in the mix. For example, if you want a smooth vintage bass tone, try setting the frequency ring to about 250Hz, and apply a little bit of cut using the filter gain knob. On the other hand, if you want an aggressive rock tone, try setting the frequency ring to 800Hz and then apply a little bit of boost to the filter gain knob. If you need more cut through a mix, try setting the frequency ring to 400 Hz and apply boost. High Mid Filter The HI MID filter provides +/-15 db of boost/cut to frequency centers between 800 Hz 3.2 KHz. In general, this filter will be most useful in adjusting the overall character of the bass tone. Examples include, accentuating pick or slap/pop attack, increasing/decreasing string/fret noise, and dialing in the tone of played harmonics. High EQ This knob provides a shelving tone control for high frequencies and cut/boost of +/-15dB. The center point is flat and the frequency is 8 KHz. -3dB; the shelf corner frequency is 5 KHz. Kosmos One of the exciting features of the minimega is the inclusion of Peavey's patented KOSMOS bass enhancement technology. The minimega has two separate Kosmos processors combinded into one, giving you maximum bass performance from an array of large and small speaker cabinets. The Kosmos controls are stacked concentrically with Kosmos A controlled by outer wheel and Kosmos C by the inner knob. For a detailed description of the applications of the Kosmos Bass Enchancement feature, see the Hints section of this manual.
5 Front Panel cont Volume This knob controls the overall volume of the amplifier. Headphone jack 1/8" headphone output for personal monitoring. Crunch Button Depressing this button activates the Crunch effect, which boosts the amp's gain enough to overdrive the preamp. When activated, you can adjust the Gain control to dial in the desired amount of saturation. This effect is also footswitchable. For a more detailed explanation of the effect, see the Hints section. Compression Enable Button This button activates the optical compression effect. This effect is also footswitchable. See detailed explanation of the effect in the Hints section. Punch Effect Button This effect adds a +4 db boost to the low end of the bass spectrum; it give punch and attack to the low notes. For a more detailed explanation of the effect, see the Hints section. Narrow Q Preset Buttons This amplifier features two filter presets or Q configurations that narrow the bandwidth. Pressing these buttons activates the filter preset. For a more detailed explanation of the effect, see the Hints section Bright Button This button gives a +10dB boost to the high end of the frequency, and allows the bass to cut through the mix more efficiently. Kosmos Bass Enhancement Button This button activates the Kosmos Bass Enhancement technology, adding additional presense and punch to the sound coming from the speaker. This effect is also footswitchable. For a more detailed explanation of the effect, see the Hints section. Mute Button This button mutes the signal to the speaker. This feature is convenient for tuning on-the-fly and is footswitchable.
6 Rear Panel Layout /60 Hz 150 WATTS Consumo de energia 150Wh POWER ON SPEAKER OUTS SPEAKER JACKS PARALLELED 4 MIN 63.2V RMS 1000W RMS 4 OHMS AUX IN DIRECT INTERFACE D.I. OUTPUTS PRE/ POST FX LOOP SEND TUNER FOR 120V OPERATION, FUSE MUST BE CHANGED TO T10AH/250V 120V V FOR V OPERATION, FUSE MUST BE CHANGED TO T5AH/250V FUSE 120V T10AH/250V V T5AH/250V CLASS 2 WIRING TRS (BALANCED) PAD GRND LIFT RETURN FOOTSWITCH mini MEGA TM AC POWER INLET This is the receptacle for an IEC line cord, which provides AC power to the unit. Connect the line cord to this connector to provide power to the unit. Damage to the equipment may result if improper line voltage is used. (See line voltage marking on unit). Never break off the ground pin on any equipment. It is provided for your safety. If the outlet used does not have a ground pin, a suitable grounding adapter should be used, and the third wire should be grounded properly. To prevent the risk of shock or fire hazard, always make sure that the amplifier and all associated equipment is properly grounded. NOTE: FOR UK ONLY As the colors of the wires in the mains lead of this apparatus may not correspond with the colored markings identifying the terminals in your plug, proceed as follows: (1) The wire that is colored green and yellow must be connected to the terminal that is marked by the letter E, or by the Earth symbol, or colored green or green and yellow. (2) The wire that is colored blue must be connected to the terminal that is marked with the letter N, or the color black. (3) The wire that is colored brown must be connected to the terminal that is marked with the letter L, or the color red POWER SWITCH Placing this switch into the ON position will provide power to the amplifier. LINE VOLTAGE SELECTOR SWITCH This selector switch allows the amplifier to be operated at different voltages. Please be sure this is set to the proper voltage for your area before turning the amplifier on for the first time. NEVER CHANGE POSITION OF THIS SWITCH WHILE THE AMP IS ON! PRIMARY FUSE The fuse is located within the cap of the fuse holder. If the fuse should fail, IT MUST BE REPLACED WITH THE SAME TYPE AND VALUE IN ORDER TO AVOID DAMAGE TO THE EQUIPMENT AND TO PREVENT VOIDING THE WARRANTY. If the amp repeatedly blows fuses, it should be taken to a factory authorized center for repair. WARNING: THE FUSE SHOULD ONLY BE REPLACED WHEN THE POWER CORD HAS BEEN DISCON- NECTED FROM ITS POWER SOURCE TWIST LOCK OUTPUTS MiniMEGA amplifiers utilize two 2-conductor twist lock connectors for paralleled speaker outputs (4Ω min). AUX INPUT This 1/8" input jack allows you to connect an external audio device to your amp and play along.
7 Rear Panel cont XLR DIRECT OUTPUT This XLR output allows the signal from the mini MEGA to be connected directly to a mixing console. TRS BALANCED OUTPUT Another output option for the minimega is the TRS output connection. A 1/4" balanced TRS cable can be connected directly into a rack-mount FX processor or outboard recording device. PRE/POST SELECTOR BUTTON This button allows you to select two funtions for the Direct Interface. In the up position, the button is in the Pre mode. In this position, the bass signal bypasses the EQ and processing of the amplifier and travels directly to the rack-mount FX processor or recording device. When the button is depressed, the amp is in Post; the signal goes through the minimega's preamp and processors before traveling to the rack-mount FX processor or recording device. PAD BUTTON The PAD button helps prevent the signal from clipping at the soundboard or recorder, by reducing the amount of signal level sent from the amplifier. Press this button if the signal to the soundboard is clipping. GROUND LIFT BUTTON In the case of humming noises coming from the Direct Interface, this button can be pressed in order to remove the ground loop. EFFECTS LOOP SEND 1/4 output jack for supplying signals to external low-level effects or signal processing equipment. EFFECTS LOOP RETURN 1/4 input for returning signals from external low-level effects or signal processing equipment. This is a switching jack. Inserting a plug into this jack will break the signal path until it is returned via the EFFECTS LOOP SEND jack. The Effects Loop is footswitchable, but the effects loop may be bypassed without the footswitch. First, hold down the CRUNCH button, and then press the HI MID NARROW Q enable button. TUNER OUTPUT A 1/4" instrument cable can be run from the tuner jack into a tuner. Even when the Mute Button (17) is engaged, the instrument signal will continue to run into the external tuner. MIDI FOOTSWITCH JACK The optional footswitch (part number ) plugs into this jack. The footswitch controls Crunch, Compressor, Kosmos, FX Loop, and Mute functions.
8 Quickstart Guide and Hints This quick start guide will help you get started with the minimega amplifier and have the best possible playing experience. Along with the Quick Start Guide, the Hints section will help you dial into the tonal sweet spots of this amp. We also recommend a thorough reading of this guide before playing through the amp, in order to prevent damage to the speakers. Getting started Before turning on the minimega, be certain that the power cable is plugged into an approved power source. Then plug the amp into a speaker or speakers (4 OHM minimum) via the Speaker Outs (22). GAIN AND VOLUME CONTROLS: Plug the instrument cable into the input jack (1) and turn on the power (19). The Volume and Gain controls are set on zero when the amp is unboxed. With the EQ knobs all set flat (to 0), slowly turn the volume up to 2 or 3. While playing, adjust the amount of gain to suit the sound you are after. Too much gain will cause the preamp to clip or overdrive. Remember to use the volume knob to control the overall output of the amplifier and the gain to control the amount of instrument signal going to the amp. Once you have the gain set for your desired sound, then increase the volume of the amp. You will need to play with the balance of gain to volume in order to find your desired sound. CRUNCH: When activated, this feature reconfigures the front end of the preamp so that the Mini Mega sounds less hi-fi and more like a vintage, all-tube bass amplifier. The effect can create a wide range of tones from very subtle overdrive all the way to full on distortion depending on the position of the GAIN knob, the volume knob on the bass, and the bass guitar itself. The CRUNCH circuit passes the bass signal through a crossover so that higher frequencies are processed and lower frequencies are not. This is so that the bass tone does not become mushy and unfocussed. HINT: To achieve equal volume with and without CRUNCH activated, start by turning on CRUNCH. Dial in the desired amount of the effect using the GAIN control, and set your overall volume using the VOLUME control. Finally, bypass CRUNCH and check the clean volume the volume should be the same or very close between the two. HINT: For best results, turn off the tweeter in your speaker cab when using CRUNCH. COMPRESSOR: The Mini Mega features an optical compressor (3) that is designed to be extremely easy to use and powerful at the same time. The compressor can be activated either by the optional footswitch (Part number ) or the Enable button (12) on the front panel. The compressor functions similarly to an automatic volume adjuster, in that it controls playing dynamics by reducing the dynamic range (or volume) of notes that are played hard. The harder you play, the more the signal level will reduce (depending on the amount of compression you set). The COMP control knob sets the amount of compression from subtle to extreme. The farther right you turn the knob, the less dynamic range you will have between your loudest and quietest notes. To all you technically inclined bassists, the COMP knob adjusts the compression ratio attack / release time and recovery gain is fixed. The compression also takes place pre-eq in the signal chain. HINT: The compressor is after the GAIN control in the signal chain, so the compressor may not be able to trigger if the gain is not set high enough or if your bass guitar volume is turned down too low. HINT: Use a little compression if you like extreme EQ settings for certain styles of music such as Reggae or Urban Gospel. This smoothes out the overall tone so that your bass playing can be heard and felt while still fitting in the mix. It also keeps power amplifier headroom in reserve so you can play louder should the need arise. LOW EQUALIZER CONTROL: The mini MEGA features an EQ to help you dial in your tone and cut through the mix. The first of the EQ controls is the Low EQ. The Low EQ control is a detented knob and controls the frequency range from 20Hz to 200Hz. PUNCH: -The punch effect adds a +4 db boost to low frequencies around 100 Hz. This enhances the attack and impact of low notes. Activating

9 Quickstart Guide and Hints PUNCH also slightly changes the response of the LOW EQ control so that it has more effect on the upper bass frequencies as well as the lower bass frequencies. HINT: Use PUNCH for a great slap sound! Actually, it sounds great left on all the time for just about any style of music! QUASI-PARAMETRIC MIDDLE EQUALIZER: The Mini Mega features two quasi-parametric EQ filters labeled LO MID and HI MID. We ve attempted to provide a very detailed description of this feature because while parametric EQ s are extremely powerful, they can be a bit confusing to those who are not familiar. The mid frequencies are extremely important because they not only determine the musicality and character of your bass tone, they also determine how your bass will hold up in a mix. For example, if you find that you are having trouble hearing yourself in a mix, most likely, adjusting (boosting) the mids will help. It s important to remember that when you play a note on a bass guitar, the note itself has a fundamental frequency that determines the pitch (that s what a tuner measures to determine pitch), but there s more to it than that. The note also has harmonics that make up the tone, so even when you play low notes, there are harmonics present that extend much higher in the frequency range. Each filter utilizes two stacked (concentric) controls. The outer ring control is used to adjust the frequency center of the filter. The inner control is the gain control used to adjust the cut or boost amount of the filter. When the gain control is centered at 12:00, the filter will have no effect on the audio response, therefore, changing the position of the frequency ring will have no effect. 400 Hz and 1.2 KHz are the default 12:00 settings on the LO MID and HI MID filters respectively, because those frequency centers will be very effective at making needed tone adjustments when using common bass guitars and bass speaker cabinets. Rotating the filter gain control counter-clockwise will apply cut, and rotating the filter gain control clockwise will apply boost HINT: To hear the effect of the mid filters, set the gain control to full cut or boost, and then sweep the frequency ring while letting notes sustain. You can also ask a friend to play through the amp while you experiment with the EQ. Just be aware that fully boosting an EQ control may require an adjustment in volume. HINT: It s a good idea to pay attention to the frequency ring settings between the LO MID and HI MID filters you probably wouldn t want to set both filters near the same frequency and then cut one while boosting the other, for example. LO MID FILTER: The LO MID filter provides +/-15 db of boost/cut to frequency centers between Hz. In general, this filter will be most useful in adjusting the overall tone of your bass and also how you sit in the mix. For example, if you want a smooth vintage bass tone, try setting the frequency ring to about 250Hz, and apply a little bit of cut using the filter gain knob. On the other hand, if you want an aggressive rock tone, try setting the frequency ring to 800Hz and then apply a little bit of boost to the filter gain knob. If you need more cut through a mix, try setting the frequency ring to 400 Hz and apply boost. HI MID FILTER: The HI MID filter provides +/-15 db of boost/cut to frequency centers between 800 Hz 3.2 KHz. In general, this filter will be most useful in adjusting the overall character of the bass tone. Examples include, accentuating pick or slap/pop attack, increasing/decreasing string/fret noise, and dialing in the tone of played harmonics. NARROW Q SWITCHES: Each filter may be run with in one of two preset Q configurations. Q refers to the width of the filter response. The default Q is wide
10 bandwidth. When you activate the NARROW Q switch, the button will illuminate and the filter tuning is adjusted to have less bandwidth. It s important to remember that because of the nature of parametric EQ s, the Q also depends on the amount of cut or boost. For that reason, when using slight amounts of cut/boost, there may be no perceivable difference between the wide/narrow Q settings. See illustration below. -LO MID frequency ring set near minimum with moderate gain boost with NARROW Q turned on. -HI MID frequency ring set near maximum with moderate gain boost with the default wide Q. The illustration is a graph of the EQ frequency response across the audio spectrum (20 Hz 20 KHz). Notice the area in between the two filters that is also affected somewhat. Because of the distance between the two frequency centers, there is sort of a dead spot in between the LO MID and HI MID filters because the frequency rings are set opposite extremes. There s nothing necessarily wrong with that, but it s something to keep in mind when making adjustments you may create areas in the frequency response that can t be adjusted effectively. HINT: For typical tone adjustments, it is advisable to use a wide Q setting for the low mid filter and a narrow Q setting for the high mid filter. This is because of the nature of audio frequencies. If you play two notes that are an octave apart, the frequency of the higher octave is twice that of the lower octave, therefore, as you play notes that are increasingly higher, the frequency difference between notes becomes increasingly farther apart. If you are trying to dial in the high mid EQ, using the default wide Q setting may result in cutting or boosting undesired areas of the tonal spectrum. By the same token, using the narrow Q setting on the low mid EQ may result in a peaky sounding response across certain areas of the fret board. These are just generalizations don t be discouraged from experimenting with creative EQ-ing. High EQ: The final of the EQ controls is the High EQ. The High EQ control is a detented knob and controls the frequency range from 3.2KHz to 20KHz. Adding higher frequencies to the bass mix can help had attack to the bass signal and can allow individual notes to push through the mix. You will have to play with the EQ to find the right combitiations that work for your particular playing style. BRIGHT: The bright effect modifies the front of the preamp so that it is more sensitive to extreme high frequencies. Activating this feature adds + 10 db of boost to frequencies around 8 KHz. This enhances the top end part of your tone. HINT: Use BRIGHT to put some life back into older strings that sound dull. Looking for an aggressive metal, hardcore, or punk tone when playing with a pick? Use BRIGHT with CRUNCH. KOSMOS Bass Enhancement System Kosmos is Peavey s exclusive bass enhancement processing technology that adds percieved bass to the bass signal without overloading the amplifier. The Mini Mega features two separate Kosmos processors combined into one for the first time. This is so the user can get maximum performance from full size bass cabs all the way down to smaller mini cabs. The Kosmos controls are stacked (concentric); Kosmos A is the outer ring control, and Kosmos C is the inner control knob. The knobs control the mix amount of each Kosmos pro-
11 cessor. Activate the effect by pressing the enable button located directly below the knob or use the optional footswitch. KOSMOS A: Kosmos A is a sub harmonic synthesizer that tracks bass notes and then generates a sub harmonic one octave below to enhance the overall bass presence by adding extreme low frequency content that can be felt. HINT: Kosmos A is fantastic for musical styles that require smooth, deep bass such as Reggae, Hip-Hop, R&B, and Electronica. CAUTION Kosmos A works best with larger bass cabinets such as 410 s. Be careful when using Kosmos A because it can damage the speakers. Listen carefully to your speaker cabinets to make sure that there are no indications of mechanical stress or cone breakup distortion. KOSMOS C: Kosmos C is a bass harmonic enhancer that works by principles of psycho-acoustics. Kosmos C is designed to make smaller bass speaker enclosures (such as 112 cabs) sound larger by creating an illusion of increased bass. This is because the human ear perceives certain combinations of tones as one single tone that is extremely low in frequency. Technically, you are adding more bass when you use this feature, but you are adding upper bass content that is easier for speakers to handle, and that doesn t eat up power amplifier headroom as much as simply boosting low EQ. This feature is especially useful when using extended range basses such as a 5-string bass with a low B string HINT: The Kosmos C ear trickery works best when the LOW EQ control is used sparingly. If you boost the lows before Kosmos C, you defeat the purpose. CAUTION You may use both KOSMOS A and C processors simultaneously, but use caution because it will be extremely easy for the power amplifier to reach full power output which may damage speaker enclosures. It s important to remember that the power rating of a speaker cabinet is basically a thermal limit and DOES NOT indicate the safe power handling limit in the sub bass region which is a mechanical limit. In other words, don t assume that using a cabinet rated at 1,000 Watts with a 1,000 Watt amplifier means you re in the clear! When you use any of the buttons on the front of the amp, any setting changes that occur 5 or more seconds before the unit is switched off will be saved in memory and will be recalled the next time the unit is switched on. Changing Display Color: One of the really unique "extras" of the mini MEGA is the customizable backlight display. You can now change to color based on your mood or the setting, and you can have a unique look to go with your unique sound! To enter the backlight edit mode, press the CRUNCH button for 2 seconds and continue holding during editing. When the CRUNCH button is released, the light settings will be stored in memory after a 5 second delay. The Mini Mega will display a color wheel light show when there is no instrument cable plugged into the input jack. To disable the light show, press the KOSMOS ENABLE BUTTON. To make the light show run while the amp output is muted, press the MUTE button. To change the color, use the COMP enable button to cycle through the 10 backlight color presets: RED, PINK, PURPLE, BLUE, TEAL, GREEN, LIGHT GREEN, YELLOW, ORANGE, and WHITE. To change the panel brightness, press the BRIGHT button. There are 4 levels of light intensity. To toggle the top half of the light panel on or off, press the PUNCH button. To restore the lighting control system to the factory presets, press and hold the KOSMOS enable and MUTE buttons with the unit powered off, and then turn the power switch on.
12 MIDI Programming MIDI Control Continuous Controllers (on MIDI channel 1): B0 cc dd cc [dd: 0-63=off ; =on] crunch 02 - compressor 03 - punch 04 - lo narrow q 05 - hi narrow q 06 - bright 07 - kosmos 08 - mute 09 - effects loop Examples: B0 07 7F... turns kosmos on B unmutes amp
13 MIDI Program Change on channel 1 C0 PRG PRG (dec) PRG (hex) Mute FX Loop Kosmos Bright Punch Compressor Crunch PRG bits: h 1 01h x 2 02h x 3 03h x x 4 04h x 5 05h x x 6 06h x x 7 07h x x x 8 08h x 9 09h x x 10 0Ah x x 11 0Bh x x x 12 0Ch x x 13 0Dh x x x 14 0Eh x x x 15 0Fh x x x x 16 10h x 17 11h x x 18 12h x x 19 13h x x x 20 14h x x 21 15h x x x 22 16h x x x 23 17h x x x x 24 18h x x 25 19h x x x 26 1Ah x x x 27 1Bh x x x x 28 1Ch x x x 29 1Dh x x x x 30 1Eh x x x x 31 1Fh x x x x x 32 20h x 33 21h x x 34 22h x x 35 23h x x x 36 24h x x 37 25h x x x 38 26h x x x 39 27h x x x x 40 28h x x 41 29h x x x 42 2Ah x x x 43 2Bh x x x x 44 2Ch x x x 45 2Dh x x x x 46 2Eh x x x x 47 2Fh x x x x x 48 30h x x 49 31h x x x 50 32h x x x 51 33h x x x x 52 34h x x x 53 35h x x x x 54 36h x x x x 55 37h x x x x x 56 38h x x x 57 39h x x x x 58 3Ah x x x x 59 3Bh x x x x x 60 3Ch x x x x 61 3Dh x x x x x 62 3Eh x x x x x 63 3Fh x x x x x x x40-0x7f MUTED!
14
15 Mini MEGA Specifications Mini MEGA NOTE: All specifications tested with mains voltage maintained at nominal level. Line Voltage: 120V 60 Hz 220V - 240V 50/60 Hz Typical Power Consumption = 200W Power Amplifier Specifications: Protection: Short circuit protection Thermal protection circuit Current limit protection circuit DC output protection circuit Input Sensitivity (signal into return jack with master volume set to 5): 8.24 dbu Power Output: All measurements with no more than 1% THD + N 8 ohms 700 watts (75.0 VRMS) 4 ohms 1000 watts (63.2 VRMS) Headphone Amplifier Specifications: Stereo 8 ohm minimum load Power Output: All measurements with no more than 1% THD + N 8 ohms 250 mw (1.41 VRMS) x 2 Preamplifier Specifications: Settings for the Following Measurements (unless stated otherwise): Gain = 5 (12 o'clock) BRIGHT = out CRUNCH = out LOW = 0 (12 o clock) LO MID = 400 Hz (12 o'clock) HI MID = 1.2 khz (12 o'clock) HIGH = 0 (12 o clock) COMPRESSION = OUT POST GAIN = 10 (fully CW) Kosmos A = Kosmos C = Input Sensitivity (input selector set to passive): Nominal Input = dbu Minimum Input = dbu Maximum Input = dbu (maximum signal at input before clipping) D.I.: Balanced Output Noise Floor: -90 db Weight: 9 lbs. / 5.4 Kg Dimensions (h x w x d): (h x w x d): 12"W x 3.125"H x 11"D Features and specifications subject to change without notice. All specifications tested with mains voltage maintained at nominal level.
 483-5365 FAX (601) 486-1278 Logo referenced in Directive 2002/96/EC Annex IV (OJ(L)37/38,13.02.03 and defined in EN 50419: 2005 The bar is the symbol for marking of new waste and is applied only to equipment manufactured after 13 August 2005")
16 Warranty registration and information for U.S. customers available online at or use the QR tag below Features and specifications subject to change without notice. Peavey Electronics Corporation 5022 Hartley Peavey Drive Meridian, MS (601) FAX (601) Logo referenced in Directive 2002/96/EC Annex IV (OJ(L)37/38, and defined in EN 50419: 2005 The bar is the symbol for marking of new waste and is applied only to equipment manufactured after 13 August 2005
MAX Series Bass Amplifiers
 MAX Series Bass Amplifiers Operating Manual www.peavey.com FCC Compliancy Statement This device complies with Part 15 of the FCC rules. Operation is subject to the following two conditions: (1) this device
6505 MICRO. Amplifier. Operating Manual.
 6505 MICRO Amplifier Operating Manual www.peavey.com FCC/ICES Compliancy Statement This device complies with Part 15 of the FCC rules and Industry Canada license-exempt RSS Standard(s). Operation is subject
Operating Manual
 Mini MAX Bass Amplifier Operating Manual www.peavey.com FCC/ICES Compliancy Statement This device complies with Part 15 of the FCC rules and Industry Canada license-exempt RSS Standard(s). Operation is
Trace Elliot Elf Bass Instrument Amplifier
 Trace Elliot Elf Bass Instrument Amplifier Owner s Manual FCC Compliancy Statement This device complies with Part 15 of the FCC rules. Operation is subject to the following two conditions: (1) this device
Peavey Invective MH 20W Tube Guitar Amplifier
 Peavey Invective MH 20W Tube Guitar Amplifier Operating Manual invective. MH 4 6 CLEAN LEAD MASTER 4 6 T1 TSI T2 EL84 ON ON 2 8 2 8 2 8 CHANL 2 8 2 8 2 8 2 8 2 8 2 8 2 8 GATE INPUT GAIN LOW HIGH PRE GAIN
Robert Randolph Signature Amplifier Head
 Robert Randolph Signature Amplifier Head Operating Manual HIGH GAIN INPUT LOW GAIN ENABLE DISABLE SEND RETURN 3 0 3 3 0 3 EQUALIZER 250 500 800 1K 3 0 3 SEND RETURN Chrs Rate EFX PARAMETER Plate Level
AG C & AG C
 Aguilar Amplification s AG 500-112C & AG 500-212C Owners Manual August 2005, Manual Version 1.3 1. The AG 500-212C was designed to give bassists the versatility of the AG 500 bass head with the award winning
REIDMAR 750 PROFESSIONAL BASS HEAD USERS MANUAL. Introduction 2 Block Diagram 3 Front Panel Controls 4 Rear Panel Features 6 Specifications 8
 EBS REIDMAR 750 USERS MANUAL REIDMAR 750 PROFESSIONAL BASS HEAD CONTENTS Page Introduction 2 Block Diagram 3 Front Panel Controls 4 Rear Panel Features 6 Specifications 8 USERS MANUAL EBS REIDMAR 750 About
UMA 4300 Professional Series Installation Power Amplifer Owner s Manual
 1 UMA 4300 Professional Series Installation Power Amplifer Owner s Manual UMA 4300 Professional Installation Power Amplifier ENGLISH The UMA 4300 is a high quality, commercial grade analog audio mixer/amplifier.
Important Safety Information
 Owner's Manual Important Safety Information FCC Notice This equipment has been tested and found to comply with the limits for a Class B digital device, pursuant to Part 15 of the FCC Rules. These limits
Darkglass Suite. Disclaimer
 USER MANUAL Darkglass Suite Download the free Darkglass Suite software from www.darkglass.com/suite to configure the pedal, load new impulses and download firmware updates. Darkglass Suite comes with a
DSL100HR & DSL40CR OWNER S MANUAL
 DSL100HR & DSL40CR OWNER S MANUAL INTRODUCTION Congratulations on your purchase of this Dual Super Lead (DSL) amplifier from Marshall Amplification. The DSL provides the legendary Marshall tone, allowing
Transponder Reader TWN4 MultiTech 3 Quick Start Guide
 Transponder Reader TWN4 MultiTech 3 Quick Start Guide Rev. 1.0 1. Introduction The transponder reader TWN4 is a device for reading and writing RFID transponders. There are different versions of TWN4 devices
VENUE Full Isolation D.I.
 VENUE Full Isolation D.I. USER S GUIDE www.lrbaggs.com INTRODUCTION Thank you for purchasing our Venue D.I. This is the first all-discrete acoustic guitar preamp to combine a transformer-coupled D.I. output
Important Safety Instructions ENGLISH - PAGES ESPAÑOL - PAGINAS FRANÇAIS - PAGES ITALIANO - PAGINE...
 ENGLISH - PAGES........... 6-8 Important Safety Instructions This symbol warns the user of dangerous voltage levels localized within the enclosure. This symbol advises the user to read all accompanying
Thank you for purchasing this Rockville Power Gig RPG152K Bluetooth pro audio speaker system.
 OWNER S MANUAL Thank you for purchasing this Rockville Power Gig RPG52K Bluetooth pro audio speaker system. We are very proud to bring you what we consider to be the absolute best value line pro audio
NEMESIS NC-200A OPERATION MANUAL
 NEMESIS NC-200A OPERATION MANUAL Publishing Date 6/10/96 Rev.4 Congratulations on your purchase of your new NEMESIS Combo Amplifier system. This manual will cover all (4) versions of the NEMESIS Combos.
INTRODUCTION. Please read this manual carefully for a through explanation of the THETA Head and its functions. PRECAUTIONS
 INTRODUCTION Congratulations on your purchase of the THETA Head. You are now the owner of the most innovative guitar amplifier ever produced. The THETA Head was designed to provide the maximum possible
Vidur Tube Pre-amplifier Owner s Manual (v1.1)
") Vidur Tube Pre-amplifier Owner s Manual (v1.1) Index Front Input 1 Pad control knob Mojo control Mute button FX loop controls 2 FX button EQ controls... 3 EQ button Master Back Tuner out... 4 FX loop Line
Vidur Tube Pre-amplifier Owner s Manual (v1.1) Index Front Input 1 Pad control knob Mojo control Mute button FX loop controls 2 FX button EQ controls... 3 EQ button Master Back Tuner out... 4 FX loop Line
DSL1CR & DSL1HR OWNER S MANUAL
 DSL1CR & DSL1HR OWNER S MANUAL INTRODUCTION Congratulations on your purchase of this Dual Super Lead (DSL) amplifier from Marshall Amplification. The DSL provides the legendary Marshall tone, allowing
Darkglass Suite. Disclaimer
 USER MANUAL Darkglass Suite Download the free Darkglass Suite software from www.darkglass.com/suite to configure the pedal, load new impulses and download firmware updates. Darkglass Suite comes with a
FEATURES FRONT PANEL. INPUT : Use this jack to connect your instrument via a standard ¼ mono cable.
 OWNER S MANUAL 2018 ended up as the most important year in Darkglass history. With groundbreaking new products, renewed classic releases, and limited-edition pedals, our product catalog grew stronger than
FOR AVLEX ONLY MT-24A. User Guide. 2.4 GHz Digital Stationary Transmitter
 2.4 GHz Digital Stationary Transmitter User Guide All rights reserved. MN 017/05 Do not copy or forward without prior approvals MIPRO. Specifications and design subject to change without notice. 2 CE5
KXB800 BASS AMPLIFIER
 KXB800 BASS AMPLIFIER OWNER S MANUAL Congratulations on the purchase of your Kustom KXB800. This Bass Amp combines quality performance and convenient features in a sturdy, rack-mountable design. You ll
Darkglass Suite. Disclaimer
 USER MANUAL Darkglass Suite Download the free Darkglass Suite software from www.darkglass.com/suite to configure the pedal, load new impulses and download firmware updates. Darkglass Suite comes with a
The Alpha Omega 900 amplifies the best qualities of one of the most powerful and distinct Darkglass pedals ever made.
 OWNER S MANUAL The Alpha Omega 900 takes the best elements of our most successful distortion preamplifier ever, combined with state-of-the-art features to make a monstrous 900-watt amplifier with earth-shattering
FEATURES FRONT PANEL. INPUT : Use this jack to connect your instrument via a standard ¼ mono cable.
 OWNER S MANUAL 2018 ended up as the most important year in Darkglass history. With groundbreaking new products, renewed classic releases, and limited-edition pedals, our product catalog grew stronger than
PHIL JONES BASS PJB BP-800
 PHIL JONES BASS PJB BP-800 OWNER S MANUAL Thank you for purchasing the PJB BP-800. A great deal of dedication and passion went into designing and building this no compromise, high-performance compact amplifier.
INSTALLATION MANUAL ES-SUB-WIRELESS-KIT ES-SUB-WIRELESS-RCVR
 INSTALLATION MANUAL ES-SUB-WIRELESS-KIT ES-SUB-WIRELESS-RCVR FCC STATEMENT This equipment has been tested and found to comply with the limits for a Class B digital device, pursuant to Part 15 of the FCC
Operating Instructions 1000RB
 Operating Instructions 1000RB Table of Contents INTRODUCTION. 3 1000RB FEATURES. 3 FRONT PANEL FEATURES 4 REAR PANEL FEATURES 5 HOOKING UP YOUR SPEAKERS 6 GETTING YOUR SOUND. 6 TROUBLESHOOTING.. 7 USING
DOWNLOAD KASA ADD TO KASA INSTALL AND POWER UP SAFETY FIRST
 WELCOME TO KASA Let s get started with your new Wi-Fi Smart Dimmer. Kasa SAFETY FIRST Read and follow all safety precautions in the Kasa app. Ensure power is off at the circuit breaker before removing
USER GUIDE TONEDEQ AFX
 www.fishman.com USER GUIDE TONEDEQ AFX Important Safety Information To ensure your personal safety and the safety of others, operate this apparatus only after completely reading this instruction manual
RACKHEAD Dual Tube/Solid-State Channel Bass Amp
 RACKHEAD 1060 Dual Tube/Solid-State Channel Bass Amp Please read this manual and the enclosed safety pamphlet carefully before operating the amp! Technical specifications subject to change without notice.
B SERIES COMBO COMBO
 B B SERIES A S S COMBO -9 Hartke Table of Contents Introduction 1 B Series Combo Bass Amplifier Features 2 Guided Tour 3 Front Panel 3-4 Rear Panel 5 Setting Up and Using Your Hartke B Series Combo Bass
THANK YOU REGISTER ONLINE. ABM-EVO-IV - Front Panel Facilities
 ABM-EVO-IV - Front Panel Facilities PUT PUT STRUMENT LE PASSIVE/ACTIVE PUT LEVEL PUT PUTS THANK YOU Thank you for purchasing your Ashdown Engineering Amplifier and welcome to the family! We really think
INTRODUCTION WARNING! IMPORTANT SAFETY INSTRUCTIONS. Congratulations on your purchase of this MG Gold amplifier from Marshall Amplification.
 OWNER S MANUAL INTRODUCTION WARNING! IMPORTANT SAFETY INSTRUCTIONS Congratulations on your purchase of this MG Gold amplifier from Marshall Amplification. The MG provides modern Marshall tones for the
260X190mm/105 克铜版纸 / 黑白印刷
 260X190mm/105 克铜版纸 / 黑白印刷 5172301 1 FEATURES A-Control Panel A1-Bass Volume Adjustment A2-Volume Adjustment A3-Audio Input Jack A4-Audio Output Jack for linking multiple chairs A5-Wire mode / Bluetooth
NV-WA40W. Installation and User Guide
 NV-WA40W Installation and User Guide Introduction The NV-WA40W-AMP is a versatile 40-watt in wall zone amplifier perfectly suited to a variety of tasks. Its design allows two line level sources to be permanently
USERS MANUAL EBS MICROBASSII BLACK LABEL SERIES. EBS MicroBassII. EBS Professional Bass Equipment SPECIFICATIONS
 SPECIFICATIONS Nominal Input Level - 8 dbv Input Impedance 10 Mohms (Ch A), 1 Mohms (Ch B) Output Impedance 10 kohms Frequency Response +0 / -3 db 20 20 khz Tone Controls Bass +/- 15 db @ 100 Hz Treble
USERS MANUAL EBS MAGNI 500 MAGNI 500 PROFESSIONAL BASS COMBO
 MAGNI 500 PROFESSIONAL BASS COMBO About the EBS Magni 500 Bass Combo! The name Magni stems from a character in Norse mythology Magni, son of Thor (the God of Thunder). The word Magni translates to Strong
Sonic Farm Tantra Bass Preamplifier USER MANUAL
 Sonic Farm Pro Audio, Vancouver, BC, Canada Tel 310-402-2390, 778-863-1613 www.sonicfarm.com for email, please use contact box on our website Sonic Farm Tantra Bass Preamplifier USER MANUAL Dear Audio
Overview. Thank you for purchasing the Suhr Eclipse Dual Overdrive/Distortion Pedal.
 User Guide Table of Contents Overview 3 Getting Connected 4 Channel Selection / Bypass 5 Controls 6 Battery Monitor 7 FX Link (External Control) 8 Sample Settings 9 Technical Specifications 10 Warranty
Murata Bluetooth mesh Node. Installation Guide
 Murata Bluetooth mesh ode Installation Guide Shipped Components Murata Bluetooth mesh ode (BCC2ZZ1PR) ocknut Page 1 Caution Installation and maintenance must be done in accordance with local, state and
IPA 2300 Power Amplifer Owner s Manual
 1 IPA 2300 Power Amplifer Owner s Manual IPA 2300 Power Amplifier ENGLISH The IPA 2300 is a high-quality industrial-grade audio amplifier. Designed for flexibility in application this amplifier represents
or call
 Email service@acecasual.com or call 1 FEATURES A-Control Panel A1-Vibration adjustment A2-Bass Volume Adjustment A3-Volume Adjustment A4-Audio Input Jack A5-Audio Output Jack for linking multiple chairs
CARE +MAINTENANCE Cleaning Important Safety Instructions Water Drop Heat Battery Charging Repair
 CARE +MAINTENANCE Cleaning 1. Wipe with a dry cloth. 2. Rinse with fresh water after exposure to soap, chlorine or seawater. 3. Do not use solvents, chemicals, cleaning solutions, alcohol, ammonia or abrasives.
WMA 4300 Professional Series Installation Power Amplifer Owner s Manual
 1 WMA 4300 Professional Series Installation Power Amplifer Owner s Manual WMA 4300 Power Amplifier ENGLISH The WMA 4300 is a high quality, commercial grade analog audio mixer/amplifier. Designed for flexibility
TONE TATTOO ANALOG MULTI-EFFECT PEDAL featuring METAL MUFF, NEO CLONE & MEMORY TOY
 TONE TATTOO ANALOG MULTI-EFFECT PEDAL featuring METAL MUFF, NEO CLONE & MEMORY TOY Congratulations on your purchase of the fully analog Electro-Harmonix TONE TATTOO, the first true multi-effect from Electro-Harmonix!
R50C Electric Guitar Amplifier (with AGX Technology)
") U S E R ' S M A N U A L R50C Electric Guitar Amplifier (with AGX Technology) May be covered by one or more of the following: U.S. Patents #4538297, 4647876, 4696044, 4745309, 4881047, 4893099, 5124657,
U S E R ' S M A N U A L R50C Electric Guitar Amplifier (with AGX Technology) May be covered by one or more of the following: U.S. Patents #4538297, 4647876, 4696044, 4745309, 4881047, 4893099, 5124657,
Need Help? SA /
 1 FEATURES A-Control Panel A1-Vibration adjustment A2-Bass Volume Adjustment A3-Volume Adjustment A4-Audio Input Jack A5-Audio Output Jack for linking multiple chairs A6-Wire mode / Bluetooth mode Switch
LeMay Audio Products. MK-I Preamplifier Users Manual John P. LeMay All Rights Reserved Rev A
 LeMay Audio Products MK-I Preamplifier Users Manual 2008 John P. LeMay All Rights Reserved Rev A 08.12.24 Congratulations on purchasing one of the world s finest professional instrument preamplifiers!
Operating Instructions 2000RB
 Operating Instructions 2000RB Table of Contents INTRODUCTION. 3 2000RB FEATURES. 3 FRONT PANEL FEATURES 4 REAR PANEL FEATURES 5 SELECTING AN OPERATING MODE & HOOKING-UP YOUR SPEAKERS 6 GETTING YOUR SOUND.
INTRODUCTION. Please read this manual carefully for a through explanation of the THETA Pre-Amplifier and its functions.
 INTRODUCTION Congratulations on your purchase of the Theta stand alone pre-amplifier. You are now the owner of the most innovative guitar amplifier ever produced. The same innovation and killer sound that
Block-800B bass head. user manual
 Block-800B bass head user manual Musikhaus Thomann Thomann GmbH Hans-Thomann-Straße 1 96138 Burgebrach Deutschland Telephone: +49 (0) 9546 9223-0 E-mail: info@thomann.de Internet: www.thomann.de 08.03.2018,
Pser G uide oduct Manual
 ADC-T2000 Hub User Product Guide Manual Hub Product Manual 1 Set Up Required Standard home router with active Internet connection Z-Wave devices to be installed Indicator Lights White Flashing: no internet
T L Audio. User Manual EQ1 VALVE EQUALISER. Tony Larking Professional Sales Limited, Letchworth, England.
 T L Audio User Manual EQ1 VALVE EQUALISER Tony Larking Professional Sales Limited, Letchworth, England. Tel: 01462 490600, International +44 1462 490600. Fax: 01462 490700, International +44 1462 490700.
KXR. Owner, s Manual. One hundred KEYBOARD EXTENDED RANGE TYPE: PR 262 P/N
 THE SOUND THAT CREATES LEGENDS KEYBOARD EXTENDED RANGE KXR One hundred TYPE: PR 262 Owner, s Manual P/N 047761 KXR 100 Owner s Manual Congratulations on your purchase of the Fender KXR 100 keyboard amplifier.
Thank you for purchasing the Empress Buffer+ Stereo. This pedal
 user manual Thank you for purchasing the Empress Buffer+ Stereo. This pedal was designed to be the complete I/O interface for your pedalboard while maintaining the highest fidelity of your guitar signal.
User Guide. Do not copy or forward without prior approvals MIPRO. Specifications and design subject to change without notice.
 User Guide ACT-70H / ACT-71Ha ACT-71H / ACT-72H All rights reserved. MN 016/01 Do not copy or forward without prior approvals MIPRO. Specifications and design subject to change without notice. 2 CE5 2
Owner s Manual B 300 B 600 B 900 B 1200 B 1500 B 902 B 1202 B 1802 B300 B1802
 Owner s Manual B 300 B 600 B 900 B 1200 B 1500 B300 B 902 B 1202 B 1802 B1802 WARNING B 300 / B 600 / B 900 / B 1200 / B 1500 / B 902 / B 1202 / B 1802 Table of Contents Table of Contents Introduction
Your Rocktron VersaTune has been designed to comply with the following Standards and Directives as set forth by the European Union:
 Your Rocktron VersaTune has been designed to comply with the following Standards and Directives as set forth by the European Union: Council Directive(s): 89/336/EEC, 73/23/EEC, 76/769/EC, 1994/62/EC, 2000/
FMT4R FM Transmitter User s manual
 FMT4R FM Transmitter User s manual Contents 1. Overview.....1 2. Getting started 1 3. Basic operation...2 4. Care and maintenance...3 5. Frequently asked questions....3 6. Technical parameter..4 It is
Ai1 OWNER S MANUAL. Getting Started:
 Ai1 OWNER S MANUAL Thank you for your purchase. We have developed a quality DI with preamp for use by professional musicians with added features for home or private practice. Features: The Ai1 is a quality
WORKINGMAN S WORKINGMAN S 12 WORKINGMAN S 15
 WORKINGMAN S SERIES BASS COMBOS OWNER S MANUAL INCLUDES: WORKINGMAN S 10 WORKINGMAN S 12 WORKINGMAN S 15 SWR SCOTTSDALE, AZ USA TABLE OF CONTENTS INTRODUCTION...................................................1
V160R ELECTRIC GUITAR AMPLIFIER WITH A TUBE PREAMP, REVERB AND BUILT-IN CHROMATIC TUNER. User s Manual
 TM V160R ELECTRIC GUITAR AMPLIFIER WITH A TUBE PREAMP, REVERB AND BUILT-IN CHROMATIC TUNER User s Manual TM Vendetta is a trademark of GHS Corporation Battle Creek MI, USA May be covered by one or more
Peavey 6505 MH 20W Tube Guitar Amplifier
 Peavey 6505 MH 20W Tube Guitar Amplifier Operating Manual www.peavey.com FCC/ICES Compliancy Statement This device complies with Part 15 of the FCC rules and Industry Canada license exempt RSS Standard(s).
T L Audio CRIMSON SERIES. User Manual EQ-3011 EQUALISER. Tony Larking Professional Sales Limited, Letchworth, England.
 T L Audio CRIMSON SERIES User Manual EQ-3011 EQUALISER Tony Larking Professional Sales Limited, Letchworth, England. Tel: 01462 490600. International +44 1462 490600. Fax: 01462 490700. International +44
Invective 120 Amplifier Head
 Invective 120 Amplifier Head Operating Manual www.peavey.com 1 FCC/ICES Compliancy Statement This device complies with Part 1 of the FCC rules and Industry Canada license-exempt RSS Standard(s). Operation
Classic 20 MH 20W Tube Guitar Amplifier
 Classic 20 MH 20W Tube Guitar Amplifier Operating Manual www.peavey.com Logo referenced in Directive 2002/96/EC Annex IV (OJ(L)37/38,13.02.03 and defined in EN 50419: 2005 The bar is
Laney DB SERIES USER MANUAL MODEL : DB150C DB150H DB300C DB300H DB400C DB400H
 Laney DB SERIES USER MANUAL MODEL : DBC DBH DBC DBH DBC DBH Laney INTRODUCTION Congratulations on your decision to purchase a Laney amplifier. Laney products are designed with ease of operation as a primary
DCH-G020 mydlink Connected Home Hub
 DCH-G020 mydlink Connected Home Hub User s Manual Version 01.0 Oct. 15 th, 2014 Manual Page 1 10/16/2014 1. PRODUCT DESCRIPTION The DCH-G020 is a Connected Home Z-Wave Gateway used to control a variety
Summit Audio Model DCL-200 Dual Compressor-Limiter Operating Manual
 Summit Audio Model DCL-200 Dual Compressor-Limiter Operating Manual IMPORTANT!: CAREFULLY READ THE ENTIRE INSTRUCTION MANUAL BEFORE HOOKUP OR OPERATION OF THE DCL-200. WARNING!: HIGH VOLTAGE. THIS UNIT
Solutions. Alpha. Manual English
 Acoustic Solutions Alpha Manual English 1 Acoustic Solutions Alpha Operating Manual Contents: 1. Introduction 2. Safety Precautions 3. Controls and Connections 4. Operation Summary 5. Technical Data 6.
KLD Guitar AMP GT-40H(M) Tube Guitar Amplifier Manual. Kailing Electronic Co.,Ltd
 Tube Guitar Amplifier Manual. Kailing Electronic Co.,Ltd") KLD Guitar AMP GT-40H(M) Tube Guitar Amplifier Manual Kailing Electronic Co.,Ltd http://www.kldguitar.com Intended to alert the user to the presence of un-insulated dangerous voltage within the product
KLD Guitar AMP GT-40H(M) Tube Guitar Amplifier Manual Kailing Electronic Co.,Ltd http://www.kldguitar.com Intended to alert the user to the presence of un-insulated dangerous voltage within the product
DELUXE MEMORY MAN w/ TAP TEMPO TAP TEMPO ANALOG DELAY with FX LOOP, MODULATION and EXPRESSION PEDAL CONTROL
 DELUXE MEMORY MAN w/ TAP TEMPO TAP TEMPO ANALOG DELAY with FX LOOP, MODULATION and EXPRESSION PEDAL CONTROL Congratulations on your purchase of the Electro-Harmonix Deluxe Memory Man w/ Tap Tempo (DMMTT).
SATELLITE RADIO OWNER'S MANUAL. Type III Radio
 SATELLITE OWNER'S MANUAL Type III Radio Table of Contents Congratulations!... 3 Operational Statement... 3 FCC Statement... 4 Activating Your Subscription... 5 Type III Radio... 6 Overview of Controls...
16+ HS300. Instructions for use. One Key Start/One Key Landing Function Headless Mode / One Key Return Altitude Hold Mode
 16+ HS300 Instructions for use One Key Start/One Key Landing Function Headless Mode / One Key Return Altitude Hold Mode usa@holystone.com ca@holystone.com By scanning the QR code or searching Holy Stone
T L Audio CRIMSON SERIES. User Manual EQ-3012 PARAMETRIC EQUALISER. Tony Larking Professional Sales Limited, Letchworth, England.
 T L Audio CRIMSON SERIES User Manual EQ-3012 PARAMETRIC EQUALISER Tony Larking Professional Sales Limited, Letchworth, England. Tel: 01462 490600. International +44 1462 490600. Fax: 01462 490700. International
General Safety and Precautions 1. Read all of the information in the owner s manual and other included product information in the packaging before
 General Safety and Precautions 1. Read all of the information in the owner s manual and other included product information in the packaging before operating the product. 2. Prolonged exposure to alarm
Black Oak / Light Oak / Cherrywood Wireless Panel Speaker
 4015115/4015116/4015117 Black Oak / Light Oak / Cherrywood Wireless Panel Speaker With Infrared Remote Control USER GUIDE For use with: Introduction These 900 MHz stereo wireless speaker system uses the
Monique. The finest bass preamplifier in the world
 Monique The finest bass preamplifier in the world Monique gives you the tone and playing characteristics of the greatest all tube bass amps in a package that won't break your back. Whether it is through
OWNER S MANUAL. SimmonsDrums.net
 SimmonsDrums.net OWNER S MANUAL TABLE OF CONTENTS WELCOME AND CONGRATULATIONS!... 3 FRONT PANEL... 4 FEATURES...5 SPECIFICATIONS...6 SIGNAL FLOW DIAGRAM...6 WARRANTY...7 2 WELCOME AND CONGRATULATIONS!
Owner s Manual AC & BATTERY POWERED FET
 Owner s Manual AC DC AC & BATTERY POWERED FET Thank you, and congratulations on your choice of BOSS AC-3 Acoustic Simulator. Before using this unit, carefully read the sections entitled: USING THE UNIT
PJB ROADCASE OWNER S MANUAL
 PJB ROADCASE OWNER S MANUAL Thank you for purchasing the PJB ROADCASE. A great deal of dedication and passion went into designing and building this no- -compromise, high performance compact-combo amplifier.
A-16D A-Net Distributor
 A-16D A-Net Distributor For use with the Personal Monitor Mixing System Information in this document is subject to change. All rights reserved. Copyright 2003 Aviom, Inc. Printed in USA Document Rev. 1.03
INTRODUCTION IMPORTANT SAFTEY INSTRUCTIONS
 INTRODUCTION Congratulations on your purchase of the Beta Bass Pedal. The Beta Bass Pedal was designed to provide professional performance in a floor foot pedal. The Beta Bass Pedal includes a bass, treble
PJB BASS CUB OWNER S MANUAL
 PJB BASS CUB OWNER S MANUAL Thank you for purchasing the PJB BASS CUB. A great deal of dedication and passion went into designing and building this no compromise, high performance compact-combo amplifier.
BH250. User s manual
 BH250 User s manual Important Safety Instructions 1 Read these instructions. 2 Keep these instructions. 3 Heed all warnings. 4 Follow all instructions. 5 Do not use this apparatus near water. 6 Clean
The sunn Legacy... SUNN STAGE GEAR... Attitude, Power and Performance for Professionals
 The sunn Legacy... In early 1963, a band from Oregon called The Kingsmen hit the charts with a catchy little tune called Louie Louie. The Kingsmen quickly became household names and Louie Louie the rock
Redhead (Original 240 watt version)
") Redhead (Original 240 watt version) Please Note: The Redhead is no longer in production (it was upgraded in 1996). The text below is provided for the convenience of SWR users who purchased this model on
Redhead (Original 240 watt version) Please Note: The Redhead is no longer in production (it was upgraded in 1996). The text below is provided for the convenience of SWR users who purchased this model on
PA WATT PORTABLE PA SYSTEM PRODUCT MANUAL
 PA-5150 5 150-WATT PORTABLE PA SYSTEM PRODUCT MANUAL THANK YOU FOR CHOOSING POLSEN. The Polsen PA-5150 is an active PA system that s ideal for solo performers or vocalists. It can be used as a PA system
Operating Instruction Manual ELECTRONIC MUSIC AMPLIFICATION SYSTEM. Model KD-1. Toa Electric Co., Ltd. KOBE, JAPAN
 Operating Instruction Manual ELECTRONIC MUSIC AMPLIFICATION SYSTEM Model KD-1 Toa Electric Co., Ltd. KOBE, JAPAN Contents Precautions... 1 General Description... 2 Features... 2 Front Panel: Names of components
forte Owner s Manual
 forte Owner s Manual Table of Contents Important Safety Instructions... 3 Introduction... 4 Quick Start... 5 Front Panel Controls and Operation... 6 Rear Panel Controls and Operation... 8 Installation
5.8G Wireless Audio Transceiver/Receiver Module DWHP83
 5.8G Wireless Audio Transceiver/Receiver Module DWHP83 1. Module dimensions and layout 2. Antenna info Brand: EDIFIER Antenna type: PCB Max Peak gain: 5.36 dbi 3. Feature: DARR83 Wireless Audio Processor
4 Channel Frequency Conscious Noise Gate. Operation Manual
 4 Channel Frequency Conscious Noise Gate Operation Manual June 2005 This page has been left intentionally blank for your notes Page 2 CONTENTS 1.0 OVERVIEW 4 2.0 DESCRIPTION OF CONTROLS 5-7 2.1 Bypass
THANK YOU! Crush Micro PiX. Thank you for choosing Orange. You are now a member of the Legendary British Guitar Amplifier owners club!
 THANK YOU! Thank you for choosing Orange. You are now a member of the Legendary British Guitar Amplifier owners club! Since 1968 when the company was founded, Orange has been a pioneering force in the
Indoor Micro Shields Owner s Manual. Please read this entire guide before operating.
 Indoor Micro Shields Owner s Manual Please read this entire guide before operating. Important Precautions Invisible Fence Brand pet containment systems have contained over two million pets. However, there
LOUIS VUITTON 1. Louis Vuitton Echo, locate your Horizon luggage in airports Battery indicator light. Light sensor to detect opening
 L E A F L E T - Louis Vuitton Echo, locate your Horizon luggage in airports Battery indicator light Light sensor to detect opening ON/OFF switch Micro-USB port for charger 3. Open LV PASS. Go to Connected
Warning: Electrical Hazard... 3 Safety Instruction Sheet for STG Product Overview What s in the box?... 4
 STG-2412 User Guide Warning: Electrical Hazard... 3 Safety Instruction Sheet for STG-2412... 3 Product Overview... 4 What s in the box?... 4 Using STG-2412 for Mixing, Processing, and Recording... 5 Software
OFFICIAL WARWICK AMP OWNER MANUAL ENGLISH QUADRUPLET
 OFFICIAL WARWICK AMP OWNER MANUAL ENGLISH QUADRUPLET SAFETY HINTS - Read these instructions - Keep these instructions - Heed all warnings - Follow these instructions Caution: To reduce the risk of electrical