We at DigiTech are very proud of our products and back up each one we sell with the following warranty:
|
|
|
- Charles Hunter
- 6 years ago
- Views:
Transcription


1
2 Warranty We at DigiTech are very proud of our products and back up each one we sell with the following warranty: The warranty registration card must be mailed within ten days after purchase date to validate this warranty. DigiTech warrants this product, when used solely within the U.S., to be free from defects in materials and workmanship under normal use and service. DigiTech liability under this warranty is limited to repairing or replacing defective materials that show evidence of defect, provided the product is returned to DigiTech WITH RETURN AUTHORIZATION, where all parts and labor will be covered up to a period of one year. A Return Authorization number may be obtained from DigiTech by telephone. The company shall not be liable for any consequential damage as a result of the product s use in any circuit or assembly. 4. Proof-of-purchase is considered to be the burden of the consumer. 5. DigiTech reserves the right to make changes in design, or make additions to, or improvements upon this product without incurring any obligation to install the same on products previously manufactured. 6. The consumer forfeits the benefits of this warranty if the product s main assembly is opened and tampered with by anyone other than a certified DigiTech technician or, if the product is used with AC voltages outside of the range suggested by the manufacturer. 7. The foregoing is in lieu of all other warranties, expressed or implied, and DigiTech neither assumes nor authorizes any person to assume any obligation or liability in connection with the sale of this product. In no event shall DigiTech or its dealers be liable for special or consequential damages or from any delay in the performance of this warranty due to causes beyond their control. NOTE: The information contained in this manual is subject to change at any time without notification. Some information contained in this manual may also be inaccurate due to undocumented changes in the product or operating system since this version of the manual was completed. The information contained in this version of the owner s manual supersedes all previous versions.
3 IMPORTANT! PLEASE READ Only connect the Control 2 Remote Foot Controller to the GSP1101 or other DigiTech products which specify a connection to the Control Do not connect the Control 2 Remote Foot Controller to Ethernet connections as damage will occur. DECLARATION OF CONFORMITY Manufacturer s Name: Manufacturer s Address: DigiTech 8760 S. Sandy Pkwy. Sandy, UT 84070, USA Declares that the product: Product name: Control 2 Note: Product name may be suffixed by the letters-eu. Product option: None Conforms to the following Product Specifications: Safety: IEC (7th ed. 2001) EMC: EN ( A1) EN (1998) Supplementary Information: The product herewith complies with the requirements of the Low Voltage Directive 73/23/EEC and the EMC Directive 89/336/EEC as amended by Directive 93/68/EEC. Vice-President of Engineering-MI 8760 S. Sandy Parkway Sandy, Utah 84070, USA Date: November 20, 2007 European Contact: Your local Digitech Sales and Service Office or Harman Music Group 8760 S. Sandy Pkwy. Sandy, UT USA Ph: (801) Fax: (801)
4
5 Contents Introduction... 1 Checking your GSP1101 Software Version... 1 Top Panel... 2 Using the Control 2 Remote Foot Controller... 5 Modes Patch Mode Patch Mode...5 Switching Between 5 Patch and 10 Patch Modes... 5 Selecting Banks... 6 Selecting Presets... 7 Bypassing Presets... 7 Turning Effects On or Off... 7 Bounce Back... 8 Volume Update... 9 MIDI CC Send... 9 Expression Pedal Calibration Tuner Assigning Parameters to the Control Footswitch (#10) Assigning Parameters to the Expression Pedals... 12
6
7 Introduction Introduction Congratulations and thank you for purchasing the Control 2 Remote Foot Controller! The Control 2 will help you get the most out of your GSP, giving you hands-free access to all the tones and effects your GSP has to offer. Please take a moment to make sure you have everything that s included with your Control 2 Remote Foot Controller purchase: Control 2 Remote Foot Controller Controller Cable The Control 2 Remote Foot Controller is extremely easy to use, but we recommend reading this brief manual to familiarize yourself with the Control 2 s many features. Checking your GSP1101 Software Version If you re using the Control 2 with a GSP1101, the GSP1101 software must be version 0 or later. To check your GSP1101 software version, follow these steps: From the GSP preset screen, press the Edit/Select knob once to access the menu navigation system. Turn the Edit/Select knob until the Version option is highlighted. The software version number is shown next to the Version option. If the version number is 0 or greater, your GSP1101 is ready to use with your Control If the version number is less than 0 (2, for example), you must update your GSP110 Go to for instructions on how to update your GSP110 Control 2 Owner s Manual
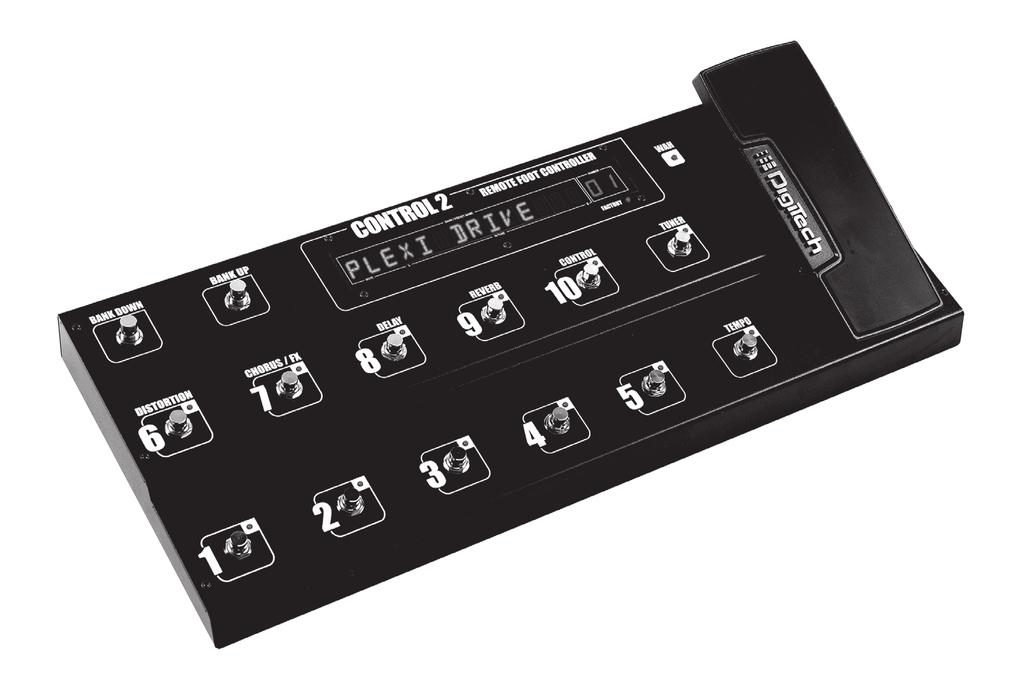
8 Top Panel Top Panel Bank Down / Bank Up Press either of these footswitches to scroll through banks (groups) of Factory and User presets. When either of these footswitches are pressed, the Display shows the presets contained in each bank, and the preset footswitches will flash (1-5 in 5 Patch mode and 1-10 in 10 Patch mode). Press a footswitch with a flashing LED to select a preset in the bank. If no preset is selected after 5 seconds (or if a footswitch with an unlit LED is pressed), you are returned to your current preset. Display Displays bank names, preset names, effect on/off status, tuner information, and expression pedal calibration information. Factory LED Lights when a Factory preset or bank is selected. Wah LED Lights when the Wah effect is activated. Expression Pedal The built-in Expression Pedal provides real time control over parameters in your presets. You can assign the Expression Pedal to almost any parameter, giving you the option to control how fast a Chorus or Rotary effect oscillates, how much gain your amp model has, how loud the delays are, and many more. See page 11 for more information about how to assign parameters to the Expression Pedal. Refer to your GSP owner s manual for a list of available presets. 7 2 Control 2 Owner s Manual
9 Top Panel The Expression Pedal can alternatively turn on and control the Wah effect by pressing down firmly on the toe switch (this disables control of other parameters assigned to the Expression Pedal). Press down firmly on the toe switch again to turn off the Wah effect and switch the pedal back to controlling the saved expression parameters. NOTE: Rock the Expression Pedal all the way forward and all the way back each time you power up the Control 6. Tuner The TUNER footswitch enables and disables the tuning function in the connected GSP. The TUNER footswitch LED lights when the Tuner is active. When the tuner is activated, the Display briefly reads TUNER. To begin tuning, play a note on your guitar (a harmonic at the 12th fret usually works best). The note being played appears in the Display, and arrows indicates whether the note is sharp or flat. An arrow pointing to the left ( ) indicates the note is sharp and should be tuned down. An arrow pointing to the right ( ) indicates the note is flat and should be tuned up. When your note is in tune, is displayed Tempo Press the TEMPO footswitch 2 or more times to set the time of the current preset s Delay effect. The TEMPO LED flashes to indicate the delay time. The Delay effect does not need to be active to set the delay time. Footswitches 1-5 These footswitches are used to select presets in the active bank. The LED adjacent to each footswitch lights to indicate which preset is selected. Footswitches 6-10 These footswitches are used for turning effects on and off (5 Patch Mode) or for selecting the second group of 5 presets in the active bank (10 Patch Mode). In 5 Patch Mode, Footswitches 6-10 act as effects on/off switches for the effect labeled above each footswitch. When an effect is turned on or off, the LED adjacent to its footswitch will light or darken to indicate the effect s on/off status. The number 10 footswitch is labeled CONTROL, and can be assigned a preset-specific parameter (min/max setting or effect on/off). See page 11 for more information about assigning parameters to the Control Footswitch. In 10 Patch Mode, each preset bank has ten presets to select from so each numbered footswitch 1-10 will select a preset. The LED adjacent to the footswitch will light to indicate which preset is selected. Only one of the ten numbered footswitches can be lit at a time in 10 Patch Mode. See page 5 for more information about 5 Patch Mode and 10 Patch Mode. Control 2 Owner s Manual
10 Rear Panel Rear Panel 1 2 Processor Jack Attach one end of the included Controller cable here. Connect the other end to your GSP unit s Foot Controller port. WARNING: Only connect the Control 2 Remote Foot Controller to the GSP1101 or other DigiTech products which specify a connection to the Control Do not connect the Control 2 Remote Foot Controller to Ethernet connections as damage will occur. Expression 2 Input Connect an optional expression pedal here using a 1/4 cable. A passive expression controller or volume pedal is recommended. Control 2 Owner s Manual
11 Using the Control 2 Remote Foot Controller Using the Control 2 Remote Foot Controller Modes The Control 2 operates in one of two modes: 5 Patch Mode or 10 Patch Mode. 5 Patch Mode In 5 Patch Mode, the footswitches numbered 1-5 each select a preset (also known as a patch ) in the selected bank. There are 20 banks to select from (you can change banks using the Bank Down/Bank Up footswitches). The lit footswitch (1-5) indicates the current preset selected in the bank; only one of the 1-5 footswitches can be lit at a given time. From the factory, 5 Patch Mode is the default mode. Also in 5 Patch Mode, Footswitches 6-9 each turn an effect on or off. You can also configure the CONTROL Footswitch to turn an effect on or off, or toggle a parameter between two values (for example, the Delay level can be switched from 20 to 40 and back). Refer to page 9 for instructions on how to configure The CONTROL Footswitch. 10 Patch Mode In 10 Patch Mode, Footswitches 1-10 each select a preset in the selected bank. There are 10 banks to select from. The lit footswitch indicates the current preset selected in the bank; only one of the 1-10 footswitches can be lit at any given time. Switching Between 5 Patch and 10 Patch Modes To change the mode, follow these steps: 4. From the GSP preset screen, press the Edit/Select knob once to enter the menu navigation system. Turn the Edit/Select knob until the Foot Controller menu is highlighted and press the knob again. In the Foot Controller menu, make sure Switch Mode is highlighted and press the Edit/Select knob to select 5 Patch or 10 Patch mode. Press the Back button to save this setting. Control 2 Owner s Manual
12 Using the Control 2 Remote Foot Controller Selecting Banks The Control 2 assigns groups of presets (called banks) to the numbered footswitches. Each bank is a group of 5 presets (5 Patch Mode) or 10 presets (10 Patch Mode) depending on the foot controller mode selected by the GSP. Hence, there are 20 banks in 5 Patch Mode and 10 banks is 10 Patch Mode. To select a new bank and a new preset, follow these steps: Press either the Bank Down or Bank Up footswitch. The name of the newly cued bank appears in the Display and the available preset footswitches flash (1-5 in 5 Patch Mode and 1-10 in 10 Patch Mode). Bank Down & Bank Up To make the bank shown in the Display active you must load a new preset by pressing one of the flashing preset footswitches. If no footswitch is pressed within 5 seconds, the Control 2 will abort the bank change and return to the preset prior to the bank footswitch being pressed. Banks are also changed when selecting presets using the Edit/Select knob on the GSP. For example, if any of presets 1-5 are selected on the GSP in 5 Patch Mode, the bank titled Presets 1-5 will be the active bank on the Control 2 and numbered Footswitches 1-5 would select presets 1-5. If preset 6 is then selected using the Edit/Select knob on the GSP, Presets 6-10 will now become the active bank and numbered Footswitches 1-5 would then select presets Note that banks titled Presets (5 Patch Mode) and Presets (10 Patch Mode) contain only 4 and 9 presets respectively. When one of these banks is selected, Footswitch 5 (5 patch mode) and the CONTROL Footswitch (10 patch mode) have no function. Control 2 Owner s Manual
13 Using the Control 2 Remote Foot Controller Selecting Presets To select a preset in 5 Patch or 10 Patch Mode, follow these steps: Press one of the footswitches numbered 1-5 (footswitches numbered 1-10 in 10 Patch Mode). The associated footswitch LED will light and the preset name and number will appear in the Display. To select another preset, press another of the footswitches numbered 1-5 (footswitches numbered 1-10 in 10 Patch Mode). The previous footswitch LED will turn off and the newly pressed footswitch s LED will now light. In 5 Patch Mode, as different presets are selected, different effect footswitch LEDs (Footswitches 6-10) will turn on and off based on the status of these effects in the active preset. Bypassing Presets To bypass an active preset, press the active preset footswitch. The Display will read BYPASS when the preset is bypassed and the preset footswitch you bypassed from will remain lit (in 5 Patch Mode, the effects footswitches that were on before bypassing will also remain lit). To return to the same preset from bypass, press the lit preset footswitch again and the last preset loaded will become active again. You can also change to another preset from bypass by pressing any non-lit preset footswitch. In 5 Patch Mode, you can also turn any of the effects (DISTORTION, CHORUS/FX, DELAY, REVERB) on or off when exiting bypass by pressing one of these footswitches instead of a preset footswitch. This will load the last active preset and turn the respective effect on or off as it is loaded. NOTE: Bypassing presets with the footswitches is not available if the Bounce Back feature is enabled. Refer to the Bounce Back section on page 8 for more information about the Bounce Back feature. Turning Effects On or Off In 5 Patch Mode, Footswitches 6-9 are programmed to turn on or off the following effects in the active preset: Footswitch 6 controls the Distortion on/off. Footswitch 7 controls the Chorus/FX on/off. Footswitch 8 controls the Delay on/off. Footswitch 9 controls the Reverb on/off. Footswitch 10 can also be programmed to turn on and off effects as well. See page 11 for more information about assigning effect on/off and parameters to the CONTROL footswitch). Control 2 Owner s Manual
14 Using the Control 2 Remote Foot Controller When you load a preset, some effects may already be on. Those effects will have a lit LED next to their footswitch(es). To turn effects on or off using Footswitches 6-10, follow these steps: Make sure the Control 2 is in 5 Patch Mode (see page 5 for instructions on how to switch modes). Press one of the footswitches numbered The footswitch s LED turns on to indicate the effect is active, or turns off to indicate the effect is bypassed. Bounce Back Bounce Back allows switching between two presets using a single footswitch in both 5 Patch and 10 Patch modes. To enable the Bounce Back feature, follow these steps: 4. From the preset screen, press the Edit/Select knob once to enter the menu navigation system. Turn the Edit/Select knob until the Foot Controller menu is selected and press the knob again. In the Foot Controller menu, select Bounce Back and press the Edit/ Select knob to turn this feature on or off. Press the Back button to save this setting. Bounce Back only works within each active bank of presets, meaning you cannot select preset 1 in the Presets 1-5 bank, change banks, select preset 51 in the Presets bank and then bounce back to preset NOTE: When Bounce Back is enabled, bypassing presets from the Control 2 is no longer available. To use the Bounce Back feature, follow these steps: 4. Select a preset using an available preset footswitch (for our example, we ll use Footswitch 1 Preset 1). Select another preset (for our example, Footswitch 4 Preset 4). Press Footswitch 4 again. Preset 1 is loaded. Subsequent presses of numbered Footswitch 4 will alternately load Preset 4 and Preset Pressing any other preset footswitch will abandon the bounce back between these two presets. Control 2 Owner s Manual
15 Using the Control 2 Remote Foot Controller Volume Update Volume Update lets you maintain relative volume levels between presets when using the Control 2 s expression pedal as a volume controller. Using this feature requires that presets have the Control 2 s built-in expression pedal, an external expression pedal connected to the GSP or Control 2, or a MIDI expression pedal linked to the Volume Pre or Volume Post parameters in the GSP s presets. With Volume Update set to ON, the pedal s position is maintained after changing presets thus keeping the relative volume the same even when the volume is backed off. When Volume Update is set to OFF, presets are set to the volume level stored with the preset when they are selected. To enable or disable the Volume Update option, follow these steps: 4. From the preset screen, press the Edit/Select knob once to enter the menu navigation system. Turn the Edit/Select knob until the Foot Controller menu is highlighted and press the knob again. In the Foot Controller menu, highlight Volume Update and press the Edit/Select knob to turn this option on or off. The default setting is on. Press the Back button to save this setting. MIDI CC Send In addition to controlling GSP processor parameters, you can configure the Control 2 s Expression Pedal and the CONTROL Footswitch to send MIDI CC (continuous controller) messages on the GSP s MIDI channel to MIDI devices connected to your GSP s MIDI Thru port. The Expression Pedal can act as a continuous control device, and the CONTROL Footswitch can act as a parameter toggle switch. To enable the MIDI CC send options for the Control 2 Expression Pedal and the CONTROL Footswitch, follow these steps: From the preset screen, press the Edit/Select knob once to enter the menu navigation system. Turn the Edit/Select knob until the Foot Controller menu is highlighted and press the knob again. In the Foot Controller menu, highlight MIDI CC Send and press the Edit/Select knob. The MIDI CC Send menu appears. To enable CC send and assign a MIDI CC that the Control 2 s Expression Pedal will transmit, highlight FC PDL and press the Edit/ Select knob. Turn the Edit/Select knob to select the desired MIDI CC and press the Control 2 Owner s Manual
16 Using the Control 2 Remote Foot Controller knob to select it. To enable CC send and assign a MIDI CC that the CONTROL Footswitch will transmit, highlight FC FSW and press the Edit/Select knob. Turn the Edit/Select knob to select a MIDI CC and press the knob to select it. Expression Pedal Calibration In order to smoothly control parameters using the Control 2 s expression pedal, the pedal needs to be calibrated the first time it is connected to the GSP. This is done using the FC Pedal Calibrate menu in the GSP. To calibrate the Control 2 s Expression Pedal, follow these steps: 4. From the preset screen, press the Edit/Select knob once to enter the menu navigation system. Turn the Edit/Select knob until the Foot Controller menu is highlighted and press the knob again. In the Foot Controller menu, highlight Pedal Calibrate and press the Edit/Select knob to start the calibration procedure. Once started, the Control 2 s Display will show TOE DOWN. Rock the expression pedal full forward and press the flashing TUNER footswitch. Calibration is now complete. NOTE: You need to rock the Expression Pedal all the way forward and all the way back each time you power up the Control 2 to re-establish its Min and Max positions. 10 Control 2 Owner s Manual
17 Using the Control 2 Remote Foot Controller Tuner The Control 2 provides access to the host GSP s tuner and provides tuner feedback via the Control 2 s Display. To tune your guitar, follow these steps: Press the TUNER footswitch. The Control 2 s Display will briefly show TUNER and the Tuner footswitch LED will now be lit. The guitar signal is normally muted when the tuner is accessed. You can rock the Expression Pedal forward to hear the note while it is being tuned. Begin playing a note on the guitar. The leftmost characters of the Display will show the note being played. The rest of the Display will show arrows indicating the relative tuning. An arrow pointing to the left ( ) indicates the note is sharp and should be tuned down. An arrow pointing to the right ( ) indicates the note is flat and should be tuned up. When your note is in tune, is displayed. Press any footswitch (or the Back button or the Edit/Select knob on the GSP) to return to the preset. Assigning Parameters to the Control Footswitch (#10) You can set up the CONTROL footswitch to control a parameter of your choice, including each effect s On/Off parameter. To assign a parameter to the CONTROL footswitch, follow these steps: 4. From the Preset screen on the GSP, press the Edit/Select knob twice. Turn the Edit/Select knob to highlight Expression Links and press the Edit/Select knob. The Edit Expression Links menu appears. Scroll down and highlight an expression link that is not in use (NO CTRL NO LINK). Press the Edit/Select knob to select the expression link. The Linking menu appears. Make sure Assign Controller is highlighted and press the Edit/Select knob. Control 2 Owner s Manual 11
18 Using the Control 2 Remote Foot Controller Turn the Edit/Select knob until <FC FSW> appears. Press the Edit/Select knob. The Linking menu appears. Scroll down and highlight LINKED TO NO LINK. Press the Edit/Select knob. Turn the Edit/Select knob to select a parameter to assign to the Control footswitch and press the Edit/Select knob. Pressing the CONTROL footswitch now toggles between the selected parameter s Min and Max values. The Min and Max values are automatically updated with the selected parameter s defaults. You can also edit the Min and Max values to customize the parameter range for your needs using the Edit/ Select knob. Changes must be stored using the GSP s Store procedure. Consult your GSP documentation for more information about storing changes to presets. Assigning Parameters to the Expression Pedals The Control 2 features two expression pedal controller options: the builtin Expression Pedal and an optional expression controller which can be connected to the rear panel of the Control Assigning parameters to either expression controller involves the same process. To assign a parameter to either expression pedal controller, follow these steps: From the Preset screen on the GSP, press the Edit/Select knob twice. Turn the Edit/Select knob to highlight Expression Links and press the Edit/Select knob. The Edit Expression Links menu appears. Scroll down and highlight an expression link that is not in use (NO CTRL NO LINK). Press the Edit/Select knob to select the expression link. The Linking menu appears. Make sure Assign Controller is highlighted and press the Edit/Select knob. To assign a parameter to be controlled by the Control 2 s built-in Expression Pedal, turn the Edit/Select knob until <FC PDL1> appears. To assign a parameter to be controlled by the Control 2 s optional rear panel expression pedal, turn the Edit/Select knob until <FC PDL2> appears. Press the Edit/Select knob. The Linking menu appears. Scroll down and highlight LINKED TO NO LINK. Press the Edit/Select knob. Turn the Edit/Select knob to select a parameter to assign to the Expression Pedal and press the Edit/Select knob. 12 Control 2 Owner s Manual
19 Using the Control 2 Remote Foot Controller The Min and Max values are automatically updated with the selected parameter s defaults. You can also edit the Min and Max values to customize the parameter range for your needs using the Edit/Select knob. Changes must be stored using the GSP s Store procedure. Consult your GSP documentation for more information about storing changes to presets. Control 2 Owner s Manual 13
20 DigiTech 8760 South Sandy Parkway Sandy, Utah PH (801) FAX (801) Printed 12/2007 Control 2 Remote Foot Controller Owner s Manual A 2007 Harman International Industries, Incorporated. All Rights Reserved.
Warning DECLARATION OF CONFORMITY. For your protection, please read the following:
 DECLARATION OF CONFORMITY Manufacturer s Name: DigiTech Manufacturer s Address: 8760 S. Sandy Parkway Sandy, Utah 84070, USA declares that the product: Product name: Bass Multi Chorus Product option: all
Grunge. Distortion. Owner s Manual
 Grunge Distortion Owner s Manual DECLARATION OF CONFORMITY Manufacturer s Name: DigiTech Manufacturer s Address: 8760 S. Sandy Parkway Sandy, Utah 84070, USA declares that the product: Product name: DigiTech
Warning. Service Office or Harman Music Group 8760 South Sandy Parkway Sandy, Utah USA Ph: (801) Fax: (801)
 Fax: (801)") DECLARATION OF CONFORMITY Manufacturer s Name: DigiTech Manufacturer s Address: 8760 S. Sandy Parkway Sandy, Utah 84070, USA declares that the product: Product name: Tone Driver Product option: all (requires
DECLARATION OF CONFORMITY Manufacturer s Name: DigiTech Manufacturer s Address: 8760 S. Sandy Parkway Sandy, Utah 84070, USA declares that the product: Product name: Tone Driver Product option: all (requires
Warning DECLARATION OF CONFORMITY. For your protection, please read the following:
 DECLARATION OF CONFORMITY Manufacturer s Name: DigiTech Manufacturer s Address: 8760 S. Sandy Parkway Sandy, Utah 84070, USA declares that the product: Product name: Synth Wah Product option: all (requires
Warning DECLARATION OF CONFORMITY. For your protection, please read the following:
 DECLARATION OF CONFORMITY Manufacturer s Name: DigiTech Manufacturer s Address: 8760 S. Sandy Parkway Sandy, Utah 84070, USA declares that the product: Product name: Bass Squeeze Product option: all (requires
ELECTROMAGNETIC COMPATIBILITY
 Owner s Manual ELECTROMAGNETIC COMPATIBILITY These symbols are internationally accepted symbols that warn of potential hazards with electrical products. The lightning flash means that there are dangerous
Warning For your protection, please read the following:
 DECLARATION OF CONFORMITY Manufacturer s Name: Manufacturer s Address: declares that the product: Product name: Product option: DigiTech 8760 S. Sandy Parkway Sandy, Utah 84070, USA HardWire CM-2 All (requires
WARRANTY We at DigiTech are very proud of our products and back-up each one we sell with the following warranty:
 Owner s Manual WARRANTY We at DigiTech are very proud of our products and back-up each one we sell with the following warranty: 1. Please register online at digitech.com within ten days of purchase to
ELECTROMAGNETIC COMPATIBILITY
 Owner s Manual Manufacturer s Name: Manufacturer s Address: declares that the product: Product name: Product option: DECLARATION OF CONFORMITY DigiTech 8760 S. Sandy Parkway Sandy, Utah 84070, U.S.A. conforms
ELECTROMAGNETIC COMPATIBILITY
 Owner s Manual ELECTROMAGNETIC COMPATIBILITY This device complies with part 15 of the FCC Rules and the Product Specifications noted on the Declaration of Conformity. Operation is subject to the following
Warning For your protection, please read the following: Important Safety Instructions
 Owner s Manual Manufacturer s Name: Manufacturer s Address: DECLARATION OF CONFORMITY declares that the product: DigiTech 8760 S. Sandy Parkway Sandy, Utah 84070, U.S.A. Product name: CF 7 Product option:
WARRANTY We at DigiTech are very proud of our products and back-up each one we sell with the following warranty:
 Owner s Manual WARRANTY We at DigiTech are very proud of our products and back-up each one we sell with the following warranty: 1. Please register online at digitech.com within ten days of purchase to
DECLARATION OF CONFORMITY
 DECLARATION OF CONFORMITY Manufacturer s Name: Harman Music Group Manufacturer s Address: 8760 S. Sandy Parkway Sandy, Utah 84070, USA declares that the product: Product name: CR-7 Product option: All
WARRANTY We at DigiTech are very proud of our products and back-up each one we sell with the following warranty:
 Owner s Manual WARRANTY We at DigiTech are very proud of our products and back-up each one we sell with the following warranty: 1. Please register online at digitech.com within ten days of purchase to
DECLARATION OF CONFORMITY
 Manufacturer s Name: Manufacturer s Address: DECLARATION OF CONFORMITY Harman Signal Processing 8760 S. Sandy Parkway Sandy, Utah 84070, USA declares that the product: Product name: HT-6 Product option:
WARRANTY We at DigiTech are very proud of our products and back-up each one we sell with the following warranty:
 OWNER S MANUAL WARRANTY We at DigiTech are very proud of our products and back-up each one we sell with the following warranty: 1. Please register online at digitech.com within ten days of purchase to
VB-99 V-Bass System. Using the Built-in Tuner. Workshop ÂØÒňΠVB99WS04
 ÂØÒňΠWorkshop VB-99 V-Bass System Using the Built-in Tuner 2009 Roland Corporation U.S. All rights reserved. No part of this publication may be reproduced in any form without the written permission of
NO RETURNED PRODUCTS WILL BE ACCEPTED AT THE FACTORY WITHOUT A RETURN AUTHORIZATION NUMBER.
 OWNER S MANUAL WARRANTY We at DigiTech are very proud of our products and back-up each one we sell with the following warranty: 1. Please register online at digitech.com within ten days of purchase to
IMPORTANT SAFETY INSTRUCTIONS
 Owner s Manual IMPORTANT SAFETY INSTRUCTIONS WARNING FOR YOUR PROTECTION READ THE FOLLOWING: KEEP THESE INSTRUCTIONS HEED ALL WARNINGS The symbols shown above are internationally accepted symbols that
HARMONY & EFFECTS PROCESSOR. Owner s Manual
 Vocalist Live Pro HARMONY & EFFECTS PROCESSOR Owner s Manual IMPORTANT SAFETY INSTRUCTIONS WARNING FOR YOUR PROTECTION PLEASE READ THE FOLLOWING: KEEP THESE INSTRUCTIONS HEED ALL WARNINGS FOLLOW ALL INSTRUCTIONS
Congratulations on purchasing Molten MIDI 5 by Molten Voltage
 OWNER S MANUAL Congratulations on purchasing Molten MIDI 5 by Molten Voltage Molten MIDI 5 is designed to control the Digitech Whammy 5. When configured for Whammy & Clock output, Molten MIDI 5 also sends
RP360 RP360 XP. Owner s Manual
 RP360 RP360 XP GUITAR MULTI-EFFECTS PROCESSORS Owner s Manual COMPLIANCE & SAFETY INSTRUCTIONS WARNING FOR YOUR PROTECTION READ THE FOLLOWING: The symbols shown above are internationally accepted symbols
GCX. Guitar Audio Switcher OWNER S MANUAL
 GCX Guitar Audio Switcher OWNER S MANUAL Please visit our web site at: www.voodoolab.com Copyright 1998 by Digital Music Corporation. This publication is protected by copyright and all rights are reserved.
TONE TATTOO ANALOG MULTI-EFFECT PEDAL featuring METAL MUFF, NEO CLONE & MEMORY TOY
 TONE TATTOO ANALOG MULTI-EFFECT PEDAL featuring METAL MUFF, NEO CLONE & MEMORY TOY Congratulations on your purchase of the fully analog Electro-Harmonix TONE TATTOO, the first true multi-effect from Electro-Harmonix!
WARRANTY We at DigiTech are very proud of our products and back-up each one we sell with the following warranty:
 OWNER S MANUAL WARRANTY We at DigiTech are very proud of our products and back-up each one we sell with the following warranty: 1. Please register online at digitech.com within ten days of purchase to
Features, Benefits, and Operation
 Features, Benefits, and Operation 2013 Decibel Eleven Features, Benefits, and Operation Contents Introduction... 2 Features... 2 Top Panel Controls... 3 Operation Basics... 4 Connections... 5 Rear Panel
AMPLIFi FX100 PILOT S GUIDE MANUEL DE PILOTAGE PILOTENHANDBUCH PILOTENHANDBOEK MANUAL DEL PILOTO 取扱説明書
 AMPLIFi FX100 PILOT S GUIDE MANUEL DE PILOTAGE PILOTENHANDBUCH PILOTENHANDBOEK MANUAL DEL PILOTO 取扱説明書 40-00-0357-D Firmware v2.50.2 Pilot s Guide also available at line6.com/support/manuals 2016 Line
IMPORTANT SAFETY INSTRUCTIONS
 Version 2.0 Table of contents IMPORTANT SAFETY INSTRUCTIONS 2 EMC/EMI & CERTIFICATE OF CONFORMITY 2 PACKAGE CONTENT 3 STRUCTURE 4 SIGNAL S PATH DIAGRAM 5 BANKS, PRESETS AND MODIFIERS 6 PRESET SELECTION
OC 10 Crocodile Tail Loop Setup Utilising Tuner Out And One Loop
 KEY All Red Lines Are Cables Taking Signal Into OC10 SETUP 1 All Green Lines Are Cables Taking Signal Out Of OC10 OC 10 Crocodile Tail Loop Setup Utilising Tuner Out And One Loop The above setup is using
Warning. Electromagnetic Compatibility. For your protection, please read the following:
 Warning For your protection, please read the following: These symbols are internationally accepted symbols that warn of potential hazards with electrical products.the lightning flash means that there are
MFJ ENTERPRISES, INC.
 Radio Interface Model MFJ-5124K/Y INSTRUCTION MANUAL CAUTION: Read All Instructions Before Operating Equipment! MFJ ENTERPRISES, INC. 300 Industrial Park Road Starkville, MS 39759 USA Tel: 662-323-5869
SANPERA I. Player`s Handbook
 SANPERA I SANPERA I Player`s Handbook TM SANPERA I Welcome Thank you for purchasing the SanperaTM I foot controller for your VYPYR amplifier. We are certain you will enjoy having the control of your VYPYR
30.march.2015 MULTIAMP MULTIAMP MIDI PEDALBOARD MIDI PEDALBOARD
 30.march.2015 MULTIAMP MIDI PEDALBOARD MULTIAMP MIDI PEDALBOARD MARK VISION A Word from Marco De Virgiliis Thank you for choosing DV Mark! We are thrilled to have you join us for an exciting new chapter
Version 2.2. Table of contents
 Version 2.2 Table of contents Structure 4 Power supply 8 Way of connecting 8 Setting INPUT GAIN and EFFECT LEVEL regulators 10 Tone parameters setting 10 Effect switching off 12 CTRL OUT output 12 MIDI
Owner s Manual. Professional Audio Equipment
 Owner s Manual Professional Audio Equipment IMPORTANT SAFETY INFORMATION WARNING FOR YOUR PROTECTION READ THE FOLLOWING: The symbols shown above are internationally accepted symbols that warn of potential
K-Switch User Manual v1.1
 K-Switch User Manual v1.1 Features and Functionality Overview 8 Switches: 4 Virtual Footswitches for controlling amplifier functions 4 Effect Loops for inserting effect units into a signal chain. Virtual
Version 2.0. Table of contents
 Version 2.0 Table of contents Structure 4 Power supply 8 Way of connecting 8 Setting INPUT GAIN and EFFECT LEVEL regulators 10 Tone parameters setting 10 Effect switching off 12 CTRL OUT output 12 MIDI
Your Rocktron VersaTune has been designed to comply with the following Standards and Directives as set forth by the European Union:
 Your Rocktron VersaTune has been designed to comply with the following Standards and Directives as set forth by the European Union: Council Directive(s): 89/336/EEC, 73/23/EEC, 76/769/EC, 1994/62/EC, 2000/
DIMENSION REVERB USER S GUIDE
 DIMENSION REVERB USER S GUIDE SA225 WELCOME Thank you for purchasing the Soundblox 2 Dimension Reverb. The Dimension Reverb features a broad set of painstakingly crafted professional quality reverb effects
MG15CFX MG30CFX. From Jim Marshall
 S MG15C CLEAN / CRUNCH OD-1 / OD-2 TAP (MANUAL) TUNER STORE MG15C GAIN BASS MIDDLE TREBLE REVERB VOLUME MASTER PH HASER INPUT STUDIO CHO CH DELAY POWER FOOTCONTROLLER MG30C CLEAN / CRUNCH OD-1 / OD-2 1
301 & 601 Mic/Line Mixers Operation Manual
 301 & 601 Mic/Line Mixers Operation Manual Biamp Systems 9300 S.W. Gemini Drive Beaverton, OR 97008 USA +1.503.641.7287 www.biamp.com 301 & 601 TABLE OF CONTENTS Introduction Front Panel Rear Panel Remote
USER MANUAL. tremolo & reverb
 USER MANUAL tremolo & reverb Flint - tremolo & reverb User Manual Front Panel : Controls the intensity or Depth of the tremolo effect. This is accomplished by varying the amplitude of the LFO that controls
MFJ ENTERPRISES, INC.
 Radio Interface Model MFJ-5124K/Y INSTRUCTION MANUAL CAUTION: Read All Instructions Before Operating Equipment! MFJ ENTERPRISES, INC. 300 Industrial Park Road Starkville, MS 39759 USA Tel: 662-323-5869
GM Arts Firmware v4.0. for BJ Devices MIDI Foot Controllers USER GUIDE
 GM Arts Firmware v4.0 for BJ Devices MIDI Foot Controllers USER GUIDE 2nd Release for version 4.03 Table of Contents Introduction... 4 GM Arts Firmware... 4 MIDI Messages... 4 What's Included... 4 Features...
Table of Content.
 Table of Content Table of Content...1 BECOS TS8-MS Analog Overdrive with External Relay Switching and MIDI Functions...2 Feedback...2 TS8-MS MIDI Features...3 Receiving Program Change MIDI messages...3
USER MANUAL BLUE NEBULA TAPE ECHO AND GUITAR FX PEDAL. Blue Nebula User Guide, Firmware Revision 4 Page 1
 USER MANUAL BLUE NEBULA TAPE ECHO AND GUITAR FX PEDAL Blue Nebula User Guide, Firmware Revision 4 Page 1 USB MIDI IN NAVIGATION BUTTONS OK = SELECT/MANUAL 12V DC JACK PARAMETER ADJUST: P1, P2, P3 PREAMP
INSTRUCTION MANUAL. MODEL: Vintage 60R. Vintage Series Guitar Amplifi er
 INSTRUCTION MANUAL MODEL: Vintage 60R Vintage Series Guitar Amplifi er 2 INTRODUCTION Thank you for choosing this Johnson amplifier. Please read this manual carefully and completely before operating your
GUITAR GUITAR PROCESSORS EFFECTS PRODUCT LINE PREAMPS EXPRESSION PEDALS MIDI CONTROLLERS BASS PROCESSORS
 GUITAR EFFECTS PRODUCT LINE 1998-99 PREAMPS GUITAR PROCESSORS EXPRESSION PEDALS BASS PROCESSORS MIDI CONTROLLERS THE TRADITION CONTINUES... TWO 2 Take a minute and ask yourself When was the last time I
MULTIWAVE BASS DISTORTION USER S GUIDE
 MULTIWAVE BASS DISTORTION USER S GUIDE SA221 WELCOME Thank you for purchasing the Soundblox 2 Multiwave Bass Distortion. The Soundblox 2 Multiwave is the newest incarnation of our original highly-acclaimed
Table of Contents. MiniSwitch - User Manual
 USER MANUAL Table of Contents Connect to Your Strymon Pedal BigSky Brigadier Deco DIG El Capistan Flint Lex Mobius Riverside TimeLine Specifications & Warranty 3 5 6 7 8 9 0 3 4 5 pg Connect to Your Strymon
DELUXE MEMORY MAN w/ TAP TEMPO TAP TEMPO ANALOG DELAY with FX LOOP, MODULATION and EXPRESSION PEDAL CONTROL
 DELUXE MEMORY MAN w/ TAP TEMPO TAP TEMPO ANALOG DELAY with FX LOOP, MODULATION and EXPRESSION PEDAL CONTROL Congratulations on your purchase of the Electro-Harmonix Deluxe Memory Man w/ Tap Tempo (DMMTT).
Overview. Thank you for purchasing the Suhr Eclipse Dual Overdrive/Distortion Pedal.
 User Guide Table of Contents Overview 3 Getting Connected 4 Channel Selection / Bypass 5 Controls 6 Battery Monitor 7 FX Link (External Control) 8 Sample Settings 9 Technical Specifications 10 Warranty
RIOT DISTORTION USER GUIDE
 RIOT DISTORTION USER GUIDE Thank you for purchasing the Suhr Riot Distortion Pedal. Please take the time to read this manual to get the most out of the Riot. The more you familiarize yourself with the
EvenMidi USER MANUAL ENGLISH 1.2 M I D I CO N TROLLER.
 EvenMidi www.evenmidi.com H9 M I D I CO N TROLLER 1.2 USER MANUAL ENGLISH CAUTION RISK OF ELECTRIC SHOCK DO NOT OPEN WARNING TO REDUCE THE RISK OF FIRE OR ELECTRIC SHOCK DO NOT EXPOSE THIS EQUIPMENT TO
Warranty We at DigiTech are very proud of our products and back up each one we sell with the following warranty:
 OWNER S MANUAL Warranty We at DigiTech are very proud of our products and back up each one we sell with the following warranty: 1. Please register online at digitech.com within ten days of purchase to
60s - Spring Tank 70s - Electronic Plate (solid state) 80s - Studio Rack Hall. 61 harm 63 tube 65 photo. 60s 70s 80s DECAY TREMOLO BYPASS REVERB
 80s - Studio Rack Hall. 61 harm 63 tube 65 photo. 60s 70s 80s DECAY TREMOLO BYPASS REVERB") Front Panel SWITCH: Switches between 3 tremolo modes. 61 Harm - Harmonic band filtering Tube - Power Tube Bias 65 Photo - Photocell SWITCH: Switches between 3 different types of reverb. - Spring Tank -
Front Panel SWITCH: Switches between 3 tremolo modes. 61 Harm - Harmonic band filtering Tube - Power Tube Bias 65 Photo - Photocell SWITCH: Switches between 3 different types of reverb. - Spring Tank -
KXB800 BASS AMPLIFIER
 KXB800 BASS AMPLIFIER OWNER S MANUAL Congratulations on the purchase of your Kustom KXB800. This Bass Amp combines quality performance and convenient features in a sturdy, rack-mountable design. You ll
Master Time, Space, and Dimension Owner s Manual
 Master Time, Space, and Dimension Owner s Manual IMPORTANT SAFETY INFORMATION WARNING FOR YOUR PROTECTION READ THE FOLLOWING: KEEP THESE INSTRUCTIONS HEED ALL WARNINGS FOLLOW ALL INSTRUCTIONS The symbols
INTRODUCTION WARNING! IMPORTANT SAFETY INSTRUCTIONS. Congratulations on your purchase of this MG Gold amplifier from Marshall Amplification.
 OWNER S MANUAL INTRODUCTION WARNING! IMPORTANT SAFETY INSTRUCTIONS Congratulations on your purchase of this MG Gold amplifier from Marshall Amplification. The MG provides modern Marshall tones for the
TAP FAVORITE - User Manual USER MANUAL. pg 1
 USER MANUAL TAP FAVORITE pg 1 Select FAVORITE MODE or TAP TEMPO MODE TAP FAVORITE can used as a preset select switch (FAVORITE MODE) or an external tap tempo switch (TAP TEMPO MODE). Tap Favorite ships
Version 1.2 USER MANUAL
 Version 1.2 USER MANUAL Read Before Using This manual covers the feature set for Sunset pedals running version 1.2 firmware. To check if your Sunset is running version 1.2 firmware, follow the instructions
FIREHAWK 1500 PILOT S GUIDE MANUEL DE PILOTAGE PILOTENHANDBUCH MANUAL DEL PILOTO 取扱説明書试用指南
 FIREHAWK 1500 PILOT S GUIDE MANUEL DE PILOTAGE PILOTENHANDBUCH MANUAL DEL PILOTO 取扱説明書试用指南 40-00-0373 Rev C Pilot s Guide also available at www.line6.com/manuals 2015 Line 6, Inc. 2 Please Note: Line 6,
Version 1.2 USER MANUAL
 Version 1.2 USER MANUAL Read Before Using This manual covers the feature set for Sunset pedals running version 1.2 firmware. To check if your Sunset is running version 1.2 firmware, follow the instructions
ÂØÒňΠGuitar synthesizer July 10, 1995
 GR-1 ÂØÒňΠGuitar synthesizer July 10, 1995 Supplemental Notes MIDI Sequencing with the GR-1 This is an application guide for use with the GR-1 and an external MIDI sequencer. This guide will cover MIDI
DSL100HR & DSL40CR OWNER S MANUAL
 DSL100HR & DSL40CR OWNER S MANUAL INTRODUCTION Congratulations on your purchase of this Dual Super Lead (DSL) amplifier from Marshall Amplification. The DSL provides the legendary Marshall tone, allowing
LBI-38976A. Mobile Communications MDX/ORION DESK TOP STATION. Operator's Manual
 LBI-38976A Mobile Communications MDX/ORION DESK TOP STATION Operator's Manual TABLE OF CONTENTS Page INTRODUCTION... 3 OPERATION OF THE STANDARD STATION WITHOUT OPTIONS... 5 STATION WITH REMOTE OPTION...
Spider IV 15. Pilot s Handbook Manuel de pilotage Pilotenhandbuch Pilotenhandboek Manual del Piloto 取扱説明書
 Spider IV 15 Pilot s Handbook Manuel de pilotage Pilotenhandbuch Pilotenhandboek Manual del Piloto 取扱説明書 Get free lessons and tones! Join Spider Online! www.line6.com/spideronline 40-00-0187 Pilot s Handbook
Modeling Guitar Processor. Owner s Manual
 Modeling Guitar Processor Owner s Manual WARNING FOR YOUR PROTECTION PLEASE READ THE FOLLOWING: KEEP THESE INSTRUCTIONS HEED ALL WARNINGS FOLLOW ALL INSTRUCTIONS the apparatus shall not be exposed to dripping
Alternate Button Functions
 Model ST-122 Owner's Manual Front Panel The front panel of the ST122 is shown below. The buttons have dual functions, selected the by Alt key in the lower right. The upper diagram shows the primary functions,
THE NEW FEATURE ON THIS PEDAL IS THE FINE TUNE ADJUSTMENT, THAT ALLOWS YOU TO ADJUST YOUR RANGE SWEEP TO YOUR DESIRED EXPRESSION RANGE.
 O W N E R S M A N UA L CONGRATULATIONS ON CHOOSING THE DIME CRYBABY WAH PEDAL. LIKE ALL DUNLOP PRODUCTS, THIS UNIQUE EFFECT IS DESIGNED TO GIVE YOU QUALITY SOUND THROUGH YEARS OF DEPENDABLE SERVICE. THE
The component shall reproduce the original musical sound, purely and naturally.
 a100 linear USER GUIDE Congratulations on your new CONSONANCE! Our products are based on a simple philosophy: The component shall reproduce the original musical sound, purely and naturally. The products
OWNER'S MANUAL GUITAR EFFECTS PROCESSOR/PREAMP
 OWNER'S MANUAL GUITAR EFFECTS PROCESSOR/PREAMP A Harman International Company CAUTION RISK OF ELECTRIC SHOCK DO NOT OPEN ATTENTION: RISQUE DE CHOC ELECTRIQUE - NE PAS OUVRIR WARNING: TO REDUCE THE RISK
Version 1.2 USER MANUAL
 Version 1.2 USER MANUAL Read Before Using This manual covers the feature set for Riverside pedals running version 1.2 firmware and later. To check if your Riverside is running version 1.2 firmware, follow
LBI Mobile Communications MDX DESK TOP STATION. Operator's Manual
 LBI-38976 Mobile Communications MDX DESK TOP STATION Operator's Manual TABLE OF CONTENTS Page INTRODUCTION... 3 OPERATION OF THE STANDARD STATION WITHOUT OPTIONS... 5 STATION WITH REMOTE OPTION... 5 OPERATION
OLA ENGLUND SIGNATURE SATAN OPERATION MANUAL
 OLA ENGLUND SIGNATURE SATAN OPERATION MANUAL Congratulations on the purchase of your new RANDALL OLA ENGLUND SIGNATURE SERIES Amplifier We at Randall Amplification appreciate that you chose the SATAN,
VACUUM TUBE GUITAR AMPLIFIER MODEL D60H OWNERS MANUAL
 VACUUM TUBE GUITAR AMPLIFIER MODEL D60H OWNERS MANUAL WELCOME TO THE FAMILY Congratulations and thank you for choosing the VHT Deliverance Sixty Guitar Amplifier! At VHT we I know you are constantly searching
2-Way, 3-Way 4-Way Crossovers 223/223XL - 234/234XL. Operation Manual
 2-Way, 3-Way 4-Way Crossovers 223/223XL - 234/234XL Operation Manual CAUTION RISK OF ELECTRIC SHOCK DO NOT OPEN ATTENTION: RISQUE DE CHOC ELECTRIQUE - NE PAS OUVRIR WARNING: TO REDUCE THE RISK OF FIRE
WARRANTY We at DigiTech are very proud of our products and back-up each one we sell with the following warranty:
 OWNER S MANUAL WARRANTY We at DigiTech are very proud of our products and back-up each one we sell with the following warranty: 1. Please register online at digitech.com within ten days of purchase to
Reaction Chromatic Tuner Instruction Manual
 Reaction Chromatic Tuner Instruction Manual Compliance Your Reaction Chromatic Tuner pedal has been tested and complies with the following Standards and Directives as set forth by the European Union: Council
EasyStart CONTENTS. Connections; Tuning; Selecting Programs 2. Saving Programs; Individual Mode; Expression Quick Assign; 3
 EasyStart Main Features Korg s REMS modeling technology delivers 72 realistic classic and modern amp, cabinet and effects models 16 types of drive & amp models cover everything from vintage overdrive to
TONE ALERT RECEIVER MODEL 2TR9A. P.O. Box West Pacific. Lexington, NE 68850
 TONE ALERT RECEIVER MODEL 2TR9A P.O. Box 480 1311 West Pacific Lexington, NE 68850 Phone: (800)445-0007 (308)324-6661 Fax: (308)324-4985 www.veetronix.com Tomorrow's Technology Today CONTROLS AND FUNCTIONS
OVERVIEW EXCLUSIVE FEATURES GETTING CONNECTED POWER REQUIREMENTS BATTERY MONITOR
 RUFUS USER GUIDE Thank you for purchasing the Suhr Rufus Reloaded. Please take some time to read through this guide to familiarize yourself with its many features and applications. OVERVIEW Rufus Reloaded
RF Sense SDR Receiver TR Switch Model MFJ-1708B-SDR. RF Sense SDR Receiver TR Switch Model MFJ-1708B-SDR-S CTRL CTRL AUX AUX +12V +12V - + DELAY DELAY
 The MFJ-1708B-SDR and the MFJ-1708B-SDRS are RF sensed TR switches with a receive splitter designed to be used with a transceiver and a separate receiver such as the popular SDR receivers. The splitter
USER MANUAL EFFECT BOARD
 USER MANUAL EFFECT BOARD 5 EXCLUSIVE PEDALS IN 1 AMAZING BOARD Congratulations on your purchase of MAGNUS a unique pedal board that brings 5 of our classic boutique pedals together in a single, easy to
-KILLING FLOOR- HIGH GAIN BOOST USER S GUIDE
 -KILLING FLOOR- USER S GUIDE We d like to thank you for making the Seymour Duncan Killing Floor High Gain Boost a part of your tone quest. The Killing Floor gives you both a volume boost and a musical,
NBKING100. Nuno Bettencourt Signature Series
 NBKING100 Nuno Bettencourt Signature Series QUICK START GUIDE START UP After you have plugged in and connected the AC power cord securely from the wall to the amplifier, connect only a high quality speaker
RP40 Operations Manual
 RP40 Operations Manual Welcome to the RedPlate Family, thank you for your purchase of a RedPlate RP40 amplifier. Please take a moment and review this manual for an understanding of all the available features
DXE DIGITAL CROSSOVER EQUALIZER
 DXE DIGITAL CROSSOVER EQUALIZER MANUAL AND USER GUIDE DXE DIGITAL HYBRID EQ/CROSSOVER FULLY BALANCED SIGNAL FROM HEAD UNIT TO CONTROL UNIT. GREEN DOT MATRIX DISPLAY REMOTE CONTROLLER. DUAL INPUT. 5 BAND
Spider Valve. Pilot s Guide Manuel de pilotage Pilotenhandbuch Pilotenhandboek Manual del Piloto 取扱説明書
 Spider Valve MKII Pilot s Guide Manuel de pilotage Pilotenhandbuch Pilotenhandboek Manual del Piloto 取扱説明書 40-00-0233 Pilot s Handbook available @ www.line6.com/manuals Rev D Important Safety Instructions
Twinline Effects Loop Router User Guide True to the Music
 www.radialeng.com Twinline Effects Loop Router User Guide 1588 Kebet Way, Port Coquitlam British Columbia, Canada, V3C 5M5 Tel: 604-942-1001 Fax: 604-942-1010 Email: info@radialeng.com Radial Twinline
USER MANUAL. dbucket Delay
 USER MANUAL dbucket Delay Front Panel : Controls the delay time according to the selected delay mode. Delay clock is continuously variable so that turning it while repeats are happening can produce interesting
Before You Start. Program Configuration. Power On
 StompBox is a program that turns your Pocket PC into a personal practice amp and effects unit, ideal for acoustic guitar players seeking a greater variety of sound. StompBox allows you to chain up to 9
MedRx Avant Polar HIT AH-I-MPHITS-5 Effective 11/07/11
 INSTALLATION MANUAL 2 Contents Getting To Know Your AVANT POLAR HIT TM... 4 Setting up the System... 6 Software Installation... 7 Driver Installation Windows 7... 10 Driver Installation Windows XP... 13
Radial Loopbone Owner s Manual
 www.tonebone.com Radial Loopbone Part # R800 7085 00 Owner s Manual 1638 Kebet Way, Port Coquitlam BC V3C 5W9 tel: 604-942-1001 fax: 604-942-1010 email: info@tonebone.com web: www.tonebone.com is a division
Owner s Manual. Getting Ready Convenient Functions Basic Operation Assigning a Function to an External Pedal...
 Owner s Manual 55 Thanks to 32-bit high-precision processing at a 96 khz sampling rate from input to output, the RV-500 gives you stunningly high-quality reverb. 55 With an easily readable screen and an
Using the USB Output Port to Charge a Device
 Table of Contents ----------------------------------- 2 Features ----------------------------------------------- 3 Controls and Functions ---------------------------------- 4 ER210 Power Sources -----------------------------------
POWER SERIES Plus. Volt / Amp / Hertz. Digital Switchboard Meter. User s Manual IM2493VAF-3
 POWER SERIES Plus Volt / Amp / Hertz Digital Switchboard Meter User s Manual General Description The POWER SERIES Plus digital switchboard meters incorporate the latest DSP microprocessor technology. Careful
Document Version 1.2
 Document Version 1.2 INTRODUCTION The X-LOAD LB-2 Reactive Load Box is a high-quality passive load box from Fractal Audio Systems. It offers a range of great features including front-panel output level
THE JIM KELLEY USER GUIDE SINGLE-CHANNEL MODEL. Limited Edition
 THE JIM KELLEY SINGLE-CHANNEL MODEL Limited Edition USER GUIDE THE JIM KELLEY AMPLIFIER The Jim Kelley Single-Channel Model is a 60 watt all-tube amplifier designed to retain your guitar s natural tonal