DELAY MOD DISTORTION FILTER VERB. Advanced Guide
|
|
|
- Rosaline Evans
- 6 years ago
- Views:
Transcription
1 M13 Stompbox Modeler DELY MOD DISTORTION FILTER VERB dvanced Guide n in-depth exploration of the digital technologies and musical machinations of the M13 Stompbox Modeler. Electrophonic Limited Edition
2 Please Note: Line 6, DL4, MM4, FM4, DM4, Verbzilla, POD X3, POD X3 Live, POD X3 Pro, PODxt and Vetta are trademarks of Line 6, Inc. ll other product names, trademarks and artists names are the property of their respective owners, which are in no way associated or affiliated with Line 6. Product names, images, and artists names are used solely to identify the products whose tones and sounds were studied during Line 6 s sound model development for this product. The use of these products, trademarks, images, and artists names does not imply any cooperation or endorsement.
3 M13 dvnced Guide M13 dvanced Guide 2008 Line 6, Inc.
4 Table of Contents Setup Details Tuner, Setup Mode Expression Pedals Looper Levels & EQ Preferences, True Bypass, Scenes FX Loop, Factory Reset MIDI Backup, Global Noise Gate, Displays Model Details Tap-based FX, Fine-Tune Mode DryThru Models, Model Defaults, Mix Expression Pedal Details Tube Compressor Model Scenes Details Momentary Scene Mode, Latch Scene Mode utosave, Manual Save Scene Setup, Effect Copy Looper Details Looper & Live Guitar Expression Pedal Control Looper Switches Looper Tutorial
5 Delay Models Parameter Details Modulation Models Parameter Details Distortion Models Parameter Details Filter Models Parameter Details Reverb Models Parameter Details ppendix : Reference... 1 MIDI Control... 1 Looper & Expression Pedals... 1 FX Toggle On/Off... 2 Scene Select... 2 BPM / Milliseconds... 3 ppendix B: Tips...B 1 MIDI Dumps...B 1 Saving Scenes Internally, Recalling The Current Scene...B 2 Firmware Update Instructions...B 3 Backup Tip For Mac Users...B 4
6
7 Setup Details Setup Details Welcome to the M13 Stompbox Modeler dvanced Guide. This guide contains in-depth details of your M13 s features and functionality. With over 80 Models and a Looper in one device, there s a lot to work with. Our goal with this guide is to provide you with the information you need to make it easy to find the sounds you re looking for. In the chapters that follow, we ll be referring to the six Knobs that adjust the various parameters of the M13. These are located below each of the four LCD displays. On the top row left is the Model Select Knob. To the right of that are Knobs 1 and 2. Knobs 3, 4 and 5 are in the second row, left to right. Now to begin, let s get in tune. Tuner To enter Tuner mode, press and hold the Tap switch for a few seconds. LCD 3 will display the Tuner. LCD 4 will display the note you re tuning. If you d like to tune to a reference other than standard 440, turn Knob 3 to select from 425 to 455. To toggle between Mute udio (your guitar will be silent) and Bypass udio (you ll hear your guitar dry with no FX), turn Knob HZ REF [ ] b # MUTE UDIO BYPSS UDIO D Tuning is straightforward: when the graphic diamond is to the left of center, your note is flat; when it s to the right, you re sharp. When the diamond is precisely in the center, two triangles will appear above and below it, indicating your string is in tune. To exit Tuner mode, press Tap again, or any other foot switch. Setup Mode To enter Setup mode, press and hold the Looper Controls switch for a few seconds. The M13 s four LCDs will display your settings, including Expression Pedals in LCD 1, Looper Levels & EQ in LCD 2, Preferences, Scenes & FX Loop in LCD 3, and MIDI, Gate & Displays in LCD 4. Depending on the way you like to work, most of your Global settings can be left as is after you ve set them initially. They ll be recalled each time you power-up. In the following pages we ll describe them all in detail.
8 Setup Details 1 2 Expression Pedals In LCD 1 you set up your expression pedal assignments. ny or all 4 FX Units in the M13 can be controlled by an expression pedal. You can use up to 2 pedals at once. Each can be assigned to an FX Unit or the Looper. You have 3 selection choices here: Pedal 1, Pedal 2, or Off. Knobs 1 & 2 set the assignments for FX 1 & FX 2, Knob 3 sets the assignment for the Looper, and Knobs 4 & 5 set the assignments for FX 3 & FX 4. Expression Pedals FX1:PDL1 FX2:PDL1 LPR:PDL2 LPR:PDL1 LPR:OFF FX3:PDL1 FX1:OFF FX1:PDL2 FX3:OFF FX3:PDL2 FX4:PDL1 FX2:OFF FX2:PDL2 FX4:0FF FX4:PDL2 *Looper pedal control is a global setting. FX pedal control settings are saved per Scene. See Chapter 2 for more details on how to set up heel and toe expression pedal settings. Looper Levels & EQ There are two Looper Levels to set up in LCD 2. The first is Play, which determines the volume of your Looper s playback as balanced with your live guitar. The second is Overdub, which determines the volume of your loop in Overdub mode. To clarify, if your Overdub Level is set to 90%, each time your loop begins a new overdub its volume will be reduced by 10%, sounding quieter and quieter with each overdub pass. The default level for both Play and Overdub is 100%. Use Knobs 1 and 4 to adjust these levels, if desired. Looper: Levels EQ PLY OVERDUB PLY HI CUT LO CUT HI CUT OVERDUB LO CUT With Knobs 2 and 5 you can adjust Looper Hi Cut and Lo Cut EQ levels. Hi Cut rolls off the high end for loop playback (@2kHz), and Lo Cut rolls off the low end (@500Hz). If applied, this EQ affects the sound of loop playback only, having no effect on live guitar.
9 Setup Details Preferences In LCD 3 you set up FX Preferences, beginning with FX order. The default is 1>2>3>4, left to right. If you prefer, you can set it to 4>3>2>1 using Knob 3. With this setting, your signal flow begins with FX Unit 4 and flows right to left. Set the FX order you prefer. The Model Select Knob toggles between True Bypass and DSP Bypass. In True Bypass, mechanically switching relays route your signal directly from input jack to output jack, bypassing all circuitry, for absolutely no processing or conversion when bypassing all FX. 1 3 If you re playing back a loop, however, or you want your Delay and Reverb trails to be heard when bypassing all FX, you must use DSP Bypass. True Bypass can only be activated when all of the following conditions are met: True Bypass is enabled in Setup mode (via the Model Select Knob). ll 4 FX Units are in a bypass state. The Looper is stopped. Looper Controls mode is inactive (Looper Controls footswitch light is off). Prefs Scenes FX Lp DSP BYP UTOSVE 1>2>3>4 MOMEN SCENE PRE LL TRUEBYP 4>3>2>1 MNL SVE LTCH SCENE POSTFX1 POSTFX2 POSTFX3 POST LL Scenes Knob 1 toggles between utosave or Manual Save. With utosave, every change you make to your Scene is saved, like a real pedal board. With Manual Save, changes made to your individual FX will be saved only if you don t change Scenes; if you do recall a Scene, all your changes will be lost. Manual Save is a good choice, however, when you want to be sure your Scenes will always be recalled exactly as programmed. Knob 4 selects Momentary Scene or Latch Scene mode. Please see Chapter 3, Scenes Details, for more in-depth information on Momentary Scene and Latch Scene modes.
10 Setup Details FX Loop You can insert the FX Loop anywhere in the signal path. Use Knob 5, LCD 3 to select your insert point. Your choices are Pre ll, Post FX 1, Post FX 2, Post FX 3, and Post ll. The following are a few routing examples to demonstrate the M13 s flexibility. (Be aware that multiple amps may cause ground hum - the common cure for this is a ground lift box): 1 4 dd an external FX unit to the M13: for example, run Vetta Comp in FX 1, U-Vibe in FX2, then assign the FX Loop to Post FX 2 and feed an external distortion pedal. That pedal s output would return to feed FX 3 and 4 to add M13 Delay and Reverb. Double routing: set the Loop to Post FX 1 and send an Octave Fuzz from FX1 out to the front of a tube amp. Route the amp s FX Send back into the M13 mono FX Return. Now add M13 Filter, Flange and Delay FX and send the M13 mono Out to your amp s FX return. ll the time-based FX will be post your tube amp s preamp. Wet/dry stereo: send a Comp or Dist model via FX Loop Send (Post FX 1) to a tube amp for your dry sound. dd Panned Phaser, Ping Pong and Reverb in the M13 and set all Mix controls to 100% wet. Now connect the M13 stereo outputs to 2 other guitar amps. You ll get wide, stereo FX left and right with dry guitar in the middle. Factory Reset There may be times when you d like to reset your M13 to its Factory settings. You may want to recall a particular Factory Scene, for example. To do a Factory Reset, first back up any Scenes you d like to keep (see MIDI Backup on page 1 5), then follow these steps: Turn the Model Select Knob under LCD 4 until Rst Fact? is displayed. Press down on the Model Select Knob - Reset To Factory? will be displayed. To initiate the Factory Reset, press down on the Model Select Knob again. ll Factory defaults will be reset, including Scene Presets and Global settings. MIDI Gate Displays DUMP LL? OFF CONTRST CH 1 DUMP EDIT? RST FCT? DECY V THRESH DECY CH 1-16 OMNI
11 Setup Details MIDI Backup With a MIDI interface and a sysex application, you can back up your M13 Scenes to computer. It makes it easy to build a custom Scenes library, or exchange Scenes with others. To backup your Scenes, or to dump the current edit buffer, follow these steps: Turn Knob 3 to set your MIDI Channel from Ch or Omni (default is Ch. 1). Turn the Model Select Knob to select Dump ll? (to back up all 12 Scenes) or Dump Edit? (to back up the current Scene in its current state). With your computer set up to record sysex, press down the Model Select knob. The M13 will transmit the sysex file to your computer, creating a backup of your Scenes that you can store and recall at any time. 1 5 To load a Scene into your M13, simply transmit the sysex file from your computer into the M13 via MIDI. This will immediately load the Scene into the M13 s memory. Global Noise Gate Knobs 1 and 4 in the center of LCD 4 control the Global Noise Gate. When activated, the Gate is in effect full time, for all your FX. Knob 1 turns on the Gate and sets the Gate Threshold. Lower values make the Gate kick in at quieter levels, higher values make it kick in at louder levels. Knob 4 sets the Gate Decay. Higher levels result in a longer transition from non-gated to gated audio. Displays To adjust the contrast of the LCD displays, use Knob 5. Set it to a value that looks good to you. Settings from 30-50% usually work well. When you ve set all the M13 s Global parameters to your liking, press any switch to exit Setup mode. s mentioned previously, the next time you power up your M13, all your Global settings will be recalled.
12
13 Model Details Model Details The following are details on a few late-breaking models and features that were implemented in the latest M13 firmware. These were the result of customer requests, as well as features the development team wanted to add in the final months of development. Tap-based FX 2 1 Many guitarists who use time-based effects like to set their delay times to a note value relative to the song tempo, as opposed to setting delay times in milliseconds. This has been included in the M13 as Tap-based FX. To set your delay time to tap tempo, turn Knob 1 to the far right and you ll see a quarter note symbol in the LCD. Change it to any note you like. Now tap the desired tempo and your time-based effect will sync to it. Your note value is persistent, so when you scroll through other effects it will be retained. To set your delay time to ms, turn Knob 2 to the right again, and you ll return to Time-based mode. Fine-Tune Mode DELY Digital Delay q BSS TREBLE When you re in Time-based mode, you may want to fine-tune your delay time to an exact number. This may be necessary to match a song s tempo, or to set up precise stereo delays, to 240 ms and 480 ms for example. To make this easy to do, we ve implemented Fine-Tune mode. When you want to dial in a precise delay time, simply do the following: FDBK djust Knob 1 to set the delay time close to the desired value. Press and hold the Tap switch and turn Knob 1 again to enter Fine-tune mode. You can now fine-tune your delay time to the millisecond with Knob 1. DELY R 480MS Stereo Delay L 240MS R-FDBK L-FDBK
14 Model Details DryThru Models 2 2 nother popular request from DL4 users was to provide a completely dry signal path when using specific Delay models with a dry Mix setting, so that no tone coloration was added. When we originally created our Tape Echo, Tube Echo, Sweep Echo and Echo Platter models, for example, we also modeled the dry path of the classic delays these models were based on. We did this because the original effects added a certain tonal character to the sound when Mix was set to dry, and many guitarists wanted that sound. To make everybody happy, we decided to add what we call DryThru models. These four models are identical to the original models of the same name, but when Mix is at 0%, we removed the tonal coloration of the originals, giving you a flat, uncolored sound. Echo Platter DryThru DELY 225 MS FDBK DELY Tube Echo DryThru 169 MS FDBK WOW/FLT DRIVE WOW/FLT DRIVE DELY Tape Echo DryThru 279 MS FDBK Sweep Echo DryThru DELY 469 MS FDBK BSS TREBLE SWP SPD SWP DEP Model Defaults ll FX in the M13 are programmed with Model Default settings. These provide you with a good musical experience when you first load up each effect, giving you great stock settings for that model. Some are also pre-configured for expression pedal control, so if you have an expression pedal plugged in and assigned to an FX Unit and you select a new model, we start you off with what we think is a good expression pedal setup for it. (See the next page for more info on setting heel and toe values for expression pedals). Mix s with all other model details, the Mix control is set up to work like it did on the DL4, MM4 or other Line 6 product that first introduced a particular model. In keeping with this, setting Mix to 100% sometimes engages a special setting found on the original effect, such as vibrato in the U-Vibe, or a richer Leslie sound in the Rotary Drm/Hrn. * ll product names used in this manual are trademarks of their respective owners, which are in no way associated or affiliated with Line 6. These trademarks of other manufacturers are used solely to identify the products of those manufacturers whose tones and sounds were studied during Line 6 s sound model development. Leslie is a registered trademark of Suzuki Musical Instrument Manufacturing Co. Ltd.
15 Model Details Expression Pedal Details lmost any parameter in the M13 can be controlled by an expression pedal, as long as you ve set up your FX Units and Looper assignments accordingly, in Setup Mode. To set up expression pedal heel and toe values for the parameter you d like to control, here s an example of how to do it. Let s say you d like to control the Mix level of a Reverse Delay. 2 3 Select Reverse Delay in one of the FX Units, and adjust the sound to your liking. Plug in your expression pedal, and set it to the heel down position. djust the Mix level of the Reverse Delay with Knob 5. Set it to 0%. Put your expression pedal in the toe down position and set the Mix level to 100%. Play your guitar and work your pedal; the reverse guitar will fade in and out. You can repeat this with any effect parameters you like. Your expression pedal will control them simultaneously. If you get to a point where you want to start over, simply unplug your pedal from the rear panel and all unsaved pedal assignments will be cleared. Tube Compressor Model In addition to the 5 compressors described in the manual, which are all typical stomp box type compressors, we also snuck in a Tube Comp model based on the studio classic Teletronix L-2 Optical Compressor, known for its smooth, easy to adjust, tube sound. You ll find it at the end of the Distortion FX group. Here s how it works: DIST Tube Comp THRESH LEVEL djust Knob 1 to set the Threshold - lower values result in more compression, along with an automatic makeup gain stage dependent upon the Threshold setting. Set the output Level with Knob 2. To use the Tube Comp model for boost only, use a high Threshold value and adjust your Level as desired. * ll product names used in this manual are trademarks of their respective owners, which are in no way associated or affiliated with Line 6. These trademarks of other manufacturers are used solely to identify the products of those manufacturers whose tones and sounds were studied during Line 6 s sound model development. Teletronix L-2 is a registered trademark of Universal udio Inc.
16
17 Scenes Details Scenes Details The M13 offers you two different ways to select your Scenes, depending on the way you like to work. Your choices are Momentary Scene mode or Latch Scene mode. To clarify what we mean by a Scene, it s basically the equivalent of a unique pedal board setup, which you can program yourself. It includes up to 4 active FX and another 8 FX set up but bypassed. When you select a particular Scene, a combination of 4 active FX is immediately loaded into your M13. The other 8 FX will also be loaded, but bypassed. You can switch any of the 8 FX on at any time, replacing any of the 4 you started with. 3 1 If you use an expression pedal in your rig, you should know that all of your heel & toe pedal assignments can be stored in a Scene, so many unique combinations are possible. Here are some details explaining Momentary Scene mode and Latch Scene mode. Momentary Scene Mode In Momentary Scene mode, here s what happens: When you step on the Scenes switch, the 4 LCDs will display the 12 Scene names in your M13. You select a Scene by stepping on any of the 12, B, C switches that correspond with the Scene names in the LCD. The Scene you choose will be loaded immediately. You will now see the 4 active FX displayed in the 4 FX Unit LCDs. You can tweak the parameters of each, if you like, or you can activate any of the bypassed FX. ny changes you make to the Scene will be saved, like a real pedal board. (see page 3 2 for details on utosave vs. Manual Save) To select a new Scene, you must step on the Scenes switch again, and you ll see the 12 Scene names you started with. Repeat the steps above for new selections. Latch Scene Mode In Latch Scene mode, the only difference is when you step on the Scenes switch, the 12 Scene names remain in the LCDs. ny Scene you select will be loaded the same way, but you won t see it s FX displayed in the LCDs. The advantage to Latch Scene mode is, you re always only 1 switch away from selecting a new Scene. So you can have 12 completely different setups ready to go, each only 1 switch away. The disadvantage is, you can t tweak or bypass any of the individual FX. You can only bypass the entire Scene.
18 Scenes Details utosave Whether you re in Momentary Scene mode or Latch Scene mode, your choice of utosave or Manual Save is an important one. In utosave, any change you make to your Scene is saved automatically. This includes not only the on or off state of the individual FX while your scene is loaded, but also the configuration of the Scene itself. 3 2 Let s load a Factory Scene and see what happens in utosave mode. Make sure you re in utosave and Momentary mode first, so you can access the individual FX. To doublecheck, press and hold the Looper Controls switch for a few seconds, to enter Setup mode. Look at LCD 3 under Scenes and see if UTOSVE and MOMEN SCENE are assigned. If you see MNL SVE and LTCH SCENE, change them with Knob 2 and Knob 4. Now press the Scenes switch and you ll see all 12 Scene names displayed. Choose Scene 2, Bridge Of Vibes. Notice the four switches are lit. That s because the loaded FX, which are displayed in the LCDs, are loaded in the locations of all 4 FX Units. You should see U-Vibe, Tube Drive, Plate and Ping Pong displayed. Play your guitar for a minute on the neck pickup. You ll hear a Robin Trower/Hendrix type of sound. Step on all 4 C switches now. You ll see Facial Fuzz, nalog Flange, Rotary Drum and Tape Echo. It s a very different sound. Now step on the Scenes switch and select 1C Swamp Thing. You ll see 3 LCDs lit, because FX Unit 2 is bypassed. Step on the Scenes switch again and go back to 2, Bridge Of Vibes. It s lost its Trower U-Vibe sound. That s because utosave has saved your changes. Notice all the C switches are lit. Manual Save To see how Manual Save differs from utosave, let s do a Factory Reset and start over. If you have any special Scenes saved, you can defer this exercise until you back up your Scenes to computer. Read all about it in Chapter 1, Page 5. ssuming you re okay to do a reset, press and hold the Looper Controls switch to enter Setup mode again. This time turn the Model Select Knob under LCD 4 to select RST FCT? and press down on the knob. Press again to initiate the reset. fter it resets, select MNL SVE under LCD 3. Now repeat the same steps you did before. Press the Scene switch, select Scene 2, then switch on all the C switches to change the sound of Bridge Of Vibes. Step on the Scenes switch again, select Scene 1C, then step on the Scenes switch and select 2 again. Play your guitar. Notice all the switches are lit this time. Scene 2 did not retain the changes you made. This can be a good thing, especially if you want to return to the exact same sound you originally programmed. In Manual Save mode, every time you select a Scene, it will be recalled exactly the same way, even if you make temporary changes to it.
19 Scenes Details Scene Setup With the M13 you can create your own custom Scenes and save them in all 12 Scene locations. Combine this with the fact that you can back up all your Scenes to computer, and you have an unlimited ability to customize and store your own library of sounds. When you begin tweaking the FX models and creating combinations you like, you ll want to familiarize yourself with Scene Setup mode. This is where you store and name your custom Scenes. Let s take it step by step, and you ll see how easy it is. Once you have a combination of FX you d like to store, do the following: With your custom Scene ready to be stored, press and hold the Scenes switch. The switch light will flash, and you ll see Select a Scene for Setup displayed. Select the switch for your current Scene, the one you want to save. Its name will appear in the center of the LCD. Name it by turning the Model Select Knob for character, and Knob 2 far right to move to the next character. *Here s a tip: press down on the Model Select knob to quickly jump to a, space, 0 or. It makes it a lot faster to name your Scene. With your scene named, press its switch again. It will stop flashing. Press the Scenes switch, then select your custom Scene. You ve just saved it. 3 3 Effect Copy The main purpose of Effect Copy is to enable you to move your current effect, with all its settings intact, to another location, and to save it there with all your edits intact. This can very useful when you ve been tweaking an effect, and you get it sounding exactly right, but you d rather have it routed either before or after another effect in your Scene. Effect Copy makes this extremely easy to do. Here s how: Set up the Effect you want to copy, with all parameters adjusted to your liking. Press down on the Select knob of the source FX Unit - its LCD will begin flashing. Press the foot switch of the destination location you d like to use. The LCD will stop flashing, indicating the Effect Copy was successful. Your source effect will now be stored in the destination location, with all your settings intact. You can also use Effect Copy to simply re-arrange your existing FX in a Scene. Or experiment with duplicates of a particular sound you ve created in the same Scene, for an extreme or unique musical effect.
20
21 Looper Details Looper Details The Looper in the M13 is similar to the looper in the DL4 Stompbox Modeler. It gives you up to 30 seconds of mono recording time at normal speed, or 60 seconds at half speed. Keep in mind your loop will play back in mono, even if you re running stereo FX. Looper & Live Guitar When you record and play back a loop, your current Scene will still be active. In fact, while your loop is playing you can select a new Scene at any time by stepping on the Scenes switch, then selecting a Scene as usual. Since the M13 responds to MIDI messages, you can optionally set up a MIDI control device to control the looper, leaving all 12 of your FX Unit switches dedicated to your M13 effects. This way, you could switch your M13 s four sets of, B and C effects on or off at any time and still control Play, Record, Overdub, Half Speed and Reverse functions. 4 1 Below is a Reference Table of MIDI CC values for controlling M13 Looper functions via MIDI. For a more comprehensive list of M13 MIDI messages, see ppendix. MIDI CC Reference Table : Looper Control M13 Footswitch MIDI CC# Looper Function Record/Overdub 50 0 to 63 = Overdub 64 to 127 = Record Play/Stop 28 0 to 63 = Stop 64 to 127 = Play Half Speed 36 Toggles between Half Speed & Normal Speed Reverse 85 Toggles Reverse On or Off Undo 82 ctivates Undo Play Once 80 ctivates Play Once function Pre/Post 84 0 to 63 = Pre 64 to 127 = Post Looper Levels --- Controlled via EXP pedal only -- not MIDI CC Expression Pedal Control You can optionally control Looper EQ, Playback and Overdub Levels with an expression pedal by setting up your heel and toe values and assignments in Setup Mode, as described in Chapter 1, Page 2. lso see Chapter 2 for more expression pedal info.

22 Looper Details Looper Controls When you engage the Looper Controls switch, the 7 switches in the two bottom rows will control the Looper, enabling you to record and play back a loop while your current Scene is still active. Here are the details: Looper Controls Switch when you step on this switch it will light up red, indicating the two bottom rows of footswitches will now control various functions of the Looper. Your current Scene will still be active, and each of the loaded FX in your Scene will be displayed in the four FX Unit LCDs. 2 Record/Overdub to record a guitar loop, step on this switch and the M13 will record up to 30 seconds of whatever you play. Step on it a second time and your recorded loop will begin to play back immediately, with Overdub mode activated (LED will flash). Overdubbing once you have a loop recorded, you can layer an overdub on your current loop at any time. Simply play back the loop and step on the Record/Overdub switch. Your new live guitar will be recorded along with your previous guitar track. Looper Levels the Playback and Overdub Level of your loop will be determined by the Looper Levels you set in Chapter 1, Page 2. Play Level is the volume of your recorded loop in relation to your live guitar volume. Overdub Level is the level of your
23 Looper Details loop that will be recorded each time the loop cycles in Overdub mode. In other words, if Overdub Level is set at 80%, every time your loop cycles in Overdub mode it will decrease in volume by 20% in relation to your live guitar. For no reduction in volume, set Overdub Level to 100%, but be aware that hot levels may build up and distort. EQ your recorded loop will also be affected by the EQ settings you made in Chapter 1, Page 1. If Hi Cut is set to On, your loop will play back with the high end slightly attenuated. Conversely, if Low Cut is set to On, your loop will play back with the low end slightly cut. Both Hi Cut and Low Cut can be active or off at the same time. 3 Play/Stop this switch simply plays or stops your loop. When in Play mode, you can step on Record/Overdub at any time to overdub live guitar with your recorded loop. 4 Half Speed step on this switch while in Play mode and your loop will play back at half speed. If you switch it again it will toggle back to normal speed. If you want to record an overdub while your loop is playing back at half speed, simply step on the Record switch and play. If you then switch back to normal speed, your new track will play at double speed, while your original track will play at normal speed, as it was originally recorded Reverse this switch puts your loop into reverse, so it will play backwards. You can activate Reverse at normal speed or half speed, and you can also record an overdub while Reverse is activated. If you do so, when you exit Reverse your newly recorded track will play backwards, and the original track will play back normally, as it was recorded. 6 Undo to undo your most recent take while in Overdub mode, step on the Undo switch. Your earlier recording will remain intact. Only the last take will be undone. *Note: there s no way to archive loops in memory. Only the current loop is preserved. 7 Play Once when you step on this switch, your loop will play once then stop. 8 Pre/Post this switch controls whether your loop will play back pre or post the FX in your current Scene. If toggled Pre (blue), this means your loop will not pass thru the current FX. If toggled Post (green), your loop will play back with your Scene FX applied. 9 FX Switches when the Looper Controls are active, the top row of C switches will control the on/off state of the four loaded FX in your Scene. Stepping on one of these switches will engage or bypass the Effect in that FX Unit, be it loaded in, B or C. For example, if your current Scene includes a Tube Drive in FX1-, stepping on the C switch for FX1 will toggle your Tube Drive on or off. This setup enables you to control all four of your FX while their locations may be hidden under the Looper switches.
24 Looper Details Looper Tutorial If you re new to loopers, here s a basic example of how you might use the M13 Looper along with your live guitar. We ll step thru the recording of a loop, add an overdub or two, use Half Speed and Reverse, and demonstrate how Pre/Post has an effect on the mix. Start by selecting one of your favorite Scenes. For this example, make sure you re in Momentary Scene mode by first pressing and holding the Looper Controls switch. Now check the third LCD and make sure MOMEN SCENE is displayed in the lower center. If it s set to LTCH SCENE, turn Knob 4, bottom row center, to toggle it to MOMEN SCENE. 4 4 Now step on the Scenes switch and you ll see the names of all 12 Scenes in the LCDs. Select one by stepping on the appropriate switch, and you ll see the loaded FX models for that Scene displayed in the 4 LCDs. Play your guitar to make sure you re happy with the sound. When you re ready, step on the Looper Controls switch, then follow these steps: Step on the Record switch and play. Make sure you hit the downbeat accurately, so that when you play back the loop it will start exactly on the beat. This is especially important if you want the loop to be rhythmically correct when it cycles around. When you reach a good out point, step on the Play switch. This will take your new loop out of record and immediately play it back. Let it loop around a few times, and see if sounds good. If it doesn t sync quite right, press Stop then record a new take. If you re happy with your loop, decide what you d like to play as an overdub. Jam along with your loop a few times in Play mode, then when you re ready to layer an overdub, step on the Overdub switch and play your part. Finish it up before the loop cycles around again, then press Stop to exit Overdub mode. Press Play and listen to your loop. You should hear your original guitar part plus your overdub. s it plays, press the Half Speed switch. You ll hear your loop an octave lower, at half its normal speed. Press Half Speed again to return to normal speed. s your loop continues to play, press the Reverse switch. You ll hear your loop play backwards. s an experiment, let it roll and hit the Overdub switch. Play for the duration of your loop then hit Stop. (You might also try this with Half Speed) Hit the Reverse switch to exit, then press Play. You ll hear your initial loop and your first overdub as originally recorded, while your second overdub will play in reverse. Toggle the Pre/Post switch, and you ll hear your loop play back with and without your current Scene s FX applied to the loop. Jam along with live guitar. This should demonstrate a few of the possibilities. Feel free to experiment on your own.
25 Delay Models Delay Models This chapter contains details on the M13 Delay models, which include all the Delay models from the Line 6 DL4. We ve also added Echo Platter from Echo Pro, and 4 new DryThru models for Tube Echo, Tape Echo, Sweep Echo and Echo Platter. See Chapter 2, Model Details, for a description of the DryThru Delay models. Parameter Details Below is a Reference Table listing all the Controls and Parameters for the Delay models. Knobs 1, 2 and 5 are basically the same for all models, adjusting Delay Time, Feedback and Mix respectively. Knobs 3 and 4 control various parameters depending on the Delay model loaded. We ll detail them all in the following pages. Delay Models Reference Table : Controls & Parameters 5 1 Model Knob 1 Knob 2 Knob 3 Knob 4 Knob 5 Tube Echo & DryThru Time Fdbk Wow/Flutter Drive Mix Tape Echo & DryThru Time Fdbk Bass Treble Mix Multi-Head Time Fdbk Heads 1-2 Heads 3-4 Mix nalog Echo Time Fdbk Bass Treble Mix nalog w/mod Time Fdbk Mod Speed Mod Depth Mix nalog w/mod Time Fdbk Mod Speed Mod Depth Mix Sweep Echo & DryThru Time Fdbk Sweep Speed Sweep Depth Mix Lo Res Delay Time Fdbk Tone Resolution Mix Digital Delay Time Fdbk Bass Treble Mix Digital Delay w/ Mod Time Fdbk Mod Speed Mod Depth Mix Stereo Delay Left Time Left Fdbk Right Time Right Fdbk Mix Ping Pong Time Fdbk Time Offset Stereo Spread Mix Reverse Time Fdbk Mod Speed Mod Depth Mix Dynamic Delay Time Fdbk Threshold Ducking Mix uto Volume Echo Time Fdbk Mod Depth Swell Time Mix Echo Platter & DryThru Time Fdbk Wow/Flutter Drive Mix
26 Delay Models Tube Echo & Tube Echo DryThru Based on the classic 63 Maestro EP-1, the first of a series of Echoplex designs featuring a cartridge of looped 1/4 tape that passed over separate record and playback heads. In the M13, we ve also included a new DryThru model, with a flat, dry signal path when Mix is set to 0%. For more info on DryThru models, see Chapter 2, Model Details. Tube Echo Tube Echo DryThru DELY 169 MS FDBK DELY 169 MS FDBK WOW/FLT DRIVE WOW/FLT DRIVE 5 2 Knob 1: Delay Time. Displayed in milliseconds or note value. Knob 2: Delay Feedback. Knob 3: Wow / Flutter. Controls the tape emulation wow and flutter effect. Knob 4: Drive. djusts the emulated tube distortion and tape saturation. Knob 5: Mix. Tape Echo & Tape Echo DryThru Based on the solid state EP-3, with transistors instead of tubes for the sound electronics. The EP-3 used the same basic mechanical design as the original Echoplex, including the looped 1/4 tape. Unlike the Tube Echo Model, which gives you control of wow, flutter and distortion, our EP-3 emulation is designed to give you a less distorted tape emulation with adjustable tone controls. We ve also included a Tape Echo DryThru model. Tape Echo DELY 279 MS FDBK BSS TREBLE Tape Echo DryThru DELY 279 MS FDBK BSS TREBLE Knob 1: Delay Time. Displayed in milliseconds or note value. Knob 2: Delay Feedback. Knob 3: Bass EQ. Knob 4: Treble EQ. Knob 5: Mix. * ll product names used in this manual are trademarks of their respective owners, which are in no way associated or affiliated with Line 6. These trademarks of other manufacturers are used solely to identify the products of those manufacturers whose tones and sounds were studied during Line 6 s sound model development. Maestro is a registered trademark of Gibson Guitar Corp.
27 Delay Models Multi Head Based on the Roland RE-101 Space Echo, which had multiple stationary heads. You change delay times by switching amongst these heads, and you can play back on multiple heads at the same time to get multi-tap delay effects. DELY Multi-Head 554 MS FDBK 1-2 ON HD4 ON 1-2 OFF HD1 ON 1-2 ON HD2 ON 3-4 OFF HD3 ON 3-4 ON HD4 ON 5 3 Knob 1: Delay Time. Displayed in milliseconds or note value. Knob 2: Delay Feedback. Knob 3: Turns heads 1 & 2 on and off. Knob 4: Turns heads 3 & 4 on and off. Knob 5: Mix. When using the Multi Head Delay model, you ll find there are many possible combinations of delay effects, depending on your selection of Head On/Off parameters. It s best to set a Delay Time first by adjusting Knob 1. To set a Delay Time to a precise millisecond value, dial in a delay time that s close to what you want, then fine tune it by pressing and holding Tap while continuing to turn Knob 1. s an option you can set Delay Time to a note value by turning Knob 1 clockwise until the 1/4 note symbol is displayed, then Tap in the tempo of your song. Once your main tempo is set, experiment with different delay repeats by selecting different combinations of the Head On/Off settings, using Knobs 3 and 4. When you have the effect you want, adjust the Delay Feedback amount using Knob 2. * ll product names used in this manual are trademarks of their respective owners, which are in no way associated or affiliated with Line 6. These trademarks of other manufacturers are used solely to identify the products of those manufacturers whose tones and sounds were studied during Line 6 s sound model development. Roland is a registered trademark of Roland Corp.
28 Delay Models nalog Echo Based on the Boss DM-2, an analog echo unit treasured for the warm, distorted tones it produced. This model is great for creating more experimental delay sounds. DELY nalog Echo 255 MS FDBK BSS TREBLE 5 4 Knob 1: Delay Time. Displayed in milliseconds or note value. Knob 2: Delay Feedback. Higher levels result in more repeats. Knob 3: Bass EQ. Knob 4: Treble EQ. Knob 5: Mix. t 100% you will hear the delay only. nalog With Modulation This model is based on the Electro-Harmonix Deluxe Memory Man. This pedal uses the bucket brigade electronics of other analog echoes and adds an adjustable chorus circuit, which is applied to the echoes only, leaving the direct sound unaffected. DELY nalog w/mod 470 MS FDBK MODSPD DEPTH Knob 1: Delay Time. Displayed in milliseconds or note value. Knob 2: Delay Feedback. Knob 3: Modulation Speed. Higher levels result in faster modulation. Knob 4: Modulation Depth. Knob 5: Mix. * ll product names used in this manual are trademarks of their respective owners, which are in no way associated or affiliated with Line 6. These trademarks of other manufacturers are used solely to identify the products of those manufacturers whose tones and sounds were studied during Line 6 s sound model development. Boss is a registered trademark of Roland Corp. Electro-Harmonix is a registered trademark of New Sensor Corp.
29 Delay Models Sweep Echo & Sweep Echo DryThru For this model we started with the tone of our EP-1 delay emulation, then added a sweeping filter effect to the delay repeats. By design, our original Sweep Echo model did not have a flat EQ response in the dry signal path, so the character of the original was retained. In the M13 we ve added a DryThru version, with flat EQ when Mix is at 0%. Sweep Echo DELY 469 MS FDBK SWP SPD SWP DEP Sweep Echo DryThru DELY 469 MS FDBK SWP SPD SWP DEP Knob 1: Delay Time. Displayed in milliseconds or note value. Knob 2: Delay Feedback. Knob 3: Speed of the sweep effect. Knob 4: Depth of the sweep effect. Knob 5: Mix between dry guitar and wet. t 100% you will hear the delay only. 5 5 Lo Res Delay Low bit resolution can create a unique sort of grunge and noise that is sometimes just the sound you re looking for, and that s what the Lo Res Delay model provides. DELY Lo Res Delay 403 MS FDBK TONE RES Knob 1: Delay Time. Displayed in milliseconds or note value. Knob 2: Delay Feedback. Knob 3: Tone of the delays only. Knob 4: Resolution, adjustable from 6 to 24 bits. Knob 5: Mix. * ll product names used in this manual are trademarks of their respective owners, which are in no way associated or affiliated with Line 6. These trademarks of other manufacturers are used solely to identify the products of those manufacturers whose tones and sounds were studied during Line 6 s sound model development.
30 Delay Models Digital Delay This model is a Line 6 original. With 32 bit floating point processing and a true stereo audio path, it s one of the best digital delays you ll find in a pedal unit. Use it when you want a clean delay effect. DELY Digital Delay 751 MS FDBK BSS TREBLE 5 6 Knob 1: Delay Time. Displayed in milliseconds or note value. Knob 2: Delay Feedback. Higher levels result in more repeats. Knob 3: Bass EQ. Knob 4: Treble EQ. Knob 5: Mix. t 0% you will hear dry guitar; at 100% you will hear the delay only. Digital Delay With Modulation Use this model to add a chorus effect to your digital delays. Like the chorus in the nalog Delay w/ Mod model, the modulation is applied to the delay repeats only, leaving your direct sound unaffected. DELY Dig Dly w/mod 437 MS FDBK MODSPD DEPTH Knob 1: Delay Time. Displayed in milliseconds or note value. Knob 2: Delay Feedback. Knob 3: Modulation Speed. Higher levels result in faster modulation. Knob 4: Modulation Depth. Knob 5: Mix.
31 Delay Models Stereo Delay This is another Line 6 high resolution digital delay, with separate delay times available for L and R channels. Some players set one side as a fast echo with many repeats, and the other slow with just a few repeats. Set it to taste for a rhythmic stereo delay effect. DELY R 911MS Stereo Delay L 342MS R-FDBK L-FDBK Knob 1: Delay Time for the left channel only. Knob 2: Feedback amount for the left channel. Knob 3: Delay Time for the right channel only. Knob 4: Feedback amount for the right channel. Knob 5: Mix. 5 7 Ping Pong The ever-popular Ping Pong Delay has two separate channels of delay panned left and right, with the output of each channel flowing into the other, usually used with a moderate level of feedback. DELY Ping Pong 470 MS FDBK OFFSET SPRED Knob 1: Delay Time for the left channel, displayed in milliseconds or note value. Knob 2: Delay Feedback. Higher levels result in more repeats. Knob 3: Offset. This sets the right channel delay time as a percentage of the left channel delay time. Half of the value in the screenshot above would equal 235 ms. Knob 4: Spread. The minimum position is mono, while max would be wide stereo. Knob 5: Mix.
32 Delay Models Reverse s the name implies, whatever you play on guitar is played back in reverse, delayed by the time you set with Knob 1. DELY Reverse 2000 MS FDBK MODSPD DEPTH 5 8 Knob 1: Delay Time. Displayed in milliseconds or note value. Knob 2: Delay Feedback. Knob 3: Modulation Speed. Higher levels result in faster modulation. Knob 4: Modulation Depth. Knob 5: Mix. 100% means you ll hear the reverse delay only. Dynamic Delay This effect was made popular by the TC Electronic 2290 Dynamic Digital Delay. It features a smart volume control for your delay effect s echoes, which sets the loudness of the delays based on how hard you play. When you stop playing in between phrases, the delay level increases for a dynamic effect. DELY Dynamic Dly 437 MS FDBK THRESH DUCKING Knob 1: Delay Time. Displayed in milliseconds or note value. Knob 2: Delay Feedback. Knob 3: Threshold. The breakpoint where the automatic volume control stops working and lets the echoes through at full volume. Knob 4: Ducking. djusts the level of the ducked repeats; higher settings will duck the delay level down more. Knob 5: Mix. * ll product names used in this manual are trademarks of their respective owners, which are in no way associated or affiliated with Line 6. These trademarks of other manufacturers are used solely to identify the products of those manufacturers whose tones and sounds were studied during Line 6 s sound model development. T.C. Electronic is a registered trademark of T.C. Electronic /S Corp.
33 Delay Models uto Volume Echo This model gives you two effects in one. The first is an auto-volume fade-in, like the attack time on a synthesizer s envelope generator. Higher Swell settings will give you a longer swell time, so that the sound slowly fades in. The second is an echo, complete with tapestyle wow & flutter modulation. DELY uto-volume Echo 392 MS FDBK MODDEP SWELL Knob 1: Delay Time. Displayed in milliseconds or note value. Knob 2: Delay Feedback. Knob 3: Modulation Depth. Knob 4: Swell. Sets the ramp time for the auto-volume swell. Knob 5: Mix. Echo Platter & Echo Platter DryThru 5 9 The Echo Platter model was orginally inspired by the Binson Echorec. The dry signal path had such a cool tone that we decided to include it in our original model. Echo Platter DryThru is the same model, but it gives you the option of a flat signal path when the Mix is set to 0%. Echo Platter DELY 225 MS FDBK WOW/FLT DRIVE Echo Platter DryThru DELY 225 MS FDBK WOW/FLT DRIVE Knob 1: Delay Time. Displayed in milliseconds or note value. Knob 2: Delay Feedback. Knob 3: Wow / Flutter. djusts the emulated tape s wow and flutter amount. Knob 4: Drive. djusts the amount of distortion created by the tube electronics and tape saturation. Knob 5: Mix. * ll product names used in this manual are trademarks of their respective owners, which are in no way associated or affiliated with Line 6. These trademarks of other manufacturers are used solely to identify the products of those manufacturers whose tones and sounds were studied during Line 6 s sound model development.
34
35 Modulation Models Modulation Models The following pages provide information on the 16 Modulation Models in the M13. ll 16 are from the Line 6 MM4 Modulation Modeler Stompbox. These models were originally based on a dream collection of classic effects, stomp boxes and rack units. Parameter Details In this chapter we ll describe the various parameters of the Modulation Models in detail, to make it easier for you to tweak your sounds. Below is a chart of all the Controls and Parameters you can adjust using Knobs 1 thru 5, located just below the LCD display. Modulation Models Reference Table : Controls & Parameters Model Knob 1 Knob 2 Knob 3 Knob 4 Knob 5 Opto Tremolo Speed Depth Shape Vol Sensing Mix Bias Tremolo Speed Depth Shape Vol Sensing Mix Phaser Speed Depth Feedback Phase Stage Mix Dual Phaser Speed Depth Feedback LFO Shape Mix Panned Phaser Speed Depth Phaser Output Pan Speed Mix U-Vibe Speed Depth Feedback Vol Sensing Mix nalog Flange Speed Depth Feedback Manual Mix Jet Flanger Speed Depth Feedback Manual Mix nalog Chorus Speed Depth Chorus/Vibrato Tone Mix Tri Chorus Speed Depth 1 Depth 2 Depth 3 Mix Pitch Vibrato Speed Depth Rise Time Vol Sensing Mix Panner Speed Depth Shape Vol Sensing Mix Rotary Drum Speed Depth Tone Drive Mix Rotary Drm/Hrn Speed Depth Horn Depth Drive Mix Dimension Switch 1 Switch 2 Switch 3 Switch 4 Mix Ring Modulator Speed Depth Shape M/FM Select Mix 6 1
36 Modulation Models Opto Tremolo Based on the tremolo circuitry of the 1965 Fender Deluxe Reverb amplifier, which features a pulsing light source directed at a photo resistor. B MOD Opto Tremolo SPEED DEPTH SHPE VOLSENS 6 2 Knob 1: Tremolo Speed. Knob 2: Tremolo Depth. Knob 3: Shape, from classic smooth tremolo to dramatic sci-fi throb. Knob 4: Volume Sensitivity. Louder input signals speed up the tremolo and lower input slows it down. Knob 5: Mix. Tremolo usually sounds best from % wet. Bias Tremolo This Model emulates a classic Vox tremolo circuit design. Bias tremolo produces a deep, 3-dimensional tremolo with a wide stereo spread. B MOD SHPE Bias Tremolo SPEED VOLSENS DEPTH Knob 1: Tremolo Speed. Knob 2: Tremolo Depth. Knob 3: Shape. The minimuim setting is a sign wave and max is a square wave. Knob 4: Volme Sensitivity. Louder input signals speed up the tremolo and lower volume inputs slow it down. Knob 5: Mix. s with Opto, BiasTremolo usually sounds best from % wet. * ll product names used in this manual are trademarks of their respective owners, which are in no way associated or affiliated with Line 6. These trademarks of other manufacturers are used solely to identify the products of those manufacturers whose tones and sounds were studied during Line 6 s sound model development. Fender and Deluxe Reverb are registered trademarks of Fender Musical Instruments Corp.Vox is a registered trademark of Vox R&D Limited.
37 Modulation Models Phaser Based on the MXR Phase 90, a four-stage phaser that has a relatively subtle sound compared to other phasers, but it has a lush, organic quality to it. B MOD Phaser SPEED DEPTH FDBK STG 4 STG 8 STG 12 STG 16 Knob 1: Phaser Speed. Knob 2: Phaser Depth. Keep at maximum for classic phase sounds. Knob 3: Feedback. Keep at minimum for classic, subtle phasing. Knob 4: Selects phase Stage, which determines the degree of out-of-phase-ness. Knob 5: Mix, from 0% (dry) to 100% (wet). 6 3 Dual Phaser Based on the Mu-Tron Bi-Phase, a multi-stage phaser known for its big jet sound. Our Dual Phaser gives you the lush, offset phasing that made the Bi-Phase a classic. B MOD FDBK Dual Phaser SPEED SINE SQURE DEPTH Knob 1:Phaser Speed. Knob 2: Phaser Depth. Sounds best at maximum. Knob 3: Variable feedback control. Knob 4: LFO Shape. Minimum is a Sine wave and maximum is a Square wave. Knob 5: Mix. From 0% to 100%. * ll product names used in this manual are trademarks of their respective owners, which are in no way associated or affiliated with Line 6. These trademarks of other manufacturers are used solely to identify the products of those manufacturers whose tones and sounds were studied during Line 6 s sound model development. MXR is a registered trademark of Dunlop Manufacturing, Inc. Mu-Tron is a registered trademark of Mark Simonsen.
38 Modulation Models Panned Phaser Modeled from the Ibanez Flying Pan, a 4-stage phase shifter with panner built in. The original featured a 3-position switch to assign phasing to the left, right, or center. B MOD Panned Phaser SPEED DEPTH CENTER LEFT PN SPD Mix 6 4 RIGHT Knob 1: Phaser Speed. Knob 2: Phaser Depth. Knob 3: ssigns the Phaser output to the Left, Center or Right channels. Knob 4: Pan Speed. Higher values result in faster panning. Knob 5: Mix. U-Vibe Essentially a four-stage phase shifter, the legendary Uni-Vibe is best known for its watery texture and sultry tones. Made famous by the late, great Jimi Hendrix. B MOD FDBK U-Vibe SPEED VOLSENS DEPTH Knob 1: Speed. Knob 2: Depth. Knob 3: Feedback amount. Knob 4: Volume Sensitivity. Play harder and the U-Vibe effect speeds up, play softer and it slows down. Knob 5: Mix. Setting Mix at 100% switches on a vibrato effect, like the original. * ll product names used in this manual are trademarks of their respective owners, which are in no way associated or affiliated with Line 6. These trademarks of other manufacturers are used solely to identify the products of those manufacturers whose tones and sounds were studied during Line 6 s sound model development. Uni-Vibe is a registered trademark of Dunlop Manufacturing, Inc. Ibanez is a registered trademark of Hoshino, Inc.
39 Modulation Models nalog Flange This is our model of the classic MXR Flanger. It s known for a very warm-sounding flange, featuring a bucket brigade analog circuit design and a uniquely shaped waveform. B MOD FDBK nalog Flange SPEED MN DEPTH Knob 1: Speed. Knob 2: Depth. Knob 3: Flanger Feedback. Knob 4: Manual control, to adjust the delay time for the flanging effect. Knob 5: Mix. From 0% to 100%. Jet Flanger 6 5 This is our model of the /D studio quiet Flanger. Introduced in 1977, this stomp box has a sweep range of 35-to-1 and a built-in compressor that work together with the tone circuitry to give the /D its signature jet-like sweep. It s a bit more dramatic than the MXR, and has a different wave shape. B MOD FDBK Jet Flanger SPEED MN DEPTH Knob 1: Speed. Knob 2: Depth. Knob 3: Feedback amount. Knob 4: Manual. This controls the delay time for the flanging effect. Knob 5: Mix. * ll product names used in this manual are trademarks of their respective owners, which are in no way associated or affiliated with Line 6. These trademarks of other manufacturers are used solely to identify the products of those manufacturers whose tones and sounds were studied during Line 6 s sound model development. MXR is a registered trademark of Dunlop Manufacturing, Inc.
40 Modulation Models nalog Chorus Based on the classic stomp box chorus, the Boss CE-1. The CE-1 came onto the music scene in 1977 and made waves with its big, warm chorus tones. B MOD CHORUS VIBRTO nalog Chorus SPEED TONE DEPTH 6 6 Knob 1: Chorus Speed. Knob 2: Choru Depth. Knob 3: Selects Chorus or Vibrato. Knob 4: djusts overall Tone of the Chorus effect. Knob 5: Mix. Usually sounds best with higher Mix levels. Tri Chorus This model is based on the Songbird/DyTronics Tri-Stereo Chorus. This analog chorus featured 3 chorus circuits working off of 12 low frequency oscillators and 3 delay lines. B MOD DEPTH2 Tri Chorus SPEED DEPTH3 DEPTH Knob 1: Chorus Speed. Knob 2: Depth of Circuit 1. Knob 3: Depth of Circuit 2. Knob 4: Depth of Circuit 3. Knob 5: Mix from 0% (dry) to 100% (wet). * ll product names used in this manual are trademarks of their respective owners, which are in no way associated or affiliated with Line 6. These trademarks of other manufacturers are used solely to identify the products of those manufacturers whose tones and sounds were studied during Line 6 s sound model development. Boss is a registered trademark of Roland Corp.
41 Modulation Models Pitch Vibrato Based on the Boss VB-2 vibrato, which featured a bucket brigade analog circuit that produced a lively vibrato. Its big claim to fame was the Rise Time control. Thanks to this clever circuit, each time you kicked it on, it sped up to where you last had it set. B MOD RISE Pitch Vibrato SPEED VOLSENS DEPTH Knob 1: Vibrato Speed. Knob 2: Vibrato Depth. Knob 3: Rise Time control. Lower levels mean a longer Rise Time. Knob 4: Volume Sensitivity. louder input speeds up the vibrato, and a lower input slows it down. Knob 5: Mix. 6 7 Panner The Panner model makes your sound constantly pan back and forth between the left and right stereo channels. If you decide to run it in mono, you ll basically hear tremolo. B MOD SINE Panner SPEED VOLSENS DEPTH Knob 1: Speed. Knob 2: Depth. SQURE TRINGLE Knob 3: Wave Shape. Minimum for Triangle, 50% for Sine, maximum for Square. Knob 4: Volume Sensitivity. Input level speeds up or slows down the panning rate. Knob 5: Mix. For wide stereo panning, set Mix to 100%. * ll product names used in this manual are trademarks of their respective owners, which are in no way associated or affiliated with Line 6. These trademarks of other manufacturers are used solely to identify the products of those manufacturers whose tones and sounds were studied during Line 6 s sound model development. Boss is a registered trademark of Roland Corp.
42 Modulation Models Rotary Drum Based on a Fender Vibratone, which features a rotating drum surrounding a 10 speaker. The Styrofoam drum has two slots, and the cabinet has three (left, right and top). The drum rotates with a vertical motion, sending sound spinning in all directions. B MOD TONE Rotary Drum FST DRIVE DEPTH 6 8 SLOW Knob 1: Speed. Select between two speeds, Fast or Slow. Knob 2: Depth. Knob 3: Overall Tone of the Rotary effect. Knob 4: Drive. Higher levels add an overdriven effect. Knob 5: Mix. For best results, set Mix at or near maximum. Rotary Drum/Horn Based on a Leslie 145, originally designed for the Hammond B3. The 145 features two sound sources: the lower part of the cabinet, which has a 12 speaker surrounded by a motorized rotary drum, and the upper enclosure, which houses a spinning horn. B MOD HRN DEP Rotary Drm/Hrn FST DRIVE SLOW DEPTH Knob 1: Speed. Select between two speeds, Fast or Slow. Knob 2: Depth of the lower part of the cabinet. Knob 3: Horn Depth. This adjusts the depth of the horn sound. Knob 4: Drive. Higher levels add an overdriven effect. Knob 5: Mix. For best results, set Mix at or near maximum. * ll product names used in this manual are trademarks of their respective owners, which are in no way associated or affiliated with Line 6. These trademarks of other manufacturers are used solely to identify the products of those manufacturers whose tones and sounds were studied during Line 6 s sound model development. Leslie is a registered trademark of Suzuki Musical Instrument Manufacturing Co. Ltd. Fender is a registered trademark of Fender Musical Instruments Corp. Hammond is a registered trademark of Hammond-Suzuki.
43 Modulation Models Dimension Based on the Roland Dimension D, one of the first true stereo chorus units that featured two separate delay lines working off the same oscillator. These independent chorus effects were then panned between the stereo outputs, resulting in a wide stereo image. Various combinations of the on/off switches provide a rich, smooth chorus. B MOD SW3 OFF Dimension SW1 ON SW4 OFF SW2 ON Knob 1: Selects Switch 1 On or Off. Knob 2: Selects Switch 2 On or Off. Knob 3: Selects Switch 3 On or Off. Knob 4: Selects Switch 4 On or Off. Knob 5: Mix. Keep it set near max for the best chorus sound. 6 9 Ring Modulator Ring modulators are for those special times when you want different, distinctive, weird, strange and otherwise non-traditional guitar sounds. With Mix set under 100%, some of your dry guitar sound will be heard. t 100%, there are no rules. B ring Ring modulator Modulator MOD SPEED DEPTH SHPE M/FM Knob 1: Speed. Knob 2: Depth. Knob 3: djusts your Wave Shape from Sine to Square. Knob 4: Select M (amplitude modulation) or FM (frequency modulation). Set to minimum for M, maximum for FM, or anywhere in-between to blend the two. Knob 5: Mix. Experiment with different Mix levels for different effects. * ll product names used in this manual are trademarks of their respective owners, which are in no way associated or affiliated with Line 6. These trademarks of other manufacturers are used solely to identify the products of those manufacturers whose tones and sounds were studied during Line 6 s sound model development. Roland is a registered trademark of Roland Corp.
44
45 Distortion Models Distortion Models This chapter provides parameter details on the 16 Distortion models from the Line 6 DM4. lso included are a Volume model, 6 Compressors and a Noise Gate. Most of the Distortions have the same parameters, and are controlled by Knobs 1 thru 5 as follows: Knob 1: Drive control. Knob 2: Bass EQ. Knob 3: Mid EQ. Knob 4: Treble EQ. Knob 5: Output level. Distortion Models Reference Table : Controls & Parameters Model Knob 1 Knob 2 Knob 3 Knob 4 Knob 5 Tube Drive Drive Bass Mid Treble Output Screamer Drive Bass Mid Treble Output Overdrive Drive Bass Mid Treble Output Classic Dist Drive Bass Filter Treble Output Heavy Dist Drive Bass Mid Treble Output Colordrive Drive Bass Mid Treble Output Buzz Saw Drive Bass Mid Treble Output Facial Fuzz Drive Bass Mid Treble Output Jumbo Fuzz Drive Bass Mid Treble Output Fuzz Pi Drive Bass Mid Treble Output Jet Fuzz Drive Fdbk Tone Speed Output Line 6 Drive Drive Bass Mid Treble Output Line 6 Distortion Drive Bass Mid Treble Output Sub Octave Fuzz Drive Bass Sub Treble Output Octave Fuzz Drive Bass Mid Treble Output Boost Comp Drive Bass Comp Treble Output 7 1
46 Distortion Models Tube Drive Based on the Chandler Tube Driver. The original was designed by keyboardist Brent Butler to add grind and girth to his Farfisa. Utilizing a single 12X7 preamp tube, the Tube Driver delivers the sweet singing sustain craved by guitarists worldwide. DIST Tube Drive DRIVE BSS Screamer MID TREBLE OUTPUT Based on the Ibanez TS-808 Tube Screamer. This medium-gain pedal was introduced in the early 80s. From Stevie Ray Vaughan to Michael Landau, the simple Tube Screamer is the overdrive heard round the world. 7 2 Screamer DIST DRIVE BSS TONE TREBLE OUTPUT Knob 3 controls Tone, true to the original Tube Screamer s Tone knob. Overdrive Based on the DOD Overdrive/Preamp 250, which was designed to slam the input of a tube guitar amp as well as add distortion. The original had only gain and level controls, but the M13 adds Bass, Mid and Treble EQ. DIST Overdrive DRIVE BSS MID TREBLE OUTPUT You can set Knob 1 at a minimum level on this and other Distortion models to get a boost in level without distorting your tone too much. * ll product names used in this manual are trademarks of their respective owners, which are in no way associated or affiliated with Line 6. These trademarks of other manufacturers are used solely to identify the products of those manufacturers whose tones and sounds were studied during Line 6 s sound model development. Tube Driver is a registered trademark of Butler udio, Inc. Ibanez is a registered trademark of Hoshino, Inc. Tube Screamer is a registered trademark of Hoshino Gakki Co. Ltd. DOD is a registered trademark of DOD Electronics Corp.
47 Distortion Models Classic Distortion Based on the ProCo Rat from the late 70s. The Rat was the beginning of a new generation of distortion boxes, with a sound that was angrier and more aggressive than a conventional fuzz tone. DIST Classic Dist DRIVE BSS FILTER TREBLE OUTPUT Knob 3 functions like the original Rat s Filter control, which gives you a brighter tone at lower settings, and a darker tone at higher settings. Heavy Distortion Based on the Boss MT-2 Metal Zone, which was introduced at the height of the big-hair metal craze of the late 80s/early 90s. Heavy and scooped, the tones of this model beg to be chunked upon. DIST Heavy Dist DRIVE BSS 7 3 MID TREBLE OUTPUT Colordrive Based on the Colorsound Overdriver, which originated from London s Macari s Music Exchange in With a high demand for Tone Benders at that time, brothers Larry and Joe Macari started building their own unique pedals under the name Sola/Colorsound. DIST Colordrive DRIVE BSS MID TREBLE OUTPUT Knob 3 at 50% has no effect on the Mids; below 50% is a cut, above 50% a boost. * ll product names used in this manual are trademarks of their respective owners, which are in no way associated or affiliated with Line 6. These trademarks of other manufacturers are used solely to identify the products of those manufacturers whose tones and sounds were studied during Line 6 s sound model development. Boss is a registered trademark of Roland Corp. Colorsound is a registered trademark of Sola Sound Limited Corp.
48 Distortion Models Buzz Saw Based on the Maestro Fuzz Tone. Legend has it that the sound of this pedal was inspired by a broken and buzzing mixer channel heard in Nashville in DIST Buzz Saw DRIVE BSS Facial Fuzz MID TREBLE OUTPUT Based on the rbiter Fuzz Face, the infamous circular stompbox that hit the London music scene in It s best known for its association with guitar legend Jimi Hendrix. DIST Facial Fuzz DRIVE BSS 7 4 Jumbo Fuzz MID TREBLE OUTPUT Based on the Vox Tone Bender. The classic Tone Bender sound can be heard all over the early Led Zeppelin albums, and is especially apparent on Communication Breakdown. DIST Jumbo Fuzz DRIVE BSS Fuzz Pi MID TREBLE OUTPUT Based on the Electro-Harmonix Big Muff π. merica s answer to the British fuzz pedals, the Big Muff π was known more for its sweet sustain than for its buzz. DIST Fuzz Pi DRIVE BSS MID TREBLE OUTPUT * ll product names used in this manual are trademarks of their respective owners, which are in no way associated or affiliated with Line 6. These trademarks of other manufacturers are used solely to identify the products of those manufacturers whose tones and sounds were studied during Line 6 s sound model development. Maestro is a registered trademark of Gibson Guitar Corp. rbiter is a registered trademark of rbiter Group PLC. Vox is a registered trademark of Vox R&D Limited. Electro-Harmonix and Big Muff Pi are registered trademarks of New Sensor Corp.
49 Distortion Models Jet Fuzz Based on the Roland Jet Phaser/P-7. s Roland states in their catalog from the 70s:... the Jet Phaser is a phase shifter producing dynamic jet sounds for rock guitar. DIST Jet Fuzz DRIVE FDBK TONE SPEED OUTPUT Knob 2 controls the amount Feedback. Knob 3 controls the Tone of the fuzz. Knob 4 controls the Speed of the phasing. Line 6 Drive Line 6 original, this model makes special use of Knob 3, labeled Mid. t minimum, you ll get the sound of a 70s-style fuzz box clone. s you adjust it towards 50%, you ll get a more modern, high gain sound like the Rat or the Boss Super Distortion. Turning it up to maximum, you ll get the gritty bite typical of a Sola Sound Tone Bender. 7 5 DIST Line 6 Drive DRIVE BSS MID TREBLE OUTPUT Line 6 Distortion nother Line 6 original, this model is out of control. Sure, it s massive. Yes, it s over the top. But it s a great distortion model. DIST Line 6 Dist DRIVE BSS MID TREBLE OUTPUT * ll product names used in this manual are trademarks of their respective owners, which are in no way associated or affiliated with Line 6. These trademarks of other manufacturers are used solely to identify the products of those manufacturers whose tones and sounds were studied during Line 6 s sound model development. Roland and Boss are registered trademarks of Roland Corp.
50 Distortion Models Sub Octave Fuzz Inspired by the Pi Roctave Divider, which combined a double octave shift with a fuzz effect, resulting in deep fat square wave distortion. DIST Sub Oct Fuzz DRIVE BSS SUB TREBLE OUTPUT Knob 3 controls the amount of Sub octave content. Octave Fuzz Based on the Tycobrahe Octavia, another example of a fuzz plus octave effect. The Octavia used an audio output transformer and two germanium diodes to rectify the guitar signal, creating the high octave type sound. Jimi Hendrix used one on Purple Haze. 7 6 DIST Octave Fuzz DRIVE BSS MID TREBLE OUTPUT Boost Comp Based on the MXR Micro mp. This effect was used to push the front-end of nonmaster volume tube amps in order to achieve a cranked sound at less than stadium levels. DIST Boost Comp DRIVE BSS COMP TREBLE OUTPUT Knob 3 adds Compression similar to that of an MXR Dyna Comp. * ll product names used in this manual are trademarks of their respective owners, which are in no way associated or affiliated with Line 6. These trademarks of other manufacturers are used solely to identify the products of those manufacturers whose tones and sounds were studied during Line 6 s sound model development. MXR is a registered trademark of Dunlop Manufacturing, Inc.
51 Distortion Models Volume Pedal Use the Volume Pedal model in any of the 4 FX Units to control Volume using an expression pedal. Set your minimum Volume by adjusting Knob 1. DIST Volume Pedal VOLUME Red Comp Based on the MXR Dyna Comp. DIST Red Comp SUSTIN LEVEL Blue Comp 7 7 Based on the Boss CS1 Compression Sustainer with the Treble switch off. DIST Blue Comp SUSTIN LEVEL Blue Comp Treb Based on the Boss CS1 Compression Sustainer with the Treble switch on. DIST Blue Comp Treb SUSTIN LEVEL * ll product names used in this manual are trademarks of their respective owners, which are in no way associated or affiliated with Line 6. These trademarks of other manufacturers are used solely to identify the products of those manufacturers whose tones and sounds were studied during Line 6 s sound model development. MXR is a registered trademark of Dunlop Manufacturing, Inc. Boss is a registered trademark of Roland Corp.
52 Distortion Models Vetta Comp From the Line 6 Vetta. djust the threshold with Knob 1, the Sensitivity control. DIST Vetta Comp SENS LEVEL Vetta Juice nother Vetta original. Knob 1 adjusts mount, a variable Compression ratio control. Knob 2 adjusts Level, with 30dB of available gain. DIST Vetta Juice MOUNT LEVEL 7 8 Tube Comp This is a Compressor model from the POD X3 family, based on a vintage Teletronix L- 2 optical compressor. djust Threshold with Knob 1 and Level with Knob 2. DIST Tube Comp THRESH LEVEL Noise Gate If you re not using the M13 s Global Noise Gate, you can use this model in any or the 4 FX Units. Knob 1 controls the Threshold, and Knob 2 controls Decay. DIST Noise Gate THRESH DECY * ll product names used in this manual are trademarks of their respective owners, which are in no way associated or affiliated with Line 6. These trademarks of other manufacturers are used solely to identify the products of those manufacturers whose tones and sounds were studied during Line 6 s sound model development. Teletronix L-2 is a registered trademark of Universal udio Inc.
53 Filter Models Filter Models These pages provide details on the 16 Filter Models in the M13. ll 16 are from the Line 6 FM4 Filter Modeler Stompbox. few Line 6 originals are also included. Parameter Details In this chapter we ll describe the various parameters of all the Filter Models in detail, to make it easier for you to tweak your sounds. Below is a chart of all the Controls and Parameters you can adjust using Knobs 1 thru 5, located just below the LCD display. Filter Models Reference Table : Controls & Parameters Model Knob 1 Knob 2 Knob 3 Knob 4 Knob 5 Tron Down Freq Q (Width) Range Filter LP/BP/HP Mix Tron Up Freq Q (Width) Range Filter LP/BP/HP Mix Seeker Freq Q (Width) Speed Steps 2-9 Mix Obi-Wah Freq Q (Width) Speed Filter LP/BP/HP Mix Voice Box Strt Vowel End Vowel Speed uto 1-4 Mix V Tron Strt Vowel End Vowel Speed (ttack) Up/Down Mix Throbber Freq Q (Width) Speed Shape Mix Spin Cycle Freq Q (Width) Speed Vol Sensing Mix Comet Trails Freq Q (Width) Speed Gain Mix Slow Filter Freq Q (Width) Speed (ttack) Up/Down Mix Octisynth Freq Q (Width) Speed (Vibrato) Depth (Vibrato) Mix Synth O Matic Freq Q (Width) Waveform Pitch Mix ttack Synth Freq Ramp Speed (ttack) Pitch Mix Synth String Freq ttack Speed (Modulation) Pitch Mix Growler Freq Q (Width) Speed Pitch Mix Q Filter Freq Q (Width) Gain Filter LP/BP/HP Mix 8 1
54 Filter Models Tron Down Inspired by the Mu-Tron III envelope follower, part auto-wah, part triggered filter. The original Mu-Tron had an up/down switch. This model is the Tron Down version. C FILTER LOW Tron Down FREQ LP Q HIGH BP HP Knob 1: Frequency. Determines the high and low settings of the filter sweep. Knob 2: Q. Sets the width of the filter. Knob 3: Range. Selects High or Low frequency focus of the filter effect. Knob 4: Filter. Selects Low Pass, Band Pass, or High Pass filter. Knob 5: Mix. 8 2 Tron Up This model emulates the Mutron III with its switch in the up position. C FILTER LOW Tron Up FREQ LP Q HIGH BP HP Knob 1: Frequency. Determines the high and low settings of the filter sweep. Knob 2: Q. This sets the width of the filter. Knob 3: Range. Selects High or Low frequency focus of the filter effect. Knob 4: Filter. Selects Low Pass, Band Pass, or High Pass filter. Knob 5: Mix. * ll product names used in this manual are trademarks of their respective owners, which are in no way associated or affiliated with Line 6. These trademarks of other manufacturers are used solely to identify the products of those manufacturers whose tones and sounds were studied during Line 6 s sound model development. Mu-Tron is a registered trademark of Mark Simonsen.
55 Filter Models Seeker Inspired by the Z-Vex Seek Wah, a box that contains 8 parked wah filters that can be set at varying positions and then sequenced through, creating a pulsating hypnotic effect. C FILTER 5.80HZ Seeker FREQ 8 STEPS Q 2 STEPS 4 STEPS 3 STEPS 5 STEPS 6 STEPS 7 STEPS 9 STEPS Knob 1: Frequency. Select from a range of sequenced patterns of wah filter settings. Knob 2: Q. Sets the width of the filters. Knob 3: Speed. Controls the time it takes to cycle through the filters. Knob 4: Steps. Sets the number of filter steps in the sequence, from 2 to 9. Knob 5: Mix. Obi-Wah Based on the Oberheim Voltage Controlled Filter, a classic Sample and Hold filter, which creates changes in tone by randomly emphasizing certain frequencies. 8 3 C FILTER 6.33HZ Obi Wah FREQ BP Q LP HP Knob 1: Frequency. Sets the frequency where the filter will change your tone. Knob 2: Q. Controls the width of the filter. Knob 3: Speed. Sets the rate of the random filter changes. Knob 4: Filter. Selects the type of filter used (Low Pass, Band Pass or High Pass). Knob 5: Mix. * ll product names used in this manual are trademarks of their respective owners, which are in no way associated or affiliated with Line 6. These trademarks of other manufacturers are used solely to identify the products of those manufacturers whose tones and sounds were studied during Line 6 s sound model development. Oberheim is a registered trademark of Gibson Guitar Corp.
56 Filter Models Voice Box Inspired by Vocoders, this model gives your guitar a sound that s typical of a classic talk box. It shifts between a starting and ending vowel sound as you play, automatically. Knob 1 selects a Start vowel and Knob 2 selects an End vowel. uto lets you choose one of four settings for shifting back and forth between the Start vowel and End vowel, automatically shifting at the Speed you set with Knob 2. You can also use an expression pedal to control the shift. C Voice Box FILTER SRT "" 2.95HZ UTO 1 END "I" SRT "E" SRT "I" SRT "O" SRT "U" UTO 2 UTO 3 UTO 4 END "" END "E" END "O" END "U" 8 4 Knob 1: Sets the starting vowel sound (, E, I, O or U). Knob 2: Sets the ending vowel sound (, E, I, O or U). Knob 3: Speed. Set how long it takes to speak from Start to End vowel. Knob 4: uto. Select among 4 different start-to-stop vocal transition settings. Knob 5: Mix. * ll product names used in this manual are trademarks of their respective owners, which are in no way associated or affiliated with Line 6. These trademarks of other manufacturers are used solely to identify the products of those manufacturers whose tones and sounds were studied during Line 6 s sound model development.
57 Filter Models V Tron This model is based on the combination of a Mu-Tron III envelope filter and a Voice Box effect. With the V Tron, your guitar speaks with an almost human voice in response to your playing. Each time you strike a new note or chord, the vowel sequence will be spoken. You can choose whether to go from Start vowel to End vowel only (Up), or have it turn around and come back again (Up/Down). C END "U" V Tron FILTER SRT "" END "U" SPEED SRT "E" SRT "I" SRT "O" SRT "U" UP/DOWN UP END "" END "E" END "I" END "O" Knob 1: Sets the starting vowel sound (, E, I, O or U). Knob 2: Sets the ending vowel sound (, E, I, O or U). Knob 3: Speed. Set how long it takes to speak from Start to End vowel. Knob 4: Mode. Selects either Up or Up/Down. Knob 5: Mix. 8 5 * ll product names used in this manual are trademarks of their respective owners, which are in no way associated or affiliated with Line 6. These trademarks of other manufacturers are used solely to identify the products of those manufacturers whose tones and sounds were studied during Line 6 s sound model development. Mu-Tron is a registered trademark of Mark Simonsen.
58 Filter Models Throbber Inspired by the versatile Electrix Filter Factory. Like the LFO section of the Filter Factory, the Throbber alters the brightness of your tone with an emphasis on a specific frequency that you can select. Throbber is perfect for those Electronica sounds. C FILTER 4.80HZ Throbber FREQ RMP UP RMP DW TRINGLE Q 8 6 Knob 1: Frequency: Selects a specific frequency range for the filter. Knob 2: Q. Controls the width of the filter. Knob 3: Speed. Sets the rate of the low frequency oscillator. Knob 4: Mode. Selects between four different wave shapes. Knob 5: Mix. Spin Cycle SQURE Inspired by Craig nderton s Wah/nti-Wah, this effect takes full advantage of the M13 s stereo capabilities. It s essentially two wah pedals panned L & R that wah in the opposite direction from each other. One goes up while the other goes down. dditionally, the wahs are sweeping from min to max automatically, and they react to playing volume. C FILTER Spin Cycle FREQ Q 1.21HZ VOLSENS Knob 1: Frequency. Controls the range of the filter emphasis in the wah tone. Knob 2: Q. Controls the width of the filter. Knob 3: Speed. Sets the speed at which the wah effects sweep. Knob 4: Volume Sensitivity. Sets the way volume will affect the speed of the effect. Knob 5: Mix. * ll product names used in this manual are trademarks of their respective owners, which are in no way associated or affiliated with Line 6. These trademarks of other manufacturers are used solely to identify the products of those manufacturers whose tones and sounds were studied during Line 6 s sound model development. Electrix is a registered trademark of Electrix Pro, Inc.
59 Filter Models Comet Trails fter several days spent crafting the code that makes up our digital secret sauce, one of our DSP developers came up with an inspired model that features 7 filters, all chasing each other around and looping back and forth across sonic space. We call it Comet Trails. C FILTER 3.33HZ Comet Trails FREQ GIN Q Knob 1: Frequency. Controls the range of the filters. Knob 2: Q. Controls the width of the filters. Knob 3: Speed. Sets the rate of the filter movement. Knob 4: Gain. Controls the overall Gain. Knob 5: Mix. Slow Filter This triggered filter rolls off the high end of your tone, with adjustable speed. You get a choice of having your tone sweep from dark to bright (Up mode), or bright to dark (Down mode). The Q lets you further shape your tone by creating a sharp boost at the point of the high end roll off. 8 7 C FILTER SPEED Slow Filter FREQ UP Q DOWN Knob 1: Frequency. Sets where the filter begins its tone shaping roll-off. Knob 2: Q. Controls the width of the filter. Knob 3: Speed. Sets the speed of the filter sweep. Knob 4: Mode. Selects between two modes: Up or Down. Knob 5: Mix.
60 Filter Models Octisynth This model is a velocity sensitive combination of Ring Modulator, Synthesizer VCO and Vibrato pedal. s an added bonus, your guitar s volume knob can control the frequency of the oscillator. Set it low for a mellow, muted response, or turn it up all the way for a radical, aggressive sound. C FILTER 0.10HZ Octisynth FREQ DEPTH Q 8 8 Knob 1: Frequency. Controls filter content, adding second order harmonics. Knob 2: Q. Controls the width of the filters. Knob 3: Speed. Sets the rate of the Vibrato. Knob 4: Depth. Controls the Depth of the Vibrato. Knob 5: Mix. Synth O Matic This model features waveforms captured from a collection of vintage analog synths, including a Moog Modular and an Oberhiem Synthesizer Expander Module. C FILTER WVE 7 Synth O Matic FREQ PITCH Q WVE 1 WVE 5 WVE 6 WVE 2 WVE 3 WVE 4 WVE 8 Knob 1: Frequency. Determines how bright your sound will be. Knob 2: Q. Sets filter width to add more or less emphasis on the selected frequency. Knob 3: Speed. Selects one of the eight synth waveforms. Knob 4: Pitch. Controls the Pitch of the synth sound. Knob 5: Mix. * ll product names used in this manual are trademarks of their respective owners, which are in no way associated or affiliated with Line 6. These trademarks of other manufacturers are used solely to identify the products of those manufacturers whose tones and sounds were studied during Line 6 s sound model development. Oberheim is a registered trademark of Gibson Guitar Corp. Moog is a registered trademark of Moog Music.
61 Filter Models ttack Synth Inspired by a Korg X911 Guitar Synth. The ttack Synth model features one of the waveforms used in the original X911, along with a few of the unique wave shaping functions we found on the unit we modeled. C FILTER SPEED ttack Synth FREQ PITCH RMP SQURE Knob 1: Frequency. Controls the stop frequency of the filter (VCF on the X911). Knob 2: Q. Selects Square, Pulse Width Modulation or Ramp for the waveform. Knob 3: Speed. Controls ttack (the time it takes to get to the stop frequency). Knob 4: Pitch. Controls Pitch over a two octave range. Knob 5: Mix. Synth String Based on the Roland GR700 Guitar Synth, which has some of the coolest analog synth sounds designed for guitar. The Synth String model is based on one of the signature sounds of the GR700. PWM 8 9 C FILTER 0.69HZ Synth String FREQ PITCH TTCK Knob 1: Frequency. Controls a low pass filter tone control. Knob 2: Q. Controls the attack time. Knob 3: Speed. Sets the speed of the vibrato-y pulse width modulation. Knob 4: Pitch. Controls the Pitch of the effect over a two octave range. Knob 5: Mix. * ll product names used in this manual are trademarks of their respective owners, which are in no way associated or affiliated with Line 6. These trademarks of other manufacturers are used solely to identify the products of those manufacturers whose tones and sounds were studied during Line 6 s sound model development. Korg is a registered trademark of Korg, Inc. Roland is a registered trademark of Roland Corp.
62 Filter Models Growler For the Growler, we modeled yet another great-sounding GR700 tone and fused it with the characteristics of the Mu-tron III, resulting in a model that gives you user-controllable pitch and pulse width modulation, and a unique sound. C FILTER 0.84HZ Growler FREQ PITCH Q 8 10 Q Filter Knob 1: Frequency. Controls the frequency of the filter. Knob 2: Q. Sets the width of the filter. Knob 3: Speed. Dials in the speed of the vibrato-y pulse width modulation. Knob 4: Pitch. Controls the Pitch of the synth over a two octave range. Knob 5: Mix. This is essentially a parked wah model a wah parked in one position that creates a unique, notched kind of sound. With the Q Filter, this effect is programmable and repeatable. You can even use it as a wah pedal if you connect an expression pedal to the M13 and set it to sweep Frequency from low to high. C FILTER GIN Q Filter FREQ LP Q BP HP Knob 1: Frequency. Controls filter frequency (like the position of a wah pedal). Knob 2: Q. Controls the width of the filter. Knob 3: Speed. Sets the gain (the amount of boost the effect gives to your guitar). Knob 4: Filter. selects the type of filter effect (Low Pass, Band Pass, or High Pass). Knob 5: Mix. * ll product names used in this manual are trademarks of their respective owners, which are in no way associated or affiliated with Line 6. These trademarks of other manufacturers are used solely to identify the products of those manufacturers whose tones and sounds were studied during Line 6 s sound model development. Mu-Tron is a registered trademark of Mark Simonsen. Roland is a registered trademark of Roland Corp.
63 Reverb Models Reverb Models This chapter describes the 11 Reverb models we ported from the Line 6 Verbzilla pedal, one of our most popular stomps in the ToneCore family. ll Reverbs are stereo, and they sound best routed towards the end of your FX chain. Parameter Details s indicated in the Reference Table below, all M13 Reverb models are set up the same way. Mix is persistent for all Reverbs (your Mix level will stay the same when you load a different Reverb model). Knobs 1 thru 5 control the following for all Reverb models: Knob 1: Decay time. Knob 2: Pre-delay time, adjustable from 20 to 200 milliseconds. Knob 3: No assignment for the Reverb models. Knob 4: Overall Tone of the wet reverb signal. Knob 5: Mix from 0% (dry) to 100% (at 100% you ll hear wet reverb signal only) Reverb Models Reference Table : Controls & Parameters Model Knob 1 Knob 2 Knob 3 Knob 4 Knob 5 63 Spring Decay Pre-Delay - Tone Mix Spring Decay Pre-Delay - Tone Mix Plate Decay Pre-Delay - Tone Mix Room Decay Pre-Delay - Tone Mix Chamber Decay Pre-Delay - Tone Mix Hall Decay Pre-Delay - Tone Mix Ducking Decay Pre-Delay - Tone Mix Octo Decay Pre-Delay - Tone Mix Cave Decay Pre-Delay - Tone Mix Tile Decay Pre-Delay - Tone Mix Echo Decay Pre-Delay - Tone Mix 9 1
64 Reverb Models 63 Spring Based on a 1963 brown self-contained spring reverb head unit. Best known for great surf guitar tone. D REVERB '63 Spring DECY 110 ms Spring TONE Based on a studio spring reverb. The spring reverb s characteristic resonant sound was created by springs suspended inside a metal box. D REVERB Spring DECY 110 ms Plate TONE Plate reverbs consisted of a thin metal sheet suspended inside a box. Dampening the metal plate was a method for adjusting the reverberant effect. 9 2 D REVERB Plate DECY 110 ms Room TONE Simulates the acoustic properties of a classic echo chamber, which was a room used in early recording studios for reverb effects. Room reverbs consist mainly of early reflections. D REVERB Room DECY TONE 110 ms
65 Reverb Models Chamber n elongated ambient space such as a hallway, stairwell or elevator shaft creates this reverb type. Lots of decay on tap here. D REVERB Chamber DECY 110 ms Hall TONE This model simulates the sound of a concert hall or large open space with a strong reverb tail. Imagine a gymnasium, performance hall, or cathedral. D REVERB Hall DECY 110 ms Ducking TONE Built using a Hall model but with a ducking effect. The volume of your reverb is ducked (reduced) while you re playing, and increases when you pause between phrases. D REVERB Ducking DECY 110 ms 9 3 Octo TONE Creates a lush, ambient space. Its dense, harmonic decay is controlled by Knob 1 (Decay Time). Octo is very effective when using volume swells. D REVERB Octo DECY TONE 110 ms
66 Reverb Models Cave Line 6 original. Cave is a surreal, cavernous echo chamber. Definitely deep. D REVERB Cave DECY 110 ms Tile TONE This model Emulates the acoustic reflections of a tiled room, such as a bathroom or shower, with clearer/brighter discreet early reflections. D REVERB Tile DECY 110 ms Echo TONE nother Line 6 original. This is a lush echo with reverb, and distinct repeats as it decays. 9 4 D REVERB Echo DECY 110 ms TONE
67 ppendix : Reference ppendix : Reference MIDI Control The M13 will send and receive MIDI CC and Program Change messages on any MIDI Channel from 1 thru 16 or Omni, selectable from the M13 Setup mode, LCD 4. MIDI implementation includes MIDI CCs for Looper Control, FX Unit On and Bypass messages, Tap Tempo, Expression Pedal CCs and Program Change messages for Scene select. It is therefor possible to control the M13 from a MIDI controller or a computer sequencer. The most common application would probably be to use a separate MIDI controller to control the M13 Looper, so that all 12 Scene select switches on the M13 would be available for individual FX control. Individual Model selection and assignment for each FX Unit from the 5 different FX groups is not implemented, but individual FX loaded into the, B and C memory locations of all 4 FX Units can be engaged or bypassed via MIDI CCs. The MIDI Reference Tables in this chapter represent the currenly implemented MIDI spec. more expanded MIDI implementation may be forthcoming in future M13 firmware updates. Looper & Expression Pedals M13 Footswitch MIDI CC# Looper Function Record/Overdub 50 0 to 63 = Overdub 64 to 127 = Record Play/Stop 28 0 to 63 = Stop 64 to 127 = Play Half Speed 36 Toggles between Half Speed & Normal Speed Reverse 85 Toggles Reverse On or Off Undo 82 ctivates Undo Play Once 80 ctivates Play Once function Pre/Post 84 0 to 63 = Pre 64 to 127 = Post Looper Levels --- Controlled via EXP pedal only -- not MIDI CC 1 Expression Pedal to 127 Expression Pedal to 127 Tap Tempo 64 2 taps determine tempo
68 ppendix : Reference FX On/Off Toggle Memory Location MIDI CC# FX Unit to 63 = Bypass 64 to 127 = On FX Unit 1B 12 0 to 63 = Bypass 64 to 127 = On FX Unit 1C 13 0 to 63 = Bypass 64 to 127 = On FX Unit to 63 = Bypass 64 to 127 = On FX Unit 2B 15 0 to 63 = Bypass 64 to 127 = On FX Unit 2C 16 0 to 63 = Bypass 64 to 127 = On FX Unit to 63 = Bypass 64 to 127 = On FX Unit 3B 18 0 to 63 = Bypass 64 to 127 = On FX Unit 3C 19 0 to 63 = Bypass 64 to 127 = On FX Unit to 63 = Bypass 64 to 127 = On FX Unit 4B 21 0 to 63 = Bypass 64 to 127 = On FX Unit 4C 22 0 to 63 = Bypass 64 to 127 = On Scene Select 2 Memory Location Program Change Scene 1C 0 Scene 1C Selected Scene 1B 1 Scene 1B Selected Scene 1 2 Scene 1 Selected Scene 2C 3 Scene 2C Selected Scene 2B 4 Scene 2B Selected Scene 2 5 Scene 2 Selected Scene 3C 6 Scene 3C Selected Scene 3B 7 Scene 3B Selected Scene 3 8 Scene 3 Selected Scene 4C 9 Scene 4C Selected Scene 4B 10 Scene 4B Selected Scene 4 11 Scene 4 Selected
69 ppendix : Reference BPM / Milliseconds BPM 1/4 Note 1/8 Note 1/16 Note 1/4 Triplet 1/8 Triplet 1/32 Note
70
71 ppendix B : Tips p p e n d i x B : Ti p s We ve had several questions from M13 users regarding saving Scenes, either within the M13 itself or when performing MIDI Dumps to computer. This chapter includes some helpful tips on how to best save and recall your custom Scenes, as well as step by step instructions on how to update your firmware. It s important to be aware that the M13 will function differently depending on whether you have it set to uto Save or Manual Save mode, as described on Page 3 2 of the Scenes Details chapter. In the following examples, we ll outline those differences and hopefully answer any questions you may have regarding saving and recalling Scenes. MIDI Dumps When saving Scenes via MIDI Dumps and loading them back into your M13, as described on Page 1 5, you should be aware of the fact that uto Save and Manual Save will have an effect on whether your Scenes are automatically saved in your M13 or not. For example, if you back up a single custom Scene to your computer via MIDI using the DUMP EDIT command, then later you want to load that Scene back into your M13, here are your two options for saving your Scene: 1. With your M13 set to uto Save... Select the destination Scene location you want to use in your M13 (such as Scene 1), then send the sysex from your computer via MIDI. Your custom Scene will load into Scene 1 and automatically save to that location. 2. With your M13 set to Manual Save... Select the destination Scene location you want to use in your M13 (such as Scene 1), then send the sysex from your computer via MIDI. Your custom Scene will load into Scene 1, but it will NOT automatically save to that location. To save it, you must immediately enter Scene Setup Mode after you load the Scene into location 1, then manually save that Scene (as described on Page 3 3). The exception to this rule is when you use the DUMP LL command to back up all your Scenes to computer, then you want to load all those Scenes into your M13 again. In this case, when you send the sysex via MIDI from your computer into your M13, all your Scenes, including any custom Scenes, will load and be saved in your M13 regardless of whether it s set to uto Save or Manual Save. *(Mac Users see Page B 4) B 1
72 ppendix B : Tips Saving Scenes Internally With your M13 set to uto Save, if you make changes to a Scene and you want to give it a new name, here s how to do it: Enter Scene Setup mode by pressing and holding the Scenes switch. Select the Scene you re already on by stepping on its switch (2B for example). Rename it as described on Page 3 3. Once you have the name you like, you can simply exit Scene Setup mode by pressing any switch and your new name for Scene 2B will be automatically saved. With your M13 set to Manual Save, if you make changes to a Scene and you want to give it a new name, you start out the same way, but you add an extra step, as follows: Enter Scene Setup mode by pressing and holding the Scenes switch. Select the Scene you re already on by stepping on its switch (2B for example). Rename it as described on Page 3 3. But this time, once you have the name you like, you must add the following step: Press and hold the switch for Scene 2B again, until its LED stops flashing. The LCD will then display Copy Completed, and your new name will be saved, along with all the Scene s current settings. Recalling The Current Scene If you change a Scene s configuration, then you step on the Scenes switch and recall the same Scene you re already on, the Scene will not change from its current settings. B 2 If you select a different Scene, however, then go back to your previous scene, you will get different results depending on whether you re in Manual Save or uto Save mode, as follows: When in uto Save mode, the M13 will retain all the changes you just made. ll the previously saved settings will be overwritten with your most recent settings. When In Manual Save mode, the M13 will NOT retain all the changes you just made. Instead, it will recall the Scene s previously saved settings.
73 ppendix B : Tips Flash Memory Update Instructions Here are some instructions on how to update your M13 s Flash Memory. Please note that Line 6 does not endorse Cubase, MIDI Ox or Sysex Librarian. We refer to these apps as examples only, since users report that they often use them to perform firmware updates. Needed: MIDI interface that connects to your computer via USB (download the current Driver for it if you don t have it installed). 2 MIDI cables (or a MIDI interface that comes with MIDI cables attached). MIDI sequencer app such as Cubase, or a sysex app such as MIDI Ox (Windows) or Sysex Librarian (Mac). Mac users: go to Page B 4 and follow the steps under Procedure. dditional Info For Windows/MIDI Ox Users: Make sure your MIDI interface Driver is installed and working. Run the MIDI Ox application. Go to Option, then MIDI Devices, select USB udio Device for both MIDI Inputs and MIDI Outputs; uncheck utomatically ttach Inputs To Outputs During Selection; click OK to accept it. Go to View, then Port Routing, delete the connection between Input Ports and Output ports if they are connected; make sure only MIDI Ox Event Port connects to Output Ports. Go to View, then Sysex; In Sysex View and Scratchpad, go to Sysex, then Configure, make sure you check Delay after F7 and set the Delay (Milliseconds Between Buffers) to 101; click OK to accept. Now go to Page B 4 and follow the steps under Procedure. (NOTE: if the update fails and you re using a USB hub, please try it without the hub). B 3
74 ppendix B : Tips Procedure: 1. Connect your MIDI interface to your computer via USB cable. 2. Connect the M13 MIDI Out to your MIDI interface In, and connect the M13 MIDI In to your MIDI interface Out. 3. Make sure your computer is set up to see the MIDI interface (on Mac, you must configure udio MIDI Setup; on Win, see dditional Instructions For Windows Users on the previous page). 4. Download the latest M13 Firmware from the Line 6 website (log in with your Line 6 User Name). 5. Launch your sysex app and select your MIDI interface Out port (for Sysex Librarian, use the top dropdown menu; for MIDI Ox, select Options/MIDI Devices). 6. Load the M13 sysex file (in Sysex Librarian, select dd to Library from the File menu; In MIDI Ox, select ctions/send/sysex File from the File Menu; then navigate to the M13 sysex file you downloaded from the Line 6 website). 7. Press Play (Sysex Librarian), or if using MIDI Ox, the file will be automatically transmitted once it is selected in the previous step. 8. The M13 will receive the sysex data and the unit will be updated to the latest Firmware. It will reboot automatically. Backup Tip For Mac Users If you re using Sysex Librarian to back up your Scenes, be sure to click on RECORD MNY in Sysex Librarian when you perform a DUMP LL or DUMP EDIT command in your M13 (as opposed to clicking on RECORD ONE). B 4 DUMP LL will transmit 196 messages, and a DUMP EDIT will transmit 16. So if you were to click on RECORD ONE, you would be recording only the first message from the M13, instead of 196 or 16 messages, resulting in an incomplete and unusable backup file.
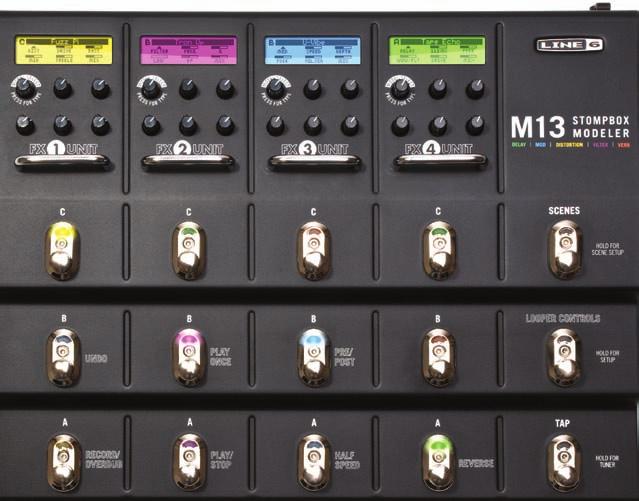
75
DELAY MODELER DETAILS
 DELAY MODELER QUICK REFERENCE CHART FOR MODEL-SPECIFIC FUNCTIONS 12 Rhythmic Delays 3 3 3 MODEL TWEAK TWEEZ Tube Echo Wow & Flutter Drive Tape Echo Bass Treble Multi-head Heads 1/2 Heads 3/4 Sweep Echo
M9 & M13 v2.0 DELAY MOD DISTORTION FILTER VERB. FX Parameters. An in-depth guide to the FX Parameters of the M9 & M13 Stompbox Modelers
 M9 & M13 v2.0 DELY MOD ORTION FILTER VERB FX Parameters n in-depth guide to the FX Parameters of the M9 & M13 Stompbox Modelers Electrophonic Limited Edition Please Note: Line 6, DL4, MM4, FM4, DM4, Verbzilla,
M13 Stompbox Modeler
 M13 Stompbox Modeler Pilot s Handbook Manuel de pilotage Pilotenhandbuch Pilotenhandboek Manual del Piloto An in-depth exploration of the advanced technologies and pulsing tonal pleasures of M13 Stompbox
Spider Valve MkII. Advanced Guide Addendum Spider FX Infusion (Firmware version 1.50, or later) Spider Valve MkII 112, 212 and HD100
 Spider Valve MkII 112, 212 and HD100") Spider Valve MkII Advanced Guide Addendum Spider FX Infusion (Firmware version 1.50, or later) Spider Valve MkII 112, 212 and HD100 Electrophonic Limited Edition Table of Contents Overview... 1 1 Spider
Spider Valve MkII Advanced Guide Addendum Spider FX Infusion (Firmware version 1.50, or later) Spider Valve MkII 112, 212 and HD100 Electrophonic Limited Edition Table of Contents Overview... 1 1 Spider
Pilot s Handbook Manuel de pilotage Pilotenhandbuch Pilotenhandboek Manual del Piloto 取扱説明書. See for Advance Guide
 M13 Stompbox Modeler Pilot s Handbook Manuel de pilotage Pilotenhandbuch Pilotenhandboek Manual del Piloto 取扱説明書 See www.line6.com/manuals for Advance Guide 40-00-0167 Advanced Users Guide available @
MODULATION MODELER DETAILS
 MODULATION MODELER QUICK REFERENCE FOR MODEL-SPECIFIC FUNCTIONS 34 MODEL TWEAK TWEEZ Opto Tremolo Shape Volume Sensing Bias Tremolo Shape Volume Sensing Phaser Feedback No. of Phase Stages Dual Phaser
vintage modified user manual
 vintage modified user manual Introduction The Empress Effects Superdelay is the result of over 2 years of research, development and most importantly talking to guitarists. In designing the Superdelay,
POD HD500. Advanced Guide. An in-depth exploration of the features & functionality of POD HD500. Electrophonic Limited Edition
 POD HD500 Advanced Guide An in-depth exploration of the features & functionality of POD HD500 Electrophonic Limited Edition Table of Contents Overview... 1 1 Home Views... 1 1 Tuner Mode... 1 3 Tap Tempo...
Pilot s Handbook Manuel de pilotage Pilotenhandbuch Pilotenhandboek Manual del Piloto 取扱説明書. See for Advance Guide
 M9 Stompbox Modeler Pilot s Handbook Manuel de pilotage Pilotenhandbuch Pilotenhandboek Manual del Piloto 取扱説明書 See www.line6.com/manuals for Advance Guide 40-00-2008 Advanced Users Guide available @ www.line6.com/manuals
TONAL RECALL INSTRUCTIONS
 TONAL RECALL INSTRUCTIONS OVERVIEW: Forget everything you know about analog delay, this one s different. Built around a pair of re-issued versions of the legendary MN3005 bucket-brigade delay chips, the
The Atmosphere. Res System Resolution, the sample rate of the digital effects engine. Turn down for slower, lower, longer, grainier, more lofi reverb.
 Decay Reverb decay time. CTRL1 Displayed on the screen under Decay. CTRL2 Displayed on the screen above Tempo. Sidebar Markers tell you what features are active. BYP lights up red for Trails Bypass mode.
Features, Benefits, and Operation
 Features, Benefits, and Operation 2013 Decibel Eleven Features, Benefits, and Operation Contents Introduction... 2 Features... 2 Top Panel Controls... 3 Operation Basics... 4 Connections... 5 Rear Panel
Spider Valve. Pilot s Guide Manuel de pilotage Pilotenhandbuch Pilotenhandboek Manual del Piloto 取扱説明書
 Spider Valve MKII Pilot s Guide Manuel de pilotage Pilotenhandbuch Pilotenhandboek Manual del Piloto 取扱説明書 40-00-0233 Pilot s Handbook available @ www.line6.com/manuals Rev D Important Safety Instructions
Pilot s Handbook for Liqua-Flange
 Pilot s Handbook for Liqua-Flange Pilotenhandbuch für Liqua-Flange Manuel de pilotage pour Liqua-Flange Pilotenhandboek voor Liqua-Flange Patent Pending 40-00-0224 Electrophonic Limited Edition available
GRAND CANYON Multifunction Delay & Looper
 GRAND CANYON Multifunction Delay & Looper Congratulations on your purchase of the Grand Canyon, a superior sounding, massively powerful Delay and Looper pedal. Within the Grand Canyon are a vast array
TABLE OF CONTENTS 1. MAIN PAGE 2. EDIT PAGE 3. LOOP EDIT ADVANCED PAGE 4. FX PAGE - LAYER FX 5. FX PAGE - GLOBAL FX 6. RHYTHM PAGE 7.
 Owner s Manual OWNER S MANUAL 2 TABLE OF CONTENTS 1. MAIN PAGE 2. EDIT PAGE 3. LOOP EDIT ADVANCED PAGE 4. FX PAGE - LAYER FX 5. FX PAGE - GLOBAL FX 6. RHYTHM PAGE 7. ARPEGGIATOR 8. MACROS 9. PRESETS 10.
POD HD500. Advanced Guide. An in-depth exploration of the features & functionality of POD HD500. Electrophonic Limited Edition
 POD HD500 Advanced Guide An in-depth exploration of the features & functionality of POD HD500. Electrophonic Limited Edition Table of Contents Overview... 1 1 Home Views... 1 1 Tuner Mode... 1 3 Tap Tempo...
REVERB (PEDAL) MANUAL v.2 MORE THAN LOGIC. UNITING ART + ENGINEERING. CONTACT.
 MANUAL v.2 MORE THAN LOGIC. UNITING ART + ENGINEERING. CONTACT.") REVERB (PEDAL) MANUAL v.2 MORE THAN LOGIC. UNITING ART + ENGINEERING. CONTACT email: info@meris.us phone: 747.233.1440 website: www.meris.us TABLE OF CONTENTS SECTION 1 PG. 1 FRONT PANEL CONTROLS SECTION
REVERB (PEDAL) MANUAL v.2 MORE THAN LOGIC. UNITING ART + ENGINEERING. CONTACT email: info@meris.us phone: 747.233.1440 website: www.meris.us TABLE OF CONTENTS SECTION 1 PG. 1 FRONT PANEL CONTROLS SECTION
The SPD-SX provides four types of master effect. While performing, you can turn the [CONTROL 1] knob or [CONTROL 2] knob to vary the master effect.
![The SPD-SX provides four types of master effect. While performing, you can turn the [CONTROL 1] knob or [CONTROL 2] knob to vary the master effect.](/thumbs/81/84227212.jpg "The SPD-SX provides four types of master effect. While performing, you can turn the [CONTROL 1] knob or [CONTROL 2] knob to vary the master effect.") Effect Guide Master Effect List FILTER The SPD-SX provides four types of master effect. While performing, you can turn the [CONTROL 1] knob or [CONTROL 2] knob to vary the master effect. This applies a
Effect Guide Master Effect List FILTER The SPD-SX provides four types of master effect. While performing, you can turn the [CONTROL 1] knob or [CONTROL 2] knob to vary the master effect. This applies a
Nemesis MIDI Implementation
 Nemesis MIDI Implementation Parameter CC# Range Value Description Factory Delay Engine 1 0-23 Selects and loads delay effect engine (with all parameters) 0 Digital 1 Diffuse 2 Analog 3 Tape 4 Noise Tape
! Memory Lane 2! Analog delay with tap tempo and dual independent delay times
 ! Memory Lane 2! Analog delay with tap tempo and dual independent delay times User Manual v1.00 May 2, 2008 Memory Lane 2 user manual v1.00 1 Introduction Thank you for purchasing a Diamond Memory Lane
Kemper Profiler Midi parameters
 Kemper Profiler Midi parameters contents: midi CC list NRPN values values for effect type (related to NRPN data) KEMEPER MIDI CC REFERENCE CHART, V.4.2 CC RANGE FUNCTION CC RANGE FUNCTION kemper midi data:
FIREHAWK 1500 PILOT S GUIDE MANUEL DE PILOTAGE PILOTENHANDBUCH MANUAL DEL PILOTO 取扱説明書试用指南
 FIREHAWK 1500 PILOT S GUIDE MANUEL DE PILOTAGE PILOTENHANDBUCH MANUAL DEL PILOTO 取扱説明書试用指南 40-00-0373 Rev C Pilot s Guide also available at www.line6.com/manuals 2015 Line 6, Inc. 2 Please Note: Line 6,
Spider. Pilot s Handbook Manuel de pilotage Pilotenhandbuch Pilotenhandboek Manual del Piloto 取扱説明書
 Spider IV Pilot s Handbook Manuel de pilotage Pilotenhandbuch Pilotenhandboek Manual del Piloto 取扱説明書 Get free lessons and tones! Join Spider Online! www.line6.com/spideronline 40-00-0186 Pilot s Handbook
Before You Start. Program Configuration. Power On
 StompBox is a program that turns your Pocket PC into a personal practice amp and effects unit, ideal for acoustic guitar players seeking a greater variety of sound. StompBox allows you to chain up to 9
Spider IV 15. Pilot s Handbook Manuel de pilotage Pilotenhandbuch Pilotenhandboek Manual del Piloto 取扱説明書
 Spider IV 15 Pilot s Handbook Manuel de pilotage Pilotenhandbuch Pilotenhandboek Manual del Piloto 取扱説明書 Get free lessons and tones! Join Spider Online! www.line6.com/spideronline 40-00-0187 Pilot s Handbook
GUITAR GUITAR PROCESSORS EFFECTS PRODUCT LINE PREAMPS EXPRESSION PEDALS MIDI CONTROLLERS BASS PROCESSORS
 GUITAR EFFECTS PRODUCT LINE 1998-99 PREAMPS GUITAR PROCESSORS EXPRESSION PEDALS BASS PROCESSORS MIDI CONTROLLERS THE TRADITION CONTINUES... TWO 2 Take a minute and ask yourself When was the last time I
Combined Effects Pedal
 Combined Effects Pedal Precautions Power Supply Use the correct AC outlet to connect the power adapter. Use a power transformer with a negative external voltage of 9V (± 10%) 300mA, otherwise it will cause
DELUXE MEMORY MAN w/ TAP TEMPO TAP TEMPO ANALOG DELAY with FX LOOP, MODULATION and EXPRESSION PEDAL CONTROL
 DELUXE MEMORY MAN w/ TAP TEMPO TAP TEMPO ANALOG DELAY with FX LOOP, MODULATION and EXPRESSION PEDAL CONTROL Congratulations on your purchase of the Electro-Harmonix Deluxe Memory Man w/ Tap Tempo (DMMTT).
INTRODUCTION WARNING! IMPORTANT SAFETY INSTRUCTIONS. Congratulations on your purchase of this MG Gold amplifier from Marshall Amplification.
 OWNER S MANUAL INTRODUCTION WARNING! IMPORTANT SAFETY INSTRUCTIONS Congratulations on your purchase of this MG Gold amplifier from Marshall Amplification. The MG provides modern Marshall tones for the
MIDX Boss GT-1 - MIDI Implementation
 MIDX Boss GT-1 - MIDI Implementation Version: May 03 2018 V2.9 PC# 00 - PC# 98 - Change Patch Number (U01-U99) PRESET CC s RECALL/SELECT PATCH = CC# 4 (0-98) STORE TO PATCH = CC# 5 (0-98) STORE TO CURRENT
EasyStart CONTENTS. Connections; Tuning; Selecting Programs 2. Saving Programs; Individual Mode; Expression Quick Assign; 3
 EasyStart Main Features Korg s REMS modeling technology delivers 72 realistic classic and modern amp, cabinet and effects models 16 types of drive & amp models cover everything from vintage overdrive to
EXPERT REVIEW: TECH 21 ACOUSTIC FLY RIG
 EXPERT REVIEW: TECH 21 ACOUSTIC FLY RIG By Phil O'Keefe February 26, 2018 Tech 21 Acoustic Fly Rig Is this the perfect travel companion for your acoustic-electric instrument? by Phil O'Keefe Travel light
K-Switch User Manual v1.1
 K-Switch User Manual v1.1 Features and Functionality Overview 8 Switches: 4 Virtual Footswitches for controlling amplifier functions 4 Effect Loops for inserting effect units into a signal chain. Virtual
Spider Valve MkII. Advanced Guide. An in-depth guide to the features and functionality of the Spider Valve MkII 112, 212 and HD100
 Spider Valve MkII Advanced Guide An in-depth guide to the features and functionality of the Spider Valve MkII 112, 212 and HD100 Electrophonic Limited Edition Please Note: Line 6, POD and Spider Valve
BOSS UNVEILS OD-1X OVERDRIVE AND DS-1X DISTORTION Special Edition Compact Pedals with Premium Tone
 FOR IMMEDIATE RELEASE Press Contact: Rebecca Eaddy Marketing Communications Manager Roland Corporation U.S. (323) 890-3718 Rebecca.Eaddy@RolandUS.com BOSS UNVEILS OD-1X OVERDRIVE AND DS-1X DISTORTION Special
Iron Ether Divaricator Owner s Manual
 IE Iron Ether Divaricator Owner s Manual The Divaricator is a versatile tone toolbox for bassists using effects. Using its 4th-order variable crossover, the pedal splits a signal into high and low frequency
NUXFRONTLINE
 Guitar Amp Mighty Line 5.6+ NUXMIGHTY8SE 148.00 100 % Analog preamp circuit for warm, organic sounds, Six channels drive mode which include Tweed, Plexi, British, Modern, Recto and M Seven 24bit/48khz
SPECTRE INSTRUCTIONS
 SPECTRE INSTRUCTIONS OVERVIEW This device complies with part 15 of the FCC rules. Operation is subject to the following two conditions: (1) This device may not cause harmful interference, and (2) this
Combined Effects Pedal
 Combined Effects Pedal CONTENTS Precautions Introdution Main Features Pedal Layout Operation Modes Live Mode Preset Mode Effect Modules Tap Tempo Using The FX LOOP Connections Technical Parameters 01
G Major GUITAR PROCESSOR USER S MANUAL
 G Major GUITAR PROCESSOR USER S MANUAL TABLE OF CONTENTS INTRODUCTION Table of Contents.................3 Introduction......................5 Front Panel......................6 Rear Panel......................8
AMPLIFi FX100 PILOT S GUIDE MANUEL DE PILOTAGE PILOTENHANDBUCH PILOTENHANDBOEK MANUAL DEL PILOTO 取扱説明書
 AMPLIFi FX100 PILOT S GUIDE MANUEL DE PILOTAGE PILOTENHANDBUCH PILOTENHANDBOEK MANUAL DEL PILOTO 取扱説明書 40-00-0357-D Firmware v2.50.2 Pilot s Guide also available at line6.com/support/manuals 2016 Line
OCTAPAD SPD-30 Effects List
 OCTAPAD SPD-30 Effects List The multi-effects feature 30 different kinds of effects. Number Effect Name 00 THRU 01 SUPER FILTER 02 STEP FILTER 03 FILTER+DRIVE 04 AUTO WAH 05 COMPRESSOR 06 LO-FI COMPRESS
CHAPTER 7 1 SOUND. Effects. Level
 Editing Effects: Chapter 7 CHAPTER 7 EDITING EFFECTS ABOUT SIGNAL PROCESSING TIP: The built-in effects processor of the QS6 is similar to that of the Alesis QuadraVerb 2, capable of generating multiple,
Contents. Basic Operation... 3 MENU Effect Saving a Sound (WRITE)... 47
... 47") Parameter Guide 01 Contents Basic Operation........................................... 3 Basic Procedure for Effect Editing........................ 3 Effect Placement..................................
Parameter Guide 01 Contents Basic Operation........................................... 3 Basic Procedure for Effect Editing........................ 3 Effect Placement..................................
CONTENTS JamUp User Manual
 JamUp User Manual CONTENTS JamUp User Manual Introduction 3 Quick Start 3 Headphone Practice Recording Live Tips General Setups 4 Amp and Effect 5 Overview Signal Path Control Panel Signal Path Order Select
I personally hope you enjoy this release and find it to be an inspirational addition to your musical toolkit.
 1 CONTENTS 2 Welcome to COIL...2 2.1 System Requirements...2 3 About COIL...3 3.1 Key Features...3 4 Getting Started...4 4.1 Using Reaktor...4 4.2 Included Files...4 4.3 Opening COIL...4 4.4 Control Help...4
PRODUCT SUPPORT. (516) USER (8737) Fax: (516) Triton Series Products
 USER (8737) Fax: (516) Triton Series Products") PRODUCT SUPPORT (516) 333 - USER (8737) product_support@korgusa.com Fax: (516) 333-9108 Triton Series Products Basic Guidelines for Setting Controller Assignments The Triton Keyboards and Triton Rack feature
PRODUCT SUPPORT (516) 333 - USER (8737) product_support@korgusa.com Fax: (516) 333-9108 Triton Series Products Basic Guidelines for Setting Controller Assignments The Triton Keyboards and Triton Rack feature
T A B L E O F C O N T E N T S
 USER MANUAL V 6.0 6 12 TABLE OF CONTENTS INTRODUCTION... 4-5 CONNECTORS............................. 6-10 CONNECTION DIAGRAM.................. 11-13 EFFECTS & SIGNAL CHAIN...14 BLOCK DESCRIPTIONS...14-15
ÂØÒňΠGuitar synthesizer July 10, 1995
 GR-1 ÂØÒňΠGuitar synthesizer July 10, 1995 Supplemental Notes MIDI Sequencing with the GR-1 This is an application guide for use with the GR-1 and an external MIDI sequencer. This guide will cover MIDI
RG-1 Regenerator NEW. from Jim Marshall OBE
 RG-1 Regenerator NEW The Regenerator is a chorus, a flanger and a phaser pedal all in one sturdy shell. It s a stereo modulation pedal providing a diverse range of six different modes for you to explore,
MANUAL v.1c CONTACT MORE THAN LOGIC. UNITING ART + ENGINEERING.
 MANUAL v.1c MORE THAN LOGIC. UNITING ART + ENGINEERING. CONTACT email: info@meris.us phone: 747.233.1440 website: www.meris.us TABLE OF CONTENTS SECTION 1 PG. 1 FRONT PANEL CONTROLS SECTION 2 PG. 2-4 GLOBAL
Pilot s Handbook for Echo Park
 Pilot s Handbook for Echo Park Pilotenhandbuch für Echo Park Manuel de pilotage pour Echo Park Manual del Piloto para el Echo Park Pilotenhandboek voor Echo Park U.S Patent No. 7,711,442 40-00-0182 Electrophonic
USER MANUAL BLUE NEBULA TAPE ECHO AND GUITAR FX PEDAL. Blue Nebula User Guide, Firmware Revision 4 Page 1
 USER MANUAL BLUE NEBULA TAPE ECHO AND GUITAR FX PEDAL Blue Nebula User Guide, Firmware Revision 4 Page 1 USB MIDI IN NAVIGATION BUTTONS OK = SELECT/MANUAL 12V DC JACK PARAMETER ADJUST: P1, P2, P3 PREAMP
MG15CFX MG30CFX. From Jim Marshall
 S MG15C CLEAN / CRUNCH OD-1 / OD-2 TAP (MANUAL) TUNER STORE MG15C GAIN BASS MIDDLE TREBLE REVERB VOLUME MASTER PH HASER INPUT STUDIO CHO CH DELAY POWER FOOTCONTROLLER MG30C CLEAN / CRUNCH OD-1 / OD-2 1
GRAVITAS INSTRUCTIONS
 GRAVITAS INSTRUCTIONS OVERVIEW: Harmonic and/or standard tremolo, pure analog warmth. This tremolo pedal features an all-analog signal path that can do any variety or shape of standard volume modulation,
POD HD Advanced Guide An in-depth exploration of the features & functionality of POD HD.
 POD HD Advanced Guide An in-depth exploration of the features & functionality of POD HD. Electrophonic Limited Edition Table of Contents Overview... 1 1 Home Views... 1 1 Tuner Mode... 1 4 Tap Tempo...
WOMBTONE mk!! INSTRUCTIONS
 FEED (RAMP) VOLUME MIX WOMBTONE mk!! INSTRUCTIONS OVERVIEW This device complies with part 15 of the FCC rules. Operation is subject to the following two conditions: (1) This device may not cause harmful
VIRTUALIZER 3D FX2000
 Multi- 71 breathtaking new algorithms true RSM (Real Sound Modeling) stereo and 3D effects Wave-adaptive virtual Room reverb algorithms for natural reverb and delay Awesome modulation, dynamic, psychoacoustic
T A B L E O F C O N T E N T S
 USER MANUAL V 4.0 TABLE OF CONTENTS INTRODUCTION... 4-5 CONNECTORS............................. 6-9 CONNECTION DIAGRAM.................. 10-11 EFFECTS & SIGNAL CHAIN...12 BLOCK DESCRIPTIONS...12-15 CABINET
Pilot s Handbook for Roto-Machine
 Pilot s Handbook for Roto-Machine Pilotenhandbuch für Roto-Machine Manuel de pilotage pour Roto-Machine Pilotenhandboek voor Roto-Machine Patent Pending 40-00-0222 Electrophonic Limited Edition available
T A B L E O F C O N T E N T S
 USER MANUAL V 5.1 6 12 TABLE OF CONTENTS INTRODUCTION... 4-5 CONNECTORS............................. 6-10 CONNECTION DIAGRAM.................. 11-13 EFFECTS & SIGNAL CHAIN...14 BLOCK DESCRIPTIONS...14-15
Operators Manual. Rocktile GP-120 Guitar Effect Processor
 Operators Manual Rocktile GP-0 Guitar Effect Processor 000850000797 Version 00 Congratulations on your purchase of this Guitar Effects Processor. Now you have this incredibly advanced multi-effect guitar
Contents. Basic Operation... 3 EFFECT... 5 MENU... 24
 Parameter Guide * Company names and product names appearing in this document are registered trademarks or trademarks of their respective owners. 2018 Roland Corporation 01 Contents Basic Operation...........................................
TURN2ON BLACKPOLE STATION POLYPHONIC SYNTHESIZER MANUAL. version device by Turn2on Software
 MANUAL version 1.2.1 device by Turn2on Software http://turn2on.ru Introduction Blackpole Station is a new software polyphonic synthesizer for Reason Propellerhead. Based on 68 waveforms in 3 oscillators
VK-1 Viking Synthesizer
 VK-1 Viking Synthesizer 1.0.2 User Manual 2 Overview VK-1 is an emulation of a famous monophonic analog synthesizer. It has three continuously variable wave oscillators, two ladder filters with a Dual
OCEANS 11 Multifunction Digital Reverb
 OCEANS 11 Multifunction Digital Reverb Congratulations on your purchase of the Electro-Harmonix OCEANS 11 Reverb, the compact digital reverb pedal that does it all. Splash your tone with subtle ambience
POD. Pilot s Handbook Manuel de pilotage Pilotenhandbuch Pilotenhandboek Manual del Piloto 取扱説明書
 POD HD300 Pilot s Handbook Manuel de pilotage Pilotenhandbuch Pilotenhandboek Manual del Piloto 取扱説明書 Go to www.line6.com/manuals and download the Advanced User Guide 40-00-0241 Advanced Users Guide available
U S E R M A N U A L. M a n u a l R e v : Memory Lane Lower Sackville, Nova Scotia CANADA, B4C 2J
 U S E R M A N U A L M a n u a l R e v : 0 8. 1 2. 2 0 0 5 30 Memory Lane Lower Sackville, Nova Scotia CANADA, B4C 2J3 902.252.3035 2005 Polyblend Systems Thanks for purchasing a Diamond Memory Lane analog
MULTI-DIMENSIONAL DELAY
 MULTI-DIMENSIONAL DELAY Introduction... 3 Precautions... 3 Rear Panel Connections... 3 Line Drawings and Features... 5 Mode Selector... 5 Control Knobs... 5 Footswitches... 6 LED Indicators... 7 Delay
Version 1.2 USER MANUAL
 Version 1.2 USER MANUAL Read Before Using This manual covers the feature set for Riverside pedals running version 1.2 firmware and later. To check if your Riverside is running version 1.2 firmware, follow
4922 Port Royal Road B-11 6 Spring Hill, Tennessee
 4922 Port Royal Road B-11 6 Spring Hill, Tennessee 37174 6 931-487-9001 www.visualsound.net 6 www.myspace.com/visualsoundusa Bob Weil and R.G. Keen worked hard to design this pedal for you, using their
VB-99 V-Bass System. Using the Built-in Tuner. Workshop ÂØÒňΠVB99WS04
 ÂØÒňΠWorkshop VB-99 V-Bass System Using the Built-in Tuner 2009 Roland Corporation U.S. All rights reserved. No part of this publication may be reproduced in any form without the written permission of
Micro Spider. Pilot s Guide Manuel de pilotage Pilotenhandbuch Pilotenhandboek Manual del Piloto
 Micro Spider Pilot s Guide Manuel de pilotage Pilotenhandbuch Pilotenhandboek Manual del Piloto Get free lessons and tones! Join Spider Online! www.line6.com/spideronline 40-00-0166 Electrophonic Limited
Quick Start. Overview Blamsoft, Inc. All rights reserved.
 1.0.1 User Manual 2 Quick Start Viking Synth is an Audio Unit Extension Instrument that works as a plug-in inside host apps. To start using Viking Synth, open up your favorite host that supports Audio
Technical Recording Data
 The sound of EPICA is rich, full and 'Real', its presets just fit into your projects ready to go. I have always found that virtual synths need a lot of work to make them fit into mixes, to my ears they
TONE TATTOO ANALOG MULTI-EFFECT PEDAL featuring METAL MUFF, NEO CLONE & MEMORY TOY
 TONE TATTOO ANALOG MULTI-EFFECT PEDAL featuring METAL MUFF, NEO CLONE & MEMORY TOY Congratulations on your purchase of the fully analog Electro-Harmonix TONE TATTOO, the first true multi-effect from Electro-Harmonix!
Grendel Drone Commander CLASSIC PEDAL Analog Music Synthesizer. Rare Waves LLC USA rarewaves.net
 CLASSIC PEDAL Analog Music Synthesizer Rare Waves LLC USA rarewaves.net What is it? is a unique synthesizer that delivers thick drone tones with the convenience of an FX pedal stompbox. brings back the
GCX. Guitar Audio Switcher OWNER S MANUAL
 GCX Guitar Audio Switcher OWNER S MANUAL Please visit our web site at: www.voodoolab.com Copyright 1998 by Digital Music Corporation. This publication is protected by copyright and all rights are reserved.
REIDMAR 750 PROFESSIONAL BASS HEAD USERS MANUAL. Introduction 2 Block Diagram 3 Front Panel Controls 4 Rear Panel Features 6 Specifications 8
 EBS REIDMAR 750 USERS MANUAL REIDMAR 750 PROFESSIONAL BASS HEAD CONTENTS Page Introduction 2 Block Diagram 3 Front Panel Controls 4 Rear Panel Features 6 Specifications 8 USERS MANUAL EBS REIDMAR 750 About
1. Use a USB cable to connect the Nextone to your computer, and then turn on the power of the Nextone. MEMO
 Using Nextone Editor Nextone Editor is editor software that lets you create your own personalized sounds by using the Nextone s CUSTOM mode to edit detailed settings for the preamp, power amp, and effects.
OC 10 Crocodile Tail Loop Setup Utilising Tuner Out And One Loop
 KEY All Red Lines Are Cables Taking Signal Into OC10 SETUP 1 All Green Lines Are Cables Taking Signal Out Of OC10 OC 10 Crocodile Tail Loop Setup Utilising Tuner Out And One Loop The above setup is using
V2.5 Update Pilot s Handbook Addendum
 V2.5 Update Pilot s Handbook Addendum Electrophonic Limited Edition. Also available at www.line6.com. Revision A. Vetta II Manual Rev B Addendum An Introduction Welcome to the Vetta II Update Addendum
USER MANUAL. tremolo & reverb
 USER MANUAL tremolo & reverb Flint - tremolo & reverb User Manual Front Panel : Controls the intensity or Depth of the tremolo effect. This is accomplished by varying the amplitude of the LFO that controls
User's Manual. HUSH Licensed by
 P R O G R A M M A B L E 2 4 - B I T D S P G U I T A R P R E A M P User's Manual HUSH Licensed by May be covered by one or more of the following: U.S. Patents #4538297, 4647876, 4696044, 4745309, 4881047,
Owner s Manual. Page 1 of 23
 Page 1 of 23 Installation Instructions Table of Contents 1. Getting Started! Installation via Connect! Activation with Native Instruments Service Center 2. Pulse Engines Page! Pulse Engine Layers! Pulse
POD HD500 Edit. Pilot s Guide. A user guide to the features and functionality of the Line 6 POD HD500 Edit application
 POD HD500 Edit Pilot s Guide A user guide to the features and functionality of the Line 6 POD HD500 Edit application POD HD500 Edit: Table of Contents Table of Contents Workflow...1 1 What s in it for
Legal Notice 1. Direm KEMPER PROFILER. Main Manual 5.5
 Legal Notice 1 Direm KEMPER PROFILER Main Manual 5.5 Legal Notice 2 Legal Notice This manual, as well as the software and hardware described in it, is furnished under license and may be used or copied
LeMay Audio Products. MK-I Preamplifier Users Manual John P. LeMay All Rights Reserved Rev A
 LeMay Audio Products MK-I Preamplifier Users Manual 2008 John P. LeMay All Rights Reserved Rev A 08.12.24 Congratulations on purchasing one of the world s finest professional instrument preamplifiers!
Wavelore American Zither Version 2.0 About the Instrument
 Wavelore American Zither Version 2.0 About the Instrument The Wavelore American Zither was sampled across a range of three-and-a-half octaves (A#2-E6, sampled every third semitone) and is programmed with
60s - Spring Tank 70s - Electronic Plate (solid state) 80s - Studio Rack Hall. 61 harm 63 tube 65 photo. 60s 70s 80s DECAY TREMOLO BYPASS REVERB
 80s - Studio Rack Hall. 61 harm 63 tube 65 photo. 60s 70s 80s DECAY TREMOLO BYPASS REVERB") Front Panel SWITCH: Switches between 3 tremolo modes. 61 Harm - Harmonic band filtering Tube - Power Tube Bias 65 Photo - Photocell SWITCH: Switches between 3 different types of reverb. - Spring Tank -
Front Panel SWITCH: Switches between 3 tremolo modes. 61 Harm - Harmonic band filtering Tube - Power Tube Bias 65 Photo - Photocell SWITCH: Switches between 3 different types of reverb. - Spring Tank -
Table of Contents Insert Effect size1
 E 1 Table of Contents Table of Contents Overview... 1 Insert Effects... 1 Effect Size... 2 Effect Input/Output... 2 Grouping... 3 Master Effects... 3 Program... 4 Program - Single/Double OSC mode... 4
Semi-modular audio controlled analog synthesizer
 Semi-modular audio controlled analog synthesizer Owner s manual 21.7.2017 - Sonicsmith Hello and thank you for purchasing a Squaver P1 synthesizer! The Squaver P1 is a semi-modular, audio controlled, analog
Congratulations on purchasing Molten MIDI 5 by Molten Voltage
 OWNER S MANUAL Congratulations on purchasing Molten MIDI 5 by Molten Voltage Molten MIDI 5 is designed to control the Digitech Whammy 5. When configured for Whammy & Clock output, Molten MIDI 5 also sends
ENSEMBLE String Synthesizer
 ENSEMBLE String Synthesizer by Max for Cats (+ Chorus Ensemble & Ensemble Phaser) Thank you for purchasing the Ensemble Max for Live String Synthesizer. Ensemble was inspired by the string machines from
SPECTRADRIVE. Ready, Set, TubeDrive...
 High-quality bass preamp ported directly from TC s line of bass amps gives you exceptional tonal options for practice, live, and studio performance TubeDrive with TonePrint technology emulates preamplifier
Version 1.2 USER MANUAL
 Version 1.2 USER MANUAL Read Before Using This manual covers the feature set for Sunset pedals running version 1.2 firmware. To check if your Sunset is running version 1.2 firmware, follow the instructions
DREAM DSP LIBRARY. All images property of DREAM.
 DREAM DSP LIBRARY One of the pioneers in digital audio, DREAM has been developing DSP code for over 30 years. But the company s roots go back even further to 1977, when their founder was granted his first
Pilot s Handbook for Verbzilla
 Pilot s Handbook for Verbzilla Pilotenhandbuch für Verbzilla Manuel de pilotage pour Verbzilla Pilotenhandboek voor Verbzilla U.S Patent No. 7,711,442 40-00-0223 Electrophonic Limited Edition available
Pilot s Handbook Manuel de pilotage Pilotenhandbuch Pilotenhandboek Manual del Piloto
 Pilot s Handbook Manuel de pilotage Pilotenhandbuch Pilotenhandboek Manual del Piloto An in-depth exploration of the advanced technologies and pulsing tonal pleasures of POD X3 & POD X3 Live. 40-00-0139