Demo. Using Inkscape and GIMP: how to pretend to be creative using only technical skills. demo
|
|
|
- Luke Gregory
- 6 years ago
- Views:
Transcription
1 1 Demo Using Inkscape and GIMP: how to pretend to be creative using only technical skills demo
2 Demo 2 Live demos have problems (technical bugs, talking while doing, and having nothing to look at afterwards), so this is a recorded demo, using screenshots It shows how to use both Inkscape and GIMP to create an illustration for a web page For you, this would tick both the drawing (vector graphics) and painting (bitmap graphics) tick boxes The subtitle is "how to pretend to be creative, using only technical skills" which is easy for me to demo because I have only technical skills
3 Fish 3 For my web site, I've decided to make a cartoon of a fish It is going to be a big, red, round fish I'm going to sketch it in Inkscape, and then switch to GIMP to "colour it in" So, I'm going to start up Inkscape
4 4
5 Zoom 5 The rectangle is the page you are creating Since the picture you are creating is scalable, you don't really care about the page boundaries But let's stay inside them anyway, so the first task is to zoom in Use the View/Zoom/Zoom-In menu item, or press the key +, three times (say) Menu items tell you what their shortcut keys are
6 6
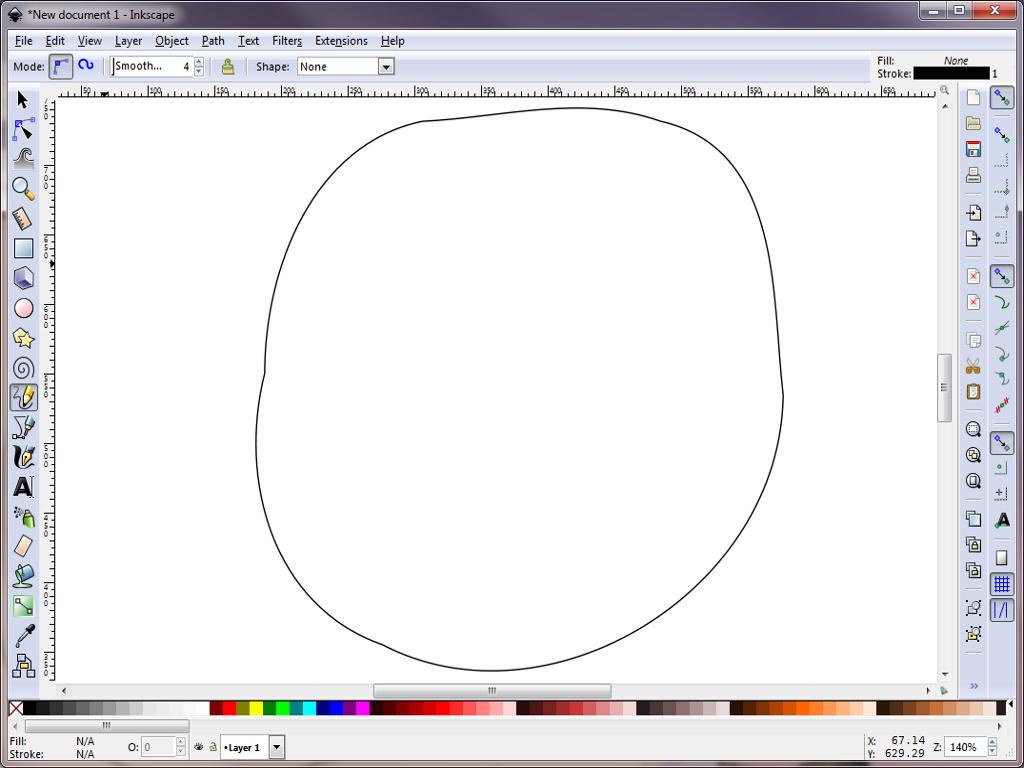
7 Circle 7 To start drawing the fish, I need a circle It is easy to use a tool to create a perfect circle But I don't want a perfect circle, I want an 'organic' circle It needs to look smooth and natural, but not perfect So I am going to draw it free-hand
8 Graphics tablet 8 For one-off tasks like this, as a non-expert, using a mouse will do If you are going to do much sketching, you could buy a "graphics tablet" online for about pounds This is what "tablet" used to mean, before tablet computers There is a learning curve in using the pen on the graphics tablet and, as with a mouse, your hand on the desk is disconnected from what you see on the screen
9 The secret 9 I struggled with using a graphics tablet, until I realized the secret The secret is to slide the tip of the pen up and down your middle finger When you slide it down, it touches the tablet and draws When you slide it up, you can move your hand over the tablet, with your middle finger touching the surface, but with the pen tip hovering just above the surface
10 Tablet computers 10 If you want to get rid of the disconnect between hand and screen, you can buy a tablet computer with a stylus Beware tablets with poor capacitative screens, meant only for stubby fingers, with stubby styluses Get one with a proper digitizer and proper accurate pen
11 Freehand drawing 11 To draw my circle, I need to choose the freehand drawing tool It's on the left in the middle, and looks like this: Then move to the start of the circle, press the mouse button or put the pen/stylus down, draw the circle, release
12 12
13 Undo 13 The most brilliant feature of using a drawing tool, instead of (say) sketching with pencil and paper and then scanning in, is undo It takes away stress and allows you to be more adventurous I decide that my 'circle' is nowhere near good enough, so I just use the Edit/Undo menu item, or Ctrl Z to undo, then I try again
14 14
15 Fixing 15 What I've drawn has two problems: It doesn't join up It isn't smooth enough But the other brilliant thing about using a tool is that I can fix these problems So I decide that it is good enough
16 Joining up 16 To fix the joining up problem, I need to edit my circle But what is it? It is a path in the vector graphics sense So I need the path editing tool, on the left near the top:
17 17
18 Points 18 There is a huge number of points being displayed And they are all on top of each other, so it is very hard to see what is going on So I need to zoom in (pressing + six times) and use the scroll bars to focus on the gap
19 19
20 Joining points 20 Now I can see what I am doing The dotted line is the bounding box of my circle, and I can see points with lines (actually bezier curves) joining them The next task is to select the two points that I want to join up Select one by clicking on it, and the other by shift-click
21 21
22 Visibility 22 It is difficult to demo selecting points; you have to try it Points go red when you hover over them, and they go blue/yellow when they've been selected There is a confirmation message at the bottom of the screen that two points (nodes) are selected
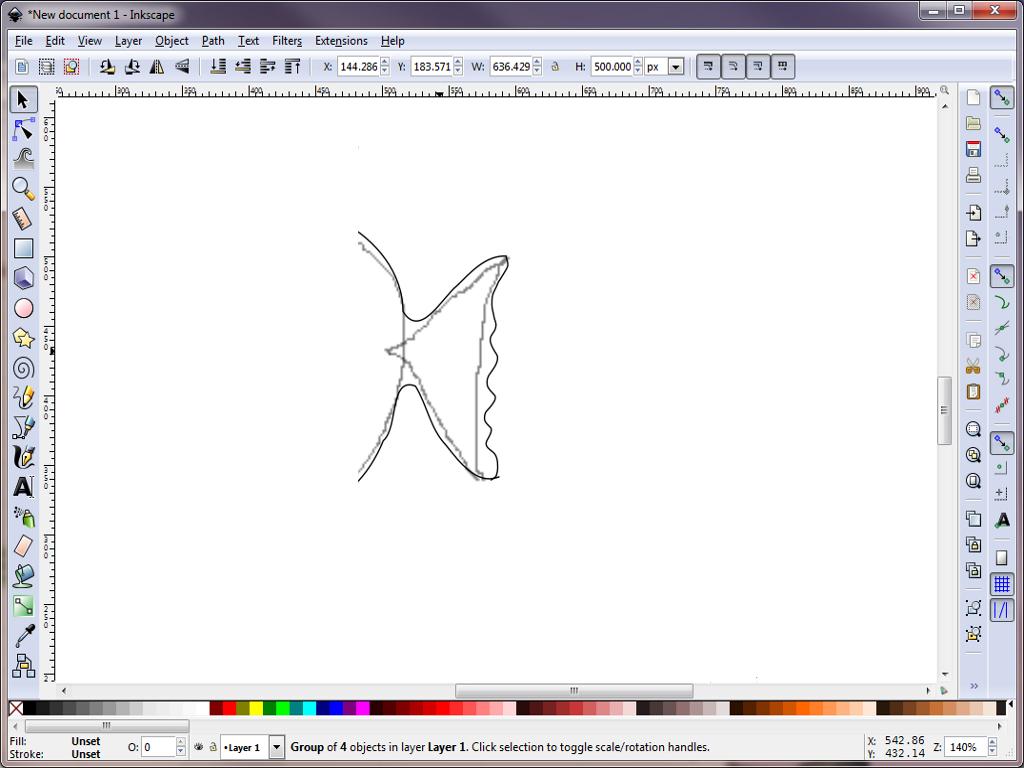
23 Joining points 23 The buttons for doing things to selected nodes are along the top: The icons show you what the buttons do, and you can hover over them to get descriptions The one I want adds an edge between two selected points:
24 24
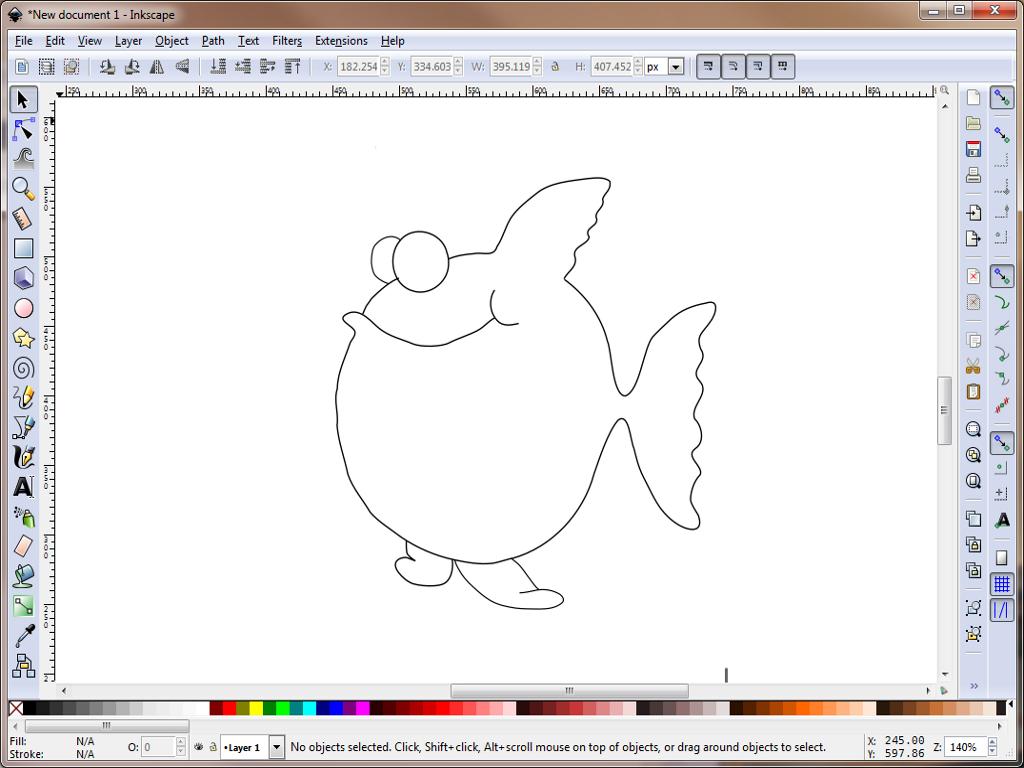
25 Checking 25 To check what I've done, and to prepare for the next stage, I zoom out and switch to the freehand tool to get rid of the display of points
26 26
27 Smoothing 27 To do smoothing, I could carry on editing points, edges and slopes I might do a little bit of that, to fix up the worst bits But it is not a good idea to do much of it, because it soaks up lots of time There is an easier way, which is to use the Path/Simplify menu item, or Ctrl L
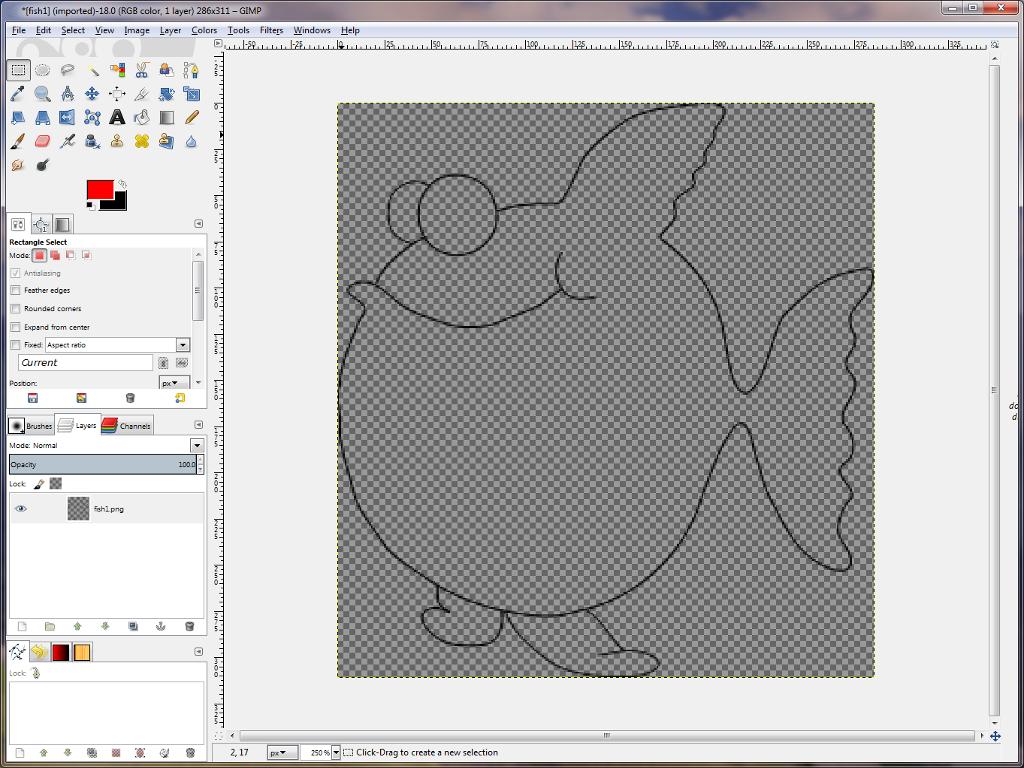
28 Overworking 28 Simplification reduces the number of points If something isn't smooth enough because its got too few points, you use interpolation (using a plugin) You can simplify as many times as you want But it is easy to simplify too many times Artists call this overworking; it requires judgement, but undo comes to the rescue I do several simplify steps to get...
29 29
30 Tail 30 To do the tail, I sketched another freehand path, smoothed it, edited points to attach it to the body, and smoothed the joins In the next picture, the grey bits are a pencil sketch (to get the scale right) imported as a bitmap image Most of the body has been removed (covered up with a white rectangle) to focus on the tail The black bits are the smoothed and joined up paths
31 31
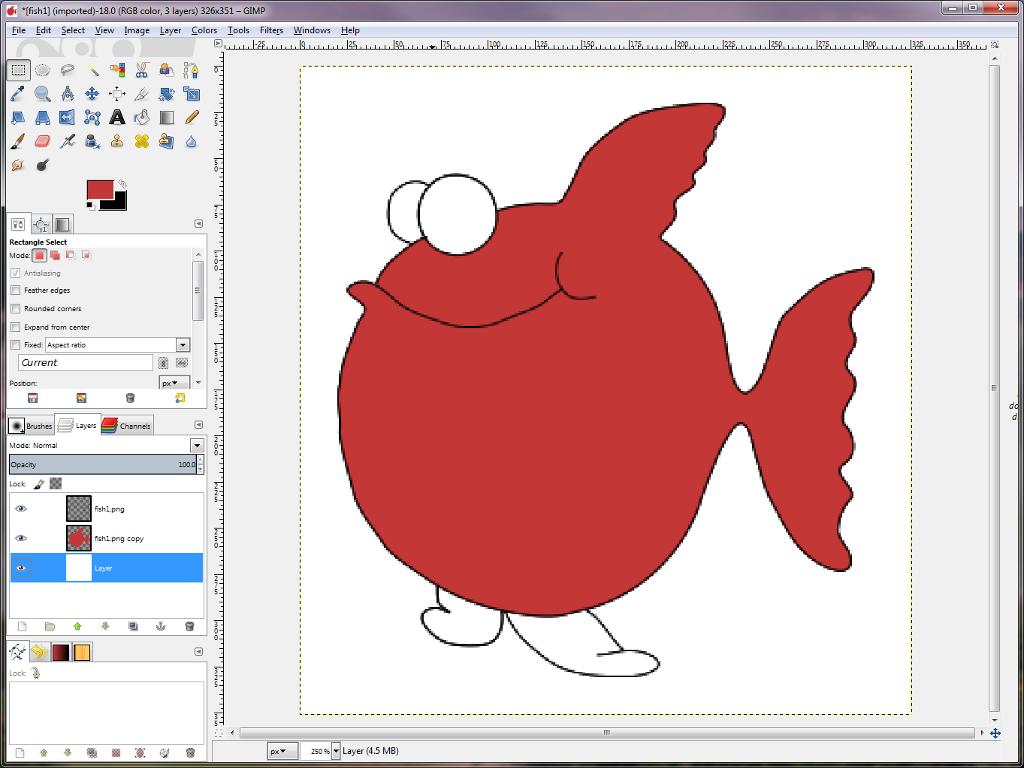
32 More work 32 I am going to leave out a lot of work using similar techniques I added fins, eyes and a mouth The final result is shown next
33 33
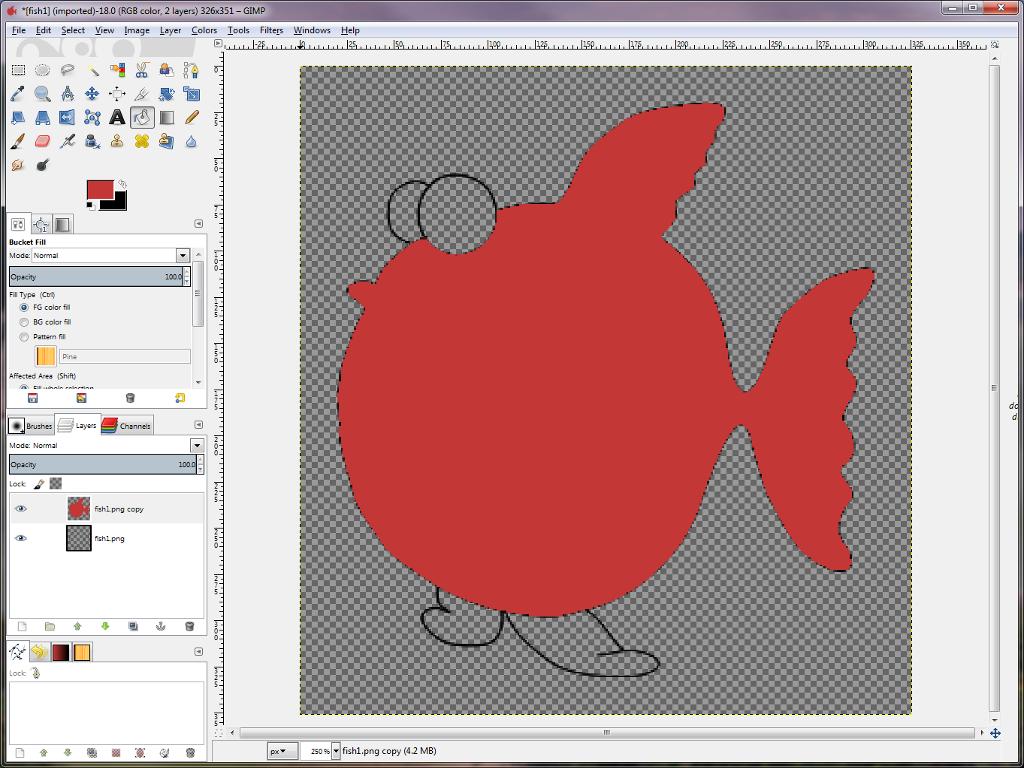
34 Export 34 It is time to export the drawing from Inkscape, ready to import it into GIMP If you use File/Save, you get a bloated SVG file with unwanted extras (this is Inkscape's 'internal' format) You can use File/Save_As and choose 'Plain SVG' to get a nicer SVG file (this counts as exporting, because it is lossy) You can then import the paths from the SVG file into GIMP You can also use File/Export_As_PNG
35 GIMP 35 When you start up GIMP, you may find it has three windows: two tool windows on either side and an image window in the middle Some people love this, and some hate it If you hate it, use Windows/Single-Window_Mode and (if you want) drag all the tools to one side Then loading the image that came from Inkscape gives this:
36 36
37 Margin 37 The chessboard pattern indicates that the black lines are on a transparent background The export process has used the bounding box, so there's no margin round the edge of the image I use the Image/Canvas_size menu item to add a margin of 20 pixels Beware: the size of the image layer hasn't increased, only the background it is shown against Use Layer/Layer_to_Image_Size to increase the fish layer to the canvas size
38 38
39 Duplicate layers 39 The next task will be to colour in the body of the fish After we have filled in the outline, we still want the black lines round it, for the cartoon look So use Layer/Duplicate_Layer to make two copies of the outline
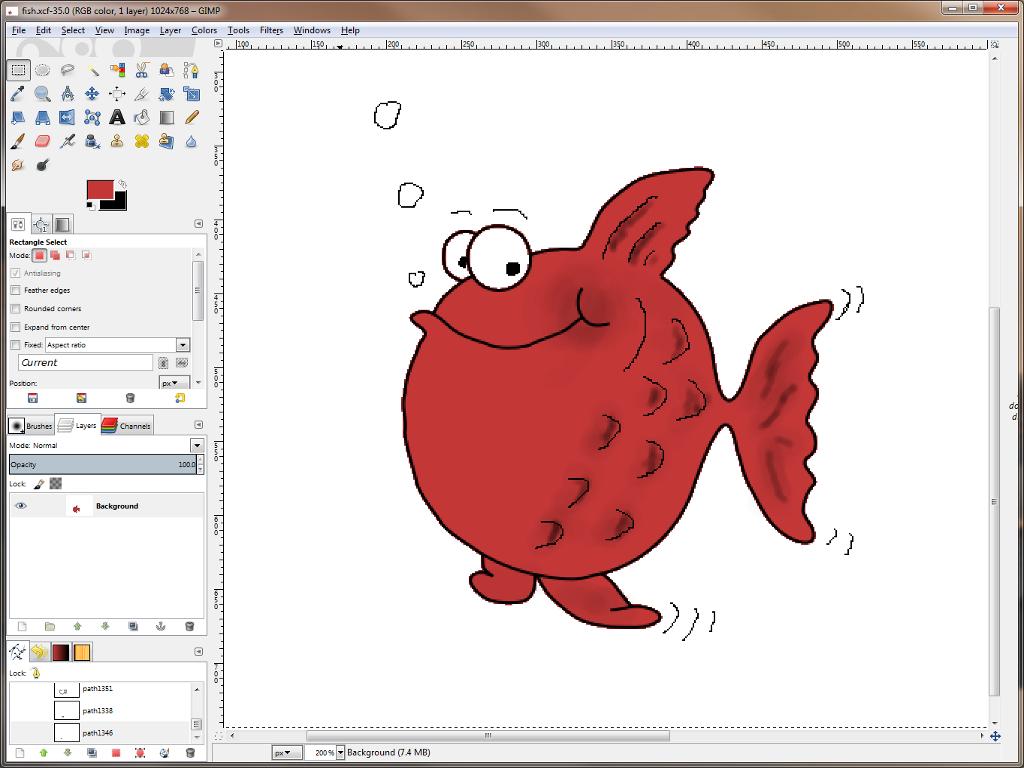
40 40
41 Colouring in 41 Now we are ready to colour in the body of the fish, in red Use the fuzzy select tool (for example) to select the body Use Select/Grow to increase the selection by one pixel all round, so as to cover the pixels at the edges of the lines Use the foreground colour tool to change to red Use the bucket fill tool and click in the body Choose Select/None to get rid of distractions
42 42
43 Swap layers 43 You can see that filling the body has covered up the lines That's a good thing, but now we need to get the lines back Use the layer dialog to put the other copy of the lines in front of the filled-in copy
44 44
45 Background 45 We need a white background now, so that we get the full effect Use the Layer/New_Layer dialog to create a new white layer At this point, everything looks white, because the white layer is in front Use the layer dialog to push the white layer to the back
46 46
47 Details 47 There are more details to sort out The fins at the bottom need to be filled in, on the middle layer Hand painting can be used for scales, eyes, eyebrows, bubbles, movement indicators The airbrush tool can add some darker patches so that the picture looks less flat
48 48
49 Saving and exporting 49 At this point I saved the image in.xcf which preserves the layers And I exported to PNG
50 Denouement 50 Now here's the most important thing: You don't really think I am creative enough to have come up with this from nothing? I didn't - the idea comes from a kid's book: "I can draw cartoons" It is OK to get your ideas from (almost) anywhere, and create an image from scratch using the tools
51 Screen shots 51 Here's how I made the screen shots for these slides I pressed "Print Screen" then in GIMP, used File/Create/From_Clipboard Then I used the rectangle select tool to roughly select the window, and Image/Crop_to_selection to cut it out Then I zoomed in and used exact rectangle select and Image/Crop_to_selection again to cut out the window Then I used Image/Scale_Image to make the image 1024 x 768 Then I exported as PNG
2.0 4 Easy Ways to Delete Background to Transparent with GIMP. 2.1 Using GIMP to Delete Background to Transparent
 1.0 Introduction As JPG files don't support transparency, when you open a JPG image in GIMP with the purpose of making the background transparent. The first thing you must to do is Add Alpha Channel. It
Rendering a perspective drawing using Adobe Photoshop
 Rendering a perspective drawing using Adobe Photoshop This hand-out will take you through the steps to render a perspective line drawing using Adobe Photoshop. The first important element in this process
GIMP (GNU Image Manipulation Program) MANUAL
 MANUAL") Selection Tools Icon Tool Name Function Select Rectangle Select Ellipse Select Hand-drawn area (lasso tool) Select Contiguous Region (magic wand) Selects a rectangular area, drawn from upper left (or lower
Selection Tools Icon Tool Name Function Select Rectangle Select Ellipse Select Hand-drawn area (lasso tool) Select Contiguous Region (magic wand) Selects a rectangular area, drawn from upper left (or lower
Lesson 2: Choosing Colors and Painting Chapter 1, Video 1: "Lesson 2 Introduction"
 Chapter 1, Video 1: "Lesson 2 Introduction" Welcome to Lesson 2. Now that you've had a chance to play with Photoshop a little bit and explore its interface, and the interface is becoming a bit more familiar
Introduction. The basics
 Introduction Lines has a powerful level editor that can be used to make new levels for the game. You can then share those levels on the Workshop for others to play. What will you create? To open the level
Stitching Panoramas using the GIMP
 Stitching Panoramas using the GIMP Reference: http://mailman.linuxchix.org/pipermail/courses/2005-april/001854.html Put your camera in scene mode and place it on a tripod. Shoot a series of photographs,
Photoshop CS6. Table of Contents. Image Formats! 3. GIF (Graphics Interchange Format)! 3. JPEG or JPG (Joint Photographic Experts Group)!
! 3. JPEG or JPG (Joint Photographic Experts Group)!") Photoshop CS6 Table of Contents Image Formats! 3 GIF (Graphics Interchange Format)! 3 JPEG or JPG (Joint Photographic Experts Group)! 3 PNG (Portable Network Graphics)! 3 Pixels! 3 Resolution! 3 Creating
Photoshop CS6 Table of Contents Image Formats! 3 GIF (Graphics Interchange Format)! 3 JPEG or JPG (Joint Photographic Experts Group)! 3 PNG (Portable Network Graphics)! 3 Pixels! 3 Resolution! 3 Creating
Drawing 1: Tools and Techniques in Corel Draw
 Drawing 1: Tools and Techniques in Corel Draw Introduction: what this assignment is about Drawing is an essential skill for Earth Science graduates, who typically produce maps, cross-sections and other
Creating Photo Borders With Photoshop Brushes
 Creating Photo Borders With Photoshop Brushes Written by Steve Patterson. In this Photoshop photo effects tutorial, we ll learn how to create interesting photo border effects using Photoshop s brushes.
Getting Started. 1. Double click on the eye con. 2. Single click on File, then new, then OK. Click here.
 Getting Started 1. Double click on the eye con. 2. Single click on File, then new, then OK. Click here. What is Photoshop? Photoshop is a program that lets you make pictures. You can put away your markers
CMPT 165 INTRODUCTION TO THE INTERNET AND THE WORLD WIDE WEB
 CMPT 165 INTRODUCTION TO THE INTERNET AND THE WORLD WIDE WEB Unit 5 Graphics and Images Slides based on course material SFU Icons their respective owners 1 Learning Objectives In this unit you will learn
Using Adobe Photoshop
 Using Adobe Photoshop 4 Colour is important in most art forms. For example, a painter needs to know how to select and mix colours to produce the right tones in a picture. A Photographer needs to understand
The original photo. The final result.
 giving a photo painted edges In this Adobe Photoshop tutorial, we re going to combine a couple of different effects. First, we ll give the photo easy-tocreate painted edges, and then we ll make it look
How to Create Website Banners
 How to Create Website Banners In the following instructions you will be creating banners in Adobe Photoshop Elements 6.0, using different images and fonts. The instructions will consist of finding images,
Contents. Introduction
 Contents Introduction 1. Overview 1-1. Glossary 8 1-2. Menus 11 File Menu 11 Edit Menu 15 Image Menu 19 Layer Menu 20 Select Menu 23 Filter Menu 25 View Menu 26 Window Menu 27 1-3. Tool Bar 28 Selection
Customized Foam for Tools
 Table of contents Make sure that you have the latest version before using this document. o o o o o o o Overview of services offered and steps to follow (p.3) 1. Service : Cutting of foam for tools 2. Service
Adobe Illustrator CS6
 Adobe Illustrator CS6 Table of Contents Image Formats 3 ai (Adobe Illustrator) 3 eps (Encapsulated PostScript) 3 PDF (Portable Document Format) 3 JPEG or JPG (Joint Photographic Experts Group) 3 Vectors
Digital Imaging - Photoshop
 Digital Imaging - Photoshop A digital image is a computer representation of a photograph. It is composed of a grid of tiny squares called pixels (picture elements). Each pixel has a position on the grid
Line Drawing to Vector Image for Complete Beginners
 Line Drawing to Vector Image for Complete Beginners Copying a Drawing into Illustrator C6 and simplifying it Open a line drawing (scanned or a digital photo) in Photoshop. The drawing is likely to be quite
SolidWorks Design & Technology
 SolidWorks Design & Technology Training Course at PHSG Ex 5. Lego man Working with part files 8mm At first glance the Lego man looks complicated but I hope you will see that if you approach a project one
Module All You Ever Need to Know About The Displace Filter
 Module 02-05 All You Ever Need to Know About The Displace Filter 02-05 All You Ever Need to Know About The Displace Filter [00:00:00] In this video, we're going to talk about the Displace Filter in Photoshop.
Create a Cute Furry Vector Monster in Illustrator
 Create a Cute Furry Vector Monster in Illustrator Other labs from this author can be found at http://www.blog.spoongraphics.co.uk/tutorials/create-a-cute-furry-vector-monster-inillustrator Follow these
Overview of Photoshop Elements workspace
 Overview of Photoshop Elements workspace When you open Photoshop Elements, the Welcome screen offers you two options (Figure 1): The Organize button opens the Organizer. In the Organizer you organize and
Create a Street Art Style Illustration By CorelDRAW Master Stefan Lindblad
 Create a Street Art Style Illustration By CorelDRAW Master Stefan Lindblad Start with an original drawing on paper. With Corel PHOTO-PAINT and CorelDRAW, creating street art images, and later printing
GIMP WEB 2.0 ICONS. Web 2.0 Icons: Paperclip Completed Project
 GIMP WEB 2.0 ICONS WEB 2.0 ICONS: PAPERCLIP OPEN GIMP or Web 2.0 Icons: Paperclip Completed Project Step 1: To begin a new GIMP project, from the Menu Bar, select File New. At the Create a New Image dialog
Cutting out in GIMP. Navigation click to go to a section
 Cutting out in GIMP Navigation click to go to a section Before you start Cutting out an element Using several elements Using backgrounds with cut out elements Adjusting the colour of elements Creating
Graphics packages can be bit-mapped or vector. Both types of packages store graphics in a different way.
 Graphics packages can be bit-mapped or vector. Both types of packages store graphics in a different way. Bit mapped packages (paint packages) work by changing the colour of the pixels that make up the
Using Adobe Photoshop
 Using Adobe Photoshop 6 One of the most useful features of applications like Photoshop is the ability to work with layers. allow you to have several pieces of images in the same file, which can be arranged
PICTURE AS PAINT. Most magazine articles written. Creating a seamless, tileable texture in GIMP KNOW-HOW. Brightness. From Photo to Tile
 Creating a seamless, tileable texture in GIMP PICTURE AS PAINT Graphic artists often face the problem of turning a photograph into an image that will tile over a larger surface. This task is not as easy
Graphics Handling (GIMP)
") http://www.plk83.edu.hk/cy/gimp Contents 1. Introduction (Page 1) 2. Understanding the User Interface (Page 1) 3. Image Authoring (Page 2) 4. Photo Retouching (Page 6) Introduction GIMP is a free computer
http://www.plk83.edu.hk/cy/gimp Contents 1. Introduction (Page 1) 2. Understanding the User Interface (Page 1) 3. Image Authoring (Page 2) 4. Photo Retouching (Page 6) Introduction GIMP is a free computer
Copyrights and Trademarks
 Mobile Copyrights and Trademarks Autodesk SketchBook Mobile (2.0) 2012 Autodesk, Inc. All Rights Reserved. Except as otherwise permitted by Autodesk, Inc., this publication, or parts thereof, may not be
Graphic Design Tutorial: Adobe Illustrator Basics
 Graphic Design Tutorial: Adobe Illustrator Basics Open your Illustrator Use the Start Menu OR the AI icon on your desktop What is Illustrator? Illustrator is a vector drawing program. It is used to draw
USER GUIDE ELECTRONIC ARTWORK
 USER GUIDE ELECTRONIC ARTWORK COPYRIGHT Copyright 2017. Wilcom Pty Ltd, Wilcom International Pty Ltd. All Rights reserved. No parts of this publication or the accompanying software may be copied or distributed,
Chapter 4: Draw with the Pencil and Brush
 Page 1 of 15 Chapter 4: Draw with the Pencil and Brush Tools In Illustrator, you create and edit drawings by defining anchor points and the paths between them. Before you start drawing lines and curves,
BEST PRACTICES COURSE WEEK 14 PART 2 Advanced Mouse Constraints and the Control Box
 BEST PRACTICES COURSE WEEK 14 PART 2 Advanced Mouse Constraints and the Control Box Copyright 2012 by Eric Bobrow, all rights reserved For more information about the Best Practices Course, visit http://www.acbestpractices.com
Easily Smooth And Soften Skin In A Photo With Photoshop
 Easily Smooth And Soften Skin In A Photo With Photoshop Written by Steve Patterson OPEN THE START FILE BY RIGHT CLICKING THE.JPG FILE AND CHOOSING OPEN WITH ADOBE PHOTOSHOP. SAVE AS: X_lastname_firstname_Smooth_Soft
Adobe PhotoShop Elements
 Adobe PhotoShop Elements North Lake College DCCCD 2006 1 When you open Adobe PhotoShop Elements, you will see this welcome screen. You can open any of the specialized areas. We will talk about 4 of them:
Unit 7 : Image Painting, Editing and Layers
 Unit 7 : Image Painting, Editing and Layers Introduction This Unit describes about various painting tools; such as selection, cropping and measuring tools, retouching, drawing and type tools, Navigation
Reveal the mystery of the mask
 Reveal the mystery of the mask Imagine you're participating in a group brainstorming session to generate new ideas for the design phase of a new project. The facilitator starts the brainstorming session
Logo Contest Pic. A Foray into Photoshop. Contributed by: Eric Rasmussen a.k.a. Sylvanite
 Logo Contest Pic A Foray into Photoshop Contributed by: Eric Rasmussen a.k.a. Sylvanite This tutorial was downloaded from http://www.penturners.org The International Association of Penturners Prologue
Autodesk. SketchBook Mobile
 Autodesk SketchBook Mobile Copyrights and Trademarks Autodesk SketchBook Mobile (2.0.2) 2013 Autodesk, Inc. All Rights Reserved. Except as otherwise permitted by Autodesk, Inc., this publication, or parts
Turning Photograph Into Cartoon-Style Picture. Digital Media I West High School Susan M. Raymond
 Turning Photograph Into Cartoon-Style Picture Digital Media I West High School Susan M. Raymond Part 1: Creating Outline Wondering how those guys on the internet turn photograph into a nice cartoon-style
Welcome to Corel DESIGNER, a comprehensive vector-based package for technical graphic users and technical illustrators.
 Workspace tour Welcome to Corel DESIGNER, a comprehensive vector-based package for technical graphic users and technical illustrators. This tutorial will help you become familiar with the terminology and
Adobe Photoshop CS2 Workshop
 COMMUNITY TECHNICAL SUPPORT Adobe Photoshop CS2 Workshop Photoshop CS2 Help For more technical assistance, open Photoshop CS2 and press the F1 key, or go to Help > Photoshop Help. Selection Tools - The
Preparing Photos for Laser Engraving
 Preparing Photos for Laser Engraving Epilog Laser 16371 Table Mountain Parkway Golden, CO 80403 303-277-1188 -voice 303-277-9669 - fax www.epiloglaser.com Tips for Laser Engraving Photographs There is
Workspace. Workspace
 Workspace Workspace AKVIS SmartMask is a plug-in to a photo editor. To call AKVIS SmartMask plugin, select the command Filter > AKVIS > SmartMask in Adobe Photoshop ; in Corel (Jasc) Paint Shop Pro it
GIMP. CHAT Web Design
 GIMP CHAT Web Design The Layers/Channels Window The Main Window The Toolbox When you open a picture, or create a new image, this is what you see: photo name image size Menus file name Zoom amount file
High Speed Motion Trail Effect With Photoshop
 High Speed Motion Trail Effect With Photoshop Written by Steve Patterson. In this Photo Effects tutorial, we'll learn how to add a sense of speed to an object using an easy to create motion blur effect!
Introducing Digital Scrapbooking. Create beautiful books from your photos using Photoshop Elements
 Introducing Digital Scrapbooking Create beautiful books from your photos using Photoshop Elements 1 Contents Digital Scrapbooking with Photoshop Elements... 3 Using Photoshop Elements... 4 Saving your
CSCI Lab 6. Part I: Simple Image Editing with Paint. Introduction to Personal Computing University of Georgia. Multimedia/Image Processing
 CSCI-1100 Introduction to Personal Computing University of Georgia Lab 6 Multimedia/Image Processing Purpose: The purpose of this lab is for you to gain experience performing image processing using some
WORN, TORN PHOTO EDGES EFFECT
 Photo Effects: CC - Worn, Torn Photo Edges Effect WORN, TORN PHOTO EDGES EFFECT In this Photoshop tutorial, we ll learn how to take the normally sharp, straight edges of an image and make them look all
Using Adobe Photoshop
 Using Adobe Photoshop 8 In the last section we looked at adjusting colours to improve your image. In this section we ll look at various ways of touching up your images to fix problems with the images or
Portrait Pro User Manual
 Portrait Pro User Manual Version 17.0 Anthropics Technology Ltd www.portraitpro.com Contents 3 Table of Contents Part I Getting Started 6 1 Quick Start... Guide 7 2 Top Tips... For Best Results 8 3 Portrait...
Note: These directions are for Paint on WindowsXp and Vista. At the end of this tutorial are features of Paint for Windows 7.
 The Power of Paint Note: These directions are for Paint on WindowsXp and Vista. At the end of this tutorial are features of Paint for Windows 7. Your Assignment Using Paint 1. Resize an image 2. Crop an
ArcSoft PhotoImpression Table of Contents:
 ArcSoft PhotoImpression Table of Contents: 1. Welcome to PhotoImpression 2. Highlights of PhotoImpression 3. System Requirements 4. Installing PhotoImpression 5. Working with PhotoImpression Getting Started
Using Adobe Photoshop
 Using Adobe Photoshop 8 In the last section we looked at adjusting colours to improve your image. In this section we ll look at various ways of touching up your images to fix problems with the images or
ADOBE PHOTOSHOP CS 3 QUICK REFERENCE
 ADOBE PHOTOSHOP CS 3 QUICK REFERENCE INTRODUCTION Adobe PhotoShop CS 3 is a powerful software environment for editing, manipulating and creating images and other graphics. This reference guide provides
Cleaning up a part automatically using Photoshop. Lance Hoffman
 Cleaning up a part automatically using Photoshop. Lance Hoffman Often when working with a scanned chart, we are dealing with bitmap (i.e. black and white) images of music pages. If the initial scan was
Creating Pastel Images and other effects in Photoshop
 Creating Pastel Images and other effects in Photoshop Martin Addison 2015 Creating pastel images Page 1 Martin Addison FRPS Using White Layers in Photoshop 1. Create a new empty Layer 2. Edit> Fill 3.
ILLUSTRATOR BASICS FOR SCULPTURE STUDENTS. Vector Drawing for Planning, Patterns, CNC Milling, Laser Cutting, etc.
 ILLUSTRATOR BASICS FOR SCULPTURE STUDENTS Vector Drawing for Planning, Patterns, CNC Milling, Laser Cutting, etc. WELCOME TO THE ILLUSTRATOR TUTORIAL FOR SCULPTURE DUMMIES! This tutorial sets you up for
Digital Design and Communication Teaching (DiDACT) University of Sheffield Department of Landscape. Adobe Photoshop CS5 INTRODUCTION WORKSHOPS
 University of Sheffield Department of Landscape. Adobe Photoshop CS5 INTRODUCTION WORKSHOPS") Adobe INTRODUCTION WORKSHOPS WORKSHOP 1 - what is Photoshop + what does it do? Outcomes: What is Photoshop? Opening, importing and creating images. Basic knowledge of Photoshop tools. Examples of work.
Adobe INTRODUCTION WORKSHOPS WORKSHOP 1 - what is Photoshop + what does it do? Outcomes: What is Photoshop? Opening, importing and creating images. Basic knowledge of Photoshop tools. Examples of work.
Creating a Mascot Design
 Creating a Mascot Design From time to time, I'm hired to design a mascot for a sports team. These tend to be some of my favorite projects, but also some of the more challenging projects as well. I tend
Open Adobe Photoshop CS3 or CS4. Then open the JPG created from the SketchUp model from within Photoshop. File menu > Open
 Open Adobe Photoshop CS3 or CS4. Then open the JPG created from the SketchUp model from within Photoshop. File menu > Open Go to View>Rulers to turn them on they should appear on the sides of each open
Datum Tutorial Part: Cutter
 Datum Tutorial Part: Cutter Objective: Learn to apply Datums in different ways Directions 1. Datum Axis Creation a. First we need to create a center axis for the cutter b. Model Tab > Datum > Select Axis
Lab 7. CSE 3, Summer In this lab we will learn how to manipulate images and create animations in Photoshop.
 Lab 7 CSE 3, Summer 2010 In this lab we will learn how to manipulate images and create animations in Photoshop. Photoshop is an extremely powerful program. (And an extremely expensive one! The full version
Getting Started. with Easy Blue Print
 Getting Started with Easy Blue Print User Interface Overview Easy Blue Print is a simple drawing program that will allow you to create professional-looking 2D floor plan drawings. This guide covers the
Create a Candy Cane. Create a new canvas with the size 8x10 inches at 300 pixel/inch. See image below Ctrl + N
 Create a Candy Cane The Basic Candy Cane Canvas and Shape 1. Create a new folder, name it Candy Cane your name. Create a new canvas with the size 8x10 inches at 300 pixel/inch. See image below Ctrl + N
The Little Fish Transcript
 The Little Fish Transcript welcome back everybody we are going to do this nice little scare to fish so if you've been following on to our shark tutorial you might notice this little guy in the thumbnail
Creating Accurate Footprints in Eagle
 Creating Accurate Footprints in Eagle Created by Kevin Townsend Last updated on 2018-08-22 03:31:52 PM UTC Guide Contents Guide Contents Overview What You'll Need Finding an Accurate Reference Creating
The KolourPaint Handbook. Thurston Dang, Clarence Dang, and Lauri Watts
 Thurston Dang, Clarence Dang, and Lauri Watts 2 Contents 1 Introduction 1 2 Using KolourPaint 2 3 Tools 3 3.1 Tool Reference............................. 3 3.2 Brush.................................. 4
2. Creating and using tiles in Cyberboard
 2. Creating and using tiles in Cyberboard I decided to add some more detail to the first hexed grip map that I produced (Demo1) using the Cyberboard Design program. To do this I opened program by clicking
VERY. Note: You ll need to use the Zoom Tools at the top of your PDF screen to really see my example illustrations.
 VERY This tutorial is written for those of you who ve found or been given some version of Photoshop, and you don t have a clue about how to use it. There are a lot of books out there which will instruct
Computer Graphics Fundamentals NOS237. Systems.
 Computer Graphics Fundamentals NOS237 B asford Systems www.basford.com.au Basford Systems This documentation and accompanying files are copyrighted. Other than for the purposes of and subject to the conditions
c) Save the document as taller3p1_tunombre
 Save the document as taller3p1_tunombre") WORKSHOP# 3 DRAW WITH INKSCAPE Preparing the page 1. Enter Inkscape and from the File menu, go to Document Properties. 2. Prepare a page with the following characteristics: a) Format A4 (millimeters as
WORKSHOP# 3 DRAW WITH INKSCAPE Preparing the page 1. Enter Inkscape and from the File menu, go to Document Properties. 2. Prepare a page with the following characteristics: a) Format A4 (millimeters as
MEDICAL EDUCATION TECHNOLOGY
 Snipping Tool Overview The Snipping Tool provides a way to capture images from your display screen and imbed them in documents you develop. This is especially useful in Histopathology lab, since it allows
The KolourPaint Handbook. Thurston Dang, Clarence Dang, and Lauri Watts
 Thurston Dang, Clarence Dang, and Lauri Watts 2 Contents 1 Introduction 1 2 Using KolourPaint 2 3 Tools 3 3.1 Tool Reference............................. 3 3.2 Brush.................................. 4
 No Tech Genius Required: Your Guide to Photo Editing with Photoshop Unless you re a graphic designer, it s likely that when you hear the word Photoshop your heart starts pumping fast and your brain shuts
The Slide Master and Sections for Organization: Inserting, Deleting, and Moving Around Slides and Sections
 The Slide Master and Sections for Organization: Inserting, Deleting, and Moving Around Slides and Sections Welcome to the next lesson in the third module of this PowerPoint course. This time around, we
How To: Graphics and Photoshop for Dummies By Ariel Vasser
 How To: Graphics and Photoshop for Dummies By Ariel Vasser Things to Keep in Mind: Simplicity is key o Don t worry too much about having a complicated graphic with multiple colors and elements o Some of
Photoshop Elements for Genealogists Part 1
 Photoshop Elements for Genealogists Part 1 By Barry J. Ewell Topics Covered Photoshop Elements Workspace Exploring the Tools Quick Fix Preview Photoshop Elements Workspace Workspace File Edit Image Enhance
AGENDA :: MULTI- MEDIA TOOLS :: CLASS NOTES. :: Homework Critiques Best and Worst Websites. :: Photoshop Lesson 2 Things aren t what they seem
 CLASS :: 02 02.02 2018 AGENDA :: Homework Critiques Best and Worst Websites :: Photoshop Lesson 2 Things aren t what they seem I. PHOTO RETOUCHING: Before There Were Computers (Web Post) http://jmcolberg.com/weblog/2010/01/photoshop_before_there_were_computers_the_art_of_retouching_and_improving_negatives_and_prints/
COPYRIGHT. Limited warranty. Limitation of liability. Note. Customer remedies. Introduction. Digitizer V5 User Guide: Artwork 30 May 2016 ii
 USER GUIDE ARTWORK Introduction COPYRIGHT Copyright 1998-2016. Wilcom Pty Ltd, Wilcom International Pty Ltd. All Rights reserved. All title and copyrights in and to Digitizer Embroidery Software (including
Adobe PhotoShop Elements 3.0 Quick Start Tutorial
 Adobe PhotoShop Elements 3.0 Quick Start Tutorial Introduction When you open Photoshop Elements, you are greeted by the welcome screen which offers you several choices: 1. Product Overview Provides a quick
GETTING STARTED MAKING A NEW DOCUMENT
 Accessed with permission from http://web.ics.purdue.edu/~agenad/help/photoshop.html GETTING STARTED MAKING A NEW DOCUMENT To get a new document started, simply choose new from the File menu. You'll get
Working with Photos. Lesson 7 / Draft 20 Sept 2003
 Lesson 7 / Draft 20 Sept 2003 Working with Photos Flash allows you to import various types of images, and it distinguishes between two types: vector and bitmap. Photographs are always bitmaps. An image
Creative Cut-Outs. 1Go to File>New>Blank File to create a new document and enter. Projects EXTRAS: GET MORE ONLINE!
 ALL IMAGES MIKE RODRIGUEZ Creative Cut-Outs By Mike Rodriguez Are you interested in applying some of your rapidly developing layer skills? In the May/June issue, we covered the basics of layers (Layers
Add Rays Of Sunlight To A Photo With Photoshop
 Add Rays Of Sunlight To A Photo With Photoshop Written by Steve Patterson. In this photo effects tutorial, we'll learn how to easily add rays of sunlight to an image, a great way to make an already beautiful
Out of Bounds - Dolphins
 Out of Bounds - Dolphins Let's start by making a copy of our original image layer - This is not essential but it's easier to rectify mistakes. From the menus, select Layer > Duplicate Layer or drag the
Job 6 2D Animator. Welcome to the Job
 Welcome to the Job Hi, I'm Mary Lou, the 2D Animator. Glad to have you helping out on the Lemon Pops Web commercial. I'm going to show you a few different techniques for producing digital animation so
Photoshop 1. click Create.
 Photoshop 1 Step 1: Create a new file Open Adobe Photoshop. Create a new file: File->New On the right side, create a new file of size 600x600 pixels at a resolution of 300 pixels per inch. Name the file
PHOTOSHOP1 15 / WORKSPACE
 MassArt Studio Foundation: Visual Language Digital Media Cookbook, Fall 2013 PHOTOSHOP1 15 / WORKSPACE Imaging software, just like our computers, relies on metaphors from the physical world for their design.
ADD A REALISTIC WATER REFLECTION
 ADD A REALISTIC WATER REFLECTION In this Photoshop photo effects tutorial, we re going to learn how to easily add a realistic water reflection to any photo. It s a very easy effect to create and you can
How to make Lithophanes for the LED Holiday Litho-Lantern
 How to make Lithophanes for the LED Holiday Litho-Lantern Bob Eaton (Festus440) Creating the lithophanes for the lantern is quite easy. You need to have some limited photo editing skill but if you're new
Using Gimp to Fix Chain Shirt 5: An armor reskinning tutorial for NWN2 by Barrel of Monkeys Version 1: July 7, 2008
 Using Gimp to Fix Chain Shirt 5: An armor reskinning tutorial for NWN2 by Barrel of Monkeys Version 1: July 7, 2008 This tutorial will walk a beginner through the steps of modifying the textures of an
Create new drawing. Select Collection. Manage graphs. Collection Name. Graphs preview
 Create new drawing Select Collection Collection Name Manage graphs Graphs preview Duplicate selection Move selection Delete selection Select All drawings Exit Share selection Selected graphs Add new Collection
Car Ad Photoshop Tutorial Miss Van Lenten Tools: Paint brush, Eraser, Quick Selection/Magic Wand, Quick Mask, Layer Mask
 Car Ad Photoshop Tutorial Miss Van Lenten Tools: Paint brush, Eraser, Quick Selection/Magic Wand, Quick Mask, Layer Mask Part One: Google image search for a car of your choosing. Make sure you go to tools
Egg Counter Version 1.0
 Egg Counter Version 1.0 Application Manual Contents About Egg Counter... 3 Image and Photography Conditions... 4 Open an image... 5 Zoomming... 6 Marking Valid Egg... 7 Marking Invalid Object... 8 Changing
Note: Adjustment layers are available only in Photo Explosion Deluxe.
 164 PHOTO EXPLOSION USER MANUAL Understanding Layers Layers keep different regions of an image separate from one another, such as separating text from the background, and shapes from text. Use the Layers