[INTERMEDIATE 3D MODELING IN TINKERCAD]
|
|
|
- Job Maximilian Craig
- 6 years ago
- Views:
Transcription
![[INTERMEDIATE 3D MODELING IN TINKERCAD] WHAT IS ADVANCED 3D MODELING?](/docs-images/72/67480326/images/1-0.jpg "The basics of 3D modeling will only get you so far; in order to model more complex and unique items you ll need to learn how to use the tools at your disposal to create the shapes needed for your")

1 [INTERMEDIATE 3D MODELING IN TINKERCAD] WHAT IS ADVANCED 3D MODELING? The basics of 3D modeling will only get you so far; in order to model more complex and unique items you ll need to learn how to use the tools at your disposal to create the shapes needed for your model. It is important to plan out how you will build your model, from what pieces you will need to what tools and techniques each piece will need. WHAT IS TINKERCAD? Tinkercad is by far the easiest 3D modeling tool available. It is entirely based in the cloud and can be accessed from anywhere that you have an Internet connection. In Tinkercad, you combine shapes to create three dimensional objects. To get a Tinkercad account follow these steps: Go to Click Create Free Account Fill in the information to create an account. Note: If you are not 13 years or older, you must provide a parent s address and a parent must confirm your account in order to start creating your own designs. You can still go through the design tutorials without a parent s consent. Once you have created an account, you will automatically be brought to the first tutorial. If you are under 13 years old, we will provide you with a login to use for this class. WHAT WE LL DO One common technique used for 3D modeling is to think of your object as made out of different simple shapes combined together. For this class we will be creating a Lego Minifigure which will use many of the advanced features in Tinkercad. Another technique we ll use is measuring; Since we are drawing inspiration from a real-world object and want to duplicate it in 3D, we ll need to know the exact measurements of every part of our figure. The image on the right which breaks down a standard Minifigure into its different components. Though we will be building the body, we will NOT create the internal mechanism which allows the figure to move. What we will be building is the head, torso, waist, legs, feet, arms and hands. 1
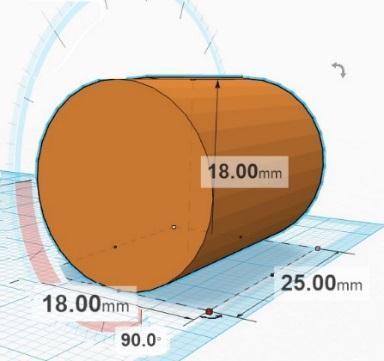
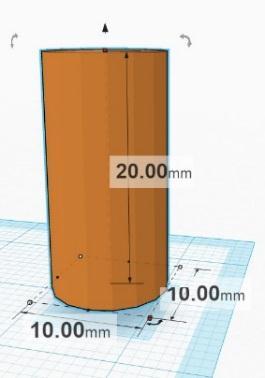
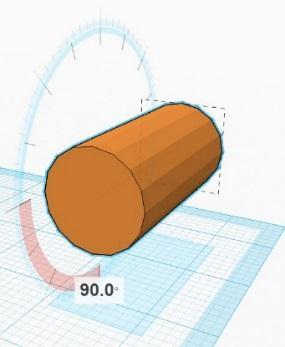
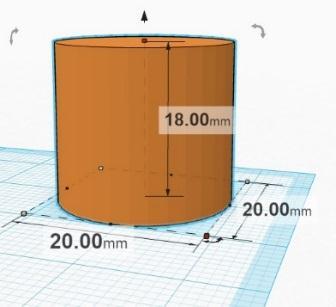
2 Before we can open up Tinkercad we need to make blueprint of our model. Below are images with all the measurements for every part of the Minifigure we will be modeling (in millimeters) that were measured ahead of time (not included are the degrees of rotation). 2

3 THINGS TO KNOW Copy and Paste When an object is selected, using CTRL + C will copy the object; Using CTRL + V will paste a copy of that object next to the original object. Duplicate Found under Edit this tool will duplicate and object much like the Copy and Paste method but will paste the copy in the exact spot of the original. Align Found on the top right hand side of the screen, align will align multiple selected object. Mirror Mirror will create a mirror image of a selected object. Group This tool will take multiple objects and join them together to form one object. Geometry The name given to pre-made objects within a 3D modeling program. 3

4 GETTING STARTED This process will start with the easiest piece to model (the legs) and move up toward the more difficult of the pieces (the arms). As we proceed we ll learn about the different modeling options of Tinkercad. Step 1: Create a new design. To start a new design, simply click the Create new design button. You will be taken to a blank canvas. You will notice that Tinkercad automatically gives your design a name. To change this, click Design in the top left corner of the screen and select Properties. Then, replace the automatic name with whatever you would like to call the design. Step 2: Choose Millimeters Go to Edit Grid on the lower right hand side of the screen. The default grid will be in millimeters. In the Grid properties box that appears, select Millimeters. You can also change the size of your workplane. Change it to the dimensions shown below. 4


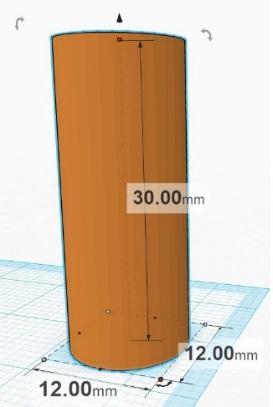
5 The Legs Step 1: Bring out a cube onto the workplane. Using the dots located on the corners and the middle of the cube, resize it to the measurements below. This will be the foot of our leg. Step 2: Bring out a cube onto the workplane. Using the dots located on the corners and the middle of the cube, resize it to the measurements below. This is the shin of our leg. Step 3: Bring out a cylinder onto the workplane. Using the dots located on the corners and the middle of the cylinder, resize it to the measurements below and rotate it using the arrows. This will be the thigh of our leg 5


6 Step 4: Using the cone located at the top of the cylinder, raise the cylinder up 29 mm. Step 5: Bright the thigh and the foot just under the cylinder. This is how it should look. Notice how the thigh (orange cylinder) does not reach all the way across the green cube, this is normal. Step 6: Highlight all 3 shapes. There should be a light blue outline over the whole thing. Press CTRL + C to copy the shapes; Press CTRL + V to paste a copy. This is what you ll see. 6


7 Step 7: At the bottom right side of your screen change the snap grid to 5.0. This will allow any movements to move 5 millimeters at a time, which will be useful for moving objects though larger distances. Use the arrow keys on your keyboard to move the copy away from the original. Step 8: Click on any empty area to deselect. Go back to snap grid and select 0.1 for more accurate movements. Click on the cylinder of the copy, use the arrow keys to move the cylinder to the left. Step 9: Highlight all the objects of one leg (not both) and click on group. Change the color to yellow. Repeat the process for the other leg. 7


8 The Midsection Step 1: Bring out a cube onto the workplane. Using the dots located on the corners and the middle of the cube, resize it to the measurements below. Step 2: Bring out a cylinder onto the workplane. Using the dots located on the corners and the middle of the cylinder, resize it to the measurements below and rotate it using the arrows. Step 3: Using the cone located at the top of the cube, raise it up 53 mm. Do the same with the cylinder but raise it up mm. Step 4: Highlight both the cube and the cylinder, go to Adjust at the top of the screen and select Align. Looking down at the objects, click on the center dots to align the objects. 8


9 Using both align dots will insure that the objects are perfectly centered with one another. Step 5: Highlight both objects and group them together. Change the color to yellow. Step 6: Bring over the legs from earlier and place the midsection between them. See the images below. When all objects are positioned, highlight legs and midsection and click Group. 9


10 The Torso Step 1: The torso will be a bit trickier than the other models. Bring out a cube onto the workplane. Using the dots located on the corners and the middle of the cube, resize it to the measurements below. Step 2: Bring out a cube onto the workplane. Using the dots located on the corners and the middle of the cube, resize it to the measurements below. This will be used to cut out parts of the original cube. Make it a hole Step 3: Place the hole next to the original cube, using the arrows rotate the hole 7 degrees; See image below. 10


11 Step 4: Move the hole so the bottom of the red cube intersects with bottom of the hole. Step 5: Highlight both objects and group; There will now be a slant on the side of the red cube. Repeat the above steps for the other side of the red cube. This is the result Step 6: Bring out a cylinder onto the workplane. Using the dots located on the corners and the middle of the cylinder, resize it to the measurements below. Place the cylinder above the torso to create the neck. 11


12 The Head Step 1: Bring out a cylinder onto the workplane. Using the dots located on the corners and the middle of the cylinder, resize it to the measurements below. Raise it 20 mm. Step 2: Bring out a half sphere onto the workplane. Using the dots located on the corners and the middle of the half sphere, resize it to the measurements below. Raise it 20 mm. Step 3: Bring the sphere and the half sphere together; Highlight and use the align tool. 12


13 After the alignment, it ll look like the half sphere has disappeared but it s actually inside the orange cylinder. Click on any empty space to deselect the objects. Click on the orange cylinder and using the cone on the top, push it down until the purple half sphere is visible. Step 4: Click on the purple half sphere, go to Edit and click Duplicate. Use the arrow keys to separate the copy from the original. Use the arrows around the copy to rotate it 180 degrees. Step 5: Highlight the orange cylinder and the original purple half sphere on top of it and group them, change the color to yellow. Step 6: Highlight the newly created object and the upside down half sphere and align them. 13


14 Step 7: Click on the yellow object and move it up using the cone above it. When the half sphere is under the yellow object as shown below, group both objects. Change color to yellow. The size of the new object will be 35 mm. Step 8: Bring out a cylinder onto the workplane. Using the dots located on the corners and the middle of the cylinder, resize it to the measurements below. This will be the cylinder on the top of the head. Step 9: Before placing the cylinder, we re going to create the hole. Bring out a cylinder onto the workplane. Using the dots located on the corners and the middle of the cylinder, resize it to the measurements below. Turn it into a hole. 14


15 Step 10: Using the align tool, align the first cylinder with the hole cylinder. Step 11: Highlight both cylinders and group them together; This is the result. Step 12: Bring out a cylinder onto the workplane. Using the dots located on the corners and the middle of the cylinder, resize it to the measurements below. This will be the cylinder on the bottom of the head. Step 13: Before placing the cylinder, we re going to create the hole. Bring out a cylinder onto the workplane. Using the dots located on the corners and the middle of the cylinder, resize it to the measurements below. Turn it into a hole. 15


16 Step 14: Using the align tool, align the first cylinder with the hole cylinder and group them. Step 15: Bring all three objects together, highlight all and align. Step 16: Once aligned, place the top cylinder into the head, do the same with the bottom cylinder, see image below. Once everything is placed, group all the objects together, group and change color to yellow. The size of the newly created object is 46 mm. 16


17 The Arms (The Upper Arm) Step 1: Bring out a cylinder onto the workplane. Using the dots located on the corners and the middle of the cylinder, resize it to the measurements below. Step 2: Bring out a half sphere onto the workplane. Using the dots located on the corners and the middle of the half sphere, resize it to the measurements below. Step 3: Click on the purple half sphere, go to Edit and click Duplicate. Use the arrow keys to separate the copy from the original. Use the arrows around the copy to rotate it 180 degrees. Step 4: Bring all three objects together, highlight all and align. Step 5: Once aligned, join the pieces together and group. The size of the new shape will be 30 mm. 17
18 (The Lower Arm, Wrist and Hand) Step 1: Bring out a cylinder onto the workplane. Using the dots located on the corners and the middle of the cylinder, resize and rotate it to the measurements below. This will be the lower arm of the arm. Step 2: Bring out a cylinder onto the workplane. Using the dots located on the corners and the middle of the cylinder, resize and rotate it to the measurements below. This will be the wrist of the arm. Step 3: Bring out a cylinder onto the workplane. Using the dots located on the corners and the middle of the cylinder, resize it to the measurements below. This will be the hand of the arm. Step 4: Bring out a cylinder onto the workplane. Using the dots located on the corners and the middle of the cylinder, resize it to the measurements below. Turn it into a Hole. This will be used to shape the hand. 18


19 Step 5: Bring the hand cylinder and the hole cylinder together, align and group them. Step 6: Bring out a cube onto the workplane. Using the dots located on the corners and the middle of the cube, resize it to the measurements below. Turn it into a Hole. This will be used to create the opening of the hand. Step 7: Bring the hand cylinder and the cube together as shown below and align. Step 8: Group the two objects. The result is shown below. Step 9: Bring the lower arm, wrist and hand together as shown below and align them. 19


 Step 1: Bring the")


20 Step 10: Bring the objects together as shown below, group them and change the color to yellow. Assembly: Part 1 Here we ll bring together the newly created objects in order to form the arm. (Note: The following positioning and rotations are based on the model as built by this guide, your numbers may differ) Step 1: Bring the upper arm and the lower arm together as shown below, align. Step 2: A minifigure s arms are not straight, the upper arm slants towards the torso, causing a small bump at the elbow. The lower arm and the hand do follow a straight line. -Using the rotation arrows around the upper arm, rotate it -57 degrees as shown below. Step 3: From the top view, rotate the upper arm 16 degrees as shown. 20


21 Step 4: While still in top view, change the offset amount to 0.1 for more accurate movements. Using the arrow keys on your keyboard, move the upper arm to the right until it resembles the image below. Step 5: In side view, you should see something like the first image below. Using the arrow keys on your keyboard, nudge the upper arm a so the yellow of the lower arm cylinder can no longer be seen, see second image below. Step 6: After the adjustments are complete the images below show how the objects should look from side and top views. Group both objects together; change color to yellow. Assembly: Part 2 The arm of a Minifigure is not round all the way around. The part of the arm that faces the torso is flat so the arm does not run into the torso when rotated. Here we ll create the flat part of the arm. Step 1: Bring out a cube onto the workplane. Using the dots located on the corners and the middle of the cube, resize it to the measurements below. Turn it into a hole. 21


22 Step: 2: Bring the newly formed arm and the cube together as shown below. Step 3: Using the arrow keys on your keyboard, move the hole cube into the arm as shown below. Step 4: Group both objects together. Result shown below. The right arm has been created. With the right arm created, now we need the left. Since the flat part will now have to be on the other side of the arm, we can t just copy and paste like we did to create the legs and since we re not going to want to go through construction again we ll be using another advanced tool of Tinkercad, the mirror tool. Step 5: Using the duplicate tool under Edit, make a copy of the arm and separate them. Keep one selected (blue outline) 22


23 Step 6: Under Adjust, select Mirror. An arrow symbol will appear next to the copy of the arm. Step 7: Clicking on the arrow highlighted above will rotate the selected arm vertically, mirroring the original arm. Assembly: Part 3 Now that we have all of the individual pieces together, it s time to assemble it all. Step 1: Bring all the created parts together. Raise each piece to the designated height as shown below. Step 2: Highlight all the objects, align. 23


)) at eacevedo@frvpld.info or 224-802-8000.")

24 Step 3: The arms of my model need some work. The arms need to fit well with the torso so they ll need to be rotated (individually). In the case of this model, the arms will need to be rotated as shown below; same for the other arm. Step 4: Highlight everything, group, make sure the color is yellow. And that s it! Lego Minifigure complete! Using everything you ve learned, if you wish to create the holes in the pack of the legs or at the bottom of the feet, go for it. If you need further assistance, don t hesitate to: or call Erica Acevedo, Bilingual IT Assistant (and digital master builder ((that s not a real title but it would be cool))) at eacevedo@frvpld.info or Also don t forget that all of the services offered by the library are free of charge. You can check out a full list of our computer classes by: 1. Going to 2. Hovering over Events and Registration 3. Clicking on Computer Classes 24
Converting a 3D object into a mould. With Tinkercad and Inkscape
 Converting a 3D object into a mould With Tinkercad and Inkscape What you need Tinkercad Inkscape a STL file to convert Create an account now Download for free now Pick up one for free now To make better
Create a Vector Glass With Layered Reflections to Create Depth
 Create a Vector Glass With Layered Reflections to Create Depth 1) Draw a rectangle at approx 3:2 ratio. Next, use the ellipse tool and hold Ctrl to create a perfect circle. Position the circle at the bottom
Getting Started. with Easy Blue Print
 Getting Started with Easy Blue Print User Interface Overview Easy Blue Print is a simple drawing program that will allow you to create professional-looking 2D floor plan drawings. This guide covers the
The Revolve Feature and Assembly Modeling
 The Revolve Feature and Assembly Modeling PTC Clock Page 52 PTC Contents Introduction... 54 The Revolve Feature... 55 Creating a revolved feature...57 Creating face details... 58 Using Text... 61 Assembling
Modeling Basic Mechanical Components #1 Tie-Wrap Clip
 Modeling Basic Mechanical Components #1 Tie-Wrap Clip This tutorial is about modeling simple and basic mechanical components with 3D Mechanical CAD programs, specifically one called Alibre Xpress, a freely
Diane Burton, STEM Outreach.
 123D Design Tutorial: LED decoration Before using these instructions, it is very helpful to watch this video screencast of the CAD drawing actually being done in the software. Click this link for the video
Using Google SketchUp
 Using Google SketchUp Opening sketchup 1. From the program menu click on the SketchUp 8 folder and select 3. From the Template Selection select Architectural Design Millimeters. 2. The Welcome to SketchUp
Drawing with precision
 Drawing with precision Welcome to Corel DESIGNER, a comprehensive vector-based drawing application for creating technical graphics. Precision is essential in creating technical graphics. This tutorial
Ornamental Pro 2010 Component Drawing Manual
 Ornamental Pro 2010 Component Drawing Manual Introduction This manual explains the methods for creating your own components for the component library. Component mode is for advanced users only. You must
33-2 Satellite Takeoff Tutorial--Flat Roof Satellite Takeoff Tutorial--Flat Roof
 33-2 Satellite Takeoff Tutorial--Flat Roof Satellite Takeoff Tutorial--Flat Roof A RoofLogic Digitizer license upgrades RoofCAD so that you have the ability to digitize paper plans, electronic plans and
Photoshop CS6 automatically places a crop box and handles around the image. Click and drag the handles to resize the crop box.
 CROPPING IMAGES In Photoshop CS6 One of the great new features in Photoshop CS6 is the improved and enhanced Crop Tool. If you ve been using earlier versions of Photoshop to crop your photos, you ll find
Kitchen and Bath Design Tutorial
 Adding Cabinets Chapter 5: Kitchen and Bath Design Tutorial This tutorial continues where the Materials Tutorial left off. You should save this tutorial using a new name to archive your previous work.
FLAMING HOT FIRE TEXT
 FLAMING HOT FIRE TEXT In this Photoshop text effects tutorial, we re going to learn how to create a fire text effect, engulfing our letters in burning hot flames. We ll be using Photoshop s powerful Liquify
Tinker Tuesday Project - Drinking Glasses
 Tinker Tuesday Project - Drinking Glasses 1. Open CorelDRAW and create a new document. Near the top left corner of the screen, click File, and then click Import on the resulting menu. Select an image from
2809 CAD TRAINING: Part 1 Sketching and Making 3D Parts. Contents
 Contents Getting Started... 2 Lesson 1:... 3 Lesson 2:... 13 Lesson 3:... 19 Lesson 4:... 23 Lesson 5:... 25 Final Project:... 28 Getting Started Get Autodesk Inventor Go to http://students.autodesk.com/
SolidWorks Design & Technology
 SolidWorks Design & Technology Training Course at PHSG Ex 5. Lego man Working with part files 8mm At first glance the Lego man looks complicated but I hope you will see that if you approach a project one
Okay, that s enough talking. Let s get things started. Here s the photo I m going to be using in this tutorial: The original photo.
 add visual interest with the rule of thirds In this Photoshop tutorial, we re going to look at how to add more visual interest to our photos by cropping them using a simple, tried and true design trick
WINGS3D Mini Tutorial
 WINGS3D Mini Tutorial How to make a building shape for panoramic render by David Brinnen December 2005 HTML Version by Hans-Rudolf Wernli Part of «Dungeon Dimension» in the background > Introduction Moving
12. Creating a Product Mockup in Perspective
 12. Creating a Product Mockup in Perspective Lesson overview In this lesson, you ll learn how to do the following: Understand perspective drawing. Use grid presets. Adjust the perspective grid. Draw and
PHOTOSHOP PUZZLE EFFECT
 PHOTOSHOP PUZZLE EFFECT In this Photoshop tutorial, we re going to look at how to easily create a puzzle effect, allowing us to turn any photo into a jigsaw puzzle! Or at least, we ll be creating the illusion
SCRAPENDIPITY Designs. Electric Quilt 7 Tutorial. Building a Quilt
 Electric Quilt 7 Tutorial Building a Quilt When you start Electric Quilt up, you will see this screen. Type the name of your quilt and hit OK Now we need to make sure we have the correct layout. Go to
Drawing the Red Christmas Bell
 Vector 3D Christmas Bells Thinking of drawing some Christmas bells for this Christmas? Read this illustrator tutorial to learn how to draw 5 different styles of vector Christmas bells using the 3D Revolve
Architecture 2012 Fundamentals
 Autodesk Revit Architecture 2012 Fundamentals Supplemental Files SDC PUBLICATIONS Schroff Development Corporation Better Textbooks. Lower Prices. www.sdcpublications.com Tutorial files on enclosed CD Visit
ADD A REALISTIC WATER REFLECTION
 ADD A REALISTIC WATER REFLECTION In this Photoshop photo effects tutorial, we re going to learn how to easily add a realistic water reflection to any photo. It s a very easy effect to create and you can
House Design Tutorial
 House Design Tutorial This House Design Tutorial shows you how to get started on a design project. The tutorials that follow continue with the same plan. When you are finished, you will have created a
BERNINA Embroidery Software 6 for the Garment-Maker
 BERNINA Embroidery Software 6 for the Garment-Maker BERNINA Embroidery software makes garment-making and embellishing fast and easy using basic tools in the software. Scanning You may choose to use the
Room 2D/3D Diagram Demo
 Room 2D/3D Diagram Demo PART 1) Basic Room Layout (2D) 1) Open the Crash Zone or Crime Zone diagram program. 2) Click on to open the CZ Point Cloud tool. 3) Click on 3D/Cloud Preferences. a) Set the Cloud
Addendum 18: The Bezier Tool in Art and Stitch
 Addendum 18: The Bezier Tool in Art and Stitch About the Author, David Smith I m a Computer Science Major in a university in Seattle. I enjoy exploring the lovely Seattle area and taking in the wonderful
Tinker Tuesday Project - Stainless Steel Tumblers
 Tinker Tuesday Project - Stainless Steel Tumblers 1. Open CorelDRAW and create a new document. Near the top left corner of the screen, click File, and then click Import on the resulting menu. Select an
CI L Planes, Trains and Automobiles with Vehicle Tracking How To use Vehicle Tracking
 CI121345-L Planes, Trains and Automobiles with Vehicle Tracking How To use Vehicle Tracking Heidi Boutwell CADLearning Learning Objectives Discover and understand Vehicle Tracking software alongside using
Kitchen and Bath Design Tutorial
 Kitchen and Bath Design Tutorial This tutorial continues where the Interior Design Tutorial left off. You should save this tutorial using a new name to archive your previous work. The tools and techniques
Inventor-Parts-Tutorial By: Dor Ashur
 Inventor-Parts-Tutorial By: Dor Ashur For Assignment: http://www.maelabs.ucsd.edu/mae3/assignments/cad/inventor_parts.pdf Open Autodesk Inventor: Start-> All Programs -> Autodesk -> Autodesk Inventor 2010
ACAD-BAU TUTORIAL For BricsCAD platform
 ACAD-BAU TUTORIAL WWW.ARHINOVA.SI For BricsCAD platform August 06 WORKSPACE ACAD-BAU RIBBON ACAD-BAU CONTROL BAR F ACAD-BAU PALETTES BASIC SETTINGS Use New command and open the template called ACB_International.DWT.
Sketch-Up Guide for Woodworkers
 W Enjoy this selection from Sketch-Up Guide for Woodworkers In just seconds, you can enjoy this ebook of Sketch-Up Guide for Woodworkers. SketchUp Guide for BUY NOW! Google See how our magazine makes you
Introduction to CATIA V5
 Introduction to CATIA V5 Release 17 (A Hands-On Tutorial Approach) Kirstie Plantenberg University of Detroit Mercy SDC PUBLICATIONS Schroff Development Corporation www.schroff.com Better Textbooks. Lower
Using Gimp to Fix Chain Shirt 5: An armor reskinning tutorial for NWN2 by Barrel of Monkeys Version 1: July 7, 2008
 Using Gimp to Fix Chain Shirt 5: An armor reskinning tutorial for NWN2 by Barrel of Monkeys Version 1: July 7, 2008 This tutorial will walk a beginner through the steps of modifying the textures of an
WORN, TORN PHOTO EDGES EFFECT
 Photo Effects: CC - Worn, Torn Photo Edges Effect WORN, TORN PHOTO EDGES EFFECT In this Photoshop tutorial, we ll learn how to take the normally sharp, straight edges of an image and make them look all
Welcome to SPDL/ PRL s Solid Edge Tutorial.
 Smart Product Design Product Realization Lab Solid Edge Assembly Tutorial Welcome to SPDL/ PRL s Solid Edge Tutorial. This tutorial is designed to familiarize you with the interface of Solid Edge Assembly
House Design Tutorial
 House Design Tutorial This House Design Tutorial shows you how to get started on a design project. The tutorials that follow continue with the same plan. When you are finished, you will have created a
Quilt Pro 6 Lesson Quilt in a Quilt
 Quilt Pro 6 Lesson Quilt in a Quilt Quilt in a Quilt The Inner Quilt This quilt is a very complex design. We will cover a unique technique not covered in the manual. While any one can master the techniques
Cricut Design Space App for ipad User Manual
 Cricut Design Space App for ipad User Manual Cricut Explore design-and-cut system From inspiration to creation in just a few taps! Cricut Design Space App for ipad 1. ipad Setup A. Setting up the app B.
AgilEye Manual Version 2.0 February 28, 2007
 AgilEye Manual Version 2.0 February 28, 2007 1717 Louisiana NE Suite 202 Albuquerque, NM 87110 (505) 268-4742 support@agiloptics.com 2 (505) 268-4742 v. 2.0 February 07, 2007 3 Introduction AgilEye Wavefront
SMALL OFFICE TUTORIAL
 SMALL OFFICE TUTORIAL in this lesson you will get a down and dirty overview of the functionality of Revit Architecture. The very basics of creating walls, doors, windows, roofs, annotations and dimensioning.
Creating a light studio
 Creating a light studio Chapter 5, Let there be Lights, has tried to show how the different light objects you create in Cinema 4D should be based on lighting setups and techniques that are used in real-world
Part 8: The Front Cover
 Part 8: The Front Cover 4 Earpiece cuts and housing Lens cut and housing Microphone cut and housing The front cover is similar to the back cover in that it is a shelled protrusion with screw posts extruding
Duplicate Layer 1 by dragging it and dropping it on top of the New Layer icon in the Layer s Palette. You should now have two layers rename the top la
 50 Face Project For this project, you are going to put your face on a coin. The object is to make it look as real as possible. Though you will probably be able to tell your project was computer generated,
AreaSketch Pro Overview for ClickForms Users
 AreaSketch Pro Overview for ClickForms Users Designed for Real Property Specialist Designed specifically for field professionals required to draw an accurate sketch and calculate the area and perimeter
WORD ART - CHANGING LETTERING SPACING
 CHANGING LETTERING SIZE Enter single letters or words and use the icon to rescale the motif. When the Maintaining Proportions (lock) icon is outlined in white, the design will be resized proportionately.
Creating Photo Borders With Photoshop Brushes
 Creating Photo Borders With Photoshop Brushes Written by Steve Patterson. In this Photoshop photo effects tutorial, we ll learn how to create interesting photo border effects using Photoshop s brushes.
Using the Ruler Tool to Keep Your Tracks Straight Revised November 2008
 Using the Ruler Tool to Keep Your Tracks Straight Revised November 2008 Suppose you had to lay a section of track 8000 feet (2424m) long. The track will include a station and several industrial sidings.
Adding Fireworks To A Photo With Photoshop
 Adding Fireworks To A Photo With Photoshop Written by Steve Patterson. In this Photoshop Effects tutorial, we re going to learn how to add fireworks to a photo. What you ll need is a photo of fireworks
84 part video tutorial training course. The course is 100% free with no catches or exclusions. You don
 Please Note: If you're new to Revit, you may be interested in my " Beginner's Guide to Revit Architecture " 84 part video tutorial training course. The course is 100% free with no catches or exclusions.
3D & STEM With Tinker CAD
 3D & STEM With Tinker CAD by Alex Reyes Digital Maestro Magazine digitalmaestro.org Table of Contents Table of Contents. 2 Wheel and Axle with TinkerCAD.. 3 The Workplane... 4 The Basic Shape... 6 Printing
Introduction to SolidWorks Introduction to SolidWorks
 Introduction to SolidWorks Introduction to SolidWorks SolidWorks is a powerful 3D modeling program. The models it produces can be used in a number of ways to simulate the behaviour of a real part or assembly
Step 1: Open A Photo To Place Inside Your Text
 Place A Photo Or Image In Text In Photoshop In this Photoshop tutorial, we re going to learn how to place a photo or image inside text, a very popular thing to do in Photoshop, and also a very easy thing
The original image. Let s get started! The final rainbow effect. The photo sits on the Background layer in the Layers panel.
 Add A Realistic Rainbow To A Photo In this Photoshop photo effects tutorial, we ll learn how to easily add a rainbow, and even a double rainbow, to a photo! As we ll see, Photoshop ships with a ready-made
Turn A Photo Into A Collage Of Polaroids With Photoshop
 http://www.photoshopessentials.com/photo-effects/polaroids/ Turn A Photo Into A Collage Of Polaroids With Photoshop Written by Steve Patterson. In this Photoshop Effects tutorial, we ll learn how to take
Roof Tutorial Wall Specification
 Roof Tutorial The majority of Roof Tutorial describes some common roof styles that can be created using settings in the Wall Specification dialog and can be completed independent of the other tutorials.
84 part video tutorial training course. The course is 100% free with no catches or exclusions. You don
 Please Note: If you're new to Revit, you may be interested in my " Beginner's Guide to Revit Architecture " 84 part video tutorial training course. The course is 100% free with no catches or exclusions.
Creating multicolored wiring diagrams in Visio 2013
 Creating multicolored wiring diagrams in Visio 2013 You can use this wiring diagramming functionality in Visio based on the Custom Line Patterns I created in Visio 2013: (some features are not present
Introduction to Photoshop Elements
 John W. Jacobs Technology Center 450 Exton Square Parkway Exton, PA 19341 610.280.2666 ccljtc@ccls.org www.ccls.org Facebook.com/ChesterCountyLibrary Introduction to Photoshop Elements Chester County Library
When Lines Intersect Lines
 &RPSOH[*UDSKLFVRQD 6LQJOH/D\HU Content provided in partnership with Peachpit Press, from the book Macromedia Flash MX for Windows and Macintosh: Visual QuickStart Guide by Katherine Ulrichà To work effectively
Star Defender. Section 1
 Star Defender Section 1 For the first full Construct 2 game, you're going to create a space shooter game called Star Defender. In this game, you'll create a space ship that will be able to destroy the
Module 2: Radial-Line Sheet-Metal 3D Modeling and 2D Pattern Development: Right Cone (Regular, Frustum, and Truncated)
") Inventor (5) Module 2: 2-1 Module 2: Radial-Line Sheet-Metal 3D Modeling and 2D Pattern Development: Right Cone (Regular, Frustum, and Truncated) In this tutorial, we will learn how to build a 3D model
Inventor (5) Module 2: 2-1 Module 2: Radial-Line Sheet-Metal 3D Modeling and 2D Pattern Development: Right Cone (Regular, Frustum, and Truncated) In this tutorial, we will learn how to build a 3D model
Introducing Digital Scrapbooking. Create beautiful books from your photos using Photoshop Elements
 Introducing Digital Scrapbooking Create beautiful books from your photos using Photoshop Elements 1 Contents Digital Scrapbooking with Photoshop Elements... 3 Using Photoshop Elements... 4 Saving your
House Design Tutorial
 Chapter 2: House Design Tutorial This House Design Tutorial shows you how to get started on a design project. The tutorials that follow continue with the same plan. When you are finished, you will have
Welcome to Corel DESIGNER, a comprehensive vector-based package for technical graphic users and technical illustrators.
 Workspace tour Welcome to Corel DESIGNER, a comprehensive vector-based package for technical graphic users and technical illustrators. This tutorial will help you become familiar with the terminology and
AutoDesk Inventor: Creating Working Drawings
 AutoDesk Inventor: Creating Working Drawings Inventor allows you to quickly and easily make quality working drawings from your 3D models. This tutorial will walk you through the steps in creating a working
ADDING FIREWORKS TO A PHOTO
 ADDING FIREWORKS TO A PHOTO In this Photoshop tutorial, we re going to learn how to add fireworks to a photo. What you ll need is a photo of fireworks and the photo you want to add the fireworks to (preferably
Name: Date Completed: Basic Inventor Skills I
 Name: Date Completed: Basic Inventor Skills I 1. Sketch, dimension and extrude a basic shape i. Select New tab from toolbar. ii. Select Standard.ipt from dialogue box by double clicking on the icon. iii.
Introduction to 3D Printing. Activity 1: Design a keychain using computer-aided design software
 Introduction to 3D Printing Activity 1: Design a keychain using computer-aided design software 1 In this activity we ll design a keychain name tag and learn the fundamentals of computer-aided design, the
SHAPE level 2 questions. 1. Match each shape to its name. One is done for you. 1 mark. International School of Madrid 1
 SHAPE level 2 questions 1. Match each shape to its name. One is done for you. International School of Madrid 1 2. Write each word in the correct box. faces edges vertices 3. Here is half of a symmetrical
04. Two Player Pong. 04.Two Player Pong
 04.Two Player Pong One of the most basic and classic computer games of all time is Pong. Originally released by Atari in 1972 it was a commercial hit and it is also the perfect game for anyone starting
General Workflow Instructions for capturing 360 images using Theta V, editing in Photoshop, and publishing to Google StreetView
 General Workflow Instructions for capturing 360 images using Theta V, editing in Photoshop, and publishing to Google StreetView This document attempts to give step-by-step instructions for capturing and
CHANGING THE MEASURING UNIT
 SMART SECURE Embroidery motifs are programmed either with or without securing stitches. The machine recognizes when no securing stitches are programmed and adds some. If securing stitches are not wanted,
EPS to Rhino Tutorial.
 EPS to Rhino Tutorial. In This tutorial, I will go through my process of modeling one of the houses from our list. It is important to begin by doing some research on the house selected even if you have
Cube in a cube Fusion 360 tutorial
 Cube in a cube Fusion 360 tutorial n Before using these instructions, it is helpful to watch this video screencast of the CAD drawing actually being done in the software. Click to link to the video tutorial.
Kitchen and Bath Design Tutorial
 Kitchen and Bath Design Tutorial This tutorial continues where the Interior Design Tutorial left off. You should save this tutorial using a new name to archive your previous work. The tools and techniques
Section 8: TWILL. Six-Holed Tablet Weaving, Section 8 Bonita Datta, January 2016
 Section 8: TWILL The last six-holed tablet weaving technique in this series of monographs is twill. By adding it to our repertoire we gain the ability to weave imagery that has prominent oblique lines,
House Design Tutorial
 Chapter 2: House Design Tutorial This House Design Tutorial shows you how to get started on a design project. The tutorials that follow continue with the same plan. When you are finished, you will have
Create A Mug. Skills Learned. Settings Sketching 3-D Features. Revolve Offset Plane Sweep Fillet Decal* Offset Arc
 Create A Mug Skills Learned Settings Sketching 3-D Features Slice Line Tool Offset Arc Revolve Offset Plane Sweep Fillet Decal* Tutorial: Creating A Custom Mug There are somethings in this world that have
COLORIZE A PHOTO WITH MULTIPLE COLORS
 COLORIZE A PHOTO WITH MULTIPLE COLORS In this Photoshop photo effects tutorial, we re going to learn how to colorize a photo using multiple colors. It s an effect I ve seen used quite a bit in ads for
1. Open the Feature Modeling demo part file on the EEIC website. Ask student about which constraints needed to Fully Define.
 BLUE boxed notes are intended as aids to the lecturer RED boxed notes are comments that the lecturer could make Control + Click HERE to view enlarged IMAGE and Construction Strategy he following set of
Alibre Design Tutorial: Loft, Extrude, & Revolve Cut Loft-Tube-1
 Alibre Design Tutorial: Loft, Extrude, & Revolve Cut Loft-Tube-1 Part Tutorial Exercise 5: Loft-Tube-1 [Complete] In this Exercise, We will set System Parameters first, then part options. Then, in sketch
Sketch PowerTab. Sketch PowerView. Starting a New Floorplan with WinSketch
 Sketch PowerView The Sketch PowerView is your complete interface for digital sketches and their resulting area calculations to transfer into your form. In the Sketch PowerView, you can even access sketches
How to Build a Game Console. David Hunt, PE
 How to Build a Game Console David Hunt, PE davidhunt@outdrs.net Covering: Drafts Fillets Shells Patterns o Linear o Circular Using made-for-the-purpose sketches to define reference geometry Using reference
Creating a Frame by Frame Animation for PhotoStory
 Creating a Frame by Frame Animation for PhotoStory There are an unlimited number of animation styles that you can create using the PhotoShop Elements software. Depending on the type of animation you want,
Colorizing A Photo With Multiple Colors In Photoshop
 Colorizing A Photo With Multiple Colors In Photoshop Written by Steve Patterson. In this Photoshop Effects tutorial, we re going to learn how to colorize a photo using multiple colors. It s an effect I
GEO/EVS 425/525 Unit 2 Composing a Map in Final Form
 GEO/EVS 425/525 Unit 2 Composing a Map in Final Form The Map Composer is the main mechanism by which the final drafts of images are sent to the printer. Its use requires that images be readable within
1. Create a 2D sketch 2. Create geometry in a sketch 3. Use constraints to position geometry 4. Use dimensions to set the size of geometry
 2.1: Sketching Many features that you create in Fusion 360 start with a 2D sketch. In order to create intelligent and predictable designs, a good understanding of how to create sketches and how to apply
Solving Problems. PS1 Use and apply mathematics to solve problems, communicate and reason Year 1. Activities. PS1.1 Number stories 1.
 PS1 Use and apply mathematics to solve problems, communicate and reason Year 1 PS1.1 Number stories 1 PS1.2 Difference arithmagons PS1.3 Changing orders PS1.4 Making shapes PS1.5 Odd or even? PS1.6 Odd
Revit Structure 2013 Basics
 Revit Structure 2013 Basics Framing and Documentation Elise Moss Supplemental Files SDC P U B L I C AT I O N S Schroff Development Corporation Better Textbooks. Lower Prices. www.sdcpublications.com Tutorial
Further Mathematics Support Programme
 Stage 1 making a cross Solving the Rubik s cube The first stage is to make a cross so that all the edges line up over the correct centre pieces in the middle layer. Figure 1 Find a white edge piece (in
SHAPE CLUSTER PHOTO DISPLAY
 SHAPE CLUSTER PHOTO DISPLAY In this Photoshop tutorial, we ll learn how to display a single photo as a cluster of shapes, similar to larger wall cluster displays where several photos, usually in different
RETRO 3D MOVIE EFFECT
 RETRO 3D MOVIE EFFECT Long before Avatar transported us to the breathtakingly beautiful world of Pandora with its state of the art 3D technology, movie audiences in the 1950 s were wearing cheap cardboard
Basic Sketching Techniques
 Basic Sketching Techniques Session Speaker Asst. Prof. DOD 1 Contents Learning Objective Introduction Perspective Basic Geometry Complex geometry Exploded view Exercise 2 Ideation sketches Ideation sketches
QUICKSTART COURSE - MODULE 1 PART 2
 QUICKSTART COURSE - MODULE 1 PART 2 copyright 2011 by Eric Bobrow, all rights reserved For more information about the QuickStart Course, visit http://www.acbestpractices.com/quickstart Hello, this is Eric
Lesson 4 Extrusions OBJECTIVES. Extrusions
 Lesson 4 Extrusions Figure 4.1 Clamp OBJECTIVES Create a feature using an Extruded protrusion Understand Setup and Environment settings Define and set a Material type Create and use Datum features Sketch