BC Ministry of Transportation and Infrastructure Civil 3D Terms of Reference
|
|
|
- Annabel Chase
- 6 years ago
- Views:
Transcription

1 BC Ministry of Transportation and Infrastructure Civil 3D Terms of Reference BC Supplement to TAC Section 1280 [January Provisional]
2 BLANK PAGE
3 Contents General Terms of Reference: Exceptions AutoCAD Civil Project Archive: Missing or Problem Content High Level Workflow Documentation Survey Workflow Design Modeling Workflow Construction Workflow Civil 3D Overview BC MoT Civil 3D Standards Technical Package Project Data Folder Structure and Submission Requirements Drawing Templates and Custom Subassemblies Detailed Procedures for Survey Workflow Civil 3D for Survey Workflow Tasks Survey Standard Components for Survey Data Processing Drawing Template - Overview Drawing Template - Point Styles and Label Styles Drawing Template Description Keys, Survey Codes and Attributes Figure Prefix Database and Figure Styles Drawing Template - Point Groups Point Naming and Numbering Point Attribution (DTM and Other) Survey Database Overview LiDAR Data Deliverables Merging LiDAR and GPS/TS Data Survey Model Drawing and Surface Naming Standards Surface Modeling Surface Breakline Definition Figure Prefix Database DTM Attribute in XML Files Surface Point Inclusion and Exclusion Surface Point Groups Surface Boundaries BC Ministry of Transportation and Infrastructure Page i
4 Drawing Properties Survey Project Data Archive Handoff to Designers Detailed Procedures for Design Modeling Workflow Civil 3D for Design Workflow Tasks Survey Deliverables to Design Design Modeling Standardized Components Civil 3D Drawing Templates Ministry Custom Subassemblies, Codes and Submission Requirements Civil 3D Object Styles and Label Styles and Submission Requirements Design Criteria Files Design Modeling Object Naming Standards Design Surface Names Centreline Horizontal Alignment Names Offset Geometry Alignment Names Profiles and Profile View Names Subassembly and Assembly Names Corridor Components and Names Sample Lines, Section Views and Volumes Create Sample Lines Attach Data to Sample Lines Sample Line Locations Create Section Views Quantity Takeoff Criteria Pavement Structure Volumes Earthworks, Stripping and Rock Volumes Calculate and Report Volumes Design Surface Models Detailed Procedures for Construction Workflow Construction Workflow Tasks Reception and Extraction of Construction Project Data Archive Data Reference Repair Broken Reference Repair Process Construction Surveys Surface Updates BC Ministry of Transportation and Infrastructure Page ii
5 Quantity Recalculation and Design Updates Export Data for Construction Layout and QA measurements Section Surface Editor Project Data Management, Archiving and Handoff Drawing and Data Management Civil 3D Tools for Data Sharing AutoCAD External References Civil 3D Data Shortcuts and Reference Objects AutoCAD External References and Object Labeling AutoCAD Xrefs and Civil 3D Data Shortcuts / Reference Objects AutoCAD External References and Corridor Targeting Civil 3D Survey Database Data Management Best Practices Project Folder Drawings, Data and Structure Design Model Folder Contents and Drawing Naming Standards Production Drawing Folder Contents and Naming Standards Production Drawing Presentation Format Plan Production Tools Drawing Properties Title Blocks and AutoCAD Sheet Set Manager Project Data Structure Summary Document Project Archive Deliverables Quality Control Checklist Project Data Archive and Deliverable Project Versioning Methodology Software Customization Appendices Appendix - Survey Codes and Civil 3D Description Keys Appendix - Survey Figure Prefix Database Appendix Subassembly Point, Link and Shape Codes Appendix - Project Archive Deliverables Table Appendix - Project Archive Deliverables Quality Control Checklist Design Model and Production Data Sharing BC Ministry of Transportation and Infrastructure Page iii
6 BLANK PAGE BC Ministry of Transportation and Infrastructure Page iv
7 General The Ministry implemented AutoCAD Civil 3D on July 1, The Ministry requirement that all design projects are to be completed using AutoCAD Civil 3D (hereinafter referred to as Civil 3D) as described in this document will be officially applied on May 1, All design projects that begin on this date or later must reference this section 1280 of the B.C. Supplement to TAC Geometric Design Guide. Design projects started prior to May 1, 2017 may be designed using Civil 3D provided that the Ministry s Senior Highway Design Engineer or designate has given approval. The current supported versions of Civil 3D drawings and projects are documented on the Ministry s Civil 3D web page. The Ministry will be transitioning to Civil 3D between July 1, 2016 and May 1, It is anticipated that Ministry Field Services will be ready to accept Civil 3D design projects at the end of the transition period. The Ministry is implementing workflow and data format requirements for the following reasons: 1. The requirements provide the Ministry with a standard format for all engineering data, regardless of whether Ministry staff or consultants complete the work. 2. The requirements provide the opportunity for the Ministry to maintain a repository of engineering data that can be easily utilized in the future. 3. The common format will optimize the flow of survey, design and construction engineering data and provide clear definition for workflow deliverables. This Civil 3D Project Data Format and Workflows Terms of Reference has been developed through consultation with Ministry survey, design and field services staff along with private sector consultants, surveyors and construction firms. Highway Project Lifecycle Definitions and Civil 3D Deliverable Requirements Needs Study (No Civil 3D deliverable requirement) The identification of requirements for new or improved highways within the Provincial highway network and/or municipal streets networks. Reconnaissance Study (No Civil 3D deliverable requirement) A qualitative, high-level approach to identify all possible corridors between two specified nodes and to review the feasibility of each corridor. A single valley would be considered a corridor. Corridor Study (No Civil 3D deliverable requirement) A quantitative and qualitative evaluation to select a preferred corridor from a number of possible alternatives, or to identify the requirements for further study of selected corridors. Route Study (No Civil 3D deliverable requirement) The graphical development of accurate plans for all feasible locations of roads and/or configurations of interchanges/intersections, and their technical review. Preliminary Design (Civil 3D deliverable required if standalone design assignment) To determine the ability of selected locations and configurations to meet the needs and requirements established in the previous stages, and recommend one for successive design. BC Ministry of Transportation and Infrastructure Page 1
8 Functional Design (Civil 3D deliverable required if standalone design assignment) The horizontal and vertical geometric design for the phase preceding the development of the final detailed design drawings. Detailed Design (Civil 3D deliverable required) The development of design model, construction (contract) drawings and technical specifications for construction, including the completed geometric and geotechnical design, special site considerations and construction details. Construction (Civil 3D deliverable required) To standardize construction supervision practices and complete the detailed design based on construction original ground and the actual sub-surfaces un-earthed. Post Construction (Civil 3D deliverable required) To develop an as-built Civil 3D DTM and produce AutoCAD Record Drawings for evidence in court, recording changes to a design during construction, and providing background information when evaluating costs of further improvements. The designer, depending on the project lifecycle phase, must submit a PRELIMINARY DESIGN, FUNCTIONAL DESIGN, DETAILED DESIGN and/or CONSTRUCTION project data archive as detailed in Section Design Project Data Archive: Preparation. The PRELIMINARY, FUNCTIONAL and DETAILED DESIGN project data archives are required by the Ministry to retain an electronic record of design options/alternatives included in the contract design report. These options/alternatives will include anything shown to the public, municipal councils, and prepared as part of the environmental review process. The CONSTRUCTION project data archive containing only the final design is required by the Ministry as a detailed record of the final design and to provide the necessary information for construction supervision Terms of Reference: Exceptions It is recognized that there are certain project situations where the Civil 3D requirements in the Terms of Reference will not apply. These specifically relate to Design Build projects and projects that meet specific exception criteria. The exception criteria are presented below as a series of questions. If any one question is answered as YES, then the project must adhere to the Terms of Reference. These questions should be answered through consultation with Ministry Field Services. Ministry Representative refers to Ministry Field Services or Ministry Field Services Consultant. Will the Ministry Representative have to provide survey layout? Will the Ministry Representative have to do earthwork quantity surveys or quality control surveys on survey layout? Will there be a requirement for the Ministry Representative to calculate any earthwork or gravel quantities from x-sections or DTM surface comparisons? Is the project an extension of, or in any way connected to an existing Civil 3D project? Is data from other sources such as AutoCAD, design summaries etc. insufficient to provide the Ministry Representative with the detail necessary to administer the project? BC Ministry of Transportation and Infrastructure Page 2
9 The requirement for a DETAILED DESIGN project data set will be determined by the Ministry design contract manager. This decision will be based on whether the completed design project will be immediately tendered for construction. If the completed design is expected to sit for a period of time for re-activation at some time in the future, then the DETAILED DESIGN project data set will be a design contract requirement. From past experience, when design projects have been completed but were not immediately tendered for construction, they were shelved for future use. Problems were often encountered when these design projects were re-activated and revisions were required prior to construction. Often the designer who originally completed the project was no-longer with the consulting firm and the original project knowledge was lost. The lack of a consistent standard for electronic design deliverables makes the reactivation of shelved designs costlier and time consuming. All Ministry highway construction projects require the completion of an As-built Civil 3D DTM and AutoCAD Record Drawings. With the exception of Design Build projects, the As-built Civil 3D DTM is completed by whoever is the Ministry Representative, be that Field Services or consultant doing the construction supervision. AutoCAD Record Drawings are prepared by the Engineer of Record responsible for the design. A non-design Build Project As-built Civil 3D DTM is to be generated from the Civil 3D design model, incorporating any construction related design changes picked up by ground survey. The As-built DTM and Record Drawing deliverable requirements also apply to all Design Build projects. For Design Build projects, the construction contractor completes these deliverables and then has them certified by the Engineer of Record responsible for the design. A Design Build As-built DTM can be generated from a Civil 3D design model or from a design completed in software other than Civil 3D, and is to incorporate any construction related design changes picked up by ground survey. The reasoning behind the requirement for As-built DTM and Record Drawing deliverables are as follows: Used in court to establish that the highway was built in accordance with design criteria and that any changes that have occurred were a result of natural settlement, etc. Record changes to a design during construction accompanied by letters or reports indicating why the changes were implemented. Enable the Ministry to quickly evaluate costs on further improvements required to a recently constructed project. BC Ministry of Transportation and Infrastructure Page 3
10 AutoCAD Civil Project Archive: Missing or Problem Content The SURVEY, PRELIMINARY DESIGN, FUNCTIONAL DESIGN, DETAILED DESIGN and CONSTRUCTION Civil 3D project data archives must contain the information specified in this section of the B.C. Supplement to TAC Geometric Design Guide as referenced by the Highway Design Contract Terms of Reference. If a designer has failed to provide the complete error free Civil 3D project data archive, it is the full responsibility of the designer to resolve all omissions, deficiencies and errors in a timely manner. In the case of the CONSTRUCTION archive, it is imperative that there is no negative impact on the construction project schedule. The Ministry will not be responsible financially for any extra work incurred by a consultant to resolve the identified omissions, deficiencies or errors when these Terms of Reference have not been followed High Level Workflow Documentation The BC Ministry of Transportation Civil 3D Survey, Design and Construction Terms of Reference is based on tasks associated with survey, design and construction workflows. Each workflow has predictable inputs and deliverables. A high-level description of the workflows is provided in the following sections Survey Workflow The survey workflow represents the procedures and tasks required to provide information upon which a road or highway design can be based. The survey workflow is to be followed by both Ministry survey staff and private sector surveyors and consultants. The information produced from the survey workflow consists of the following: Existing ground base plan drawings Reduced coordinate point files Existing ground surface models Pipe networks representing existing sanitary, storm and water main The survey workflow involves the collection and reduction of data from both ground and aerial sources. Ground data is collected as GPS, total station, terrestrial LiDAR and terrestrial photogrammetry. Aerial data is collected as aerial LiDAR and photogrammetric images. Survey data is adjusted and reduced to comma delimited coordinate files prior to importing to Civil 3D. All survey data imported to Civil 3D is processed through the survey database to enable figure generation and facilitate continued data retrieval of survey data in Civil 3D projects. The deliverable from the survey workflow consists of the survey project archive and is handed off as an input to the design workflow Design Modeling Workflow The design modeling workflow represents the steps required to provide information that can be used to create a construction tender package and for construction administration tasks. The design workflow is used by both Ministry designers and private sector consultants. The information produced from the design workflow consists of the following: BC Ministry of Transportation and Infrastructure Page 4
11 Design Model drawings Production Drawings Quantities Construction Staking Data Project Data Summary Document Civil 3D provides the following functionality that enables the design modeling workflow. Data Shortcuts and Reference Objects for sharing Civil 3D surface, alignment, profile and pipe network object data between design model and final production drawings AutoCAD External References to share graphical data and some Civil 3D data Surfaces for representing existing, design, construction and post construction surfaces Alignments used to represent horizontal control for road and highway design as well as offset features for corridor model targeting Profiles and Profile Views used to represent vertical control for centreline and offer features for corridor model targeting Subassemblies the individual components of the cross section (lane, shoulder, daylight etc.) Corridor Models the 3D representation of the overall road / highway design Sample Lines used to calculate volumes or display section views Section Views created from sample lines and used to show surface section data, corridor surface section data, corridor section data and material section data Quantity Takeoff Criteria to define how volumes are calculated Plan Production Tools to automate the layout of plan/profile and cross section sheets The design modeling workflow is applicable to preliminary design, functional design, detailed design, construction and post construction projects. The deliverable from the design workflow is the construction archive and is handed off as an input to the construction workflow Construction Workflow The construction workflow represents the steps required to work with design data to construct the proposed works and is used by Ministry Field Services staff. This work typically includes the following: Design model data extraction for field layout, machine guidance and quality assurance Construction surveys for earthworks and other contract payment computations Design model updates modify existing surfaces and design model to include actual conditions and to provide revised construction layout data and quantity calculations The construction workflow requires a working knowledge of Civil 3D as identified in both the survey and design workflows. BC Ministry of Transportation and Infrastructure Page 5
12 Civil 3D Overview Civil 3D is Autodesk s flagship product used for survey, design and construction activities for road and highway design projects. Civil 3D can be thought of as a BIM (Building Information Modeling) tool for the infrastructure and road/highway design in the following context: Data sharing between design team members on a single project. Movement of engineering data between process-adjacent project phases (planning to design, design to construction, construction to record data collection and management). Civil 3D is an object based design and drawing production environment where objects are used to represent design elements such as surfaces, alignment, profiles, corridor models and sections. Objects are programmatically related to one another which can facilitate design updates. A few of these relationships are summarized in the following bullets: Surfaces, Surface Profiles and Alignments editing horizontal alignment geometry or surface data results in an automatic update to the surface profile. Layout Profiles, Assemblies and Corridor Models editing the layout profile or the assembly (typical cross section) will trigger an automatic update to the corridor model. Corridor Model, Sections and Quantities changes to a corridor model will result in automatic updates to material volumes and corridor section data in the section views. Finally, Civil 3D is a design modeling tool where the production and labeling of engineering data in production drawings is a largely automated process. This is accomplished using object styles to control the display of design objects and object label styles for labeling design objects. Object labels dynamically update with changes to the properties of the object BC MoT Civil 3D Standards Technical Package To assist Ministry staff and consultants with the completion of Civil 3D survey, design and construction work to Ministry standards, the Ministry provides the Civil 3D Standards Technical package on the Ministry website: The Ministry Civil 3D Standards Technical package contains the following items: Installation instructions Civil 3D drawing templates Civil 3D survey user settings file Civil 3D survey figure prefix database Civil 3D subassemblies incorporating Ministry highway design standards Ministry ENGTools ribbon tab containing Ministry custom routines AutoCAD tool palettes containing Ministry symbols Sample Drawings symbols, linetypes, hatch patterns, logos, title blocks etc. BC Ministry of Transportation and Infrastructure Page 6
13 The Ministry Civil 3D Standards Technical package is occasionally updated and you will be notified of these updates when you start Civil 3D (using the BC MoT AutoCAD profile). Consultants and Ministry staff are responsible for ensuring they are working with the latest version. The Ministry provides technical support in the use of this material through the contact below. Any other Civil 3D technical support should be directed to Autodesk as provided for by a consultant s annual subscription agreement. Greg Toews Engineering Software Support Ministry of Transportation and Infrastructure Greg.Toews@gov.bc.ca Ministry technical support for standard libraries, tables, programs and subassemblies should be requested by as required Project Data Folder Structure and Submission Requirements All project data is organized into a standardized project data folder structure which locates drawing and other files in terms of design model data and drawing production data. In order to facilitate data transfer from survey to design, and design to Ministry Field Services for construction administration purposes, it is imperative that all projects make use of the Ministry Civil 3D project data folder structure in order that both AutoCAD and Civil 3D references can be easily resolved after transfer of project data. Data storage consistency is of paramount importance. Design Model folders contain design and modeling data and Drawing Production folders contain final drawings produced as part of a contract drawing set. Design model data and drawings can be referenced by other design model drawings (for example alignment, profile and existing surface data is referenced into corridor design drawings). Design model data and drawings are also referenced by production drawings. These references are accommodated using both AutoCAD external references and Civil 3D data shortcuts and reference objects. AutoCAD external references must be inserted as overlays to eliminate the possibility of circular references. A Project Data Structure Description document is required with each data handoff that clearly defines the drawing and data relationships defined by AutoCAD external references, Civil 3D data shortcuts and Civil 3D reference objects. Details of project data folder structure and drawing naming requirements can be found in the Detailed Procedures for Design Modeling Workflow section Drawing Templates and Custom Subassemblies All design model and production drawings must be created using the AutoCAD drawing templates provided as part of the Ministry Civil 3D Terms of Reference technical package. In instances where deficiencies are encountered or standardized components are missing from the drawing template, designers should notify the technical support representative at the Ministry. BC Ministry of Transportation and Infrastructure Page 7
14 The Ministry has also created several custom Civil 3D subassemblies to model various cross section components. These subassemblies have been developed for the following reasons: Incorporate Ministry of Transportation Highway Design Standards To provide high level corridor functionality that is not available in stock Civil 3D subassemblies To incorporate standardized codes for subassembly points, links and shapes Consistency in the use of Ministry standard subassembly codes is critical for construction administration tasks and is a core requirement for project submissions. Designers have the option to use stock Civil 3D generic link subassemblies as they allow for user defined point and link codes, which can be set to Ministry standards. Designers can also use Autodesk Subassembly Composer to create their own subassemblies if subassemblies reference Ministry standard point, link and shape codes. If Subassembly Composer is used consultants must notify the Ministry technical representative and supply the subassembly PKT file with the project Detailed Procedures for Survey Workflow This section provides detailed procedures as part of the survey workflow Civil 3D for Survey Workflow Tasks Civil 3D provides the following functionality that enables the survey workflow: Survey Database for managing import events from multiple source files, figure (linework) generation and breakline definitions Survey Queries for extracting condition based data from the survey database for base plan creation and surface modeling Figure Prefix Database for automating the assignment of survey figures to layers and the definition of surface breaklines based on standardized descriptions Description Keys for automating the assignment of point styles, point label styles, full (alternate) descriptions, point layer assignment and optional description parameters (non DTM attributes incorporated within the point description) based on standardized descriptions Point Groups - for organizing points and controlling points display Surfaces for modeling existing surfaces Civil 3D Data Shortcuts and Reference Objects for sharing original ground surface data and pipe networks between drawings AutoCAD External References for sharing base plan data between drawings The last two data sharing related items apply to the survey workflow for creating pre-engineering base plans and existing ground surface models from a combination of ground and aerial survey data. Civil 3D pipe networks can be used to model existing utilities such as drainage systems so that existing utilities can be referenced into design drawings for tie ins. BC Ministry of Transportation and Infrastructure Page 8
15 Survey Standard Components for Survey Data Processing This section discusses the Civil 3D standardized components applicable to the Ministry survey workflow. The most critical standardized component for the survey workflow is the survey field code. The survey field code governs the following: Point symbol and annotation representation Point group allocation Inclusion of the point in the surface model Survey figure generation Surface breakline definition Survey codes are recognized in Civil 3D by description keys, point groups and the figure prefix database Drawing Template - Overview The following drawing templates are available to facilitate the survey workflow: BC_C3D2016_Template_R2.0.dwt BC_C3D2016_TitleBlocks_R2.0.dwt BC_C3D2016_SheetSet_R1.0.dst The main Template contains all AutoCAD components required to create drawings for existing conditions modeling, design modeling, construction modeling and sheet production. The TitleBlocks template contains just the layouts and title block definitions used for drawing production. Use the From Template command (right click on Layout) to import layout from the TitleBlocks drawing template Drawing Template - Point Styles and Label Styles Point styles are used to control the display of the point node and in most cases, reference a standardized AutoCAD symbol. Civil 3D point nodes are annotative and will automatically resize with the annotation / drawing scale in model space and the viewport scale in paper space. Point label styles reference the C3D Existing AutoCAD text style. Point styles and point label styles are automatically assigned to points using Description Keys that reference the survey point code. The default direct assignment of the point style and the point label to the point is reflective of how the point needs to be displayed on a final production drawing. For example, manhole points are assigned the Storm Manhole point style and the _<off> point label style, and pavement edges are assigned the _<off> point style and _<off> point label style. BC Ministry of Transportation and Infrastructure Page 9

16 Refer to the section on Point Groups for an explanation on how to temporarily override the direct assignment of the point style and point label style to the point to visualize point properties using point label styles Drawing Template Description Keys, Survey Codes and Attributes The Ministry Civil 3D drawing template makes use of description keys to automate the assignment of point styles and point label styles based on the survey field, or Raw description. Description keys also assign a Full (alternate) description, assign the point to an AutoCAD layer, and can employ description parameters within the full description as one method to incorporate attribution. The preferred method for attribution, however, is to use AutoCAD Civil user defined property classifications as there is greater flexibility with display and annotation of attributes. Description keys are created for each unique survey code and are organized into the following sets: 00 EX Control 01 EX Geotech 02 EX Property 03 EX Road and Rail 04 EX Signs and Site 05 EX Structure 06 EX Topography 07 EX Utility Drainage 08 EX Utility Gas and Oil 09 EX Utility General 10 EX Utility Power and Tel 11 EX Utility Sanitary and Storm 12 EX Utility Water 20 Construction The full description keys sets, which show the survey field coding standard, are listed in the Appendices Figure Prefix Database and Figure Styles Survey figures are used to represent base plan linework such as pavement edges, ditch centrelines and sidewalks. The Survey Figure Prefix Database is used for the following: Assign survey figures to a layer Assign figure styles (ByLayer) BC Ministry of Transportation and Infrastructure Page 10
17 Assigns a yes/no parameter for breaklines definition Assigns figures to a Civil 3D site The Figure Prefix Database is called BC Survey.fdb_xdef and is located in the following folder: Civil 3D 2016 example: C:\ProgramData\Autodesk\C3D 2016\enu\Survey Points used on figures are also referenced by description keys because point display is independent of figure display. Description keys for points used on figures use an asterisk (*) as a suffix to allow for unique figure identifiers (EP1, EP2 etc.). An example is shown in the following illustration: The figure prefix database entries are listed in the Appendices Drawing Template - Point Groups Point Groups are defined in the drawing template and are used for the following: Organize points in to logical categories for point management. Control point display using point group sort order and style overrides. The Ministry drawing template contains the following point group definitions: _All (Design and Analysis) _All (Drawing Production) _All (Off) 00 EX Control 01 EX Geotech 02 EX Property 03 EX Road and Rail 04 EX Signs and Site 05 EX Structure 06 EX Topography 07 EX Utility Drainage 08 EX Utility Gas and Oil 09 EX Utility General 10 EX Utility Power and Tel 11 EX Utility Sanitary and Storm 12 EX Utility Water 20 Construction OG Surface (Ground Descriptions) OG Surface (DTM Attribute) OG Surface (User Defined) _All Points Point groups with the numeric prefix correlate directly to the Description Key Sets. BC Ministry of Transportation and Infrastructure Page 11
 point group toggles point style and point label styles overrides on, and will show all points based on the styles shown in the above figure.")

 to prioritize point group display.")
18 Point group point style and point label style assignments are only applied when the point style and point label style overrides are turned on. The _All (Design and Analysis) point group toggles point style and point label styles overrides on, and will show all points based on the styles shown in the above figure. The _All (Drawing Production) point group toggles point style and point label style overrides off and shows all points based on the direct assignment of the point style and point label style to the point. Description keys automate the direct assignment of the point style and the point label style to the point, and are used to display the points based on final drawing production requirements. Point group sort order can be adjusted (right click on Point Groups) to prioritize point group display. When _All (Design and Analysis) is at the top, then all points are displayed because the overrides in this point group are turned on. When _All (Drawing Production) is at the top, then all points are displayed based on final drawing production requirements because overrides in this point group are turned off. BC Ministry of Transportation and Infrastructure Page 12

19 When _All (Off) is at the top, then all points are not displayed because the overrides are turned on and reference the <none> point style and point label styles Point Naming and Numbering The Ministry Civil 3D drawing template incorporates point names for data collected using GPS and total station. Point names use alphanumeric point ID s and the format is YYYYMMDDINIT#### where YYYY is the year, MM is the month, DD is the day, INIT is the surveyor s initials and #### is the point number. An example of point names is shown in the following image: The benefits of the point name format are summarized in the following bullets: Date of survey is attached to each point Surveyor s initials are attached to each point Point number coordination is not required if project involves multiple surveyors Points can be queried by date or by initials Point names can be created easily in a spreadsheet by using the concatenation function. The Ministry Civil 3D drawing template includes the following point file formats that make use of point names: Name N E Z D (comma) no attribution unless using description parameters. Name N E Z D DTM (comma) DTM attribute as separate field and other point attributes using description parameters. Name N E Z D DTM and Attributes (comma) DTM and other point attributes (ATT1 through ATT5) as their own fields. When point names are used an arbitrarily large point number is assigned to points in the survey database. This point number is carried forward to the drawing and should be ignored. If points are inserted to the drawing directly using point names without using the Survey Database, then the CreatePoints command settings will automate the assignment of the point number using the Next Point Number value. This is shown in the following illustration. BC Ministry of Transportation and Infrastructure Page 13

20 The Ministry Civil 3D drawing template includes several label styles to show point names. Point names are not required for LiDAR data. For LiDAR data, the surveyor initials and date are indicated in the file name which is translated to the name of the import event in the Survey Database Point Attribution (DTM and Other) Point attributes consist of DTM attributes for surface inclusion and other point attributes that are used to provide additional information on the point feature. The DTM attribute is required while other point attributes are optional, and incorporated at the discretion of the surveyor. Point attribution can be accommodated using either of the following methods. Point Description Parameters Point User Defined Property Classifications The DTM attribute must be incorporated as its own field by a specific DTM attribute referenced by point user defined property classifications. The two methods for point attribution, and the DTM attribute are discussed in the following sections. Description Parameters Description parameters are enabled within the description keys and facilitate attribution by incorporating the attribute directly within the full description. Spaces separate description parameters from the point description, and from each other. When description parameters are used a separate field for the DTM attribute is required. This is facilitated using point user defined property classifications. Sample description keys that reference description parameters are shown in the following illustration: Each point allows for up to 5 description parameters ($1, $2, $3, $4 and $5). For example, the following survey code (raw description): CI 600 CSP F would result in the following full description: Culvert In 600 CSP F BC Ministry of Transportation and Infrastructure Page 14


21 Description parameters do not require the use of the asterisk (*) as a suffix in the code component of the description key, and are enabled in the Create Point Command Settings. Attribute segregation and labeling is not very flexible with description parameters as all attributes are contained within the single raw and full description fields for the point. User Defined Property Classifications User defined property classifications can be used to supplement the default list of point properties available in Civil 3D. To work with user defined property classifications, attributes must exist in the source data file as comma separated values to the right of the point description. An example is shown in the following image: The Ministry Civil 3D drawing template incorporates the DTM, ATT1, ATT2, ATT3, ATT4 and ATT5 user defined property classifications as shown in the following illustration, from the Settings tab of Toolspace: The 6 attributes fields are referenced by the point file formats used for importing points and can be displayed on the points by using label styles. The attribute fields are automatically created in both the survey database and the drawing. BC Ministry of Transportation and Infrastructure Page 15
")

22 Ministry Description Key Sets, which show the optional attributes for the survey codes are listed in the Appendices. DTM Attribute The DTM attribute is required for all survey data files and is accommodated in both comma delimited and XML survey data files using the following convention: Comma delimited files (CDF) Y for surface inclusion and N for surface exclusion XML files ground for surface inclusion and feature for surface exclusion The intent of the DTM attribute is twofold, and is summarized in the following bullets: Greater flexibility for generating point group and survey queries for surface modeling Saves the attribute in the survey database for survey created from comma delimited files The following image shows point file formats in the ministry template that include the DTM attribute: The ministry template also contains the OG Surface (DTM) attribute which queries the Y and ground attributes from comma delimited and XML files respectively Survey Database Overview The Civil 3D survey database is external to the drawing and is used for the following: Managing collections of survey and construction point data using Import Events Generating figures using Linework Code Sets and the Figure Prefix Database Use the Set working folder command to specify the path for the survey database and create the survey database using the following location and naming convention. The survey database working folder is static and need to be changed when working on different projects. \<ProjectName>\DesignModel\SurveyDatabases\<SDB ProjectName> BC Ministry of Transportation and Infrastructure Page 16
23 The survey database files exist in the <SDB ProjectName> folder. SDB is a prefix to the survey database name so that it can be identified as such when browsing and searching the project folder structure using Windows Explorer. Refer to the Project Data Folder Structure section for more information. There is no direct relationship between any single drawing and the Civil 3D survey database. A drawing must be opened prior to opening a survey database. Once the survey database is opened a user can i) create points and figures ii) delete points and figures and iii) edit points and figures. At any time, a user can remove points and figures from a drawing, and insert points and figures to a drawing. Survey data is managed in the survey database using Import Events, which are created each time a point file is imported to the survey database. The name of the import event defaults to the name of the imported file. Import events organize the survey points and figures created with each file, and allow the user to selectively add and remove point and figure data to and from the drawing. A collection of import events is shown in the following illustration: To prevent unwanted coordinate conversions when importing points and figure to the drawing, the survey database units (Edit survey database settings command) and zone must match the units and zone of the drawing. When an Import Event is inserted to the drawing, Civil 3D creates a Point Group with the same name as the Import Event at the top of the Point Group hierarchy. This point group provides an important correlation between drawing points, the survey database and the source data file. Adjust point group sort order and move the import event point group to the bottom of the list so as not to interfere with point display. Importing Reduced Coordinates When importing points to the survey database, select a point file format that matches the format of the source file. Points should only be imported to the survey database if they contain a description, the DTM attribute and other optional attributes. The point file formats available are defined in the Ministry Civil 3D drawing template. An import event is created for each file that is imported to the survey database. As much as reasonably possible, points inserted to the drawing should be edited in the source data file to correct for Ministry standard descriptions, attribute values and linework. Editing a point in the drawing or in the survey database should be avoided to prevent overwriting of edits when a file is re-imported. BC Ministry of Transportation and Infrastructure Page 17

24 Files containing points with no descriptions (NEZ format) typically originate from LiDAR surveys and are not to be imported to the survey database and the drawing. These files should be moved to the \<ProjectName>\DesignModel\01_ExistingSurfaces\SourceData folder and directly referenced by the surfaces. Working with Legacy Data (MTS) The Ministry Standard Survey Format MTS survey data files can be converted to XML files using the Ministry Convert Survey File command available on the ENGTools ribbon tab. The XML file can then be imported to the survey database. Survey codes in legacy MTS data files must be updated to reflect the new Ministry survey coding standard to trigger the proper use of description keys, point group population and figure generation using figure prefixes. These updates should be made in a copy of the MTS file prior to converting to LandXML. Rename the MTS file to a CSV file to facilitate editing in Excel. The following illustration shows MTS data in Excel and highlights the key columns for editing. After importing an XML file to the survey database and the drawing Civil 3D creates a point group called All at the top of the point group list. Rename this point group to match the name of the XML file and move to the bottom of the point group list so as not to interfere with point display. Non Featurized LiDAR Data Non featurized (NEZ) LiDAR data is typically ground (bare earth) data and should not be imported to the survey database nor the drawing. Files containing this type of data should be referenced directly by Civil 3D surfaces. Survey Figure Editing Use the Edit Survey Figure Properties command to edit figure geometry and other data. The following useful figure editing functionality is available with this command: Change the order of selected vertices Reverse the order of selected vertices Insert vertices Break, trim and join selected figures BC Ministry of Transportation and Infrastructure Page 18


25 The Edit Survey Figure Properties dialog box is shown in the following illustration: To prevent Civil 3D from zooming to the extents of the figure after selecting a figure to edit, turn off Automatic pan and zoom under Interactive Graphics in Survey User Settings Re-importing source data to the survey database will overwrite any figure edits. Therefore, it is recommended that figure editing be done in the source data files prior to import to ensure proper figure generation upon file import. Survey figures can be horizontally and vertically offset using the Civil 3D Stepped Offset command. This may be useful for creating a back of curb figure from a curb gutter line figure. Surveyors should ensure that figures created using this method are written back to the survey database. Civil 3D linework code sets offer significant flexibility for survey figures and are only available when working with comma delimited files. BC Ministry of Transportation and Infrastructure Page 19
26 Survey Queries Survey queries are useful for selectively accessing point and figure data in a survey database. Once a survey query has been defined the following options are possible: Display the results of the survey query in the drawing using preview graphics. Display the results of the survey query in the editor (Panorama) for further manipulation. Insert the results of the query to the drawing. Remove the query results of the query from the drawing. Add the results of the query to the surface. All point and figure properties can be queried with several very useful conditions to check against. Standardized survey queries can be saved as external files (QML) and are to be saved in the \DesignModel\00_SurveyBase\Survey Queries project folder. These queries can either be imported to the Survey Database or they can be referenced directly from the external files. The following survey queries are provided in the Ministry Civil 3D project folder structure. Base Plan Creation Base plan creation involves working with survey data to show all the required symbols and linework that constitute a pre-engineering base plan. With proper field procedures and consistent standards, the creation of the base plan should, for the most part, be an automated process. Finalizing the details of the base plan involves the following key steps: Ensuring all survey figures are properly generated and correctly represented in the drawing using the appropriate figure style. To facilitate corridor targeting, survey figures representing the same feature must be joined together to create a single figure from start to end. The Ministry Figure Prefix Database automates the style assignment and places the figure on the desired layer. Resolve crossing survey figures which will eliminate surface modeling problems associated with crossing breaklines. Scaling and rotating featurized points to correctly display symbols. Use the Point Rotate utility on the Civil 3D panel of the ENGTools ribbon tab to rotate and align multiple points with features. Adding the required annotation to describe base plan features. Point rotation and scale adjustments can be saved back to the survey database and recognized when points are subsequently inserted to another drawing. BC Ministry of Transportation and Infrastructure Page 20
 should be excluded. Breaklines should be defined for both hard and soft terrain breaks to prevent triangulation from crossing over a terrain break.")
27 Original Ground Surface Modeling Original ground surface models should be created with the following key points in mind: Points not representative of topography (top of hydrant, inverts etc.) should be excluded. Breaklines should be defined for both hard and soft terrain breaks to prevent triangulation from crossing over a terrain break. LiDAR data (NEZ) must be referenced directly by the surface model as an external file, and not imported to create points in the drawing. Long triangulation lines generated near surface boundaries should be removed. Surface model data density must be appropriate for the phase of the project (preliminary design, functional plan, detailed design etc.). Civil 3D Object Naming Standards Object naming standards facilitate data interpretation. The following object naming standards must be incorporated as part of the survey workflow: 1) Point Names - YYYYMMDDINIT#### (see above section on point naming and numbering) 2) Point Descriptions as per the Ministry survey point coding standard (refer to Appendices) 3) Figure Names as per the Ministry survey point coding standard (refer to Appendices) a) Figure generation techniques using linework code sets or LandXML can place numeric prefixes and suffixes on the figure name. These prefixes and suffixes are undesirable for labels on survey figures projected to section views. The Set Figure Description command can be used to copy the alpha portion of the figure name to the figure description, which can in turn be referenced by a section view projection label style. 4) DTM Surface Names use the following a) V-SOG Survey Original Ground (GPS or total station data) b) V-LOG LiDAR Original Ground (LiDAR) c) V-COG Combined Original Ground (Ground and aerial surface data) d) V-STRP Stripping Surfaces e) V-TYPEA TYPE A Subsurface (Rock) Surface descriptions are strongly encouraged to provide further information on i) what the surface represents ii) who created the surface and iii) surface creation date. A meaningful suffix can also be added to the name of the surface to provide additional useful information. BC Ministry of Transportation and Infrastructure Page 21
28 Surface naming standards incorporate the following required prefixes to help organize surfaces that are created during the survey, design and construction workflows: V- Survey workflow surfaces D- Design workflow surfaces C- Construction workflow surfaces S- Construction workflow, section surfaces Survey Data File, Import Event and Point Group Naming Conventions Point groups have been pre-defined in the drawing template and are used to i) organize points into logical categories and ii) control point display using point group sort order. When a file is imported to the survey database an import event is created with a name that matches the name of the source file. When a survey import event is inserted to the drawing, a point group is created with a name that matches the name of the import event. The source survey data file should therefore be named with a representative and descriptive naming convention using the following format: SURVINIT_ProjectDescription The point naming standard and file date provide information on the surveyor and the date the data was collected LiDAR Data Deliverables LiDAR data must be carefully managed in Civil 3D. The critical issue is that Civil 3D performance is significantly degraded when an excessive number of points are inserted in the drawing. For this reason, LiDAR data deliverables should be broken down into the following 3 files: 1. Ground feature data spot elevation data only in NEZ comma delimited format. This represents the bulk of LiDAR data and these files can be referenced directly by Civil 3D surfaces without creating an excessive amount of point data in the survey database and the drawing. 2. Featurized point data point data that needs to be in the drawing in order to show a symbol (power pole, catch basin etc.). 3. Linework data point file containing points that will result in the automated generation of survey figures. Point density along survey figures should be sufficient to define both horizontal and vertical curvature and be no less than 5m apart. Points not required to define horizontal and vertical deflection along the figure should be removed. 4. Breakline Exception Data exceptions to data that normally represents point and figure data is provided in a separate file. Only the featurized point data and linework data result in the creation of an import event in the survey database. The featurized point data import events can be selected to import just the points that are required to be displayed with a symbol. Surveyed points are required to generate survey figures in the survey database but figures can exist in the drawing without point data. The figure data import events can be imported to the drawing while the points used to create the figures remain in the survey database. The preferable formats for these 3 files are comma delimited ASCII files; however, MTS files are still acceptable. BC Ministry of Transportation and Infrastructure Page 22
29 Merging LiDAR and GPS/TS Data Often time surveyors need to aggregate LiDAR and GPS data to create a base plan and existing ground surface model. In Civil 3D, data aggregation for a base plan is a separate step from data aggregation for a surface model. The process starts with aggregating the data for the base plan. Both processes are described below. Aggregating LiDAR and GPS/TS Data for Base Plan Creation This process makes use of external references and clipping boundaries. 1. Create SDB and complete base plan drawing for ground data (SURVBASE-SOGdwg). 2. Create SDB and complete base plan drawing for aerial data (SURVBASE-LOG.dwg). 3. Create new drawing to aggregate data (SURVBASE-COG.dwg). 4. Attach SURVBASE-SOG as an external reference. 5. Using AutoCAD 2D polylines draw clipping boundaries around the limits of the ground data. These will as an internal clipping boundary for the SURFBASE-LOG external reference. 6. Attach SURVBASE-LOG as an AutoCAD external reference. 7. Use the ENGTools custom Clipping Boundary Multiple command and select the polylines to clip the SURVBASE-LOG external reference inside areas of the closed polylines. 8. Tweak polyline clipping boundary geometry to optimize results. The clipping boundary polylines are also used as clipping boundaries for the surfaces. These can either be copied to Windows clipboard or write blocked to separate drawing for insertion into surface drawing. Aggregation of aerial and ground data for surface creation is discussed in the next section. Aggregating LiDAR and GPS/TS Data for Surface Creation This process makes use of Civil 3D surface boundaries and the polylines used for clipping the base plan data. 1. Create surface drawing (EXSURF-COG.dwg). 2. Create aerial LiDAR surface from data in LiDAR survey database (S-LOG). 3. Create ground GPS/TS surface from data in GPS/TS survey database (S-SOG). 4. Use 2D polylines to create clipping boundaries for base plan as surface show boundaries (this process first requires the definition of an outer hide boundary). 5. Create combined S-SOG and S-LOG surface (S-COG). 6. Paste in S-LOG. 7. Paste in S-SOG. With this procedure, the S-LOG data is replaced with S-SOG data within the physical limits of the S-SOG outer boundaries. BC Ministry of Transportation and Infrastructure Page 23

30 Survey Model Drawing and Surface Naming Standards The survey workflow results in the production of separate drawings for both pre-engineering base plans and existing ground surface models. The following drawing naming prefix standards should be followed: Base Topography Drawing Name Prefixes SURVBASE-SOG, SURFBASE-LOG, SURVBASE-COG. Existing Surface Drawing Name Prefixes EXSURF-SOG, EXSURF-LOG, EXSURF-COG. Suffixes to drawing names can be anything necessary to further describe the content of the drawing or the surface Surface Modeling Accurate surface models require i) good breakline definition and ii) the exclusion of points not representative of actual terrain elevations. Furthermore, as surface models can be directly created by extracting data from the survey database, a survey figures defining original ground surface boundaries are also required. These items are addressed in the following sections Surface Breakline Definition Automated breakline definition can be accomplished using either the Civil 3D figure prefix database or by referencing the DTM attribute in the comma delimited or survey LandXML file, with the latter being created from MTS files Figure Prefix Database The Ministry Civil 3D figure prefix database applies a breakline tag to certain survey figures when they are created. These tags are based on description only and a few examples are shown in the following illustration. BC Ministry of Transportation and Infrastructure Page 24


31 The breakline attribute for individual figures can be subsequently modified with the Edit Survey Figure Properties command. The following dialog box shows the breakline attribute toggle for an individual figure when using the Edit Survey Figures Properties command. This procedure for defining surface breaklines is used when breaklines are created from comma delimited files imported to the survey database. Survey figures with the breakline attribute set to Yes can be automatically added to a surface as breaklines using the Create breaklines command DTM Attribute in XML Files LandXML files created from MTS files with the Convert Survey File utility sometimes assign a DTM attribute, ground or feature, to survey figures. After importing the LandXML file to the survey database a Civil 3D survey query can then be used to add survey figures and/or survey points to a surface that have the ground attribute assigned. An example of a survey query is shown in the following illustration: For LandXML files containing LiDAR data the query would not be applied to points as presumably ground point data has been created in a separate file for direct reference by the surface model. BC Ministry of Transportation and Infrastructure Page 25

.")
32 Surface Point Inclusion and Exclusion LiDAR ground points for surface inclusion are to be referenced by the surface model directly from an external file. GPS or total station points in the survey database can be included or excluded from the surface using either point groups or by using a survey query to reference the DTM attribute in the LandXML survey file. These methods are discussed in the following sections Surface Point Groups The Ministry Civil 3D drawing template contains the following point groups that can be used for surface modeling. OG Surface (Ground Descriptions). OG Surface (DTM Attribute). OG Surface (User Defined). The OG Surface (Ground) point group is created by including raw descriptions that match standard Ministry survey descriptions that are valid for original ground surface modeling (the DTM G attribute). This is shown in the following illustration: The point group can be modified to include other points or exclude points from the point group. The OG Surface (DTM Attribute) point group adds points with the DTM Y and ground attributes from comma delimited and XML files respectively. This is shown in the following illustration: The OG Surface (User Defined) point group is empty and can be populated with any points the surveyor deems as valid for surface inclusion. BC Ministry of Transportation and Infrastructure Page 26

33 Surface Boundaries As original ground surface models can be directly created from data in the survey database an additional requirement is for the surface boundary to be defined as a figure in the survey database using the BZ (breakline) figure code. The surface boundary is created by snapping to points on the survey perimeter representative of the surface Drawing Properties Drawing properties are required to be populated when a new drawing is created. The following properties should be documented in drawing properties: Drawing title / description. Author. Creation date. Purpose of drawing. Drawing template used to create drawing. The following illustration shows the drawing properties dialog box populated with information. The drawing properties command is available under Drawing Utilities from the Application Menu. BC Ministry of Transportation and Infrastructure Page 27
34 Survey Project Data Archive Handoff to Designers Seamless project data transfer is required between survey, design and construction project phases. To accommodate survey, design and construction data storage, a Ministry standard project folder structure has been defined to accommodate survey, design model, production drawing and construction components. The survey deliverable consists of a zipped project folder to be named <ProjectName>-Survey.zip and contains the following information: Source and reduced survey data files. Survey base plan drawings. Existing ground surface models and supporting files. Civil 3D pipe networks representing existing utilities. Aerial photographs. Refer to the Project Data Management, Archiving and Handoff Section for more details on these requirements Detailed Procedures for Design Modeling Workflow The design modeling workflow includes all tasks required to create the design, produce a drawing set, calculate quantities and generate construction staking data for a construction tender package. This section details Civil 3D procedures and Ministry standards applicable to the design modeling workflow. Design project data is organized into design model drawings and production drawings. Refer to the Project Data Management, Archiving and Handoff section for details on folder structure and naming standards, design model and production drawing naming standards and Civil 3D object naming standards. Drawings created in the design workflow are organized into the following categories: Design model drawings drawings that contain the survey, surface, alignment, profile, corridor and pipe network design objects that are referenced into production drawings Production drawings drawings that constitute the final drawings in the construction drawing package that reference data directly from the design model drawings using AutoCAD external references and Civil 3D data shortcuts All design model and production drawings are required to be submitted to the Ministry when the design is finished. Ministry Field Services staff use the corridors and other data in the design model drawings for construction staking and layout. Field Services also may update designs based on conditions identified during construction that were not evident during design phases. For these reasons, it is imperative that all folders, drawings, design objects, data structure and data sharing meet Ministry standards. BC Ministry of Transportation and Infrastructure Page 28
35 Civil 3D for Design Workflow Tasks Civil 3D provides the following functionality to enable the design modeling workflow: Alignments for generating centreline control alignments for profile generation, corridor modeling, sample line generation, offset geometry for plan production and corridor targeting and other features such as curb returns, ditches and retaining walls. Offset Alignments for generating alignment offsets, tapers, transitions and widenings that react to centreline geometry edits. Surface Profiles dynamic profiles for existing and proposed (corridor top) surfaces. Layout Profiles for proposed centreline, ditch and offset geometry profiles. Superimposed Profiles alignment profiles superimposed to the profile views for other alignments. Pipe Networks parts list, structures and pipes for modeling existing and proposed storm, sanitary and water underground utilities. Profile Views grid objects to show surface profiles, layout profiles, superimposed profiles and pipe networks. Subassemblies and Assemblies typical cross section components used for corridor modeling. Corridor design model representation of the road design. Sample Lines created for alignments, organized in sample line groups and used for quantity calculation and section view generation. Section Views grid objects used to show surface section data, corridor surface section data, corridor section data, material section data and pipe network section data. Quantity Takeoff Criteria user defined criteria to calculate pavement structure and earthworks volumes. Feature Lines closed and open linear and polylinear segments used for modeling proposed surfaces. Grading Objects slope projections created from feature lines used for modeling proposed surfaces. Civil 3D Data Shortcuts and Reference Objects for sharing surface, alignment, profile and pipe network data between drawings. AutoCAD External References for sharing graphical data between design model and production drawings. The last 2 items relate to data management and are integral components for sharing data between multiple design model drawings and design model drawings and production drawings. BC Ministry of Transportation and Infrastructure Page 29
36 Survey Deliverables to Design Deliverables from the survey workflow to design are provided in the Ministry standard folder structure outlined in the Project Data Management, Archiving and Handoff section. Survey deliverables consist of the following: Source and reduced survey data files. Survey base plan drawings. Existing ground surface models and supporting files. Civil 3D pipe networks representing existing utilities. Aerial photographs. Data provided from the survey workflow should not require any modification by designers. Designers are to create new drawings from the Ministry template and reference survey drawing and surface data as outlined in the Project Data management, Archiving and Handoff section Design Modeling Standardized Components Ministry AutoCAD and Civil 3D design modeling standardized components applicable to the design workflow are summarized in the following sections Civil 3D Drawing Templates The following drawing templates are available to facilitate the design workflow: BC_C3D2016_Template_R2.0.dwt BC_C3D2016_TitleBlocks_R2.0.dwt BC_C3D2016_SheetSet_R1.0.dst The Design Model drawing template contains AutoCAD and Civil 3D standardized components required to create drawings for existing conditions modeling, design modeling, construction modeling and contract drawing production. The Title Blocks drawing template contains just the layouts and title block definitions used for drawing production. AutoCAD Sheet Set Manager fields are incorporated for standardized title block production. Use the From Template command (right click on Layout) to import layout from the Title Blocks drawing template to production drawings. BC Ministry of Transportation and Infrastructure Page 30
37 Ministry Custom Subassemblies, Codes and Submission Requirements Several custom Civil 3D subassemblies have been developed that incorporate Ministry highway design standards and point coding conventions. These are made available via the Ministry Civil 3D technical package and consist of the following: 1. BC Lane 2. BC Shoulder 3. BC RockCheck (conditional) 4. BC RockDitch (conditional) 5. BC CutFillCheck (conditional) 6. BC Ditch 7. BC Fill 8. BC Curb 9. BC FollowSurface 10. BC Sidewalk Help files for each of the subassemblies is available within Civil 3D. Point, link and shape codes used for the BC custom subassemblies are unique, and referenced by BC specific code set styles for assemblies, corridor design, displaying corridor section data in the corridor section editor, and displaying corridor section data in section views. Designers are required to use the BC custom subassemblies for design model drawings as these contain the necessary point, link and shape codes for the cross section components. Civil 3D generic links and other subassemblies with point, link and shape code input parameters can also be used. When using generic links and other subassemblies designers shall ensure that BC standard point and link codes are used. Designers can also use Civil 3D Subassembly Composer to create their own subassemblies, provided the coding conventions match those required by the Ministry. See the Appendices for the complete list of subassembly codes. The following code set styles are provided in the Design Model drawing template: BC Assembly BC Corridor BC Corridor Section (Section Editor) BC Corridor Section (Section Views 1:250) C3D Assembly C3D Corridor C3D Corridor Section (Section Editor) C3D Corridor Section (Section Views 1:250) Subassembly The code set styles prefixed with BC are used for BC custom subassemblies and are the default code set styles for the Create Assembly, Create Corridor and Corridor Section Editor command settings. The code set styles prefixed with C3D reference point, link and shape codes in the stock Civil 3D subassemblies. BC Ministry of Transportation and Infrastructure Page 31
38 The BC Corridor Section (Section Views 1:250) and C3D Corridor Section (Section views 1:250) are the only code set styles used for final drawing production. Designers must ensure that code set styles are modified accordingly when assemblies incorporate both BC custom and stock Civil 3D subassemblies Civil 3D Object Styles and Label Styles and Submission Requirements The design model and production drawing architecture promotes data sharing between drawings, as opposed to data duplication. This means that final production drawings source data directly from the design model drawings. The object and label styles in the Ministry Civil 3D drawing template have been created to fully automate the drawing production annotation process. The use of AutoCAD text to annotate station, elevation, grade, offset, length or any other physical data extractable from Civil 3D design objects is not permitted. If there are any deficiencies in the drawing template that prevent design object labeling as per Ministry standards, then designers are required to notify the Ministry immediately so that these deficiencies can be addressed. The requirement for the exclusive use of Civil 3D label styles for design object annotation is necessary for the construction administration process and ensures that design model data can be directly sourced for construction staking and layout data. It is important that all Civil 3D production drawing labels reference design model directly as this is an indication that design model data has not been compromised Design Criteria Files Civil 3D design criteria files are associated with an alignment that has an assigned design speed, and are used for the following: Create minimum standard radius curves and spirals. Calculating and assigning superelevation values to curves and spirals. Create minimum sag / crest curves using stopping, passing and headlight sight distance criteria. Create warnings when minimum values for horizontal curvature, vertical curvature and superelevation values are not used. The technical package installs the Ministry design criteria file in the following location: C:\ProgramData\Autodesk\C3D 2015\enu\Data\Corridor Design Standards\Metric The Ministry design criteria file is called!bc MoT Civil 3D 2014 Roadway Design Standards.xml and references horizontal and vertical curvature standards in BC Supplement to TAC Section Design Modeling Object Naming Standards Ministry naming standards are required for all design elements created in Civil 3D. The Ministry Design Model drawing template incorporates naming standards as much as possible in the object naming templates found in command settings. Naming standards are applicable to preliminary design, functional design, detailed design and construction projects created in Civil 3D. In addition to the object name, all Civil 3D object properties provide an input field for description. Designers should make full use of these input fields to further describe the object. Those who are unfamiliar with the project should be able to understand the role of each object in the design from the object name and description. BC Ministry of Transportation and Infrastructure Page 32
39 Design Surface Names A design surface is defined as a surface created by designers as part of the design workflow. Rock surfaces, for example, would be created by a designer from borehole data. The basic design surface naming conventions that must be used are to prefix all design surfaces with a D for design. Surface names are referenced by other Civil 3D settings. Surfaces are placed on a layer that uses the surface name as a suffix to the default object layer name. The surface profile naming template also references the surface name as a suffix for the profile name. For these reasons the surface name must be short, descriptive and contain no spaces. Corridor design surfaces must reference the corridor name as well as the surface name. Examples of design surface names are shown below: D-L250TOP D-L100SUBGRADE D-L10025MM D-L100DATUM D-TYPEA D-TYPED Civil 3D naming templates in surface command settings provide limited capabilities to automate the assignment of surface names Centreline Horizontal Alignment Names The purpose of implementing naming conventions for centreline horizontal alignments is to ensure that all alignments have unique names and stationing. Contract drawings that show horizontal alignments must have the horizontal alignment names match the names used within the Civil 3D design model. All alignments in a project should also incorporate unique station values to avoid any conflict. Horizontal alignment naming conventions and start stations are summarized as follows: L100 Major alignment with starting station or L100An (n=1,2,3) Major alignment alternatives L200, L210, L250, L300 etc. Minor or sideline alignments with starting station values following the same convention as the major alignment ( or , or etc.) C1, C2, C3 etc. Access/intersection curve horizontal alignments (curb returns). Alignments are not required for curves with a radius less than 10m or a length less than 20m D10, D11, D12 etc. Ditch horizontal alignments S20, S21, S22 etc. Structure horizontal alignments The AutoCAD Civil 3D drawing template incorporates the following stationing conventions: (a ) (b ) BC Ministry of Transportation and Infrastructure Page 33
40 Command and ambient settings default to the (a ) station format. New functional and preliminary design projects shall adopt the (a ) station format. Detailed design projects stemming from a functional or preliminary detailed design can continue with the (b ) station format. If the (b ) station format is to be used drawing ambient settings and command settings need to be changed to reference the (b ) styles. Civil 3D naming templates in command settings provide limited capabilities to automate the assignment of alignment names based on what the alignment represents. Designers must be diligent when entering the correct alignment names Offset Geometry Alignment Names The offset geometry alignment naming standard is as follows: <Centreline Alignment Name><Offset Alignment Name><Side><n> Some examples are as follows: L100PEPL (L100 proposed edge of pavement left) L200PGUR (L200 proposed gutter right) L200EPL (L200 existing edge of pavement left) If required a numeric suffix n can be added to the offset geometry alignment names. The following feature specific offset alignments names are required: PLE Proposed lane edge PEP Proposed edge of pavement PSH Proposed shoulder edge PDW Proposed driveway PRW Proposed right of way PTLC Proposed license to construct PCLGR Proposed clearing and grubbing PTC Proposed toe of cut PTF Proposed toe of fill PTO Proposed toe PVC Proposed vertical cutoff PGU Proposed gutter PDC Proposed ditch centre PDE Proposed ditch edge PSWI Proposed sidewalk inside PSWO Proposed sidewalk outside PB Proposed barrier IC Island curb AC Asphalt curb RMC Raised median curb MC Concrete median divider SD Storm drain (same applies to Civil 3D pipe networks) SS Sanitary sewer (same applies to Civil 3D pipe networks) WM Water main (same applies to Civil 3D pipe and pressure networks) BC Ministry of Transportation and Infrastructure Page 34

41 In all instances the designer should make full use of the description field if there is additional information needed to describe the offset geometry alignment beyond what is required by the naming convention Profiles and Profile View Names The following examples highlight the naming standards for surface profiles, design profiles and profile views. Surface Profile Naming Standards The design model drawing template automates the name assignment to surface profiles using the following convention: <Alignment Name>-<Sampled Surface Name> This command setting is shown in the following illustration: Examples of surface profile names are shown below: L100-V-SOG L200-D-L100TOP L100-D-L200TOP Design Profile Naming Standards Design profiles can be created using the Profile Creation Tools or the Profile From Corridor command. Design profiles for all alignments must use the alignment name as a prefix which is also appended with Pn, where n is the alternative number as shown below: L100P1, L200A1P1, L100A1P2, L100PEPR1 etc. Profile Creation Tools The Ministry design model drawing template automates the assignment of the name to a design profile in the Profile Creation Tools command settings using the following convention: <Alignment Name>P<Next Counter> This command setting is shown in the following illustration: BC Ministry of Transportation and Infrastructure Page 35


42 The Next Counter property increments every time a profile is created using the Profile Creation Tools Command irrespective of the alignment. Designers must be careful to ensure that the numeric suffix correctly represents the profile alternative. Profile From Corridor The Ministry design model drawing template automates the assignment of the name to a design profile from the Profile From Corridor command settings using the following convention: <Corridor Name>P<Corridor Feature Code> The command settings also assign the corridor first baseline name, which is generally the alignment name, to the corridor name. The Profile From Corridor command settings is shown in the following illustration: Subassembly points are used to create the feature lines and subassembly point names are assigned to the corresponding corridor feature lines. Designers will need to update assigned profile names to reflect the designed profile naming convention. BC Ministry of Transportation and Infrastructure Page 36
 of a cross section and assemblies represent the entire cross section that is applied along with an alignment and profile to model a corridor.")
43 Subassembly and Assembly Names Subassemblies represent the individual components (lane, shoulder, ditch etc.) of a cross section and assemblies represent the entire cross section that is applied along with an alignment and profile to model a corridor. Assembly and subassembly naming conventions are summarized in the following sections. Assemblies Much like typical section annotation in a contract drawing set, the assembly should include the alignment (corridor) name as a prefix and the station range as a suffix. An example is as follows: L to This naming convention is only required for the final submission of the construction archive as station ranges often change during the design process. If an assembly for a corridor is applicable to multiple station ranges for the same alignment or is applicable to another corridor, the assembly should be copied and renamed appropriately. The Create Assembly command setting in the design model drawing template is unable to automate name assignment but cues designers to use the recommended naming convention. This is shown in the following illustration: The Ministry Civil 3D technical package incorporates functionality that creates dynamic labels as part of the assembly object that will automatically update when an assembly is renamed. Subassemblies Subassemblies are organized into assembly groups, which are created when the assembly is selected for subassembly insertion. Assembly groups are not created when an existing subassembly point is selected for subassembly insertion. The Create Assembly and Create Subassembly Tool naming templates in the Ministry design model drawing template assign sides (Left or Right) for the group name. Subassembly names use the subassembly local name for a prefix and the side for a suffix. The following illustration shows assembly groups and subassemblies with representative naming conventions in the Assembly Properties dialog box. BC Ministry of Transportation and Infrastructure Page 37


44 It is important to use good assembly group and subassembly naming conventions as these are continually referenced when assigning corridor targets Corridor Components and Names Naming standards applicable to corridor modeling components include the corridor name, baseline name, region name, feature line names, corridor surface names and names applied to alignments, profiles and feature lines extracted from corridor feature lines. The Create Corridor command settings in the Ministry design model drawing template assign names to the corridor components to the extents possible. Designers will need to ensure extracted alignments and profiles are assigned names based on the Ministry standard previously outlined. The naming templates in the Create Corridor command settings are shown in the following illustration: The Ministry corridor component naming standards are further described in the following sections. Corridor Name The corridor name is assigned from the corridor first baseline which, in turn, gets its name from the baseline alignment. The corridor name, therefore, is the same as the alignment name. If more than 1 baseline is used for the corridor the designer shall choose a meaningful and representative name for the corridor. BC Ministry of Transportation and Infrastructure Page 38
45 Baseline Name The corridor baseline is assigned to the alignment and profile pair used to model the corridor. The name assigned to the baseline is the same as the baseline alignment name. Region Name The corridor region is the application of the assembly over a station range. The assembly name is assigned to the corridor region. Corridor Feature Line Names Corridor feature lines are the longitudinal corridor components created by connecting the subassembly points. Corridor feature line names are automatically assigned from the subassembly point code names and cannot be renamed. Alignment and Profile Names Alignments and profiles extracted from corridor feature lines shall be named in accordance with the alignment and profile naming standards mentioned earlier in this section. Corridor Surfaces Corridor surfaces shall be named in accordance with the surface naming standards mentioned above. Feature Lines Feature lines are useful for design surface modeling and corridor targeting. When using feature lines for 2D/3D corridor targets, alignment and profile names referenced in the previous section shall be used Sample Lines, Section Views and Volumes Civil 3D sample lines are used to i) create Section Views and ii) calculate volumes. Section views should be created first so that material volumes can be visually confirmed. The high-level process for section view generation and volume calculation is summarized as follows: 1. Create sample lines. a. Attach section data to sample lines. b. Identify locations for sample lines. 2. Create section views. 3. Select or create Quantity Takeoff Criteria. 4. Calculate and report volumes. 5. Produce section sheets. These individual steps are summarized in the following sections. BC Ministry of Transportation and Infrastructure Page 39
46 Create Sample Lines Sample lines and section views are created in a separate drawing and organized in a Sample Line Group, which can be found under the Alignment in Prospector. The drawing name and location for sample lines and section views is as follows: \<ProjectName>\DesignModel\03_Corridors\SECT-<AlignmentName>.dwg This drawing is created using the Ministry Civil 3D drawing template and requires the following references: Centreline alignment as Civil 3D reference object. Corridor drawing as AutoCAD external reference (attachment). Data required for volume calculation is accessed through the corridor Xref and no other Civil 3D reference objects are required Attach Data to Sample Lines When creating sample lines, you select the data to attach to the sample lines. The data types you can attach are as follows: Surface section data displayed with a Section Style. Corridor surface section data displayed with a Section Style. Corridor section data displayed with a Code Set Style. Be sure to only attach the data that is required for volume calculation or to be displayed in section views Sample Line Locations Sample line insertion locations are based on the phase of the project and summarized below: Functional Design Station interval maximum of 20m. Detailed Design Significant geometry deflection locations chosen by the designer. 10m on all tangents, spirals and vertical curves. Horizontal geometry points (TS, SC, CS, ST etc.). Vertical geometry high and low points and grade break stations. Superelevation critical points (NC, RC, LC and FS). Roadway typical cross section change stations (changes in materials, widths, slopes etc.). Key deflection points (begin/end tapers, barrier flares etc.). Structure stations (bridge abutments and retaining wall start, end and deflection points). All intersection stations (access and intersection curves, etc.). BC Ministry of Transportation and Infrastructure Page 40
47 Structure stations are not required if structure construction is to be paid for by facial area or by an allinclusive cost. In these situations, cross section stations are still required at 5 metre intervals for approximate wall structure excavation and backfill quantity calculations used for project tender reference purposes. Guidelines for sample line locations for structures are shown in the following illustrations: BC Ministry of Transportation and Infrastructure Page 41
48 The designer must supply vertical cutoff stations through an intersection, where major, minor, sideline and access/intersection curve horizontal alignment stations are coincident. These stations will include all key locations necessary for layout and to provide an accurate representation of earthwork quantities through an intersection. Key stations will include beginning and end of access/intersection curves, paint line convergences and island corners. BC Ministry of Transportation and Infrastructure Page 42
49 The following drawings show the typical requirements for spot elevations and design cross section stations required for construction supervision layout and earthwork calculations through an intersection. Cross section stations are to be supplied at the beginning and end of an intersection (Sta & ) with full roadway width and a station 1cm outside of each of these stations at the vertical cutoff offset. BC Ministry of Transportation and Infrastructure Page 43
50 BC Ministry of Transportation and Infrastructure Page 44

51 Sample line locations can be created from corridor assembly insertion locations. When corridor assembly insertion locations match the location requirements mentioned above, use the From corridor stations option in Sample Line Tools to create sample lines at corridor assembly insertion locations. This is shown in the following illustration: BC Ministry of Transportation and Infrastructure Page 45

52 Regardless of the assembly insertion locations in no circumstances should sample lines be create at locations were assemblies were not inserted on the corridor model Create Section Views Create Section Views using the Create Multiple Views in Civil 3D. You can create Section Views in production mode, meaning that they will be laid out and oriented in the drawing in a manner consistent with final drawing production. You can select the layout from the Ministry C3D Title Blocks drawing template that is configured for cross section production at 1:250 scale. Be sure to set the drawing annotation scale to 1:250 prior to creating section views in production mode. After Section Views have been created use the Civil 3D Plan Production Create Section Sheets command to create the layouts with the title blocks Quantity Takeoff Criteria Civil 3D Quantity Takeoff Criteria are used to calculate pavement structure, earthworks and other end area volumes from sample lines. Pavement structure and earthworks volumes are calculated by applying a Quantity Takeoff Criteria to a sample line group that has surface, corridor surface and corridor section data attached. The Ministry design model drawing template provides a selection of generic Quantity Takeoff Criteria for use on projects. It is the designer s responsibility to create the required Quantity Takeoff Criteria for each project. Quantity Takeoff Criteria for pavement structure and earthworks volume calculation are discussed in the following sections. BC Ministry of Transportation and Infrastructure Page 46

53 Pavement Structure Volumes Pavement structure volumes are calculated from the end areas of subassembly shapes. The Pavement Structure Quantity Takeoff Criteria in the design model drawing template is shown in the following illustration. The Include condition is specific to the Structures quantity type. BC Ministry of Transportation and Infrastructure Page 47


54 Earthworks, Stripping and Rock Volumes A quantity takeoff criteria that makes use of sub-criteria is included in the Ministry Civil 3D DWT that accounts for earthworks, stripping and rock calculations. This is shown in the following illustration: Subcriteria can be used to aggregate material volumes given multiple conditions Calculate and Report Volumes A sample line group with sample lines at the required design increment is necessary for volume calculation. A chosen selection of surface data (V-SOG, D-TYPEA etc.), corridor surface data (D- L100DATUM) and corridor section data (L100A1) are attached to sample for various types of volume calculations. When computing volumes, the name of the object in the drawing (surface, corridor surface or section) is matched to the name of the material in the Quantity Takeoff Criteria. This process results in the following: Attachment of material section data to sample lines BC Ministry of Transportation and Infrastructure Page 48

, stripping (STRP) and rock (TYPEA) material list with the material names and subcriteria.")
55 Calculation of pavement structure and earthworks quantities as part of the sample line group Creation of a material list in the sample line group As the material list is referenced when reporting materials, it is important to assign a representative name to each material list that is created. A recommended practice is to assign names of applicable quantity takeoff criteria to the material list. The following illustration shows an earth (TYPED), stripping (STRP) and rock (TYPEA) material list with the material names and subcriteria. BC Ministry of Transportation and Infrastructure Page 49

56 The following illustration shows a Pavement Structure material list with the material names directly below them. Material Names The following material names are to be used when creating Quantity Takeoff Criteria ACT asphalt top lift ACB asphalt base 25MM 25mm crushed base course 50MM 50mm crushed base course 75MM 75mm crushed base course SGSB select granular sub base SHLD-GRVL shoulder gravel SHLD-BUILD shoulder buildup LEVMAT1 levelling material 1 LEVMAT2 levelling material 2 OVERBRDN overburden earth cut TYPE-A type A cut (solid rock) TYPE-B type B cut (over 50% broken rock) TYPE-C type C cut (rock requires ripping) TYPE-D type D cut (all other materials including earth) TYPE-A FILL type A (solid rock) TYPE-D FILL type D (all other materials including earth) SHLDX-PVMT shoulder excavation pavement SHLDX-GRVL shoulder excavation gravel STRIPPING - stripping BC Ministry of Transportation and Infrastructure Page 50
57 BLVD-GRVL boulevard gravel BLVD-MAT boulevard material TOPSOIL topsoil CURB concrete curb and gutter SWLK-GRVL sidewalk gravel SWLK-CONC sidewalk concrete SURCHARGE surcharge (preload) MILLRAP milling/recycling of asphalt pavement MILLCUG milling contaminated gravels SUBEX - sub excavation FOUNDEX foundation excavation WASTE unsuitable material GRAVSTRIP gravel support strip Design Surface Models Three design surface models are required as part of the construction project data archive. Surface models are required for the following cross section elements: Finished grade Top of 25mm granular Subgrade Design surface models shall be created from corridor models and include boundaries to properly contain the triangulation within the desired limits. Data shortcuts for design surface models are created from the corridor drawing. The proposed surfaces drawing combines all design model surface data in a single drawing using Civil 3D reference objects. BC Ministry of Transportation and Infrastructure Page 51
58 Detailed Procedures for Construction Workflow The construction workflow involves all tasks required to construct the road or highway facility by referencing design model data and construction drawings created as part of the survey and design workflows. The construction workflow is enabled by Ministry Field Services staff and in some instances private sector consultants and contractors. Construction workflow activity typically involves the following: Design model data extraction for field layout, machine guidance, quality assurance purposes Monthly Construction surveys for earthworks and other contract payment computations Design model updates modify existing surfaces and design models to include actual conditions and to provide revised construction layout data and quantity calculations The construction workflow requires a working knowledge of Civil 3D as identified in both the survey and design workflows. Ministry Field Services and other construction personnel are required to become familiar with the Ministry Civil 3D project folder structure and contents as outlined in the Detailed Procedures for Design Workflow section Construction Workflow Tasks All Civil 3D functionality found in the survey and design workflows is applicable to the construction workflow. Refer to the sections on survey and design workflows to identify Civil 3D functionality for construction workflow tasks Reception and Extraction of Construction Project Data Archive Project drawing and data relationships must be maintained throughout all project phases. Ministry Field Services and other construction administration staff are required to become familiar with data creation and management procedures and standards outlined in the Project Data Management, Archiving and Handoff section. Once the final detailed design phase of a project is finished the following file is handed off to construction administration staff: <ProjectName>-Construction.zip Upon reception of the construction project data archive construction administration staff shall immediately make a copy of the project data archive file, rename it to <ProjectName>- ConstructionRev#.zip and extract the design model and production drawing folders to the standardized Civil 3D project path. Doing so ensures data received from the project detailed design phase remains intact and unaltered Data Reference Repair Data reference repair of the design data set is a critical component of the construction workflow. This step involves resolving and repairing broken data references which are created when a design model and BC Ministry of Transportation and Infrastructure Page 52
59 production drawing data set is transferred from a drive with a unique letter and root folder on one computer, to another drive with a unique letter and root folder on another computer. Design model and production drawings created during the design workflow are held together using AutoCAD external references and Civil 3D data shortcuts and reference objects. Examples of these types of references are summarized in the following bullets: SOG surface is referenced from surface design model drawing into alignment and profile design model drawing with an Civil 3D data shortcut and reference object. Alignment and profile data is referenced from alignment and profile design model drawing into corridor design model drawing with Civil 3D data shortcuts and reference objects. Alignment and profile data is referenced into production drawings with Civil 3D data shortcuts and reference objects. Plan geometry data is referenced from design model drawings into 100 (Plan) and 400 (Geometrics and Laning) production drawings. LiDAR surfaces reference XYZ spot elevation data from external files. The Civil 3D survey database is used to import point and figure (field generated linework) data for pre-engineering data acquisition and construction surveys. The design workflow requires the creation of a Project Data Structure document which clearly describes the project data relationships between design model and production drawings Broken Reference Repair Process The project data set is provided in a ZIP file which is extracted to the designated project folder. Once the data has been extracted each project drawing is opened, starting with the design model drawings, and the references are repaired. The following reference repairs are required: Civil 3D survey database paths Civil 3D reference objects Civil 3D data shortcuts Civil 3D surface reference files AutoCAD external references The following sections discuss the resolution of broken references. Civil 3D Survey Database Path Civil 3D survey databases are used to manage i) pre-engineering data acquisition and ii) construction surveys. The Civil 3D survey databases are prefixed with SDB and are created the following folders: Data Acquisition - \DesignModel\00_SurveyBase\SurveyDatabases Construction - \DesignModel\09_Construction\MonthlyVolumes\Month(n)\SurveyDatabases To set the path for the survey database in Civil 3D, from Survey tab of Toolspace: 1. Right click on Survey Databases and click Set working folder. 2. Browse to the location of the survey database (indicated in bullets above). BC Ministry of Transportation and Infrastructure Page 53


60 The survey databases in the working folder are then displayed in the Survey Databases collection. This is shown in the following illustration: The survey database is a static, local setting and needs to be changed with each project. Civil 3D Reference Objects A Civil 3D data shortcut provides a link to an object (surface, alignment, profile, pipe network or view frame group) and is created from the source drawing containing the objects. Civil 3D reference objects are created in the consumer drawing using a data shortcut. The name of the reference object and the source drawing name and path location are stored in the consumer drawing and are not reliant upon the data shortcut itself. When a project data archive is moved from one drive and folder location to another drive an folder location, Civil 3D references may break. When a Civil 3D broken reference is encountered an operator may be notified about the broken reference upon opening a drawing, at which point the operator is prompted to fix the broken reference by locating the drawing containing the source object. Automatic notifications are not always guaranteed operators should always scan the alignment, profile, surface, pipe network and view frame group collections in Prospector tab of Toolspace to search for broken references. Broken references are indicated with a symbol to the left of the object name. To repair a broken reference right click on the object name and click Repair Broken References. This is shown in the following illustration. If other broken references exist in the drawing Civil 3D will prompt you to repair them with the dialog box shown in the following illustration: BC Ministry of Transportation and Infrastructure Page 54


61 Broken references will either be repaired automatically or with user input depending on the extent and nature of the broken references. Civil 3D Data Shortcuts Civil 3D data shortcuts are created from a source drawing and serve as link to create surface, alignment, profile, pipe network and view frame group data in the consumer drawing. The Civil 3D data shortcut is a small XML file that contains the following information: Name of source object Name and location and path of source drawing containing the source object Data shortcuts may still be required to create reference objects after the construction project data archive has been handed off to Ministry Field Services. When a Civil 3D project archive folder is moved from one drive and root folder to another drive and root folder the location and path of the source drawing is no longer valid. This is shown in the following illustration: To repair broken data shortcuts follow these steps: 1) Set the working folder for data shortcuts a) From Prospector right click on Data Shortcuts collection, click Set Working Folder and browse to and select the project DesignModel folder b) Right click on Data Shortcuts collection, select Set Data Shortcuts Project Folder and select 08_References c) From Prospector expand the collections under Data Shortcuts and note the broken references with the yellow exclamation symbol to the left of the object name d) Right click on each broken shortcut and select Repair Broken Shortcut BC Ministry of Transportation and Infrastructure Page 55


62 Once all broken data shortcuts are repaired reference objects can be created without issue. AutoCAD External References Operators are notified if AutoCAD external references cannot be resolved upon opening a drawing with the following dialog: After selecting Update, the location of referenced files the External Reference palette is displayed. At the bottom of the palette you can browse the path for the reference file. This is shown in the following illustration: AutoCAD external references remain intact when they are saved with a relative path Construction Surveys Construction surveys serve several purposes through the life of a construction project. These are summarized in the following bullets: BC Ministry of Transportation and Infrastructure Page 56
63 To update various material horizons used in the design process. These surfaces may have been assumed or based on lower accuracy surveys, or may simply be out of date (original ground, rock, etc). Earthwork volumes can then be updated based on these new horizons. To record excavation and embankment progress and to compute quantities for contract progress payment. For Quality Assurance purposes to ensure that construction works meet the intended design and fit within the design model. To record as-built conditions for later inclusion in as-built plans and documents. Survey data is to be imported to Civil 3D via the survey database and procedures and standards for processing construction survey data in Civil 3D are the same as those outlined for pre-engineering data acquisition surveys. Source data from construction surveys is to be stored in the \09_Construction\SourceData folder. Survey databases are created in the 09_Construction design model folder and assigned a meaningful and representative name such as the material type(s) or location of survey. A new drawing created from the Ministry Civil 3D drawing template is to be used for survey data import and surface modeling updates. Construction drawings are named using the following convention: CONST or CONST as a prefix to the drawing name Surface Updates Earth, rock and other existing surfaces used during the design process are updated with construction field observation data so that quantities can be recalculated and designs subsequently updated. Original ground surfaces created during the design phase shall not be edited. The procedure for creating construction remeasure surfaces is summarized as follows: 1. In the construction drawing create reference objects for the existing surface used during the design phase of the project. 2. Import construction survey data to the construction drawing via the Civil 3D survey database. 3. Create construction remeasure survey surface using breaklines and boundaries. A construction survey surface may be represented with islands of data (using a hide boundary and then several show boundaries). 4. Create a construction remeasure surface by pasting the existing surface created during design phase and then pasting construction remeasure survey surface. 5. Create a data shortcut for the construction remeasure surface. Construction remeasure surfaces shall use the following naming convention: REMEAS- as a prefix to the standardized surface name The construction remeasure surface is then referenced into the corridor design model drawing(s) so that corridor models can be updated. BC Ministry of Transportation and Infrastructure Page 57
64 Quantity Recalculation and Design Updates Quantity recalculation and design updates may be required due to differences between existing surfaces used during the design process and construction remeasure surfaces. The following points should be recognized when performing design updates and quantity recalculations. 1. Integrity of existing conditions surfaces created during the detailed design shall be maintained 2. Design Updates a. Create Civil 3D surface reference objects from data shortcuts for construction remeasure surfaces in corridor design model drawings. b. Corridor surface targets are updated to reference construction remeasure surfaces. c. Reviewing and addressing corridor design issues stemming from new corridor targets for construction remeasure surfaces. d. Ensure corridor design surfaces are properly formed. 3. Quantity Recalculation a. Create reference objects for construction remeasure surfaces in sections design model / production drawing. b. Modify alignment sample line group properties to add construction remeasure surfaces. c. Update sample line group material list definitions with construction remeasure surfaces and re-report volumes. Upon completion of the corridor design model updates construction administration staff can begin with data extraction for construction staking Export Data for Construction Layout and QA measurements Ministry Field Services staff and other construction administration personnel are required to extract data form corridor design model drawings for construction layout and quality assurance measurement purposes. The following data types can facilitate these processes: Polylines and feature lines Points Alignments and profiles Corridor design surfaces Corridor models Construction administration staff are required to understand procedures for creating and extracting data from Civil 3D corridor design model drawings Section Surface Editor The Section Surface Editor utility is available either via the Prospector Toolbox or the Ministry ENGTools ribbon tab. The Section Surface Editor works with surface data attached to sample lines (and displayed in section views) and offers a range of functionality to edit surfaces from the perspective of the cross section. The Section Surface Editor can be used to trim, extend and combine surfaces so that correct volumes can be reported and representative data can be extracted for construction layout. BC Ministry of Transportation and Infrastructure Page 58
65 Project Data Management, Archiving and Handoff Project data is shared among survey, design and construction staff who work at the Ministry, and with private consultants and contractors. The efficient management of project data and consistency in folder structure and names, drawing names, object names and drawing/data relationships is critical for data handoff and ease of interpretation by all parties involved. This section outlines standards required for project data management, archiving and handoff. Handoff of project data archives occurs at the following project phase transitions: Preliminary design to functional design Functional design to detailed design Survey data acquisition to detailed design Detailed design to construction Construction to detailed design The following items are required to accompany each data handoff. 1. Civil 3D Project Data Structure Document 2. Civil 3D Project Archive Electronic Deliverables Quality Checklist 3. Civil 3D Project Archive Electronic Deliverables Table 4. Civil 3D Project Archive Project data archive management and required deliverable items are addressed in the following sections Drawing and Data Management This section addresses Civil 3D drawing, data management and drawing/data sharing procedures for Ministry road and highway design projects. As all projects have different requirements, these data sharing standards are to be used as guidelines for recommended best practices. With each project submission, the designer must provide a Project Data Structure Description document that highlights the data relationships among design model drawings, production drawings and drawing objects. A Word document can be used to describe the AutoCAD external reference and Civil 3D data references for each design model and production drawing. The following sections address Civil 3D tools for data sharing, data management best practices, data shortcut and reference object naming standards, design model drawing naming standards, folder structure, surface reference files and project data structure description Civil 3D Tools for Data Sharing The use of AutoCAD external references and Civil 3D data shortcuts and reference objects introduce a variety of options for sharing data among design model and production drawings. These techniques are detailed in the following sections. BC Ministry of Transportation and Infrastructure Page 59
66 AutoCAD External References AutoCAD external references (Xrefs) can be used to share graphical data. Xrefs must be inserted as overlays to ensure there are no duplicate or circular references. The only exception is that the crosssection drawing should attach the corridor drawing attachments to expose assembly insertion stations for sample line locations. Xrefs should also be saved with a relative path to prevent unresolved references when the project data archive is transferred to Ministry Field Services. Care should be taken to not duplicate the display of Xref data with Civil 3D reference object data Civil 3D Data Shortcuts and Reference Objects Civil 3D data shortcuts are created from source design model drawings and are used to create reference objects in other drawings. This procedure enables sharing of Civil 3D surface, alignment, profile and pipe network data between drawings. For instance, a corridor design model drawing would reference an alignment and profile from the alignment and profile design model drawing. The same alignment and profile would be referenced into final production drawings using data shortcuts AutoCAD External References and Object Labeling Some Civil 3D objects can be labelled through the Xref. This means that if a drawing containing Civil 3D data is attached to the current drawing as an Xref, the Civil 3D data can be labelled in the current drawing. All labeling should be completed in production drawings as much as reasonably possible AutoCAD Xrefs and Civil 3D Data Shortcuts / Reference Objects The combination of Xrefs, data shortcuts and reference objects allows for the creation of section views in a separate drawing from the corridor model. Assuming the corridor design model drawing has been created the procedure is as follows: 1) Create new drawing and attach corridor design model as an Xref 2) Create reference object to corridor control alignment 3) Create sample lines on reference alignment The surface, corridor surface and corridor section data in the Xref is pulled through the Xref and attached to the sample lines for the reference alignment. This procedure is recommended to i) keep drawing size down ii) reduce corridor recalculation and section update time and iii) maintain a drawing/annotation scale specific to sections AutoCAD External References and Corridor Targeting In Civil 3D, polylines and survey figures can serve as corridor targets from an Xref. This functionality is useful when the alignment geometry design model drawing is externally referenced into the corridor design model drawing. Corridor models should always target offset alignment geometry to control section widths. This way the designer can be assured that updates to the alignment geometry model drawing will result in a corresponding corridor recalculation. BC Ministry of Transportation and Infrastructure Page 60
67 Civil 3D Survey Database The design workflow requires access to survey figures for the following reasons: Survey figures representing existing features are sometimes used for corridor targeting. Where possible, survey figures should not be fragmented for the entire length of the feature to minimize the selection of corridor targets Survey figures are required in cross section production drawings to label existing features in section views Managing construction survey data used for quantity calculation and construction staking (refer to Detailed Procedures for Construction Workflow) Refer to the Detailed Procedures for Survey Workflow for information on the survey database for accessing figures from data acquisition surveys Data Management Best Practices Project data sharing can be complex, especially for large projects. It is critical to keep data management practices well organized. The following is a list of suggestions to help optimize data management practices when working on Ministry projects: 1. Data sharing requires the application of consistent naming standards for objects and drawings to facilitate data comprehension by other design team members and construction administration staff. Data shortcuts and reference objects should always maintain the same name as the source object. 2. Data shortcut folders should only contain valid references that are used in other drawings. Cluttering data shortcut folders with unused references unnecessarily complicates access to object data from other drawings. 3. Reference objects should only be created when needed. Consumer drawings should not contain reference objects that are not used for design model or final drawing production 4. Design model and production drawings that are either source or consumer drawings should never be renamed. 5. Project data folders should only contain data immediately applicable to the project. Any superfluous data that does not either contribute directly to the design model or production drawings should be stored in personal design folders under the working folder. The final aspect of data management is communication. Project team members that share data on a large project must be intimate with the data sharing strategy for the project. If a geometric designer changes an alignment or profile, then this change must be communicated to whoever is designing the corridor so the appropriate update can be made Project Folder Drawings, Data and Structure All project data is organized into a standardized project data folder structure which locates drawing and other files in terms of design model data and drawing production data. To facilitate data transfer to Ministry Field Services for construction administration purposes, it is imperative that all projects make use of the Ministry Civil 3D project data folder structure in order that both AutoCAD and Civil 3D references can be easily resolved after transferring engineering project data to Ministry Field Services. Data storage consistency is of paramount importance. BC Ministry of Transportation and Infrastructure Page 61
68 Design Model folders contain design and modeling data and Drawing Production folders contain final drawings required for a contract drawing set. Design model data and drawings can be referenced by other design model drawings (for example alignment, profile and existing surface data is referenced into corridor design drawings). Design model data and drawings are also referenced by production drawings. These references are accommodated using both AutoCAD external references and Civil 3D data shortcuts / reference objects. AutoCAD external references must be inserted as overlays to eliminate the possibility of circular references. It is strongly recommended that design teams discuss the overall strategy for project data sharing before any work begins on a project. The intent is to understand the data relationship between design model and production drawings bearing in mind that data should be shared and not duplicated. A Project Data Structure document is required with each design submission that clearly defines the drawing and data relationships defined by AutoCAD external references, Civil 3D data shortcuts and Civil 3D reference objects. The following diagram shows the project folder structure to be used for Ministry Civil 3D projects. The following pages contain descriptions of the folders, contents and data reference sources. BC Ministry of Transportation and Infrastructure Page 62
69 The project folder structure and contents can be created from Ministry ENGTools ribbon tab. BC Ministry of Transportation and Infrastructure Page 63
70 Design Model Folder Contents and Drawing Naming Standards Design model drawings are organized in the DesignModel folders and contain the survey, design and construction data and drawings required for the following: Survey Workflow - create completed pre-engineering base plan, existing ROW cadastral and existing ground surface model(s). Design Workflow - create the design and generate production drawings, calculate quantities and generate construction staking data. Construction Workflow survey exposed surface, update surface models, update design models and recalculate quantities. The following design model folders and recommended contents are guidelines for the assembly of project data. Naming conventions must be consistent to the utmost extent possible. The intent of drawing and data file naming standards is to facilitate data interpretation by Ministry Field Services staff. 00_SurveyBase The 00_SurveyBase folder contains the following: 1. Survey base drawings (ground and aerial) containing featurized points and survey figures. 2. Existing ROW / cadastral drawings. 3. Source data folders (ground and aerial) containing data imported to Civil 3D. 4. Civil 3D survey databases (ground and aerial) The following naming standards are accepted: Survey base drawings SURVBASE, or SURVBASE- as a prefix to the drawing name. (for example SURVBASE-SOG, SURVBASE-ProjectName, SURVBASE-LOG-ProjectName) ROW / cadastral drawings - PROP, or PROP- as a prefix to the drawing name. Survey source data files INITYYYYMMDD, or INITYYYYMMDD- as a prefix to the file name where INIT is the surveyor s initials. Civil 3D survey databases SDB- as a prefix to the survey database name (SDB-SOG, SDB- ProjectName, or SDB-LOG-ProjectName). The project name and content type (LiDAR, GPS) is used as a suffix. 01_Existing Surfaces The 01_ExistingSurfaces folder contains the following: 1. Surface drawings containing existing surface(s). 2. Source folders containing LiDAR (NEZ) and other source data directly referenced by surfaces. Survey point and figure data is imported from the project survey database(s) to create existing surface model(s). The following naming standards are accepted: Existing surface drawings EXSURF, or EXSURF- as a prefix to the drawing name (for example EXSURF-LOG, EXSURF-SOG, EXSURF-COG or EXSURF-ProjectName). Surface source data files INITYYYYMMDD or DATASOURCE (CAICEEXPORT) as the file name, or as a prefix to the file name where INIT is surveyor initials. File contents should have header line(s) starting with # to provide additional information on the data. BC Ministry of Transportation and Infrastructure Page 64
71 02_Geometry The 02_Geometry folder contains the following data: 1. Horizontal alignments, offset geometry and profiles drawing this drawing contains the centreline geometry, offset geometry, pavement markings, profiles and profile views. The only annotation in this drawing is that which is displayed in all drawing referencing this drawing as an external reference. This drawing is referenced into design model drawings that are to be, in turn, referenced into 100, 400, 500, 600 and 700 series production drawings. Pavement markings are also created in this drawing and can be frozen in reference drawings where they are not required. This drawing can also be exported to AutoCAD for transfer to other disciplines. Alignment stationing, geometry point and geometry stationing is not created in this drawing. Data shortcuts for 200 series profiles drawings are created from this drawing. 2. Horizontal geometry drawing for 100 series Plan drawings references the horizontal alignment, offset geometry and profile drawing as an overlay external reference. The alignment is also created as a Civil 3D reference object to generate annotation required for 100 series plan drawings. This drawing references the SURVBASE drawing as an overlay external reference. This drawing is externally referenced into the 100 series production drawing(s) and contains annotation only required by the 100 series production drawings. 3. Horizontal geometry drawing for 400 series Geometrics and Laning Drawings references the horizontal alignment, offset geometry and profile drawing as an overlay external reference. The alignment is also created as a Civil 3D reference object to generate annotation required for 400 series drawings. This drawing is externally referenced into the 400 series production drawing(s) and contains annotation only required by the 400 series production drawings. 4. Horizontal geometry drawing for 500 series Spot Elevations Drawings references the horizontal alignment, offset geometry and profile drawing as an overlay external reference. The alignment is also created as a Civil 3D reference object to generate annotation required for 500 series drawings. This drawing is externally referenced into the 500 series production drawing(s) and contains annotation only required by the 500 series production drawings. 5. Source data folder containing import data (XML) for alignment and profiles 6. Surface data for surface profile creation is referenced using Civil 3D data shortcuts from drawings in 01_ExistingSurfaces folder. The following drawing naming standards are accepted: Horizontal alignment, offset geometry and profiles drawings ALIGEOMPROF, or ALIGEOMPROFas a prefix to the drawing name (for example ALIGEOMPROF-ProjectName) Horizontal geometry drawing for 100 series Plan drawings 100PLAN, or 100PLAN- as a prefix to the drawing name (for example 100PLAN-ProjectName) Horizontal geometry drawing for 400 series Geometrics and Laning drawings 400GEOMLANE or 400GEOMLANE- as a prefix to the drawing name (for example 400GEOMLANE-ProjectName). Horizontal geometry drawing for 500 series Spot Elevation drawings 500SPOTELEV or 500SPOTELEV- as a prefix to the drawing name (for example 500SPOTELEV-ProjectName). Civil 3D plan production tools can be used to create view frames in ALIGEOMPROF drawing. Data shortcuts can be created to the view frame groups to facilitate consistent sheet layout for 100, 400, 500, 600 and 700 series production drawings. The Ministry title block template contains layouts and viewports that are configured for both plan and profile sheet creation using the plan production tools. BC Ministry of Transportation and Infrastructure Page 65
72 03_Corridors The 03_Corridors folder contains the following: 1. Design model drawing(s) containing corridor models and/or grading objects. 2. Working cross section drawing(s) not required for production. The following data sharing mechanisms are suggested for referencing data into corridor and working section drawings. Horizontal and vertical alignment data is referenced into corridor design model drawing with Civil 3D data shortcuts from ALIGEOMPROF drawing in 02_Geometry folder. ALIGEOMPROF drawing in 02_Geometry folder is externally referenced so offset geometry can be used as horizontal targets for corridor models. SURVBASE drawing in 00_SurvBase folder is externally referenced so existing geometry can be used as horizontal and vertical targets for corridor models. Alternatively, survey figures can be imported from the survey database in 00_SurvBase folder to the corridor drawing(s) for horizontal and vertical targets. Existing surface data is referenced into corridor design model drawing(s) with a Civil 3D data shortcut from EXSURF drawing in 01_ExistingSurfaces folder. Working cross section drawing(s) reference centreline alignment with Civil 3D data shortcut from ALIGEOMPROF drawing in 02_AlignmentGeometryProfiles folder and references corridor drawing(s) with AutoCAD external reference from 03_CorridorsSections folder. Cross section drawing(s) connect to survey database(s) to import survey figures to be shown in section views. The following naming standards for corridor design model drawings are accepted: Corridor design model drawings - <AlignmentNames>CORR, or <AlignmentNames>CORR- as a prefix to the drawing name (for example L100CORR-ProjectName or L100L200CORR- ProjectName). Grading design model drawings - <AlignmentNames>GRAD, or <AlignmentNames>GRAD- as a prefix to the drawing name (for example AlignmentNamesGRAD-ProjectName). Working cross section drawings - <AlignmentNames>SECT, or <AlignmentNames>SECT- as a prefix to the drawing name. Design cross sections required for contract sets are located in \DrawingProduction\1000DesignSections folder. 04_ProposedSurfaces The 04_Proposed Surface folder contains the following drawing: 1. Design surface drawing containing proposed surfaces created with a Civil 3D data shortcut from corridor model surfaces residing in corridor drawings in 03_Corridors folder. The following drawing naming standards are accepted: Design surface drawing PRSURF, or PRSURF- as a prefix to the drawing name (for example PRSURF-ProjectName). BC Ministry of Transportation and Infrastructure Page 66
73 05_SignagePavementMarkings The 05_SignagePavmentMarkings folder contains the following: 1. Signage and pavement marking drawing. Alignment, offset geometry and pavement markings are referenced as Xref from ALIGEOMPROF drawing in 02_Geometry folder. The following drawing naming standard is accepted: Horizontal geometry drawing for 600 series Signage and Pavement Markings drawings 600SIGNPAVEMARK or 600SIGNPAVEMARK- as a prefix to the drawing name (for example 600SIGNPAVEMARK-ProjectName). The 600SIGNPAVEMARK drawing is attached as an external reference to the 600 series signage and pavement markings production drawings. 06_DrainageUtilities The 06_DrainageUtilities folder contains the following: 1. Storm, sanitary and water main drawing. 2. Source data folder containing import data (XML) for utilities. Alignment and profile data is referenced with data shortcuts from ALIGEOMPROF dwg in the 02_Geometry folder. Alignment offset geometry is referenced using an external reference from the ALIGEOMPROF dwg in the 02_Geometry folder. Design surface data is referenced from the PRSURF dwg in the 04_ProposedSurfaces folder. Existing surface data is referenced from the EXSURF dwg in the 01_ExisitngSurfaces folder. A combined existing-proposed surface can be created in this dwg if required. The following drawing naming standards are accepted: Storm, sanitary and water main drawing any combination of 700ST, 700SS and 700WM as a prefix to the drawing name (for example 700STWM, 600STSSWM). Source data files DATASOURCE, or DATASOURCE- as a prefix to import file name. 07_OrthoImagery The 07_OrthoImagery folder contains the following: Aerial images to be referenced by both design model and drawing production drawings. Naming standards for aerial images shall be reasonably descriptive. 08_References The 08_References folder contains the following: Civil 3D data shortcut folders containing data shortcut files for surfaces, alignments, profiles, pipe networks and view frame groups. Other drawings that may be referenced into design model and production drawings using AutoCAD external references such as legal drawings and that are not accommodated by folders under the \10_Subdisciplines folder. Data shortcut folders must be organized, use standardized object naming conventions and contain only data that is actively being used by the project. Invalid/old data shortcuts should be removed from these folders. Data shortcuts and reference object names shall assume the same names as the source objects. BC Ministry of Transportation and Infrastructure Page 67
74 Reference drawings are typically externally referenced into production drawings either directly or via other design model drawings. All references must be adapted to conform to Ministry CAD standards and should contain no 3 rd party layer, block or text style definitions. Any references to non-standard SHX and any other source files must be removed. Drawing level of detail beyond what is required for drawing production should be removed from reference drawings. 09_Construction The 09_Construction folder contains the following: 1. Construction surfaces drawing to recreate assumed existing surfaces. New construction surfaces are created from field data collected as part of the construction administration process. 2. Civil 3D survey databases for managing different types of construction survey data. 3. Construction survey data files. Updates to existing surfaces using construction survey data is accomplished by i) referencing the original surfaces using a data shortcut ii) creating construction surfaces in a construction drawing from construction survey data and iii) creating a combined original and construction surface by pasting the original and construction surfaces together. This updated combined original and construction surface is then referenced by the corridor design model drawing where corridor surface targets are updated. Accepted naming conventions for construction surface drawings, survey databases and data files are: Construction drawings CONST, or CONST- as a prefix to the drawing name (for example CONSTSURF-ProjectName). Construction survey databases SDB- as a prefix (depending on how Field Services staff choose to manage different types of data). Construction survey data files INITYYYYMMDD, or INITYYYYMMDD- as a prefix to the file name. Please refer to the Construction Workflow section for details on construction data management. 10_Subdisciplines The 10_Subdisciplines folder contains subfolders for construction staging (drainage, preload and traffic management), electrical and lighting, environmental, geotechnical, landscaping and structural. These reference drawings are externally referenced into corresponding production drawings. The following naming standards for references are accepted: Construction Drainage CONSTDRAIN, or CONSTDRAIN- as a prefix to the drawing name Construction Preload CONSTPRELOAD, or CONSTPRELOAD- as a prefix to the drawing name Construction Traffic CONSTTRAF, or CONSTTRAF- as a prefix to the drawing name Electrical and Lighting ELECLIGHT, or ELECLIGHT- as a prefix to the drawing name Environmental ENV, or ENV- as a prefix to the drawing name Geotechnical GEOTECH, or GEOTECH- as a prefix to the drawing name Landscaping LAND, or LAND- as a prefix to the drawing name Structural STRCT, or STRCT- as a prefix to the drawing name Archaeological ARCH or ARCH- as a prefix to the drawing name BC Ministry of Transportation and Infrastructure Page 68
75 20_Working The 20_Working folder contains personal designer folders to create drawings and other data that are not directly required for design model and production drawings and not required for transmittal to Ministry Field Services. 21_Transfer The 21_Transfer folder is for creating drawings and data required by other sub consultants for structural, geotechnical, hydraulic, environmental and other disciplines. Drawings created for transfer to others should contain no references to external data. Creating these standalone drawings is accomplished by binding the AutoCAD external references and promoting the Civil 3D reference objects. These drawings may need to be exported to AutoCAD to reduce Civil 3D objects to AutoCAD entities. Drawings in the 21_Transfer folder are not required for transmittal to Ministry Field Services Production Drawing Folder Contents and Naming Standards Ministry contract drawings are organized in the DrawingProduction folders. Production drawings reference data from design model drawings using AutoCAD external references and Civil 3D data shortcuts. When sharing data between drawings, care should be taken to not duplicate the display of reference object data with external reference data. In no instances, should source engineering data reside in production drawings. Alignment, profile and other labeling should, as much as reasonably possible, be done in final production drawings. Existing sections 1210 through 1260 of Ministry Supplement to TAC are to be referenced for contract drawing production requirements. Production drawing naming standards are referenced from BC Supplement to TAC section Presentation of data on drawings should optimize the clarity of design and construction data, show required information based on modern day construction techniques and align data presentation with what C3D can produce. As with design model drawings, the precise data structure for assembling production drawings is at the discretion of the designer. The number of layouts in each production drawing is also at the discretion of the designer. The following folders are used for final production drawings. 000_CoverKeyplanLegend The 000_CoverKeyplanLegend folder contains the cover, key plan and legend drawings. The ALIGEOMPROF drawing in 02_Geometry folder is referenced with an AutoCAD external reference for the key plan. 100_PlanDrawings The 100_PlanDrawings folder contains the 100 series Plan drawing(s) required for a contract set. Alignments and associated annotations are referenced from the ALIGEOMPROF drawing in the 02_Geometry folder. BC Ministry of Transportation and Infrastructure Page 69
76 The 100PLAN design model drawing in 02_Geometry folder is attached as an AutoCAD external reference to show the required offset geometry. Individual contract drawings can be created as either a single drawing with multiple layouts or multiple drawings with 1 layout each. 100_RW_PropertyAcquisition The 100_RW_PropertyAcquisition folder contains the property acquisition drawings that show the right of way requirements for the project. These drawings shall adopt the same drawing number as their plan counterpart but with a RW suffix to the drawing name. 200_ProfileDrawings The 200_ProfileDrawings folder contains the 200 series profile drawings required for a contract set. Alignments and profiles are referenced with Civil 3D data shortcuts from the ALIGEOMPROF drawing in 02_Geometry folder. All profile geometry and profile view data is annotated in the production drawing. Individual contract drawings can be created as either a single drawing with multiple layouts or multiple drawings with 1 layout each. This drawing can be created using Civil 3D Plan Production Tools from ALIGEOMPROF drawing. 300_TypicalSections The 300_TypicalSections folder contains standalone 300 series drawings showing typical sections for the project. 350_Details The 350_Details folder contains standalone drawings showing construction details such as barrier flare treatments, crash attenuators and berms. 400_GeometricsLaning The 400_GeometricsLaning folder contains the 400 series Geometrics and Laning drawings required for a contract set. The 400GEOMLANE design model drawing in 02_Geometry folder is attached as an AutoCAD external reference to show the required offset geometry and associated annotations. 500_SpotElevations The 500_SpotElevations folder contains the 500 series spot elevation drawings required for a contract set. The 500SPOTELEV drawing in 02_Geometry is externally referenced to show offset alignment geometry. Surfaces in the PRSURF drawing in 04_ProposedSurfaces are referenced with data shortcuts for proposed spot elevation labels. 600_SignagePavementMarkings The 600_SignagePavementMarkings folder contains the 600 series Signage and Pavement Markings production drawings required for a contract set. The SIGNPAVEMARK drawing in 05_SignagePavementMarkings folder is referenced into the production drawing with an external reference. 700_DrainageUtilities The 700_DrainageUtilities folder contains the 700 series drainage and utilities production drawings required for a contract set. Alignment and offset geometry are referenced from 700DrainageUtilities BC Ministry of Transportation and Infrastructure Page 70
77 drawing in 06_Drainage Utilities folder. Pipe networks in design model drawings in 06_DrainageUtilties folder are referenced with data shortcuts for plan and profile pipe and structure annotation. 800_VolumeOverhaul The 800_VolumeOverhaul folder contains the volume overhaul production drawings required for a contract set. 900_GravelQuantityHaulChart The 900_GravelQuantityHaulChart folder contains the gravel quantity haul chart drawings required for a contract set. 1000_DesignSections The 1000_DesignSections folder contains the design section drawings required for a contract set. The sections drawing can be moved from 03Corridors if section views were created in production mode. 1100_Subdisciplines The 1100_Subdisciplines folder contains subfolders for construction staging (drainage, preload and traffic management), electrical and lighting, environmental, geotechnical, landscaping and structural production drawings. These drawings reference design model drawings from the 10_Subdisciplines folders using external references and are not typically required as part of a Ministry roads design package. 2000_Working The 2000_Working folder contains working drawings that are not required for the contract set. This folder and drawings are not required as part of the submission to Ministry Field Services. 2100_Transfer The 2100_Transfer folder contains copies of production drawings required by project partners or sub consultants. These drawings are not required as part of a contract set. This folder and drawings are not required as part of the submission to Ministry Field Services Production Drawing Presentation Format Production drawing format standards are referenced from BC Supplement to TAC section Plan Production Tools Civil 3D Plan Production Tools are useful for automating the creation of plan, profile and section sheets. The use of Plan Production Tools is at the discretion of the designer. For some projects, the production of alignment and profile drawings (100, 200, 400, 500, 600 and 700 series production drawings) can be significantly enhanced with the use of Plan Production Tools. View frames for 200 series Profile production drawings can be created in ALIGEOMPROF drawing. View frames for 100, 100RW, 400, 500, 600 and 700 series drawings are also created in ALIGEOMPROF and referenced into corresponding design model drawings, which are in turn, referenced into production drawings. For projects where design sections are required, Plan Production Tools can significantly increase productivity associated with creating design section sheets (1000 series production drawings). BC Ministry of Transportation and Infrastructure Page 71

78 Drawing Properties Drawing properties are required to be populated for every drawing in the DesignModel and DrawingProduction folders. The following properties should be documented in drawing properties: Drawing title / description Author Creation date Purpose of drawing Drawing template used to create drawing The following illustration shows the drawing properties dialog box populated with information. The drawing properties command is available under Drawing Utilities from the Application Menu Title Blocks and AutoCAD Sheet Set Manager AutoCAD Sheet Set Manager is to be used to organize contract drawings in a contract set. Applicable functionality of sheet set manager includes the following: All drawings in a contract set are accessed from a single interface regardless of their location Drawing can be selectively opened and published in sheet set manager Sheet set manager fields are used to populate title blocks, which means that title block components can be edited prior to plotting without opening drawings The following sheet set manager file is installed with the Ministry Civil 3D technical package. BC_C3D2015_SheetSet_R1.0.dst BC Ministry of Transportation and Infrastructure Page 72
79 The sheet set manager fields referenced by the title blocks are summarized in the following bullets: 1. Sheet Custom Properties a. Drawing Type b. Project Description 1 c. Project Description 2 d. Station Range e. Revision Number f. Designed By g. Designed Data h. Quality Control By i. Quality Control Date j. Quality Assurance By k. Quality Assurance Date l. Drawn By m. Drawn By Date 2. Sheet Set Custom Properties a. Region Name b. Branch Name c. File Number d. Project Number 3. Sheet Set Property a. Drawing Name The project sheet set manager file is to be located in the following folder: \<ProjectName>\DrawingProduction\_SheetSetManagerDST Project Data Structure Summary Document Projects are submitted to the Ministry in accordance with the required design model and production drawing folder structure and file naming conventions. Every file in the folder structure must be required by either the design model or final production drawings. Superfluous or unused files should be removed from the folder list prior to submission. The Project Data Structure Summary document describes the drawing and data relationships among design model and production drawings. These relationships are defined by external references, data shortcuts, survey databases and surface reference files. Use the \ProjectDataStructureSummary folder. Design model and production drawings - reference objects and external references should be identified. For AutoCAD external references the following information is required: Name of source drawing Purpose of the Xref For Civil 3D data shortcuts, the following information is required. Name of the source drawing Name of the data shortcut and reference object Purpose of the reference object BC Ministry of Transportation and Infrastructure Page 73
80 All other relevant information required for design model and final production drawings relating to survey data files and databases (data acquisition and construction), surface reference files, XML files and other files should be thoroughly documented Project Archive Deliverables Quality Control Checklist A completed and signed Civil 3D Project Electronic Deliverables Quality Control Checklist must accompany the Civil 3D Project Data Archive to ensure that the project has been reviewed and that the Terms of Reference requirements have been met. Checklist items refer to specific sections of the Terms of Reference and must be initialled by the project design manager or marked as N/A if the item does not apply to the specific assignment. Civil 3D Project Archive Deliverables Quality Control Checklist Project Name: Project Phase: Design Manager Name: Signature: Date: Drawing and Data File Naming Standards Design Model Drawings Compliant with Naming Standards Production Drawings Compliant with Naming Standards Civil 3D Object, Data Shortcut and Reference Object Naming Standards Surface Names Compliant with Naming Standards Alignment Names Compliant with Naming Standards Profile Names Compliant with Naming Standards Assembly and Subassembly Names Compliant with Naming Standards Corridor Names Compliant with Naming Standards Pipe Network Names Compliant with Naming Standards Data Management Use of Ministry Custom Subassemblies and Ministry Point, Link and Shape Codes Use of Ministry Drawing Template Project Data Structure Description Document Complete Unused Drawings Removed from DesignModel and DrawingProduction Folders Unused Data Shortcuts Removed from Data Shortcut Folders Unused Reference Objects Removed from Design Model and Production Drawings Sheet Set Manager Setup for Production Drawings AutoCAD External References Inserted as Relative Paths Transfer and Working Folders Removed from Archive BC Ministry of Transportation and Infrastructure Page 74
81 Project Data Archive and Deliverable Project data archive preparation should be based on the strict adherence to the project data archive content and naming conventions described in previous sections. The survey project data archive will be kept separate from the design project archives. Only a clean copy of the project survey (survey, mapping, 3DLaser, LiDAR) elements, related survey databases, surfaces and other data representing pre-design existing conditions are to be included in the design project archive files. The preliminary, functional, and detailed design project data archives are required by the Ministry to retain an electronic record of all additional design alternative included in the contract design report. These options will include anything shown to the public, municipal councils and prepared as part of the environmental review process. The construction project data archive containing only the final design is required by the Ministry as a detailed record of the final design and to provide the necessary information for Ministry construction supervision The project data archive is created at the end of each project phase by zipping the project folder structure and assigning the following naming convention: <ProjectName>-Survey.zip (used for design) <ProjectName>-PreliminaryDesign.zip (used for functional design) <ProjectName>-FunctionalDesign.zip (used for detailed design) <ProjectName>-DetailedDesign.zip (used for projects that will be tendered at a future time <ProjectName>-Construction.zip (used for construction) <ProjectName>-ConstructionRev#.zip (used for construction revisions) <ProjectName>-ConstructionRecorded.zip (used for records management) The construction archive containing only the final design is required by the Ministry as a detailed record of the final design and to provide the necessary information for Ministry construction supervision purposes. The construction archive must be cleaned up so that it only contains the final design and related work. All data related to the preliminary iterations or rejected design alternatives must be deleted from the project folders. The designer must complete the following table that identifies the Civil 3D Project Data Archive that is provided with the completed design assignment. Civil 3D Project Archive Deliverables Table Project Name: Project Phase: Design Manager Name: Signature: Date: Rev Civil 3D Project Data Archive File Name Size (MB) (add rows as needed) Date (YYYY-MM-DD) Designer Initials BC Ministry of Transportation and Infrastructure Page 75
82 Project Versioning Methodology Project versioning is a mechanism for capturing and archiving a set of design model and production drawings and supporting files at any specific project stage. Project versioning may be required at the end of the preliminary and functional design phases as well as at the 50% complete, 90% complete, 100% complete detailed design and IFT (Issued for Tender) project phases. Project versioning may also be required for construction revision design updates. Project versioning and archiving is best accomplished by zipping a folder structure at any given point in time and copying the zip file to a secure location. This is also an effective mechanism to archive project data at critical points during the design process beyond what is required by submissions. To revert to any given project archive, maintain the current project folder path and follow these steps: 1. Zip the current project folder structure and move to a secure location 2. Extract the archived project to the same project folder path Project versioning is best accomplished with good folder structures and good naming conventions. The data relationships between drawings and design objects must remain intact throughout the entire project procurement process. Under no circumstances should Civil 3D reference objects be promoted or AutoCAD external references be bound. BC Ministry of Transportation and Infrastructure Page 76
83 Software Customization To facilitate workflows several custom software applications have been developed and incorporated into the Ministry Civil 3D technical package. Help files are available from within the routines themselves. The following routines have been developed: Convert Survey File while this routine offers a wide range of functionality it is most commonly used for converting legacy Ministry MTS survey files to LandXML format, which can then be imported directly to the Civil 3D survey database. Section Surface Editor this routine provides tools for editing ground, stripping, rock and other surfaces in cross section format to ensure that surfaces are properly closed to one another and define the correct end area material type envelopes. Multiple Clipping Boundaries the multiple clipping boundaries command allows for multiple clipping boundaries on external references. This functionality is particularly useful when combining ground and aerial survey data to form an aggregate pre-engineering base plan. Figure Names to Descriptions figures often contain numeric prefixes and or suffixes. This routine removes the numeric prefixes and suffixes and copies the alpha component of the name only to the figure description. When figures representing existing features are projected to section views, the description can be used as the label. Horizontal Geometry Tables the horizontal geometry table provides geometry labeling capability beyond what is available in AutoCAD Civil 3D and labels horizontal geometry data in tables based on Ministry drawing production standards. Automated Assembly Labels the assembly name is important because it i) provides a meaningful indication of where the assembly is applied and ii) is used as the name for corridor regions. The assembly name is shown in the label, which is part of the assembly object, and will automatically update when the assembly name changes. Point Rotation and Scale to SDB Civil 3D point scales and rotation values can be written to and read from the survey database. Subassembly Customization several custom subassemblies have been developed that reference Ministry highway design and subassembly point code naming standards. Help files are available for each of these routines from directly within Civil 3D. BC Ministry of Transportation and Infrastructure Page 77
84 Appendices BLANK PAGE BC Ministry of Transportation and Infrastructure Page 78


85 Appendix - Survey Codes and Civil 3D Description Keys BC Ministry of Transportation and Infrastructure Page 79

86 BC Ministry of Transportation and Infrastructure Page 80

87 BC Ministry of Transportation and Infrastructure Page 81

88 BC Ministry of Transportation and Infrastructure Page 82

89 BC Ministry of Transportation and Infrastructure Page 83

90 BC Ministry of Transportation and Infrastructure Page 84

91 BC Ministry of Transportation and Infrastructure Page 85

92 BC Ministry of Transportation and Infrastructure Page 86

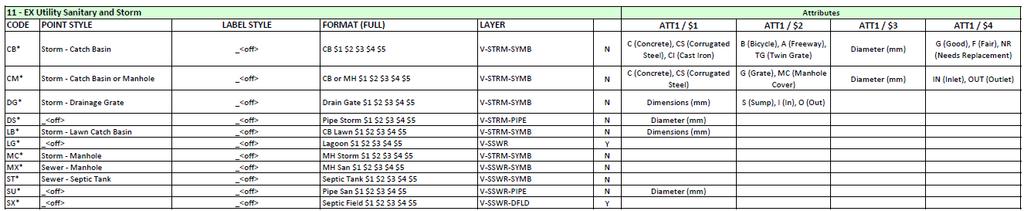
93 BC Ministry of Transportation and Infrastructure Page 87

94 BC Ministry of Transportation and Infrastructure Page 88

95 BC Ministry of Transportation and Infrastructure Page 89

96 Appendix - Survey Figure Prefix Database BC Ministry of Transportation and Infrastructure Page 90

97 BC Ministry of Transportation and Infrastructure Page 91

98 BC Ministry of Transportation and Infrastructure Page 92

99 BC Ministry of Transportation and Infrastructure Page 93

100 BC Ministry of Transportation and Infrastructure Page 94
101 Appendix Subassembly Point, Link and Shape Codes BC Ministry of Transportation and Infrastructure Page 95

102 BC Ministry of Transportation and Infrastructure Page 96
103 Appendix - Project Archive Deliverables Table Civil 3D Project Archive Deliverables Table Project Name: Project Phase: Design Manager Name: Signature: Date: Rev Civil 3D Project Data Archive File Name Size (MB) Date (YYYY-MM-DD) Designer Initials BC Ministry of Transportation and Infrastructure Page 97
104 Appendix - Project Archive Deliverables Quality Control Checklist Civil 3D Project Archive Deliverables Quality Control Checklist Project Name: Project Phase: Design Manager Name: Signature: Date: Drawing and Data File Naming Standards Design Model Drawings Compliant with Naming Standards Production Drawings Compliant with Naming Standards Civil 3D Object, Data Shortcut and Reference Object Naming Standards Surface Names Compliant with Naming Standards Alignment Names Compliant with Naming Standards Profile Names Compliant with Naming Standards Assembly and Subassembly Names Compliant with Naming Standards Corridor Names Compliant with Naming Standards Pipe Network Names Compliant with Naming Standards Data Management Project Data Structure Description Document Complete Use of Ministry Custom Subassemblies and Ministry Point, Link and Shape Codes Use of Ministry Drawing Template Unused Drawings Removed from DesignModel and DrawingProduction Folders Unused Data Shortcuts Removed from Data Shortcut Folders Unused Reference Objects Removed from Design Model and Production Drawings Sheet Set Manager Setup for Production Drawings AutoCAD External References Inserted as Relative Paths Transfer and Working Folders Removed from Archive BC Ministry of Transportation and Infrastructure Page 98
105 Design Model and Production Data Sharing BC Ministry of Transportation and Infrastructure Page 99
106 BC Ministry of Transportation and Infrastructure Page 100
107 BC Ministry of Transportation and Infrastructure Page 101

108 BC Ministry of Transportation and Infrastructure Page 102
Module 10. Assemblies and Corridors. Objectives
 NOTES Module 10 Assemblies and Corridors In this module, you learn to work with assemblies and corridors in AutoCAD Civil 3D. Corridor models are used to represent road designs in Civil 3D. An assembly
Montana Association of Registered Land Surveyors Conference 2013
 AutoCAD CIVIL 3D Survey Features - Field to Finish This session is an introduction to the Civil 3D Survey Tools. We will cover some basics of working with Survey Databases and Automated Linework. We will
Exercise 1: The AutoCAD Civil 3D Environment
 Exercise 1: The AutoCAD Civil 3D Environment AutoCAD Civil 3D Interface Object Base Layer Object Component Layers 1-1 Introduction to Commercial Site Grading Plans AutoCAD Civil 3D Interface AutoCAD Civil
Subdivision Cross Sections and Quantities
 NOTES Module 11 Subdivision Cross Sections and Quantities Quantity calculation and cross section generation are required elements of subdivision design projects. After the design is completed and approved
Create styles that control the display of Civil 3D objects. Copy styles from one drawing to another drawing.
 NOTES Module 03 Settings and Styles In this module, you learn about the various settings and styles that are used in AutoCAD Civil 3D. A strong understanding of these basics leads to more efficient use
PART XII: TOPOGRAPHIC SURVEYS
 PART XII: TOPOGRAPHIC SURVEYS 12.1 Purpose and Scope The purpose of performing topographic surveys is to map a site for the depiction of man-made and natural features that are on, above, or below the surface
CADD & Civil 3D User Guidelines
 THURSTON COUNTY PUBLIC WORKS DEPARTMENT Design and Construction Division CADD & Civil 3D User Guidelines V4.0_06_10_15 1 THURSTON COUNTY PUBLIC WORKS DEPARTMENT DESIGN AND CONSTRUCTION DIVISION CADD &
Designing with BIM for Infrastructure on Large Transportation Projects
 Designing with BIM for Infrastructure on Large Transportation Projects July 19, 2012, 10:00 a.m. Pacific Time Join civil designer Dave DeJong from Stantec as he discusses how BIM for Infrastructure has
RRR Design & Modeling with the FDOT Civil 3D State Kit
 RRR Design & Modeling with the FDOT Civil 3D State Kit Mike Racca - CADD Applications Development Specialist Production Support Office CADD 605 Suwannee St - MS 40, Tallahassee, Florida 32399 Session Objectives:
580 - NOISE BARRIERS OPSS 580 INDEX
 580 - OPSS 580 INDEX 580.1 GENERAL 580.1.1 Noise Barrier Design Elements 580.1.1.1 Wind-Load Designs 580.1.1.2 Sound-Absorptive Barriers 580.1.1.3 Noise Barrier Colour, Pattern and Texture 580.1.2 Grading
Connecting the Dots Is for Kids: Advanced Survey Workflows in Autodesk AutoCAD Civil 3D
 Connecting the Dots Is for Kids: Advanced Survey Workflows in Autodesk AutoCAD Civil 3D Brian Levendowski, PE CAD Technology Center, Inc. CI3217-P Collection and processing of survey data is a crucial
Drawing Management Brain Dump
 Drawing Management Brain Dump Paul McArdle Autodesk, Inc. April 11, 2003 This brain dump is intended to shed some light on the high level design philosophy behind the Drawing Management feature and how
Autodesk Civil 3D Project Management Workflow Using Autodesk Vault
 Autodesk Civil 3D 2007 Autodesk Vault Autodesk Civil 3D 2007 - Project Management Workflow Using Autodesk Vault With Autodesk Vault, the comprehensive data management tool included with Autodesk Civil
Autodesk Advance Steel. Drawing Style Manager s guide
 Autodesk Advance Steel Drawing Style Manager s guide TABLE OF CONTENTS Chapter 1 Introduction... 5 Details and Detail Views... 6 Drawing Styles... 6 Drawing Style Manager... 8 Accessing the Drawing Style
Ohio Department of Transportation Division of Production Management Office of Geotechnical Engineering. Geotechnical Bulletin
 Ohio Department of Transportation Division of Production Management Office of Geotechnical Engineering Geotechnical Bulletin GB 5 GEOTECHNICAL SUBMISSION GUIDELINES Geotechnical Bulletin GB5 was developed
AutoCAD Civil 3D Fundamentals
 AutoCAD Civil 3D Fundamentals Course Length: 4 days The AutoCAD Civil 3D Fundamentals training course is designed for Civil Engineers and Surveyors who want to take advantage of the AutoCAD Civil 3D software
Corridors. To create a corridor you must have an alignment (baseline), a profile (existing or proposed), and an assembly.
, a profile (existing or proposed), and an assembly.") Corridors To create a corridor you must have an alignment (baseline), a profile (existing or proposed), and an assembly. Alignments You have 2 choices in defining an alignment: (1) Alignments > Create
Corridors To create a corridor you must have an alignment (baseline), a profile (existing or proposed), and an assembly. Alignments You have 2 choices in defining an alignment: (1) Alignments > Create
Getting Started Guide
 SOLIDWORKS Getting Started Guide SOLIDWORKS Electrical FIRST Robotics Edition Alexander Ouellet 1/2/2015 Table of Contents INTRODUCTION... 1 What is SOLIDWORKS Electrical?... Error! Bookmark not defined.
Create all plan and profile sheets in the current drawing. Create all plan and profile sheets in individual drawings.
 NOTES Module 18 Roadway Plan Production In this module, you learn how to work with Roadway Plan Production tools in AutoCAD Civil 3D. The Plan Production tools are used to automate the generation of plan
CBCL Limited Sheet Set Manager Tutorial 2013 REV. 02. CBCL Design Management & Best CAD Practices. Our Vision
 CBCL Limited Sheet Set Manager Tutorial CBCL Design Management & Best CAD Practices 2013 REV. 02 Our Vision To be the most respected and successful Atlantic Canada based employeeowned firm, delivering
Inserting and Creating ImagesChapter1:
 Inserting and Creating ImagesChapter1: Chapter 1 In this chapter, you learn to work with raster images, including inserting and managing existing images and creating new ones. By scanning paper drawings
9 LAND SURVEYING. 9.1 General. 9.2 Administrative Requirements Standards Meetings Survey Data Provided to the Design-Builder
 9 LAND SURVEYING 9.1 General The Design-Builder shall conduct all Work necessary to meet the requirements associated with land surveying, including Project and supplemental horizontal and vertical control
DIGITAL DATA SUBMISSION STANDARDS Procedures and Guidelines
 DIGITAL DATA SUBMISSION STANDARDS Procedures and Guidelines 2014 Citizens Wastewater of Westfield - GIS Digital Standards Table of Contents Introduction... 3 Definitions and Terms... 3 Reference Documents...
AutoCAD Civil 3D 2013 South African Country Kit
 AutoCAD Civil 3D 2013 South African Country Kit Contents 1 General... 3 1.1 Introduction from the author and creator... 3 1.2 Overview... 4 2 Drawing Settings... 8 2.1 Edit Drawing Settings... 8 3 Layers...
LD20558-L Parking Lots with AutoCAD Civil 3D Corridors
 LD20558-L Parking Lots with AutoCAD Civil 3D Corridors Steven Hill CAD Manager, Civil Designer / Geosyntec Consultants.NET Application Developer / Red Transit Consultants, LLC Learning Objectives Discover
Existing and Design Profiles
 NOTES Module 09 Existing and Design Profiles In this module, you learn how to work with profiles in AutoCAD Civil 3D. You create and modify profiles and profile views, edit profile geometry, and use styles
A Practical Guide to Carlson Software Fundamentals 2015 Rick Ellis Douglas L. Aaberg, PLS Duke Gardner
 A Practical Guide to Carlson Software Fundamentals 2015 Rick Ellis Douglas L. Aaberg, PLS Duke Gardner A Cadapult Press Publication Copyright Copyright Cadapult Press, Inc. 2015 All rights reserved. No
Tips and Tricks. Matt Kolberg, Technology Consultant. Consulting Training Software
 Tips and Tricks Matt Kolberg, Technology Consultant Consulting Training Software Civil 3D Session Description This 60-minute session will reveal those hidden gems and other undocumented functionality in
Advance Steel. Drawing Style Manager s guide
 Advance Steel Drawing Style Manager s guide TABLE OF CONTENTS Chapter 1 Introduction...7 Details and Detail Views...8 Drawing Styles...8 Drawing Style Manager...9 Accessing the Drawing Style Manager...9
Zooming in on Architectural Desktop Layouts Alexander L. Wood
 December 2-5, 2003 MGM Grand Hotel Las Vegas Alexander L. Wood Code BD41-3L Take advantage of both AutoCAD and Autodesk Architectural Desktop Layout features. We'll look at the basics of setting up AutoCAD
Wholly Sheets, Batman - Plotting in AutoCAD Civil 3D Seth Cohen Advanced Technologies Solutions Inc.
 Seth Cohen Advanced Technologies Solutions Inc. CV637 Are you confused about how to plot all the different views (plan, profile, and cross sections) in AutoCAD Civil 3D software? Then this class is for
Sheet Metal OverviewChapter1:
 Sheet Metal OverviewChapter1: Chapter 1 This chapter describes the terminology, design methods, and fundamental tools used in the design of sheet metal parts. Building upon these foundational elements
Triangulate This! Under the Hood on Surfaces and Grading
 Triangulate This! Under the Hood on Surfaces and Grading Dana Probert, P.E. Autodesk, Inc. CI6640-P This class will teach you the details on how AutoCAD Civil 3D builds surfaces from point clouds, points,
City of Kitchener Infrastructure Services Department Engineering Services Division. CAD Standards for Engineering
 City of Kitchener Infrastructure Services Department Engineering Services Division CAD Standards for Engineering Printed: October 29, 2012 Revision History Revision Description Date Layer revisions. June
A Practical Guide to Carlson Software Fundamentals 2018 Rick Ellis Douglas L. Aaberg, PLS Duke Gardner
 A Practical Guide to Carlson Software Fundamentals 2018 Rick Ellis Douglas L. Aaberg, PLS Duke Gardner A CADapult Press Publication Copyright Copyright CADapult Press, Inc. 2017 All rights reserved. No
AutoCAD Civil 3D 2009 ESSENTIALS
 AutoCAD Civil 3D 2009 ESSENTIALS SDC PUBLICATIONS Schroff Development Corporation www.schroff.com Better Textbooks. Lower Prices. Alignments and Profiles Section 2: Profiles In this section you learn how
A Practical Guide to Carlson Survey 2014
 A Practical Guide to Carlson Survey 2014 Level 1 Rick Ellis A Cadapult Press Publication Copyright Copyright Cadapult Press, Inc. 2014 All rights reserved. No part of this publication may be reproduced
Option 1. Design Options are diverse e.g. new route alignments covering a wide area. Option 2. Design Options are restricted
 MINIMUM STANDARD Z/16 SURVEY SPECIFICATIONS 1. GENERAL This specification sets out the Consultant s requirements for topographical survey (ground and aerial) for the Detailed Business Case (DBC) and Pre-Implementation
Corridors To create a corridor you must have an alignment (baseline), a profile (existing or proposed), and an assembly.
, a profile (existing or proposed), and an assembly.") Corridors 2018-2019 To create a corridor you must have an alignment (baseline), a profile (existing or proposed), and an assembly. Alignments You have 2 choices in defining an alignment from scratch: (1)
Corridors 2018-2019 To create a corridor you must have an alignment (baseline), a profile (existing or proposed), and an assembly. Alignments You have 2 choices in defining an alignment from scratch: (1)
State of Florida Department of Transportation. FDOT Traffic Plans. Signing & Pavement Markings (CE ) Signalization (CE ) Lighting
 Signalization (CE ) Lighting") State of Florida Department of Transportation FDOT Traffic Plans Signing & Pavement Markings (CE-11-0117) Signalization (CE-11-0119) Lighting (CE-11-0118) User Training Manual October 2017 PRODUCTION SUPPORT
State of Florida Department of Transportation FDOT Traffic Plans Signing & Pavement Markings (CE-11-0117) Signalization (CE-11-0119) Lighting (CE-11-0118) User Training Manual October 2017 PRODUCTION SUPPORT
CSI: CAD Standards Implementation
 CSI: CAD Standards Implementation Sam Lucido Haley and Aldrich, Inc. IT15277 Did you know that AutoCAD has a CAD Standards Manager? Yes, there is a panel on the Ribbon under the manage tab where you can
Type A. BWSC CAD Standards for Site Plans (Design and As-Built) Format. Scale. Fonts, Linetypes, Shapes
 Format. Scale. Fonts, Linetypes, Shapes") BWSC CAD Standards for Site Plans (Design and As-Built) Type A The following CAD standards are for Type A application and involve no work in Public Street, except for connection(s) to the Boston Water
BWSC CAD Standards for Site Plans (Design and As-Built) Type A The following CAD standards are for Type A application and involve no work in Public Street, except for connection(s) to the Boston Water
Mastering AutoCAD 2D
 Course description: Mastering AutoCAD 2D Design and shape the world around you with the powerful, flexible features found in AutoCAD software, one of the world s leading 2D design applications. With robust
Civil Product Update. Derricke Gray, Product Manager Bentley Civil Americas
 Civil Product Update Derricke Gray, Product Manager Bentley Civil Americas 1 WWW.BENTLEY.COM 2016 Bentley Systems, Incorporated 2016 Bentley Systems, Incorporated Agenda Civil Update o Where we are at
USACE Training: User Reference Guide V2
 USACE Training: User Reference Guide V2 Copyright 2017 Advanced Solutions, Inc. All Rights Reserved March 6, 2018 1 Advanced Solutions, Inc. USACE Training Prepared and Produced by: Advanced Solutions,
Automated Machine Guidance
 Design Manual Chapter 5 - Roadway Design 5H - Automated Machine Guidance 5H-1 Automated Machine Guidance A. Concept Automated machine guidance (AMG) for grading is a process in which grading equipment,
How to Design and Submit a DOT Project with Civil 3D
 11/30/2006-5:00 pm - 6:30 pm Room:San Polo - 3503 (ISD Campus) How to Design and Submit a DOT Project with Civil 3D Seth Cohen - ProSoft NET CV35-2 This lab will delve into the workflows and processes
Any student may retake any class at any time and for any reason without additional charge.
 1 ENVISIONCAD ABOUT US Guaranteed Training 1 ENVISIONCAD ABOUT US EnvisionCAD is a provider of training solutions for MicroStation and select InRoads products. We also use our expertise to assist organizations
COPYRIGHTED MATERIAL. The Interface
 Chapter 1 The Basics If you want to be a master in anything, you have to start with the basics. Since the Autodesk AutoCAD Civil 3D platform has evolved so much over the years, now more than ever you have
Optimizing Digital Drawing Files and BIM Models for Measurement and Estimating
 Optimizing Digital Drawing Files and BIM Models for Measurement and Estimating Simon Lovegrove MRICS, AAIQS - Exactal CM4228 Drawing file formats issued for measurement and estimating purposes range from
Section 4: Ontario Realty Corporation CAD Standards and Guidelines
 Section 4: Ontario Realty Corporation CAD Standards and Guidelines Ontario Realty Corporation 11 th Floor, Ferguson Block 77 Wellesley Street West Queen s Park Toronto, ON, M7A 2G3 August 10, 2007 Version
Release Notes - Fixes in Tekla Structures 2016i SP1
 Release Notes - Fixes in Tekla Structures 2016i SP1 is modified., the ID of the connection plate is not changed anymore when the connection now uses normal rebar groups instead of tapered groups., the
Design of Roundabouts using Corridor Models (Part 1 of 2)
") AUTODESK CIVIL3D Design of Roundabouts using Corridor Models (Part 1 of 2) Dynamic vertical modeling By Jack Strongitharm Civil 3D Technical Sales Manager UK and Ireland jack.strongitharm@autodesk.com
AUTODESK CIVIL3D Design of Roundabouts using Corridor Models (Part 1 of 2) Dynamic vertical modeling By Jack Strongitharm Civil 3D Technical Sales Manager UK and Ireland jack.strongitharm@autodesk.com
Appendix to Chapter 1 Release 3
 Appendix to Chapter 1 Release 3 Introduction to AutoCAD Architectural Desktop Release 3 Enhancements to AutoCAD Architectural Desktop Release 3 include changes in the content of the menu bar, toolbars,
Full Contents. InRoads Essentials
 Section 1: Overview Essentials 1.1 Introduction... 3 Learning InRoads... 3 Basic Rules... 3 How to Use This Guide... 4 Section Breakdown... 5 Section 1: Overview Essentials... 5 Section 2: Production Essentials...
What is a Survey? The site plan is usually based on an professional land survey.
 Site Plan: Illustrates the existing natural and built features of a site and describes proposed construction in relation to the existing features. The site plan is essential for studying the influence
B.2 MAJOR SUBDIVISION PRELIMINARY PLAN CHECKLIST
 B.2 MAJOR SUBDIVISION PRELIMINARY PLAN CHECKLIST YES* GENERAL SUBMISSION ITEMS Does the submission include: 1. Thirteen (13) copies of completed Application Form? 2. Thirteen (13) copies of the Preliminary
Advanced Topics Using the Sheet Set Manager in AutoCAD
 Advanced Topics Using the Sheet Set Manager in AutoCAD Sam Lucido Haley and Aldrich, Inc. GEN15297 Do you still open drawings one at a time? Do you print drawings one at a time? Do you update the index
Release Notes - Fixes in Tekla Structures 2016i PR1
 Release Notes - Fixes in Tekla Structures 2016i PR1, you can now set the to either or. is modified., the ID of the connection plate is not changed anymore when the connection now uses normal rebar groups
CHAPTER 11 SURVEY CADD
 CHAPTER 11 SURVEY CADD Chapter Contents Sec. 11.01 Sec. 11.02 Sec. 11.03 Sec. 11.04 Sec. 11.05 Sec. 11.06 Sec. 11.07 Sec. 11.08 Sec. 11.09 Sec. 11.10 General Description of Survey File Contents of Survey
CAD STANDARDS & DRAWING RECORD REQUIREMENTS
 CAD STANDARDS & DRAWING RECORD REQUIREMENTS Version 3.0 City of Coquitlam * Engineering & Public Works * September 2016 3000 Guildford Way, Coquitlam, British Columbia V3B 7N2 File #: 11-5220-02/000/2
Detail Design For Pavement Rehabilitation on Trunk Highway 14 From Tracy to Revere
 Detail Design For Pavement Rehabilitation on Trunk Highway 14 From Tracy to Revere Section 1 Introduction and Intersection Information State Project (SP) 6401-37 on MN Highway 14 SP 6401-37 is a Bituminous
AUTOCAD CIVIL 3D 2016
 SMALL SCALE AND MICRO IRRIGATION SUPPORT PROJECT Training Manual on AUTOCAD CIVIL 3D 2016 for irrigation professionals SMIS RPMU, Hawassa January 25-30/2017 (Prepared by Abdo Kedir) CONTENTS 1 CIVIL 3D
1: INTRODUCTION TO AUTOCAD
 AutoCAD syllabus 1: INTRODUCTION TO AUTOCAD Starting AutoCAD AutoCAD Screen Components Drawing Area Command Window Navigation bar Status bar Invoking Commands in AutoCAD Keyboard Ribbon Application Menu
Revit Structure 2012 Basics:
 SUPPLEMENTAL FILES ON CD Revit Structure 2012 Basics: Framing and Documentation Elise Moss autodesk authorized publisher SDC PUBLICATIONS www.sdcpublications.com Schroff Development Corporation Structural
It is expected that this standard will evolve over time; however the use of this standard should remain consistent within individual projects.
 1.0 Introduction A computer aided design (CAD) procedure is necessary to ensure that drawings produced by and for the University are readable, understandable, of a consistent standard, and, where necessary,
COPYRIGHTED MATERIAL. Welcome to the Civil 3D Environment
 Welcome to the Civil 3D Environment Chapter 1 To paraphrase, Civil 3D isn t your father s AutoCAD. If you re just getting into the Civil 3D environment, want to learn how to get around in models, and would
Survey Data and TOPO Checklist
 Checklists Survey Data and TOPO Preliminary Plan Field Review Plans o Field Review Erosion Control Right-of-Way and Utility Meeting Plans Final Plan Field Review Plans Methods of Plan Markups Plan-in-Hand
GEOPAK V8i SELECTseries 1, Road 2
 GEOPAK V8i SELECTseries 1, Road 2 Ohio Department of Transportation October, 2012 Ohio Department of Transportation GEOPAK Road Training Guide for MicroStation V8i SELECTseries 1, October, 2012 The information
Minimum Drawing & Electronic Submittal Requirements For Record Drawings /As-Builts
 Minimum Drawing & Electronic Submittal Requirements For Record Drawings /As-Builts PUBLIC WORKS ENGINEERING DEPARTMENT Revised: February 1, 2017 MINIMUM DRAWING REQUIREMENTS A. GENERAL PLAN REQUIREMENTS:
SANITARY SEWER SYSTEM ADMINISTRATIVE STANDARDS A.1 SANITARY SEWER SYSTEM PLAN SUBMITTAL PROCEDURES AND GENERAL REQUIREMENTS
 SANITARY SEWER SYSTEM ADMINISTRATIVE STANDARDS A.1 SANITARY SEWER SYSTEM PLAN SUBMITTAL PROCEDURES AND GENERAL REQUIREMENTS All plans for sanitary sewer main extensions, improvements and modifications
Chapter 6 Title Blocks
 Chapter 6 Title Blocks In previous exercises, every drawing started by creating a number of layers. This is time consuming and unnecessary. In this exercise, we will start a drawing by defining layers
Work Type Definition and Submittal Requirements Work Type: Subsurface Utility Engineering (SUE)
") MUST be qualified under Minnesota Department of Transportation Prequalification Program - Work Type 15.1 Subsurface Utility Engineering The first section, Work Type Definition, provides a detailed explanation
MUST be qualified under Minnesota Department of Transportation Prequalification Program - Work Type 15.1 Subsurface Utility Engineering The first section, Work Type Definition, provides a detailed explanation
Ohio Department of Transportation, VBA Documentation
 Contents 1.1 Current Versions... 2 1.2 Overview... 3 1.3 Supporting Files and Standards... 4 1.3.1 ODOT_Drainage.cel... 4 1.3.2 ODOT2013.ddb... 5 1.4 ODOT_StormSewerPlan2013.mvba... 6 1.4.1 Mode: Place
BIM. e Submission Guideline Structural. Annex 1a. Recommended Process Revit 2010
 BIM e Submission Guideline Structural Annex 1a Recommended Process Revit 2010 Building and Construction Authority 5 Maxwell Road #16-00 Tower Block MND Complex Singapore 069110 www.bca.gov.sg Revision
Moving to Model-Based Design
 Infrastructure Solutions White Paper Moving to Model-Based Design Choosing Between 2D and 3D Do you really have to choose between 2D and 3D? The answer is no, but it is important to know why. Over the
Sheet Metal OverviewChapter1:
 Sheet Metal OverviewChapter1: Chapter 1 This chapter describes the terminology, design methods, and fundamental tools used in the design of sheet metal parts. Building upon these foundational elements
MODEL SETUP FOR RENOVATION PROJECTS INSTRUCTIONS AND TUTORIALS
 MODEL SETUP FOR RENOVATION PROJECTS INSTRUCTIONS AND TUTORIALS WHAT S INSIDE INTRODUCTION 1 PART ONE LAYERS AND CLASSES FOR RENOVATION PROJECT 1 OVERVIEW 1 SETTING UP LAYERS AND CLASSES 1 CREATING OBJECT
Suveying Lectures for CE 498
 Suveying Lectures for CE 498 SURVEYING CLASSIFICATIONS Surveying work can be classified as follows: 1- Preliminary Surveying In this surveying the detailed data are collected by determining its locations
Working With AutoCAD and QCAD Terminology and Functionality Prepared By David Robb Last Updated: 23/09/2002
 Introduction Working With AutoCAD and QCAD Terminology QCAD is QA Software s Drawing Upload Utility for use with AutoCAD and QA Software s project collaboration system Teambinder. The purpose of this document
MODEL SETUP FOR RENOVATION PROJECTS: INSTRUCTIONS AND TUTORIALS
 MODEL SETUP FOR RENOVATION PROJECTS: INSTRUCTIONS AND TUTORIALS TABLE OF CONTENTS INTRODUCTION 1 PART ONE LAYERS AND CLASSES FOR RENOVATION PROJECT 2 OVERVIEW 2 SETTING UP LAYERS AND CLASSES 2 CREATING
Mastering. AutoCAD Sheet Sets THE COVER. An Expert Guide
 Mastering THE COVER Qui volore imagnihillit que la nimolora vellorendemporaecab imperit harum que dolor mint faccabori inveles et fugitibus dioris maiones. AutoCAD Sheet Sets An Expert Guide Contents Introduction
Best Practices For Consultants
 Best Practices For Consultants Electronic Submission of Engineering Drawings Last Updated June 2015 Table of Contents 1.0 Overview... 1 2.0 Technical Requirements... 2 2.1 Browser... 2 2.2 Pop-Up Blockers...
Autodesk Inventor Drawing Manager Tips & Tricks
 Alessandro Gasso Autodesk, Inc. MA1280 This class covers several workflows that answer the most common questions from the Inventor users about the Drawing Manager. You will learn how to add the scale value
036-ShopDrawings hsbinoutput/shop Drawings
 1 FUNCTION The function of this document is to provide information on how to use the shop drawings (hsbinoutput\shop drawings) in hsb2009+. In hsbcad you have Element drawings that can be generated automatically
DRAFT Solid Edge ST4 Update Training Draft
 DRAFT Solid Edge ST4 Update Training Draft Presented by: Steve Webb Topics Parts List Table Titles Column Headers Headers Merging Header Rotate Cell Aspect Ratio Cell Formatting Overriding Disabled Cells
SPECIFICATIONS FOR NEW UNDERGROUND RESIDENTIAL DISTRIBUTION SYSTEMS
 Page: 4-1 4.0 URD Process and Documentation Requirements 4.1 Process Steps The process of developing underground distribution facilities in a residential area consists of 10 major steps, which are summarized
Designing in the context of an assembly
 SIEMENS Designing in the context of an assembly spse01670 Proprietary and restricted rights notice This software and related documentation are proprietary to Siemens Product Lifecycle Management Software
Full Contents. Survey V8.08 Essentials
 Section 1: Overview Essentials 1.1 Introduction... 3 Learning InRoads Survey... 3 Basic Rules... 3 How to Use This Guide... 4 Section Breakdown... 5 Section 1: Overview Essentials... 5 Section 2: Production
TABLE OF CONTENTS 1200 PLAN PREPARATION
 1200 PLAN PREPARATION TABLE OF CONTENTS PAGE 1201 General Plan Sheet Information... 12-1 1201.1 Introduction... 12-1 1201.2 Unit of Measure... 12-1 1201.3 Plan Sheet Materials and File Format... 12-1 1201.4
User Guide US AUS Avontus Software Corporation. All Rights Reserved
 User Guide Scaffold Designer is a simple but powerful scaffold drawing tool that allows the design of scaffold structures of any complexity and generates a bill of materials automatically. This guide covers
To apply proposed roadway data (vertical alignments, cross section template data, cut/fill slopes, etc.)
") That CAD Girl J ennifer dib ona Website: www.thatcadgirl.com Email: thatcadgirl@aol.com Phone: (919) 417-8351 Fax: (919) 573-0351 Roadway Design Extracting Existing Ground Cross Sections This document
That CAD Girl J ennifer dib ona Website: www.thatcadgirl.com Email: thatcadgirl@aol.com Phone: (919) 417-8351 Fax: (919) 573-0351 Roadway Design Extracting Existing Ground Cross Sections This document
Technology Accreditation Canada (TAC) SURVEY/GEOMATICS TECHNOLOGY TECHNOLOGIST Canadian Technology Accreditation Criteria (CTAC)
 SURVEY/GEOMATICS TECHNOLOGY TECHNOLOGIST Canadian Technology Accreditation Criteria (CTAC)") Technology Accreditation Canada (TAC) SURVEY/GEOMATICS TECHNOLOGY TECHNOLOGIST Canadian Technology Accreditation Criteria (CTAC) Preamble These CTAC are applicable to programs having titles involving Survey/Geomatics
Technology Accreditation Canada (TAC) SURVEY/GEOMATICS TECHNOLOGY TECHNOLOGIST Canadian Technology Accreditation Criteria (CTAC) Preamble These CTAC are applicable to programs having titles involving Survey/Geomatics
Full Contents. Essentials, Workbook
 Section 1: Overview Essentials 1.1 Introduction... 3 Learning InRoads... 3 Basic Rules... 3 How to Use This Guide... 4 Section Breakdown... 5 Section 1: Overview Essentials... 5 Section 2: Production Essentials...
Creo Parametric 2.0: Introduction to Solid Modeling. Creo Parametric 2.0: Introduction to Solid Modeling
 Creo Parametric 2.0: Introduction to Solid Modeling 1 2 Part 1 Class Files... xiii Chapter 1 Introduction to Creo Parametric... 1-1 1.1 Solid Modeling... 1-4 1.2 Creo Parametric Fundamentals... 1-6 Feature-Based...
Using Dynamic Views. Module Overview. Module Prerequisites. Module Objectives
 Using Dynamic Views Module Overview The term dynamic views refers to a method of composing drawings that is a new approach to managing projects. Dynamic views can help you to: automate sheet creation;
Revit Structure 2014 Basics
 Revit Structure 2014 Basics Framing and Documentation Elise Moss Authorized Author SDC P U B L I C AT I O N S Better Textbooks. Lower Prices. www.sdcpublications.com Powered by TCPDF (www.tcpdf.org) Visit
Up to Cruising Speed with Autodesk Inventor (Part 1)
") 11/29/2005-8:00 am - 11:30 am Room:Swan 1 (Swan) Walt Disney World Swan and Dolphin Resort Orlando, Florida Up to Cruising Speed with Autodesk Inventor (Part 1) Neil Munro - C-Cubed Technologies Ltd. and
11/29/2005-8:00 am - 11:30 am Room:Swan 1 (Swan) Walt Disney World Swan and Dolphin Resort Orlando, Florida Up to Cruising Speed with Autodesk Inventor (Part 1) Neil Munro - C-Cubed Technologies Ltd. and
Washington County Road Engineering Plan Submittal/Review Checklist
 Washington County Road Engineering Plan Submittal/Review Checklist Washington County Land Use Case File Number: Parcel(s): Developer/Owner Name(s): Developer/Owner E-mail(s): The following elements should
Virtual components in assemblies
 Virtual components in assemblies Publication Number spse01690 Virtual components in assemblies Publication Number spse01690 Proprietary and restricted rights notice This software and related documentation