VCS SKETCH User Group Meeting
|
|
|
- Peter Lane
- 6 years ago
- Views:
Transcription
1 VCS SKETCH 2009 User Group Meeting From Field To Finished in CAMAvision
 this indicates the number of sketches on the parcel.")

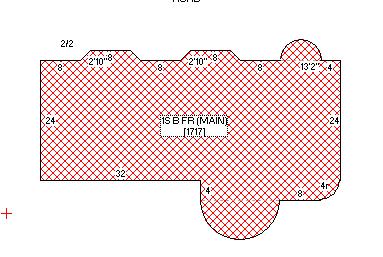
2 Accessing Sketch in Parcel Maintenance To get started with Sketch open CAMAvision enter Parcel Maintenance and load the parcel you re going to sketch. Now click on the Sketch button to enter the sketch program. If there is a number in the text of the button (e.g., Sketch [2] ) this indicates the number of sketches on the parcel. Adding a New Sketch Screen If you re dealing with a new parcel or a parcel without a current sketch the canvas will be blank. To start sketching we have to open a new sketch canvas, to do that click on the icon that looks like a blank sheet of paper. Adding a Sketch Object To start sketching an object, choose the add a general object icon from the tool sketching tool bar as shown to the left. The keyboard shortcut is <Ctrl>+<O>. After clicking on the new object icon the Define New Sketch Item window opens. From here we can Name and place the new object on the canvas. 2


3 After naming the object, for this example we re using 1S B FR (MAIN), click OK at the bottom left of the window. TIP: The Instant Object tab has many predefined shapes. Simply select the shape, enter a couple of dimension length, and let sketch do the rest. It is ideal if all you are drawing is a box, or rectangle, and makes short work of drawing gazebos. Basic Drawing After clicking OK the drawing toolbar becomes active. Choose which style of line you re going to draw. We re going to start with a Horz/Vert Line. 3
4 Press the button indicated on the toolbar or use the keyboard short-cut <Ctrl>+<L>. *Also notice at the bottom of the screen step by step directions are prompting you. At this point we re being prompted to enter a Length of the line we wish to draw. Type the desired Length. I m using 24 in this example. TIP: Lengths and diameters are always measured in feet. Fractions of a foot are entered as a decimal. Here is a conversion chart of decimal to inches. Decimal to Inches = 1 inch = 2 inches = 3 inches = 4 inches = 5 inches = 6 inches = 7 inches = 8 inches = 9 inches = 10 inches = 11 inches Example: To enter 24 6 you would type:


5 On the canvas you ll notice a + symbol. This is the starting point of your sketch. To draw horizontal and vertical lines, press one of the four arrow keys on your keyboard after typing in the length. So, I ll enter 24 in the Length field then immediately press the up arrow key to insert a 24 foot vertical line on my canvas. 5
6 Now to draw a line going to the right enter a number in the Length field (I ll use 8) then press the right arrow key. This will make the line as shown below. At this point I m going to draw an angle. There are a few ways to do this. I ll start with the Free Ended Line key on the drawing tool bar. This icon is located just to the right of the Horz/Vert key. The keyboard shortcut is <Ctrl>+<F>. A free-ended line will draw in all directions: up, down, left, right and will only be anchored when you press <Enter>. Until the line is anchored, you can repeatedly type in a length and press a direction key and the line will change. Free-ended drawing combines the capabilities of the simple horizontal/vertical drawing mode and diagonal drawing. It can even be used in place of these two other drawing modes. 6

7 In the above example I entered a 2 in my Length field then used the up arrow, I then entered a 2 in the Length field again but used the right arrow to make a 2 10 diagonal line. The line is anchored by pressing <Enter>. The other way to draw a diagonal line is to use the Radial Line tool on the toolbar. This is located just to the right of the Free Ended Line icon. The keyboard shortcut is <Ctrl>+<R>. You ll notice now we re being prompted to enter Degrees. In order to use this tool you must know what degree the angle is and how long the line is. This degree diagram can be used to determine how an angled line will be drawn in Sketch. In order to draw a diagonal line going back towards the house I find that the angle is 135 and type that into the toolbar and press the <Enter> key. At this point you re prompted to enter the Length. In this case it s In order to draw the line 2 10 long you must convert the 10 to a percentage. 10 inches divided by 12 inches is 83% so the number I ll be entering into the tool bar is 2.83 for the length. Refer to the tip on decimal inches (above). Now I have a diagonal line 2 10 long going back towards the base of my dwelling. 7

8 As you can see the sketch can become crowded with dimension labels as we draw our object. In order to remove these unneeded or unwanted labels press the <Delete> key on your computer s keyboard. Once will turn the label off, pressing it again will turn the dimension label back on. One more way to draw a diagonal line is to use the Diagonal Line tool on the tool bar, located to the right of the Radial Line tool. The keyboard shortcut is <Ctrl>+<D>. This tool behaves similar to the Free Ended line tool. First you must enter the Length then press an arrow key to move to the first pivot point. For example, enter 2 and use the up arrow then enter 2 and use the right arrow making a 2 10 diagonal line. As you can see, it behaves just like the Free Ended line tool. But unlike the Free Ended line, you can only enter two lines for the Diagonal Line tool. 8
9 The next tool is the Three Point Arc which is located to the right of the Diagonal Line tool on the toolbar. Arcs are among the most challenging lines to draw, but the Three Point Arc makes it a breeze. The keyboard shortcut is <Ctrl>+<A>. The first step is to use the arrow keys to move to the ending point of the arc. At this point you position the cursor point similar to the Free Ended line: typing in Lengths and pressing the arrow keys to move the cursor. You can move the cursor in any direction at one-inch intervals or type in a Length and then press an arrow key to draw a straight line. The end point is committed when <Enter> is pressed. Note: This imaginary line you are drawing is the cord length of the arc. In this instance the length from one side of the arc to the other happens to also be the 8 foot diameter of an imaginary full circle. I m going to type 8 into the Length field and press the right arrow key, then press <Enter> to begin sizing the arc. This gives me a line that is 8 long on my sketch. 9
 and then pressing an arrow key will adjust the arc faster. <Spacebar> inverts the arc. Press <Enter> to commit to the end of this Three Point Arc.")
10 The second step is to use the arrow keys adjust the diameter of the arc (if you image it as a piece of full circle) by pressing the arrow keys. Typing a small number (typically 1-10) and then pressing an arrow key will adjust the arc faster. <Spacebar> inverts the arc. Press <Enter> to commit to the end of this Three Point Arc. TIP: If your sketch has only one arc, try to plan so your arc is the last line to be drawn. This saves you time since you can forgo all of step one (above) by simply pressing the <Home> key. This will simultaneously close the sketch and get to the end-point of the arc. The next tool on the toolbar is the Simple Radius Arc located to the right of the Three Point Arc button. The keyboard shortcut is <Ctrl>+<S>. This tool allows the user to make quick quarter arcs. First type the radius length, then press a key <A>.<D> for clockwise quarter-arcs, <E>.<H> for counter-clockwise quarter arcs (see the sketch cheat sheet), the <Spacebar> inverts the arc and <Insert> toggles on/off the radius line. 10
11 In this example the radius is 4 and I want the quarter arc to arc to the bottom and to the left of my object. Therefore I m going to type 4 in the tool bar and then press the B key on my keyboard to make the following arc. The last drawing tool on my tool bar is the Half Circle. It is located to the right of the Simple Arc tool. The keyboard shortcut is <Ctrl>+<C>. First type the diameter length, then press an arrow key to draw the half-circle. <Spacebar> inverts the arc. For the example below I entered 16 in for the Diameter, pressed my left arrow key and pressed the space bar once. Another handy tool in the sketch program is the ability to close an object without knowing a dimension. In order to do this you can press the <Home> key on your keyboard. This will take you immediately from the point you are at back to the home (starting) point of the object. 11
12 If you are drawing rectangles or square objects, you can save even more time and press <Ctrl>+<Home> and have sketch draw two of the four sides for you. Home After getting back to the home position, press <Enter> once to position the dimension of the last line, then Click <OK> to confirm the position of the caption/text and <Enter> again to position the caption of the object and finally <Enter> one last time to confirm the position of the entire object. Adding a New Note Object To add Text to a sketch, press the icon of an A. Text labels can be up to 255 characters in length and even word-wrap. The keyboard shortcut is <Ctrl>+<N>. After clicking on that icon the Define New Sketch Item window appears. 12

13 From here you can type the text of the note you wish to appear on the sketch then click OK. Once the note appears, use the arrow keys to position it on the sketch. Don t worry if you need to edit the text of note after the fact. You can do it later with the Edit Name Object dialog. 13
14 Moving an Object The behavior of the mouse while you are not drawing can be divided into three modes: Selection, Object Moving, and Label Moving. Which mode the mouse is in can be easily determined by seeing which of the following buttons is pressed on the toolbar. Here the mouse cursor mode is for moving objects. Clicking the label of an object while pressing and holding the left-mouse button will let you move the object as you move your mouse. You can quickly toggle between the three modes by pressing <Ctrl>+<Space>. Moving a Label Similar to the Object Moving, is the Label Moving mode. When in this mode, clicking an object s label and holding the left-mouse button will let you move just the label of the object. Note objects are special in that they are both an object and just a note. You can move these types of objects around using either the Move Object or Move Label mode. Tip: It s possible to multi-select objects for moving all at once. While holding the <Shift> key down while clicking each object label, it s possible to select several objects to move together as a group. Line Styles, Line Colors and Fill Patterns To emphasize an object, or perhaps indicate special walls the user may want to change the color of an object s lines or even the line style. To make the Line Colors toolbar appear click on Edit in the Main Menu and choose Line Colors at the bottom of the list. The keyboard shortcut is <F9>. 14


15 The following toolbar will appear: To change the line colors choose an object then change the color. To change a lines appearance choose the object then change from Solid to Dot, Dash and so on. To change the width of a line choose the object and adjust the Width by clicking on the up or down arrow to the right of the Width field. The user can also fill the object by choosing a type of fill and the color. 15


16 To create the following look 16

17 Editing Object Labels and Notes You can also edit the labels of object. Enlarge or change the font, or even add some color to an object s label or to a Note. To access the label properties screen press the pencil icon next to the current object or press the keyboard shortcut <F5>. On the Main toolbar. This will open the Edit Name Object dialog: Edit the label text. Add border sides around the label. Adjust the font, size and color. 17
 only True Type fonts, or those with TT next to the font name, can be rotated.")
18 In this example I have colored, enlarged a font and rotated a text label to indicate a road. There are a couple rules that must be followed regarding rotated labels: 1) only True Type fonts, or those with TT next to the font name, can be rotated. 2) Rotated labels can only be one line word wrapped labels will not rotate. Trying to rotate a wrapped label will cause it to reformat to one line. TIP: Care should be taken if you switch fonts. Many other programs, such as Microsoft Office or ESRI ArcGIS, may install additional fonts on your computer that others in your office do not have. Sketch will simply default the font if a sketch with an unknown font is loaded, but for consistency try to stick with only the standard Windows fonts. Keep in mind this could also affect sketches processed for your websites, too. 18

19 Leader-Lines for Labels Sometimes the description label of an object cannot fit within the object so you have to position it outside. Adding a Leader-Line to the label pointing it back to the object its referring can ensure your sketches are clear. Leader-Lines can be activated and from within the Edit Name Object dialog. Tip: Adding a leader-line to a simple label can be used to indicate a roadway. 19

20 Centering and Rotation Sketch has the tools to let you quickly center or rotate an entire sketch. To center an entire sketch, simply press the Center button located on the toolbar. The rotate feature has you first selecting one or more objects to rotate. You can select any number of objects on screen to rotate even the entire sketch if you want. Select the object whose origin point (the point you started drawing the object) you want to rotate around, and then either use the mouse or arrow keys to move the rotation slider bar. TIP: If you need to add a rotated patio, deck, garage or some other object, it s easier to first draw it using straight lines and then rotate it into place. This saves you time. TIP: Description labels do not rotate with the Rotation dialog. Instead rotate labels from within the Edit Name Object dialog. Dimension labels never rotate. 20

21 Dimension Lines and Vertical Markers Dimension Lines are simple measurement objects that can be used to indicate distance between objects, height or length whatever you need. In this example, I added a horizontal measurement line and then rotated it 45. Vertical Markers are objects that you can add to a sketch to clarify and indicate the number of floors of an object. The Verticals editor has several options that let you tailor the look of the object. A typical use for the Vertical Marker would be when drawing a multi-level commercial structure and you want to indicate the height. 21

22 Linking an Object to Pricing Linking is the action of associating the calculated area of a sketch object to a partition of the structure pricing. Any sketch object with an area can be linked to the pricing portion of parcel. Currently you are able to link a sketch to the Residential main area, basement finish, porch areas, deck areas, veneer perimeter, addition areas, and garage areas. For commercial structures you can link the description label itself, as well as the main area, basement area and perimeter. So why link? One reason is because it makes it easier on you and your staff if areas change and you need to update both sketch and pricing. For example, if the Main area on a sketch changes and its area is linked to the pricing you can update the sketch and be assured the new area will be updated in the pricing. In other words it saves you time since you only have to edit the area by changing the sketch. It also improves the accuracy of your data because the SF your are pricing matches exactly what your sketch says. 22
 can be displayed next to each object that is")
23 On the pricing side, you can tell an area is linked by the dark border around the area field. On the sketch, a little link indicator (a in the example above) can be displayed next to each object that is linked to pricing. 23

24 Linking By Example The typical way to begin linking is to start on the sketch. In this example we will be linking the main area of the sketch to the pricing. First select the object to be linked then press the Link button on the toolbar. Alternatively you could select the object and press <Ctrl>+<L>. The sketch screen will immediately minimize 1 allowing you to look access the pricing screens. 1 If you a multiple monitors you can have both the parcel maintenance and sketch screens up at the same time on the different monitors. Sketch will not minimize if its on the other screen. 24


25 The cursor will change to a figure pointer. Click on the Main Area SF field and you will get a linking confirmation message. Press Yes to confirm the link. And then the outline around the data entry field will change. 25
26 Object Naming Guide The following is a suggested guide for naming your sketch objects. These are the same procedures used by Vanguard Appraisals, Inc. for reappraisal and data entry projects. Main Areas: 1S (Main) 1S B (Main) 1S A (Main) 1S B A (Main) 1S B S/F(Main) 1S B S/L(Main) 1S "A" (Main) 1S B "A" (Main) 1 1/2S (Main) 1 1/2S B (Main) 1 1/2S A (Main) 1 1/2S B A (Main) 2S (Main) MFD HOME (i.e., Mobile Home) 2S B (Main) 2S A (Main) 2S B A (Main) Addition Areas: 1S 1S B 1S A 1S B A 2S 2S B 2S A 2S B A 1 1/2 S 1S GREAT RM 1 1/2S B 1S B GREAT RM 1S STL/GLASS SOLAR RM All of the above blanks ( ) may be filled in with one of the following types of construction: FR CONC EARTH BRK STUCCO LOG STN PERMASTN C BLK BERMED Porches: 1S OP 2S OP 1S 3 S PORCH 1S EP 2S EP 2S 3 S PORCH 1S SCRNP 2S SCRNP 1S E BRZY 1S O BRZY All of the above blanks ( ) may be filled in with one of the following types of construction: FR C BLK LOG PERMASTN BRK STUCCO STN 26
27 Veneer: 1/2S 1S 1 1/2S 2S All of the above blanks ( ) may be filled in with one of the following types of construction: BRK PERMASTN STN SIM STN Patio: VINYL DK FLAGSTN PATIO WD DK ROOF CONC PATIO RF OH C BLK PATIO CONC STP BRK PATIO WD STP STN PATIO CONC STP/R Garages: 1S GAR All of the above blanks ( ) may be filled in with one of the following types of construction: FR CONC BRK STUCCO STN PERMASTN C BLK LOG Miscellaneous: BSMT ENTRY BSMT EXT 27
Getting Started. with Easy Blue Print
 Getting Started with Easy Blue Print User Interface Overview Easy Blue Print is a simple drawing program that will allow you to create professional-looking 2D floor plan drawings. This guide covers the
Sketch PowerTab. Sketch PowerView. Starting a New Floorplan with WinSketch
 Sketch PowerView The Sketch PowerView is your complete interface for digital sketches and their resulting area calculations to transfer into your form. In the Sketch PowerView, you can even access sketches
House Design Tutorial
 House Design Tutorial This House Design Tutorial shows you how to get started on a design project. The tutorials that follow continue with the same plan. When you are finished, you will have created a
ACI Sketch. Copyright October 2008, ACI All Rights Reserved. 24 Old Kings Road North Palm Coast, FL appraiserschoice.com
 ACI Sketch Copyright October 2008, ACI All Rights Reserved 24 Old Kings Road North Palm Coast, FL 32137 appraiserschoice.com 800.234.8727 ACI Sketch Contents Getting Started 1 Working with the Grid 2 Unit
House Design Tutorial
 Chapter 2: House Design Tutorial This House Design Tutorial shows you how to get started on a design project. The tutorials that follow continue with the same plan. When you are finished, you will have
House Design Tutorial
 House Design Tutorial This House Design Tutorial shows you how to get started on a design project. The tutorials that follow continue with the same plan. When you are finished, you will have created a
Apex v5 Assessor Introductory Tutorial
 Apex v5 Assessor Introductory Tutorial Apex v5 Assessor Apex v5 Assessor includes some minor User Interface updates from the v4 program but attempts have been made to simplify the UI for streamlined work
House Design Tutorial
 Chapter 2: House Design Tutorial This House Design Tutorial shows you how to get started on a design project. The tutorials that follow continue with the same plan. When you are finished, you will have
Advance Dimensioning and Base Feature Options
 Chapter 4 Advance Dimensioning and Base Feature Options Learning Objectives After completing this chapter you will be able to: Dimension the sketch using the autodimension sketch tool. Dimension the sketch
Learning Guide. ASR Automated Systems Research Inc. # Douglas Crescent, Langley, BC. V3A 4B6. Fax:
 Learning Guide ASR Automated Systems Research Inc. #1 20461 Douglas Crescent, Langley, BC. V3A 4B6 Toll free: 1-800-818-2051 e-mail: support@asrsoft.com Fax: 604-539-1334 www.asrsoft.com Copyright 1991-2013
House Design Tutorial
 Chapter 2: House Design Tutorial This House Design Tutorial shows you how to get started on a design project. The tutorials that follow continue with the same plan. When we are finished, we will have created
New Sketch Editing/Adding
 New Sketch Editing/Adding 1. 2. 3. 4. 5. 6. 1. This button will bring the entire sketch to view in the window, which is the Default display. This is used to return to a view of the entire sketch after
User Guide V10 SP1 Addendum
 Alibre Design User Guide V10 SP1 Addendum Copyrights Information in this document is subject to change without notice. The software described in this document is furnished under a license agreement or
CONTENT INTRODUCTION BASIC CONCEPTS Creating an element of a black-and white line drawing DRAWING STROKES...
 USER MANUAL CONTENT INTRODUCTION... 3 1 BASIC CONCEPTS... 3 2 QUICK START... 7 2.1 Creating an element of a black-and white line drawing... 7 3 DRAWING STROKES... 15 3.1 Creating a group of strokes...
ARCHICAD Introduction Tutorial
 Starting a New Project ARCHICAD Introduction Tutorial 1. Double-click the Archicad Icon from the desktop 2. Click on the Grey Warning/Information box when it appears on the screen. 3. Click on the Create
AutoCAD Tutorial First Level. 2D Fundamentals. Randy H. Shih SDC. Better Textbooks. Lower Prices.
 AutoCAD 2018 Tutorial First Level 2D Fundamentals Randy H. Shih SDC PUBLICATIONS Better Textbooks. Lower Prices. www.sdcpublications.com Powered by TCPDF (www.tcpdf.org) Visit the following websites to
MEASUREMENT CAMERA USER GUIDE
 How to use your Aven camera s imaging and measurement tools Part 1 of this guide identifies software icons for on-screen functions, camera settings and measurement tools. Part 2 provides step-by-step operating
Evaluation Chapter by CADArtifex
 The premium provider of learning products and solutions www.cadartifex.com EVALUATION CHAPTER 2 Drawing Sketches with SOLIDWORKS In this chapter: Invoking the Part Modeling Environment Invoking the Sketching
Introduction to Autodesk Inventor for F1 in Schools (Australian Version)
") Introduction to Autodesk Inventor for F1 in Schools (Australian Version) F1 in Schools race car In this course you will be introduced to Autodesk Inventor, which is the centerpiece of Autodesk s Digital
Introduction to Autodesk Inventor for F1 in Schools (Australian Version) F1 in Schools race car In this course you will be introduced to Autodesk Inventor, which is the centerpiece of Autodesk s Digital
AutoCAD LT 2012 Tutorial. Randy H. Shih Oregon Institute of Technology SDC PUBLICATIONS. Schroff Development Corporation
 AutoCAD LT 2012 Tutorial Randy H. Shih Oregon Institute of Technology SDC PUBLICATIONS www.sdcpublications.com Schroff Development Corporation AutoCAD LT 2012 Tutorial 1-1 Lesson 1 Geometric Construction
Chief Architect X3 Training Series. Layers and Layer Sets
 Chief Architect X3 Training Series Layers and Layer Sets Save time while creating more detailed plans Why do you need Layers? Setting up Layer Lets Adding items to layers Layers and Layout Pages Layer
AutoCAD 2018 Fundamentals
 Autodesk AutoCAD 2018 Fundamentals Elise Moss SDC PUBLICATIONS Better Textbooks. Lower Prices. www.sdcpublications.com Powered by TCPDF (www.tcpdf.org) Visit the following websites to learn more about
33-2 Satellite Takeoff Tutorial--Flat Roof Satellite Takeoff Tutorial--Flat Roof
 33-2 Satellite Takeoff Tutorial--Flat Roof Satellite Takeoff Tutorial--Flat Roof A RoofLogic Digitizer license upgrades RoofCAD so that you have the ability to digitize paper plans, electronic plans and
Importing and processing gel images
 BioNumerics Tutorial: Importing and processing gel images 1 Aim Comprehensive tools for the processing of electrophoresis fingerprints, both from slab gels and capillary sequencers are incorporated into
Getting Started. Right click on Lateral Workplane. Left Click on New Sketch
 Getting Started 1. Open up PTC Pro/Desktop by either double clicking the icon or through the Start button and in Programs. 2. Once Pro/Desktop is open select File > New > Design 3. Close the Pallet window
with MultiMedia CD Randy H. Shih Jack Zecher SDC PUBLICATIONS Schroff Development Corporation
 with MultiMedia CD Randy H. Shih Jack Zecher SDC PUBLICATIONS Schroff Development Corporation WWW.SCHROFF.COM Lesson 1 Geometric Construction Basics AutoCAD LT 2002 Tutorial 1-1 1-2 AutoCAD LT 2002 Tutorial
AreaSketch Pro Overview for ClickForms Users
 AreaSketch Pro Overview for ClickForms Users Designed for Real Property Specialist Designed specifically for field professionals required to draw an accurate sketch and calculate the area and perimeter
Working With Drawing Views-I
 Chapter 12 Working With Drawing Views-I Learning Objectives After completing this chapter you will be able to: Generate standard three views. Generate Named Views. Generate Relative Views. Generate Predefined
Ornamental Pro 2004 Instruction Manual (Drawing Basics)
") Ornamental Pro 2004 Instruction Manual (Drawing Basics) http://www.ornametalpro.com/support/techsupport.htm Introduction Ornamental Pro has hundreds of functions that you can use to create your drawings.
Ornamental Pro 2004 Instruction Manual (Drawing Basics) http://www.ornametalpro.com/support/techsupport.htm Introduction Ornamental Pro has hundreds of functions that you can use to create your drawings.
SMALL OFFICE TUTORIAL
 SMALL OFFICE TUTORIAL in this lesson you will get a down and dirty overview of the functionality of Revit Architecture. The very basics of creating walls, doors, windows, roofs, annotations and dimensioning.
Dimensioning the Rectangular Problem
 C h a p t e r 3 Dimensioning the Rectangular Problem In this chapter, you will learn the following to World Class standards: 1. Creating new layers in an AutoCAD drawing 2. Placing Centerlines on the drawing
CAD Tutorial. CAD Detail Windows. In this tutorial you ll learn about: CAD Detail Windows Exploding and Modifying a CAD Block
 CAD Tutorial In this tutorial you ll learn about: CAD Detail Windows Exploding and Modifying a CAD Block Creating a New CAD Block CAD Detail from View Creating a Plot Plan CAD Detail Windows CAD Details
Drawing a Plan of a Paper Airplane. Open a Plan of a Paper Airplane
 Inventor 2014 Paper Airplane Drawing a Plan of a Paper Airplane In this activity, you ll create a 2D layout of a paper airplane. Please follow these directions carefully. When you have a question, reread
AutoCAD 2020 Fundamentals
 Autodesk AutoCAD 2020 Fundamentals ELISE MOSS Autodesk Certified Instructor SDC PUBLICATIONS Better Textbooks. Lower Prices. www.sdcpublications.com Powered by TCPDF (www.tcpdf.org) Visit the following
AutoCAD LT 2009 Tutorial
 AutoCAD LT 2009 Tutorial Randy H. Shih Oregon Institute of Technology SDC PUBLICATIONS Schroff Development Corporation www.schroff.com Better Textbooks. Lower Prices. AutoCAD LT 2009 Tutorial 1-1 Lesson
SDC. AutoCAD LT 2007 Tutorial. Randy H. Shih. Schroff Development Corporation Oregon Institute of Technology
 AutoCAD LT 2007 Tutorial Randy H. Shih Oregon Institute of Technology SDC PUBLICATIONS Schroff Development Corporation www.schroff.com www.schroff-europe.com AutoCAD LT 2007 Tutorial 1-1 Lesson 1 Geometric
AutoCAD LT Drawing Formats
 AutoCAD LT Section 5 AutoCAD LT Drawing Formats This section covers: 1. Layers 2. Colors 3. Linetypes 4. Units 5. Text Styles 6. Dimension Styles 7. Point Styles AutoCAD LT Introduction AutoCAD LT Drawing
g. Click once on the left vertical line of the rectangle.
 This drawing will require you to a model of a truck as a Solidworks Part. Please be sure to read the directions carefully before constructing the truck in Solidworks. Before submitting you will be required
Autodesk AutoCAD 2013 Fundamentals
 Autodesk AutoCAD 2013 Fundamentals Elise Moss SDC P U B L I C AT I O N S Schroff Development Corporation Better Textbooks. Lower Prices. www.sdcpublications.com Visit the following websites to learn more
Lesson 6 2D Sketch Panel Tools
 Lesson 6 2D Sketch Panel Tools Inventor s Sketch Tool Bar contains tools for creating the basic geometry to create features and parts. On the surface, the Geometry tools look fairly standard: line, circle,
Photoshop CC 2018 Essential Skills
 Photoshop CC 2018 Essential Skills Adobe Photoshop Creative Cloud 2018 University Information Technology Services Learning Technology, Training, Audiovisual and Outreach Copyright 2018 KSU Division of
Toothbrush Holder. A drawing of the sheet metal part will also be created.
 Prerequisite Knowledge Previous knowledge of the following commands is required to complete this lesson; Sketch (Line, Centerline, Circle, Add Relations, Smart Dimension,), Extrude Boss/Base, and Edit
Modeling Basic Mechanical Components #1 Tie-Wrap Clip
 Modeling Basic Mechanical Components #1 Tie-Wrap Clip This tutorial is about modeling simple and basic mechanical components with 3D Mechanical CAD programs, specifically one called Alibre Xpress, a freely
The Revolve Feature and Assembly Modeling
 The Revolve Feature and Assembly Modeling PTC Clock Page 52 PTC Contents Introduction... 54 The Revolve Feature... 55 Creating a revolved feature...57 Creating face details... 58 Using Text... 61 Assembling
ISCapture User Guide. advanced CCD imaging. Opticstar
 advanced CCD imaging Opticstar I We always check the accuracy of the information in our promotional material. However, due to the continuous process of product development and improvement it is possible
1 Best Practices Course Week 12 Part 2 copyright 2012 by Eric Bobrow. BEST PRACTICES COURSE WEEK 12 PART 2 Program Planning Areas and Lists of Spaces
 BEST PRACTICES COURSE WEEK 12 PART 2 Program Planning Areas and Lists of Spaces Hello, this is Eric Bobrow. And in this lesson, we'll take a look at how you can create a site survey drawing in ArchiCAD
12. Creating a Product Mockup in Perspective
 12. Creating a Product Mockup in Perspective Lesson overview In this lesson, you ll learn how to do the following: Understand perspective drawing. Use grid presets. Adjust the perspective grid. Draw and
Training Guide 1 Basic Construction Overview. (v1.1)
") Training Guide 1 Basic Construction Overview (v1.1) Contents Training Guide 1 Basic Construction Overview... 1 Creating a new project... 3 Entering Measurements... 6 Adding the Walls... 10 Inserting Doors
Training Guide 1 Basic Construction Overview (v1.1) Contents Training Guide 1 Basic Construction Overview... 1 Creating a new project... 3 Entering Measurements... 6 Adding the Walls... 10 Inserting Doors
Architecture 2012 Fundamentals
 Autodesk Revit Architecture 2012 Fundamentals Supplemental Files SDC PUBLICATIONS Schroff Development Corporation Better Textbooks. Lower Prices. www.sdcpublications.com Tutorial files on enclosed CD Visit
SolidWorks Part I - Basic Tools SDC. Includes. Parts, Assemblies and Drawings. Paul Tran CSWE, CSWI
 SolidWorks 2015 Part I - Basic Tools Includes CSWA Preparation Material Parts, Assemblies and Drawings Paul Tran CSWE, CSWI SDC PUBLICATIONS Better Textbooks. Lower Prices. www.sdcpublications.com Powered
Residential Design using AutoCAD 2007
 Residential Design using AutoCAD 2007 Daniel John Stine SDC PUBLICATIONS Schroff Development Corporation www.schroff.com www.schroff-europe.com Lesson 2 Crash Course Introduction (the Basics) This lesson
Digital Photography 1
 Digital Photography 1 Photoshop Lesson 3 Resizing and transforming images Name Date Create a new image 1. Choose File > New. 2. In the New dialog box, type a name for the image. 3. Choose document size
Activity 1 Modeling a Plastic Part
 Activity 1 Modeling a Plastic Part In this activity, you will model a plastic part. When completed, your plastic part should look like the following two illustrations. While building this model, take time
Autodesk AutoCAD 2012: Fundamentals. Elise Moss. autodesk authorized publisher SDC PUBLICATIONS
 Autodesk AutoCAD 2012: Fundamentals Elise Moss autodesk authorized publisher SDC PUBLICATIONS www.sdcpublications.com Schroff Development Corporation Autodesk AutoCAD 2012: Fundamentals Lesson 3.0 Drawing
DeltaCad and Your Cylinder (Shepherd s) Sundial Carl Sabanski
 Sundial Carl Sabanski") 1 The Sundial Primer created by In the instruction set SONNE and Your Cylinder Shepherd s Sundial we went through the process of designing a cylinder sundial with SONNE and saving it as a dxf file. In
1 The Sundial Primer created by In the instruction set SONNE and Your Cylinder Shepherd s Sundial we went through the process of designing a cylinder sundial with SONNE and saving it as a dxf file. In
In the following sections, if you are using a Mac, then in the instructions below, replace the words Ctrl Key with the Command (Cmd) Key.
 Key.") Mac Vs PC In the following sections, if you are using a Mac, then in the instructions below, replace the words Ctrl Key with the Command (Cmd) Key. Zoom in, Zoom Out and Pan You can use the magnifying
Mac Vs PC In the following sections, if you are using a Mac, then in the instructions below, replace the words Ctrl Key with the Command (Cmd) Key. Zoom in, Zoom Out and Pan You can use the magnifying
Digital Imaging and Photoshop Fun/ Marianne Wallace
 EZ GREETING CARD This tutorial uses Photoshop Elements 2 but it will also work in all versions of Photoshop. It will show how to create and print 2 cards per 8 ½ X 11 sized papers. The finished folded
Unit. Drawing Accurately OVERVIEW OBJECTIVES INTRODUCTION 8-1
 8-1 Unit 8 Drawing Accurately OVERVIEW When you attempt to pick points on the screen, you may have difficulty locating an exact position without some type of help. Typing the point coordinates is one method.
Landscaping Tutorial. Chapter 5:
 Chapter 5: Landscaping Tutorial This tutorial was written to help you learn how to use Home Designer Landscape and Deck s Terrain tools. In this tutorial, you will learn how to add elevation information
LESSON 02: GET STRONGER FOR PS USERS COMPANION BOOK. Digital Scrapbook Academy. February 2018: Lesson 02 Get Stronger for Photoshop Users
 Digital Scrapbook Academy February 2018: Lesson 02 LESSON 02: GET STRONGER FOR PS USERS COMPANION BOOK Page 1 of 19 Table of Contents Table of Contents 2 Welcome to Lesson 02 for Photoshop Users 4 1: Add
Drawing 8e CAD#11: View Tutorial 8e: Circles, Arcs, Ellipses, Rotate, Explode, & More Dimensions Objective: Design a wing of the Guggenheim Museum.
 Page 1 of 6 Introduction The drawing used for this tutorial comes from Clark R. and M.Pause, "Precedents in Architecture", VNR 1985, page 135. Stephen Peter of the University of South Wales developed the
Roof Tutorial Wall Specification
 Roof Tutorial The majority of Roof Tutorial describes some common roof styles that can be created using settings in the Wall Specification dialog and can be completed independent of the other tutorials.
Principles and Practice
 Principles and Practice An Integrated Approach to Engineering Graphics and AutoCAD 2011 Randy H. Shih Oregon Institute of Technology SDC PUBLICATIONS www.sdcpublications.com Schroff Development Corporation
1. Create a 2D sketch 2. Create geometry in a sketch 3. Use constraints to position geometry 4. Use dimensions to set the size of geometry
 2.1: Sketching Many features that you create in Fusion 360 start with a 2D sketch. In order to create intelligent and predictable designs, a good understanding of how to create sketches and how to apply
Excel: A Quick Start Guide For Beginners - Learn How To Boost Your Productivity Today!
 Excel: A Quick Start Guide For Beginners - Learn How To Boost Your Productivity Today! Bonus Gift For You! Get free access to your complimentary book How To Get Things Done: 100+ Productivity Hacks To
Drawing with precision
 Drawing with precision Welcome to Corel DESIGNER, a comprehensive vector-based drawing application for creating technical graphics. Precision is essential in creating technical graphics. This tutorial
Exploring Photoshop Tutorial
 Exploring Photoshop Tutorial Objective: In this tutorial we will create a poster composed of three distinct elements: a Bokeh, an image and title text. The Bokeh is an effect which is sometimes seen in
QUICKSTART COURSE - MODULE 1 PART 2
 QUICKSTART COURSE - MODULE 1 PART 2 copyright 2011 by Eric Bobrow, all rights reserved For more information about the QuickStart Course, visit http://www.acbestpractices.com/quickstart Hello, this is Eric
Step 1: Create A New Photoshop Document
 Film Strip Photo Collage - Part 2 In part one of this two-part Photoshop tutorial, we learned how Photoshop s shape tools made it easy to draw a simple film strip which we can then use as a photo frame,
ILLUSTRATOR BASICS FOR SCULPTURE STUDENTS. Vector Drawing for Planning, Patterns, CNC Milling, Laser Cutting, etc.
 ILLUSTRATOR BASICS FOR SCULPTURE STUDENTS Vector Drawing for Planning, Patterns, CNC Milling, Laser Cutting, etc. WELCOME TO THE ILLUSTRATOR TUTORIAL FOR SCULPTURE DUMMIES! This tutorial sets you up for
Try what you learned (and some new things too)
") Training Try what you learned (and some new things too) PART ONE: DO SOME MATH Exercise 1: Type some simple formulas to add, subtract, multiply, and divide. 1. Click in cell A1. First you ll add two numbers.
Training Try what you learned (and some new things too) PART ONE: DO SOME MATH Exercise 1: Type some simple formulas to add, subtract, multiply, and divide. 1. Click in cell A1. First you ll add two numbers.
After completing this lesson, you will be able to:
 LEARNING OBJECTIVES After completing this lesson, you will be able to: 1. Create a Circle using 6 different methods. 2. Create a Rectangle with width, chamfers, fillets and rotation. 3. Set Grids and Increment
1 Sketching. Introduction
 1 Sketching Introduction Sketching is arguably one of the more difficult techniques to master in NX, but it is well-worth the effort. A single sketch can capture a tremendous amount of design intent, and
FlashChart. Symbols and Chart Settings. Main menu navigation. Data compression and time period of the chart. Chart types.
 FlashChart Symbols and Chart Settings With FlashChart you can display several symbols (for example indices, securities or currency pairs) in an interactive chart. You can also add indicators and draw on
Photoshop CC Editing Images
 Photoshop CC Editing Images Rotate a Canvas A canvas can be rotated 90 degrees Clockwise, 90 degrees Counter Clockwise, or rotated 180 degrees. Navigate to the Image Menu, select Image Rotation and then
SHAPE CLUSTER PHOTO DISPLAY
 SHAPE CLUSTER PHOTO DISPLAY In this Photoshop tutorial, we ll learn how to display a single photo as a cluster of shapes, similar to larger wall cluster displays where several photos, usually in different
Solidworks Tutorial Pencil
 The following instructions will be used to help you create a Pencil using Solidworks. These instructions are ordered to make the process as simple as possible. Deviating from the order, or not following
Module 1H: Creating an Ellipse-Based Cylindrical Sheet-metal Lateral Piece
 Inventor (10) Module 1H: 1H- 1 Module 1H: Creating an Ellipse-Based Cylindrical Sheet-metal Lateral Piece In this Module, we will learn how to create an ellipse-based cylindrical sheetmetal lateral piece
1.6.7 Add Arc Length Dimension Modify Dimension Value Check the Sketch Curve Connectivity
 Contents 2D Sketch... 1 1.1 2D Sketch Introduction... 1 1.1.1 2D Sketch... 1 1.1.2 Basic Setting of 2D Sketch... 2 1.1.3 Exit 2D Sketch... 4 1.2 Draw Common Geometry... 5 2.2.1 Points... 5 2.2.2 Lines
An Introduction to Dimensioning Dimension Elements-
 An Introduction to Dimensioning A precise drawing plotted to scale often does not convey enough information for builders to construct your design. Usually you add annotation showing object measurements
7.0 - MAKING A PEN FIXTURE FOR ENGRAVING PENS
 7.0 - MAKING A PEN FIXTURE FOR ENGRAVING PENS Material required: Acrylic, 9 by 9 by ¼ Difficulty Level: Advanced Engraving wood (or painted metal) pens is a task particularly well suited for laser engraving.
GEO/EVS 425/525 Unit 2 Composing a Map in Final Form
 GEO/EVS 425/525 Unit 2 Composing a Map in Final Form The Map Composer is the main mechanism by which the final drafts of images are sent to the printer. Its use requires that images be readable within
AP Art History Flashcards Program
 AP Art History Flashcards Program 1 AP Art History Flashcards Tutorial... 3 Getting to know the toolbar:... 4 Getting to know your editing toolbar:... 4 Adding a new card group... 5 What is the difference
Autocad Basics 7/28/2009. Chapter 14 - Learning Objectives
 Chapter 14 - Learning Objectives Autocad Basics Chapter 14 July 28, 2009 Use grips to stretch, copy, move, rotate, scale, and mirror objects. Edit objects using the Quick Properties panel and the Properties
Part 2: Earpiece. Insert Protrusion (Internal Sketch) Hole Patterns Getting Started with Pro/ENGINEER Wildfire. Round extrusion.
 Hole Patterns Getting Started with Pro/ENGINEER Wildfire. Round extrusion.") Part 2: Earpiece 4 Round extrusion Radial pattern Chamfered edge To create this part, you'll use some of the same extrusion techniques you used in the lens part. The only difference in this part is that
Part 2: Earpiece 4 Round extrusion Radial pattern Chamfered edge To create this part, you'll use some of the same extrusion techniques you used in the lens part. The only difference in this part is that
Module 1G: Creating a Circle-Based Cylindrical Sheet-metal Lateral Piece with an Overlaying Lateral Edge Seam And Dove-Tail Seams on the Top Edge
 Inventor (10) Module 1G: 1G- 1 Module 1G: Creating a Circle-Based Cylindrical Sheet-metal Lateral Piece with an Overlaying Lateral Edge Seam And Dove-Tail Seams on the Top Edge In Module 1A, we have explored
Autodesk Advance Steel. Drawing Style Manager s guide
 Autodesk Advance Steel Drawing Style Manager s guide TABLE OF CONTENTS Chapter 1 Introduction... 5 Details and Detail Views... 6 Drawing Styles... 6 Drawing Style Manager... 8 Accessing the Drawing Style
AutoDesk Inventor: Creating Working Drawings
 AutoDesk Inventor: Creating Working Drawings Inventor allows you to quickly and easily make quality working drawings from your 3D models. This tutorial will walk you through the steps in creating a working
Revit Structure 2012 Basics:
 SUPPLEMENTAL FILES ON CD Revit Structure 2012 Basics: Framing and Documentation Elise Moss autodesk authorized publisher SDC PUBLICATIONS www.sdcpublications.com Schroff Development Corporation Structural
Radial dimension objects are available for placement in the PCB Editor only. Use one of the following methods to access a placement command:
 Radial Dimension Old Content - visit altium.com/documentation Modified by on 20-Nov-2013 Parent page: Objects A placed Radial Dimension. Summary A radial dimension is a group design object. It allows for
Key Terms. Where is it Located Start > All Programs > Adobe Design Premium CS5> Adobe Photoshop CS5. Description
 Adobe Adobe Creative Suite (CS) is collection of video editing, graphic design, and web developing applications made by Adobe Systems. It includes Photoshop, InDesign, and Acrobat among other programs.
GO! with Microsoft PowerPoint 2016 Comprehensive
 GO! with Microsoft PowerPoint 2016 Comprehensive First Edition Chapter 2 Formatting PowerPoint Presentations Learning Objectives Format Numbered and Bulleted Lists Insert Online Pictures Insert Text Boxes
Part III: Taking Your Drawings to the Next Level
 174 Figure 7-1: Set the grid so that it provides a truly useful measuring aid. Because the shapes in this diagram are multiples of 1 inch in size, every shape fits neatly within a grid area. The half-inch
Advance Steel. Drawing Style Manager s guide
 Advance Steel Drawing Style Manager s guide TABLE OF CONTENTS Chapter 1 Introduction...7 Details and Detail Views...8 Drawing Styles...8 Drawing Style Manager...9 Accessing the Drawing Style Manager...9
Appendix B: Autocad Booklet YR 9 REFERENCE BOOKLET ORTHOGRAPHIC PROJECTION
 Appendix B: Autocad Booklet YR 9 REFERENCE BOOKLET ORTHOGRAPHIC PROJECTION To load Autocad: AUTOCAD 2000 S DRAWING SCREEN Click the start button Click on Programs Click on technology Click Autocad 2000
Welcome to Solid Edge University
 #SEU15 Welcome to Solid Edge University Realize innovation. State-of-the-Art Drafting, Made Even Better Investing in What You Need General Workflow Dimension Enhancements Annotation Enhancements Page 2
J. La Favre Fusion 360 Lesson 5 April 24, 2017
 In this lesson, you will create a funnel like the one in the illustration to the left. The main purpose of this lesson is to introduce you to the use of the Revolve tool. The Revolve tool is similar to
AutoCAD 2D. Table of Contents. Lesson 1 Getting Started
 AutoCAD 2D Lesson 1 Getting Started Pre-reqs/Technical Skills Basic computer use Expectations Read lesson material Implement steps in software while reading through lesson material Complete quiz on Blackboard