Main screen of ipocket Draw
|
|
|
- Frederick Christian Parsons
- 5 years ago
- Views:
Transcription
1
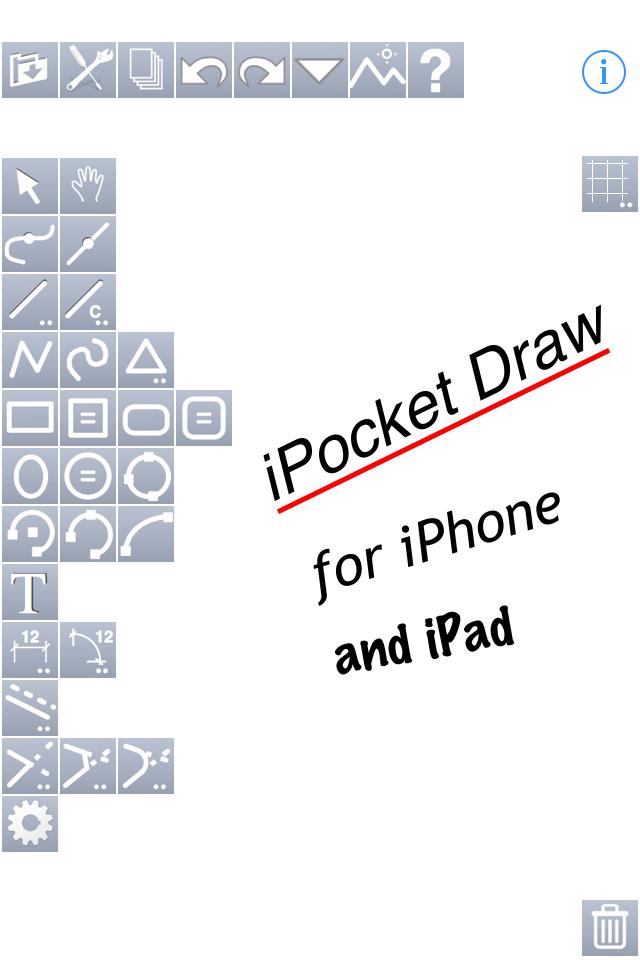
2 Main screen of ipocket Draw The tools of "management" Informations on the drawing and the softaware Display/Hide and settings of the grid (with a 2x tap) Drawing tools and adjustment tools The tools with.. have options or settings accessible with a 2x tap To erase objects Page 1
3 Screen to manage files : To return to the main screen List of saved files Are visible here only dxf files (Autocad) and rcad files (ipocket Draw and RealCADD) One tap on the wanted file and "Done" to display it in the main screen. For a dxf file, a setting screen is displayed. Selected file Management of files Page 2

4 Creation of a new file : Page 3
5 Erase, rename, duplicate a file : Page 4

6 Send by mail, export, print : Page 5
7 Choice of file format for sending by or transfer : Page 6

8 Screen to choose the app after "Open in as..." : Page 7
9 First options to print : Page 8

10 Second options to print : Page 9

11 Import from other apps : From the screen to manage files, you can import only.rcad or.dxf files. The import of picture files is done with the command : Page 10
12 Setting of preferences : Unit for length and for angles and accuracy used for display the datas of objects and for the dimensioning. WARNING : The Dimension tools have their own preferences. Scale of the active layer Size of the handles of the selected objects Page 11
13 Setting of the grid : from the precedent screen or 2x tap on To display or not the grid. Isometric grid. Settings to display the grid on the screen : Step x Step y Number of divisions Color of the grid One tap on the square of color display a screen to select a new color. Setting of attraction on the grid. Reminder of the functioning of the button "Grid" on the main screen. Page 12
14 Definition of paths : Now you can choose between : 3 kind of line cap styles This drawing is updated according your choices. 3 kind of line join styles and if the path width is modified by the zoom. Page 13
15 Definition of dashes : Settings of the two kinds of predefined dotted lines : One simple dotted line One double dotted line The setting of dashes is specific for each object. The change of predefined dotted lines doesn't change the existing objects. Page 14
16 Definition of arrows : Settings of the predefined arrows : empty circles filled circles empty arrows filled arrows inclined line Like for dotted lines, the setting of arrows is specific for each object. The change of predefined arrows doesn't change the existing objects. Page 15
17 Settings of the layers : Attribute of the layer A = The layer is active The active layer is this one on which the objects are created or copied. Only one can be active.! The objects duplicated stay on the layer of the original object. List of layers Each has a name (Layer0), a scale (1/50), a default color (black). All this values can be changed. V = The layer is visible selected = visible C = Default color If selected, the color of all objects of the layer will be this one of the layer. This allows to control more easy on which layer is each objects. To change the default color of a layer, tap on the filled square (black here) in front of the name of the layer. + : To create a new layer Options of the layers Page 16

18 Settings of the layers : continuation A new layer has been created with a tap on + A tap on the name of the first layer allows to edit it. Page 17
19 Settings of the layers : continuation A tap on the second part of the scale allows to edit it. An important difference between Autocad and ipocket Draw is that with ipocket Draw, you draw with a choosen scale like by hand. Although the scale can be changed during design, it is easier to fix before you start drawing. With this method you can easily mix different scales in the same drawing with the use of layers. It is possible to have a layer "Overview" with a scale of 1/100 for example and a layer "Details" to 1/10. Objects take automatically the scale of the layer on which they are drawn. Page 18

20 Settings of the layers : continuation List in Edit mode The hierarchy of the layers is modifiable by moving them into the list. In "ipocket Draw", the list of the objects is hierarchised in function of the layers. If the layer 1 is above the layer 0, all objects of the layer 1 will be above them of the layer 0. Page 19

21 Options of the layers : You can limit the selection and the attraction at only the objects of the active layer (buttons off) or allow this on the objects of all visible layers. Here, you can define layer's layouts. The file "example_03" shows how this works. Page 20
22 The menu "Action" : Press upon this button to display a menu on the iphone. On ipad, a tap displays a pop-up screen. The content of the menu (or pop-up screen) is according to the context. Here none object is selected and the clipboard is empty, thus the only possible action is "Select all". Page 21

23 The menu "Action" : Many actions will propose to you some choices or parameters to do the choosen action. Here "Select all" has been actived and a choice is proposed to you. Page 22

24 The menu "Action" : The top of the menu "Action" when objects are selected. The last line "..." shows you that there is others actions. Page 23

25 The menu "Action" : The bottom of the menu The first line "..." shows you that there is others actions. The 3 next pages show you examples of asks for choice or data to do the choosen action. Page 24
26 The menu "Action" : Duplicate and Move Parameters of the action "Duplicate and Move". Page 25

27 The menu "Action" : Parallels Parameters of the action "Parallels". Page 26

28 The menu "Action" : Align Choice of how align. If in the selected objects, one of them is locked, the alignment will be done on it. Page 27
29 The menu "Action" : Manual rotation Two commands, Manual rotation and Symmetry with an axis need some complementary actions from you. ipocket Draw shows you what to do with a text below the icons. Here, for Manual rotation, the action is to draw an arc by beginning with a line which shows the center of rotation. When the line (radius of the arc) is drawn, ipocket Draw asks you to draw the arc himself. (see next page) Page 28
30 The menu "Action" : Manual rotation The line (radius of the arc) has been drawn. Now you have to draw an arc to rotate the selected objects. The text of help is modified. Of course, the rotation of the selected objects is made in real time when the arc is drawn. Page 29

31 The menu "Action" : Symmetry with an axis For this command, you have only to select a line which will be the axis of the symmetry. Page 30

32 The menu "Action" : Hatch Parameters of action "Hatch". Here you can choose between the 15 predefined hatchs or modify the parameters of the selected hatch. Page 31
33 The menu "Action" : Texture Parameters of action "Texture". You can choose between the 15 predefined textures. The hatchs and textures can be applied on simple objects (rectangles, circles, ellipses) but also on overlapped objects and on areas defined by a set of lines, arcs, polygons. Once they are created, the hatchs and the textures are independant objects. When you create a texture you can modifiy its scale. Page 32

34 The menu "Action" : Hatch or Texture Obtained texture with the rectangle and the ellipse selected together. The result would be similar with a hatch. Page 33

35 Le menu "Action" : Hachure ou Texture Obtained texture with a selection containing two lines, two arcs and a polygon with two sides. The result would be similar with a hatch. Page 34
 are transfered into ipocket Draw via itunes or apps like Air Sharing or Box or DropBox with their")
36 Importation : This button allows to import : - a photo from album; - a picture file; - a drawing from library. Files of picture (jpeg, png or pdf) are transfered into ipocket Draw via itunes or apps like Air Sharing or Box or DropBox with their command "Open in". Page 35
37 Importation of a picture file : The picture files available are listed and you can choose one of them to add it into your drawing. From this screen, you can import other picture files from other apps with : Page 36
38 Importation of a picture file : The imported picture is centered on the screen. Page 37
, you can display all your drawing.")
39 Importation of a picture file : With a "Zoom all" (4x taps), you can display all your drawing. Page 38

40 Importation of a vectorial pdf file : When importing a vectorial pdf file (= not scanned) ipocket Draw detects the presence of vector objects and offers to keep either the image or the vector objects. Page 39

41 Importation of a vectorial pdf file, next : The import of vector objects requires an additional purchase. But as indicated by the warning shown against, before buying you can test it but only half vector objects found is kept. Depending on the source of the PDF file, the recognition of certain objects, especially the texts or dashed objects, may not work correctly. Page 40
42 Importation from library : The library's files are displayed. By default, ipocket Draw has two library files : Arrows and Stars Select this one in which you want choose a drawing. Page 41

43 Importation from library : The file "Stars" was chosen. The list of all available drawings is displayed. Select which one you want. Page 42

44 Importation from library : Then he is added to your drawing. Page 43
. Page 44")
45 Enrich the library : Of course you can enrich the library by adding into it your own symbols. To do this, begin by drawing a symbol, select it, then copy it (menu action - Copy). Page 44

46 Enrich the library : You can create a new library file or you can add a drawing into an existing library file. To create a new library file, tap on the button "+" of the library screen. A dialog is displayed to enter the name of the new library file. Page 45
47 Enrich the library : The file "My library" just comes to be created, now you must name the new drawing. Page 46
48 Enrich the library : The drawing "Symbol1" has been added into the library file "My library". Page 47

49 Enrich the library : The drawing "Symbol2" has been added into the displayed library file with the button "+" of this screen. Page 48
50 The help screen : The top of the screen. Page 49

51 The help screen : The center of the screen. Page 50
52 The help screen : The bottom of the screen. Page 51
53 The information screen : This screen gives you some informations whose the number of layers and of objects into the open drawing. Page 52

54 The drawing tools : The drawing tools are not displayed all at the same time on the screen. When a tool is selected, the next tap on its icon display the next tool. The tools are grouped by kind. The tool "Arrow" permutes with the tool "Hand", the tool "Polygon" with the tool "Spline" then the tool "Regular polygon", etc. All tools with ".." can be parametered. A double tap displays the parameters screen. A long press on the tools "Line" or "Rectangle" or "Rounded rectangle" or "Ellipse" allows to choose the drawing mode by center. A second long press resets the drawing mode. Icons of this tools in the drawing mode by center. Page 53

55 The drawing tools : The use of the drawing tools is intuitive, for example, to draw a line, select the tool "Line" then put a finger on the screen to define the first point of the line then move your finger on the screen until the second point of the line then remove your finger from the screen. All tools which need two points work the same way. If more than two points are needed, the two first are done like for a line and the others with others "touch and drag". Page 54
56 Parameters of the tool "Constrained line" : The tool "Constrained line" allows you to draw lines according predefined angles that you define with this screen. Enter only angles between 0 and 180. Page 55

57 Parameters of the tool "Regular polygon" : The tool "Regular polygon" needs only one parameter : the number of sides of the polygon to create. Page 56
 but if L3 is fixed instead of L2, the bond line may be variable. See the next page. You can choose the kind of arrow.")
58 Parameters of the tool "Dimension" : The tool "Dimension" has much more parameters. You can set the length of the bond line and its kind. If L1 and L2 are set, the bond line will have a fixed length (L1+L2) but if L3 is fixed instead of L2, the bond line may be variable. See the next page. You can choose the kind of arrow. You can also choose to display the unit of length, to remove unnecessary zeros and also to turn the texts according the dimension lines. After the first dimension line, the tool is changed as multiple dimension line to allow you to continue the same dimension line. To begin a new dimension line, select again the tool. Page 57

59 Line and Text attribute of the tool "Dimension" : The "Dimension" tool has its own prefs for its lines and its texts and you can set them here. Page 58

60 Unit and Accuracy of the tool "Dimension" : The unit and the accuracy of the "Dimension" tool can be different than those of the drawing. For example, you can draw in meters and do dimensions in centimeters. Page 59

61 Parameters of the tool "Dimension" : Dimensions with L1 and L2 fixed. Dimensions with L1 and L3 fixed. Page 60
62 The tool "Dimension" : Of course, this tool allows you to draw inclined dimension lines. Page 61
63 The tool "Angular Dimension" : Page 62
64 The tool "Parallels" : Via the settings screen, you choose between an interactive mode, single or multiple of shifting. The value for the shift don't need to be indicate in interactive mode since in this case the offset is given by a "tap and drag". For the other two modes the choice of the side of the parallel(s) is given by the user also with a "tap and drag" from the object of which you want parallels. Page 63

65 Parameters of the tool "Prolong and cut" : The options of this tool allow to use it by different ways : - only to prolong lines - to prolong and cut lines - to prolong, cut and delete. To use this tool, select it and drag a line between two objects whose at least a line. If you use it on two lines, the last switch allows to do the action on the two lines or only on the first. Page 64
66 Parameters of the tool "Chamfer" : To use this tool, select it and drag a line between two lines after having fixed L1 or L2. Page 65
67 Parameters of the tool "Fillet" : To use this tool, select it and drag a line between two lines after having fixed L1 or R. Page 66

68 Default attributes of objects : One tap on this button displays this screen to fix the default attributes of objects to be create. So you can define : the width, kind, color and opacity of lines, the color and opacity of fill color and choose if objects will be filled or not. After you have text attributes : B, I, U to have bold, italic and underlined text then the choice of font and the size of characters. If none object is selected before that a new one is created, this default attributes will be used. By cons, if an object is selected before the start of a new object, the selected object's attributes will be applied at the new object. Page 67

69 Object's attributes : or 2x tap on object When the same screen is called with at least one object selected, its content is adapted according the kind of the object. Here with an object "Line". The screen displays the object's attributes and also its geometric data. For a line, the abscissa and the ordinate of its two points, its dx and dy, its length and its angle. All this data can be modified. Page 68

70 Object's attributes : or 2x tap on object To modify a value, you can enter a new value or a formula. Here we want to divide by 2 the dy. Page 69
 and the area")
71 Object's attributes : or 2x tap on object Here a rectangle is edited. There is no more length and angle but there is the perimeter (P) and the area (S). Page 70
. The two buttons of this line allow you to edit the other sides.")
72 Object's attributes : or 2x tap on object When a polygon or a spline is edited, you can scroll the screen and there is a new line at the bottom which indicates the number of sides of the object and the digit of the edited side (Side: 1/3). The two buttons of this line allow you to edit the other sides. Page 71

73 Object's attributes : or 2x tap on object When you edit an object "text", you can modify the text itself. Page 72
74 The attractions when drawing : When you draw or modify a drawing, ipocket Draw indicates you the detected attractions. Here the red line is being created and one attraction has been detected at the end of the other line. As soon as you go near enough some particular points, the attraction occurs and the extremity of the object being created is "magnetized" on the detected attraction. The different attractions are : - extremity; - center and middle; - intersection; - surface; When an attraction is detected, you are sure that the points will be the same. Here the extremity of the 2 lines will be exactly equal. Page 73
75 The attractions when drawing : Here the attraction has been detected on the middle of the black line. Note the change of the attraction symbol. Page 74
76 The attractions when drawing : Here the attraction has been detected on the surface of the black line. Note the change of the attraction symbol. Page 75
77 The attractions when drawing : Here the attraction has been detected on the intersection between the 2 black lines. Note the change of the attraction symbol. Page 76
78 The attractions when drawing : You can also have attractions in alignment with previously detected points. Here after starting the red line we activated the attraction on points A and B which are then stored as reference and allow an attraction in alignment. The last three points detected by attraction at the extremity or center or intersection are kept for the attraction Alignment. These points are reset when a new object is drawn or an object modified. Page 77

79 Displacement-Modification of objects : When objects are selected, squares are drawn at their extremities. On lines, arrows are drawn to indicate their direction and for arcs, a filled circle is added. The squares allow to take the objects in attraction "extremity" and modify them. If you do this when several objects are selected, the object taken by its handle will be modified and the others only moved. The filled circles on arcs allow to modify their radius. If you want only move selected objects, you must take one outside the handles. The blue circles allow to deform all selected objects, freely (circles with ) or by keeping the proportions (circles with =). You switch between = and with a 2x tap on the tool "Arrow" or "Hand". Page 78
80 Displacement-Modification of objects : You can also "take" an object by attraction "extremity" or "center" to move it. Here the rectangle has been taken by the upper-right corner and placed in attraction on the end of the line. So the points superimposed themselves perfectly. To take an object by attraction "extremity" without deform it, just do not select it before. Page 79
81 Watch our tutorial videos on YouTube : Visit and use our forum about ipocket Draw : Page 80
BIM - ARCHITECTUAL IMPORTING A SCANNED PLAN
 BIM - ARCHITECTUAL IMPORTING A SCANNED PLAN INTRODUCTION In this section, we will demonstrate importing a plan created in another application. One of the most common starting points for a project is from
Part Design. Sketcher - Basic 1 13,0600,1488,1586(SP6)
") Part Design Sketcher - Basic 1 13,0600,1488,1586(SP6) In this exercise, we will learn the foundation of the Sketcher and its basic functions. The Sketcher is a tool used to create two-dimensional (2D)
Part Design Sketcher - Basic 1 13,0600,1488,1586(SP6) In this exercise, we will learn the foundation of the Sketcher and its basic functions. The Sketcher is a tool used to create two-dimensional (2D)
Mastering AutoCAD 2D
 Course description: Mastering AutoCAD 2D Design and shape the world around you with the powerful, flexible features found in AutoCAD software, one of the world s leading 2D design applications. With robust
06/17/02 Page 1 of 12
 Understanding the Graphical User Interface When you start AutoCAD, the AutoCAD window opens. The window is your design work space. It contains elements that you use to create your designs and to receive
1: INTRODUCTION TO AUTOCAD
 AutoCAD syllabus 1: INTRODUCTION TO AUTOCAD Starting AutoCAD AutoCAD Screen Components Drawing Area Command Window Navigation bar Status bar Invoking Commands in AutoCAD Keyboard Ribbon Application Menu
Lesson 6 2D Sketch Panel Tools
 Lesson 6 2D Sketch Panel Tools Inventor s Sketch Tool Bar contains tools for creating the basic geometry to create features and parts. On the surface, the Geometry tools look fairly standard: line, circle,
Tutorial Guide to AutoCAD 2014
 Tutorial Guide to AutoCAD 2014 2D Drawing, 3D Modeling Shawna Lockhart SDC P U B L I C AT I O N S For Microsoft Windows Better Textbooks. Lower Prices. www.sdcpublications.com Visit the following websites
Cricut Design Space App for ipad User Manual
 Cricut Design Space App for ipad User Manual Cricut Explore design-and-cut system From inspiration to creation in just a few taps! Cricut Design Space App for ipad 1. ipad Setup A. Setting up the app B.
Tutorial Guide to AutoCAD 2013
 Tutorial Guide to AutoCAD 2013 2D Drawing, 3D Modeling Shawna Lockhart SDC P U B L I C AT I O N S Schroff Development Corporation For Microsoft Windows Better Textbooks. Lower Prices. www.sdcpublications.com
Autodesk Advance Steel. Drawing Style Manager s guide
 Autodesk Advance Steel Drawing Style Manager s guide TABLE OF CONTENTS Chapter 1 Introduction... 5 Details and Detail Views... 6 Drawing Styles... 6 Drawing Style Manager... 8 Accessing the Drawing Style
Tutorial Guide to AutoCAD 2015
 Tutorial Guide to AutoCAD 2015 2D Drawing, 3D Modeling Shawna Lockhart SDC P U B L I C AT I O N S For Microsoft Windows Better Textbooks. Lower Prices. www.sdcpublications.com Powered by TCPDF (www.tcpdf.org)
Dean Muccio AutoCAD Interior Designer. for the. AutoCAD for Mac and PC SDC. Better Textbooks. Lower Prices.
 Dean Muccio AutoCAD 2020 for the Interior Designer AutoCAD for Mac and PC SDC P U B L I C AT I O N S Better Textbooks. Lower Prices. www.sdcpublications.com Powered by TCPDF (www.tcpdf.org) Visit the following
Advance Steel. Drawing Style Manager s guide
 Advance Steel Drawing Style Manager s guide TABLE OF CONTENTS Chapter 1 Introduction...7 Details and Detail Views...8 Drawing Styles...8 Drawing Style Manager...9 Accessing the Drawing Style Manager...9
Getting Started. with Easy Blue Print
 Getting Started with Easy Blue Print User Interface Overview Easy Blue Print is a simple drawing program that will allow you to create professional-looking 2D floor plan drawings. This guide covers the
Dean Muccio. AutoCAD 2018 for the. Interior Designer. AutoCAD for Mac and PC SDC. Better Textbooks. Lower Prices.
 Dean Muccio AutoCAD 2018 for the Interior Designer AutoCAD for Mac and PC SDC P U B L I C AT I O N S Better Textbooks. Lower Prices. www.sdcpublications.com Powered by TCPDF (www.tcpdf.org) Visit the following
Architecture 2012 Fundamentals
 Autodesk Revit Architecture 2012 Fundamentals Supplemental Files SDC PUBLICATIONS Schroff Development Corporation Better Textbooks. Lower Prices. www.sdcpublications.com Tutorial files on enclosed CD Visit
Evaluation Chapter by CADArtifex
 The premium provider of learning products and solutions www.cadartifex.com EVALUATION CHAPTER 2 Drawing Sketches with SOLIDWORKS In this chapter: Invoking the Part Modeling Environment Invoking the Sketching
Isometric Drawings. Figure A 1
 A Isometric Drawings ISOMETRIC BASICS Isometric drawings are a means of drawing an object in picture form for better clarifying the object s appearance. These types of drawings resemble a picture of an
PRODIM CT 3.0 MANUAL the complete solution
 PRODIM CT 3.0 MANUAL the complete solution We measure it all! General information Copyright All rights reserved. Apart from the legally laid down exceptions, no part of this publication may be reproduced,
Creo Revolve Tutorial
 Creo Revolve Tutorial Setup 1. Open Creo Parametric Note: Refer back to the Creo Extrude Tutorial for references and screen shots of the Creo layout 2. Set Working Directory a. From the Model Tree navigate
1. Reference Guide and Glossary
 1. Reference Guide and Glossary Design Panel New Click the New Icon at any time to create a new project from scratch. Projects Browse, select, and cut projects from the Projects Tab. This includes your
Chapter 4: Draw with the Pencil and Brush
 Page 1 of 15 Chapter 4: Draw with the Pencil and Brush Tools In Illustrator, you create and edit drawings by defining anchor points and the paths between them. Before you start drawing lines and curves,
Drawing with precision
 Drawing with precision Welcome to Corel DESIGNER, a comprehensive vector-based drawing application for creating technical graphics. Precision is essential in creating technical graphics. This tutorial
INTRODUCTION to CAD ACAD BASICS. 2.1 Starting with ACAD. 2.2 Layout and sketching. 2.3 Drawing environment. 2.4 Elements of drawing
 INTRODUCTION to CAD ACAD BASICS 2.1 Starting with ACAD 2.2 Layout and sketching 2.3 Drawing environment 2.4 Elements of drawing 2.4.1 Draw commands 2.5 3D functions 2.6 Starting the drawing 2.6.1 Drawing
Introduction to AutoCAD 2012
 Page 1 Introduction to AutoCAD 2012 Alf Yarwood Answers to Multiple choice questions Chapter 1 1. The toolbar at the top of the AutoCAD 2012 window is: (a) The Draw toolbar (b) The Modify toolbar (c) The
Modeling Basic Mechanical Components #1 Tie-Wrap Clip
 Modeling Basic Mechanical Components #1 Tie-Wrap Clip This tutorial is about modeling simple and basic mechanical components with 3D Mechanical CAD programs, specifically one called Alibre Xpress, a freely
After completing this lesson, you will be able to:
 LEARNING OBJECTIVES After completing this lesson, you will be able to: 1. Create a Circle using 6 different methods. 2. Create a Rectangle with width, chamfers, fillets and rotation. 3. Set Grids and Increment
COMPUTER AIDED DRAFTING LAB (333) SMESTER 4
 SMESTER 4") COMPUTER AIDED DRAFTING LAB (333) SMESTER 4 Introduction to Computer Aided Drafting: The method of preparing engineering drawing by using the computer software is known as Computer Aided Drafting (CAD).
COMPUTER AIDED DRAFTING LAB (333) SMESTER 4 Introduction to Computer Aided Drafting: The method of preparing engineering drawing by using the computer software is known as Computer Aided Drafting (CAD).
Assignment 12 CAD Mechanical Part 2
 Assignment 12 CAD Mechanical Part 2 Objectives In this assignment you will learn to apply the hidden lines, isometric snap, and ellipses commands along with commands previously learned.. General Hidden
Anna Gresham School of Landscape Design. CAD for Beginners. CAD 3: Using the Drawing Tools and Blocks
 Anna Gresham School of Landscape Design CAD for Beginners CAD 3: Using the Drawing Tools and Blocks Amended for DraftSight V4 October 2013 INDEX OF TOPICS for CAD 3 Pages ESnap 3-5 Essential drawing tools
Advance Concrete. Tutorial
 Advance Concrete Tutorial Table of contents About this tutorial... 9 How to use this guide... 10 Lesson 1: Creating a building grid... 11 Step 1: Create a default building grid... 11 Step 2: Set the distances
in the list below are available in the Pro version of Scan2CAD
 Scan2CAD features Features marked only. in the list below are available in the Pro version of Scan2CAD Scan Scan from inside Scan2CAD using TWAIN (Acquire). Use any TWAIN-compliant scanner of any size.
Chapter 2. Drawing Sketches for Solid Models. Learning Objectives
 Chapter 2 Drawing Sketches for Solid Models Learning Objectives After completing this chapter, you will be able to: Start a new template file to draw sketches. Set up the sketching environment. Use various
Revit Structure 2013 Basics
 Revit Structure 2013 Basics Framing and Documentation Elise Moss Supplemental Files SDC P U B L I C AT I O N S Schroff Development Corporation Better Textbooks. Lower Prices. www.sdcpublications.com Tutorial
Welcome to Corel DESIGNER, a comprehensive vector-based package for technical graphic users and technical illustrators.
 Workspace tour Welcome to Corel DESIGNER, a comprehensive vector-based package for technical graphic users and technical illustrators. This tutorial will help you become familiar with the terminology and
This section will take you through the process of drawing an oblique block. Your entire part, in all views, should look like Figure 1.
 Oblique Block Preface This section will take you through the process of drawing an oblique block. Your entire part, in all views, should look like Figure 1. Figure 1 68 / 3D Scripted Drawings: Oblique
Drawing and Assembling
 Youth Explore Trades Skills Description In this activity the six sides of a die will be drawn and then assembled together. The intent is to understand how constraints are used to lock individual parts
AutoCAD Tutorial First Level. 2D Fundamentals. Randy H. Shih SDC. Better Textbooks. Lower Prices.
 AutoCAD 2018 Tutorial First Level 2D Fundamentals Randy H. Shih SDC PUBLICATIONS Better Textbooks. Lower Prices. www.sdcpublications.com Powered by TCPDF (www.tcpdf.org) Visit the following websites to
Introduction to CATIA V5
 Introduction to CATIA V5 Release 17 (A Hands-On Tutorial Approach) Kirstie Plantenberg University of Detroit Mercy SDC PUBLICATIONS Schroff Development Corporation www.schroff.com Better Textbooks. Lower
1.6.7 Add Arc Length Dimension Modify Dimension Value Check the Sketch Curve Connectivity
 Contents 2D Sketch... 1 1.1 2D Sketch Introduction... 1 1.1.1 2D Sketch... 1 1.1.2 Basic Setting of 2D Sketch... 2 1.1.3 Exit 2D Sketch... 4 1.2 Draw Common Geometry... 5 2.2.1 Points... 5 2.2.2 Lines
Drawing 8e CAD#11: View Tutorial 8e: Circles, Arcs, Ellipses, Rotate, Explode, & More Dimensions Objective: Design a wing of the Guggenheim Museum.
 Page 1 of 6 Introduction The drawing used for this tutorial comes from Clark R. and M.Pause, "Precedents in Architecture", VNR 1985, page 135. Stephen Peter of the University of South Wales developed the
Welcome to Storyist. The Novel Template This template provides a starting point for a novel manuscript and includes:
 Welcome to Storyist Storyist is a powerful writing environment for ipad that lets you create, revise, and review your work wherever inspiration strikes. Creating a New Project When you first launch Storyist,
ILLUSTRATOR BASICS FOR SCULPTURE STUDENTS. Vector Drawing for Planning, Patterns, CNC Milling, Laser Cutting, etc.
 ILLUSTRATOR BASICS FOR SCULPTURE STUDENTS Vector Drawing for Planning, Patterns, CNC Milling, Laser Cutting, etc. WELCOME TO THE ILLUSTRATOR TUTORIAL FOR SCULPTURE DUMMIES! This tutorial sets you up for
Create new drawing. Select Collection. Manage graphs. Collection Name. Graphs preview
 Create new drawing Select Collection Collection Name Manage graphs Graphs preview Duplicate selection Move selection Delete selection Select All drawings Exit Share selection Selected graphs Add new Collection
Chapter 1. Creating, Profiling, Constraining, and Dimensioning the Basic Sketch. Learning Objectives. Commands Covered
 Chapter 1 Creating, Profiling, Constraining, and Dimensioning the Basic Sketch Learning Objectives After completing this chapter, you will be able to: Draw the basic outline (sketch) of designer model.
The Revolve Feature and Assembly Modeling
 The Revolve Feature and Assembly Modeling PTC Clock Page 52 PTC Contents Introduction... 54 The Revolve Feature... 55 Creating a revolved feature...57 Creating face details... 58 Using Text... 61 Assembling
Corel PHOTO-PAINT BERNINA Page 1 DL
 Corel PHOTO-PAINT 2018 BERNINA Page 1 Corel PHOTO-PAINT Corel PHOTO-PAINT is part of BERNINA Embroidery Software and gives users many tools for editing photos or bitmap artwork. Corel PHOTO- PAINT can
n 4ce Professional Module
 n 4ce Fact Sheet n 4ce Professional Module For the discerning user with specialist needs, n 4ce Professional provides extra facilities in Design and 3D presentations. Using the same platform as Lite, extra
Draw IT 2016 for AutoCAD
 Draw IT 2016 for AutoCAD Tutorial for System Scaffolding Version: 16.0 Copyright Computer and Design Services Ltd GLOBAL CONSTRUCTION SOFTWARE AND SERVICES Contents Introduction... 1 Getting Started...
Sketch PowerTab. Sketch PowerView. Starting a New Floorplan with WinSketch
 Sketch PowerView The Sketch PowerView is your complete interface for digital sketches and their resulting area calculations to transfer into your form. In the Sketch PowerView, you can even access sketches
Creating a light studio
 Creating a light studio Chapter 5, Let there be Lights, has tried to show how the different light objects you create in Cinema 4D should be based on lighting setups and techniques that are used in real-world
User Manual. This User Manual will guide you through the steps to set up your Spike and take measurements.
 User Manual (of Spike ios version 1.14.6 and Android version 1.7.2) This User Manual will guide you through the steps to set up your Spike and take measurements. 1 Mounting Your Spike 5 2 Installing the
COURSE: INTRODUCTION TO CAD GRADES: UNIT: Measurement
 UNIT: Measurement - Students will demonstrate correctness in measuring using various scales and instruments. Demonstrate the various marks that make up a ruler including 1/16, 1/8, ¼ and ½. Assessment
Part 1- Fundamental Functions
 Part 1- Fundamental Functions Note: Alt+Tab will allow you to move between programs in the docker. Shift+Tab removes right pallets Tab removes all pallets Ctrl+1= centers art board Ctrl + 0= fill window
Constructing a Wedge Die
 1-(800) 877-2745 www.ashlar-vellum.com Using Graphite TM Copyright 2008 Ashlar Incorporated. All rights reserved. C6CAWD0809. Ashlar-Vellum Graphite This exercise introduces the third dimension. Discover
Autodesk. SketchBook Mobile
 Autodesk SketchBook Mobile Copyrights and Trademarks Autodesk SketchBook Mobile (2.0.2) 2013 Autodesk, Inc. All Rights Reserved. Except as otherwise permitted by Autodesk, Inc., this publication, or parts
Dharmapuri LAB MANUAL. : B.E. - Civil Engineering Year & Semester : I Year / II Semester
 Dharmapuri 636 703 LAB MANUAL Regulation : 2013 Branch : B.E. - Civil Engineering Year & Semester : I Year / II Semester CE6261-COMPUTER AIDED DRAFTING AND MODELLING LABORATORY ICAL ENG VVIT DEPARTMENT
AutoCAD LT 2009 Tutorial
 AutoCAD LT 2009 Tutorial Randy H. Shih Oregon Institute of Technology SDC PUBLICATIONS Schroff Development Corporation www.schroff.com Better Textbooks. Lower Prices. AutoCAD LT 2009 Tutorial 1-1 Lesson
Overview of Photoshop Elements workspace
 Overview of Photoshop Elements workspace When you open Photoshop Elements, the Welcome screen offers you two options (Figure 1): The Organize button opens the Organizer. In the Organizer you organize and
Tutorial 2: Setting up the Drawing Environment
 Drawing size With AutoCAD all drawings are done to FULL SCALE. The drawing limits will depend on the size of the items being drawn. For example if our drawing is the plan of a floor 23.8m X 15m then we
AutoCAD LT 2012 Tutorial. Randy H. Shih Oregon Institute of Technology SDC PUBLICATIONS. Schroff Development Corporation
 AutoCAD LT 2012 Tutorial Randy H. Shih Oregon Institute of Technology SDC PUBLICATIONS www.sdcpublications.com Schroff Development Corporation AutoCAD LT 2012 Tutorial 1-1 Lesson 1 Geometric Construction
This section will take you through the process of drawing a fixture base. Your entire part, in all views, should look like Figure 1.
 Fixture Base Preface This section will take you through the process of drawing a fixture base. Your entire part, in all views, should look like Figure 1. Figure 1 92 / Scripted 3D Drawings: Fixture Base
12. Creating a Product Mockup in Perspective
 12. Creating a Product Mockup in Perspective Lesson overview In this lesson, you ll learn how to do the following: Understand perspective drawing. Use grid presets. Adjust the perspective grid. Draw and
GstarCAD Mechanical 2015 Help
 1 Chapter 1 GstarCAD Mechanical 2015 Introduction Abstract GstarCAD Mechanical 2015 drafting/design software, covers all fields of mechanical design. It supplies the latest standard parts library, symbols
User s Manual ❿ Drawings-Detailing
 User s Manual ❿ Drawings-Detailing 2 CONTENTS I. THE NEW UPGRADED INTERFACE of SCADA Pro 4 1. UNITS 5 1.1 Drawings-Detailing 5 I. Files 6 II. Drawing 25 III. Formworks 30 IV. Edit 45 V. View 58 VI. Layers
Version 8 Tutorial
 Version 8 Tutorial 800-989-4243 214-340-9436 support@vertigraph.com www.vertigraph.com 1 Table of Contents A. Overview... 4 B. About the SiteWorx/OS Window... 4 C. File Types Raster, Vector and PDF...
Principles and Applications of Microfluidic Devices AutoCAD Design Lab - COMSOL import ready
 Principles and Applications of Microfluidic Devices AutoCAD Design Lab - COMSOL import ready Part I. Introduction AutoCAD is a computer drawing package that can allow you to define physical structures
Morpholio Quick Tips TracePro. Morpholio for Business 2017
 m Morpholio Quick Tips TracePro Morpholio for Business 2017 m Morpholio Quick Tips TracePro 00: Hand Gestures 01: Start a New Drawing 02: Set Your Scale 03: Set Your Pens 04: Layer Controls 05: Perspective,
Create A Briefcase Icon
 Create A Briefcase Icon In this tutorial, I will show you how to create a briefcase icon with rectangles, ellipses, and gradients. This briefcase icon is great for web designs and user interfaces. Moreover,
SKKK 1021 Engineering Drawing
 SKKK 1021 Engineering Drawing Introduction to AutoCAD Agus Arsad Introduction Overview & background Starting, interface & file system Basic drawing commands Basic editing commands View command Why use
ADA Curriculum for Pre-Engineering Students Correlation Guide
 ADA Curriculum for Pre-Engineering Students Correlation Guide Madsen/Autodesk Inventor 7: Basics Through Advanced Note: The concepts presented in the ADA Curriculum are covered in the text as they pertain
Conquering the Rubicon
 Autodesk Inventor R10 Fundamentals: Conquering the Rubicon Elise Moss SDC PUBLICATIONS Schroff Development Corporation www.schroff.com www.schroff-europe.com Schroff Development Corporation P.O. Box 1334
SDC. AutoCAD LT 2007 Tutorial. Randy H. Shih. Schroff Development Corporation Oregon Institute of Technology
 AutoCAD LT 2007 Tutorial Randy H. Shih Oregon Institute of Technology SDC PUBLICATIONS Schroff Development Corporation www.schroff.com www.schroff-europe.com AutoCAD LT 2007 Tutorial 1-1 Lesson 1 Geometric
Version 9 Tutorial and User Guide
 Version 9 Tutorial and User Guide 800-989-4243 214-340-9436 support@vertigraph.com www.vertigraph.com 1 Table of Contents A. Overview... 4 B. About the SiteWorx/OS Window... 4 C. File Types Raster, Vector
AutoCAD 2D. Table of Contents. Lesson 1 Getting Started
 AutoCAD 2D Lesson 1 Getting Started Pre-reqs/Technical Skills Basic computer use Expectations Read lesson material Implement steps in software while reading through lesson material Complete quiz on Blackboard
Basic 2D drawing skills in AutoCAD 2017
 Basic 2D drawing skills in AutoCAD 2017 This Tutorial is going to teach you the basic functions of AutoCAD and make you more efficient with the program. Follow all the steps so you can learn all the skills.
Fundamentals III PROJECT EXERCISE
 4 Fundamentals III PROJECT EXERCISE This project exercise provides point-by-point instructions for setting up the drawing with layers and then creating the objects shown in Figure P4 1. project EXERCISE
Tutorial Building the Nave Arcade
 Tutorial: Digital Gothic AH C117B (Winter 2017) Tutorial Building the Nave Arcade Overview: Step 1: Determining and Drawing The Arch (Quinto Arch) Step 2: Extrude Molding Profile Step 3: Adding Walls Step
Engineering & Computer Graphics Workbook Using SOLIDWORKS
 Engineering & Computer Graphics Workbook Using SOLIDWORKS 2017 Ronald E. Barr Thomas J. Krueger Davor Juricic SDC PUBLICATIONS Better Textbooks. Lower Prices. www.sdcpublications.com Powered by TCPDF (www.tcpdf.org)
Introducing SolidWorks
 Introducing SolidWorks SAAST Robotics 2008 SolidWorks Software Visually-based 3-D Mechanical design software Engineers and Designers use it to: Quickly sketch out ideas Experiment with features, dimensions
AEROPLANE. Create a New Folder in your chosen location called Aeroplane. The four parts that make up the project will be saved here.
 AEROPLANE Prerequisite Knowledge Previous knowledge of the following commands is required to complete this lesson. Sketching (Line, Rectangle, Arc, Add Relations, Dimensioning), Extrude, Assemblies and
Vectorworks / MiniCAD Tutorials
 Vectorworks / MiniCAD Tutorials Tutorial 1: Construct a simple model of a little house Tutorial 2: Construct a 4 view Orthographic drawing of the Model These tutorials are available as Adobe Acrobat 4
Ornamental Pro 2004 Instruction Manual (Drawing Basics)
") Ornamental Pro 2004 Instruction Manual (Drawing Basics) http://www.ornametalpro.com/support/techsupport.htm Introduction Ornamental Pro has hundreds of functions that you can use to create your drawings.
Ornamental Pro 2004 Instruction Manual (Drawing Basics) http://www.ornametalpro.com/support/techsupport.htm Introduction Ornamental Pro has hundreds of functions that you can use to create your drawings.
Required Materials For complete material(s) information, refer to
 information, refer to") Butler Community College Science, Technology, Engineering, and Math Division Brett Trimpe Revised Spring 2016 Implemented Fall 2016 COURSE OUTLINE AutoCAD Basics Course Description EN 107. AutoCAD Basics.
Butler Community College Science, Technology, Engineering, and Math Division Brett Trimpe Revised Spring 2016 Implemented Fall 2016 COURSE OUTLINE AutoCAD Basics Course Description EN 107. AutoCAD Basics.
Revit Structure 2012 Basics:
 SUPPLEMENTAL FILES ON CD Revit Structure 2012 Basics: Framing and Documentation Elise Moss autodesk authorized publisher SDC PUBLICATIONS www.sdcpublications.com Schroff Development Corporation Structural
Advance Dimensioning and Base Feature Options
 Chapter 4 Advance Dimensioning and Base Feature Options Learning Objectives After completing this chapter you will be able to: Dimension the sketch using the autodimension sketch tool. Dimension the sketch
Table of contents. Table of contents 2 Introduction 4 Overview 4
 Tiling v1.2 TABLE OF CONTENTS Table of contents Table of contents 2 Introduction 4 Overview 4 Global setup 6 Poster size 6 Format 6 Width and Height 7 Margins 8 Frame 8 Scale 9 Tile setup 9 Tile size 10
ENGINEERING GRAPHICS ESSENTIALS
 ENGINEERING GRAPHICS ESSENTIALS with AutoCAD 2012 Instruction Introduction to AutoCAD Engineering Graphics Principles Hand Sketching Text and Independent Learning CD Independent Learning CD: A Comprehensive
CAD Tutorial 24: Step by Step Guide
 CAD TUTORIAL 24: Step by step CAD Tutorial 24: Step by Step Guide Level of Difficulty Time Approximately 40 50 minutes Lesson Objectives To understand the basic tools used in SketchUp. To understand the
Module 2: Radial-Line Sheet-Metal 3D Modeling and 2D Pattern Development: Right Cone (Regular, Frustum, and Truncated)
") Inventor (5) Module 2: 2-1 Module 2: Radial-Line Sheet-Metal 3D Modeling and 2D Pattern Development: Right Cone (Regular, Frustum, and Truncated) In this tutorial, we will learn how to build a 3D model
Inventor (5) Module 2: 2-1 Module 2: Radial-Line Sheet-Metal 3D Modeling and 2D Pattern Development: Right Cone (Regular, Frustum, and Truncated) In this tutorial, we will learn how to build a 3D model
Training Guide Basics
 Training Guide Basics 2014, Missler Software. 7, Rue du Bois Sauvage F-91055 Evry, FRANCE Web: www.topsolid.com E-mail: info@topsolid.com All rights reserved. TopSolid Design Basics This information is
Engineering & Computer Graphics Workbook Using SolidWorks 2014
 Engineering & Computer Graphics Workbook Using SolidWorks 2014 Ronald E. Barr Thomas J. Krueger Davor Juricic SDC PUBLICATIONS Better Textbooks. Lower Prices. www.sdcpublications.com Powered by TCPDF (www.tcpdf.org)
Relative Coordinates
 AutoCAD Essentials Most drawings are created using relative coordinates. This means that the next point is set from the last point drawn. The last point drawn is stored as temporary 0,0". AutoCAD uses
1. Open the Feature Modeling demo part file on the EEIC website. Ask student about which constraints needed to Fully Define.
 BLUE boxed notes are intended as aids to the lecturer RED boxed notes are comments that the lecturer could make Control + Click HERE to view enlarged IMAGE and Construction Strategy he following set of
Introduction to Layers
 Introduction to Layers By Anna Castano A layer is an image or text that is piled on top of another. There are many things you can do with layer and it is easy to understand how it works. Through the introduction
Appendix B: Autocad Booklet YR 9 REFERENCE BOOKLET ORTHOGRAPHIC PROJECTION
 Appendix B: Autocad Booklet YR 9 REFERENCE BOOKLET ORTHOGRAPHIC PROJECTION To load Autocad: AUTOCAD 2000 S DRAWING SCREEN Click the start button Click on Programs Click on technology Click Autocad 2000
Copyrights and Trademarks
 Mobile Copyrights and Trademarks Autodesk SketchBook Mobile (2.0) 2012 Autodesk, Inc. All Rights Reserved. Except as otherwise permitted by Autodesk, Inc., this publication, or parts thereof, may not be
Photo One Digital Photo Shoots and Edits
 Photo One Digital Photo Shoots and Edits You will submit photo shoots, unedited and you will submit selected edited images. The shoots will be explained first and the edits will be explained later on this
Isometric Circles and Arcs
 AutoCAD and Its Applications BASICS Supplemental Material Chapter 4 Isometric Circles and Arcs On an isometric drawing, circles appear as ellipses and arcs as elliptical arcs. You must properly align isometric
digitization station DIGITAL SCRAPBOOKING 120 West 14th Street
 digitization station DIGITAL SCRAPBOOKING 120 West 14th Street www.nvcl.ca techconnect@cnv.org DIGITAL SCRAPBOOKING With MyMemories Suite 6 The MyMemories Digital Scrapbooking software allows you to create