Keycards come with an imbedded RFID chip and antenna, there is no battery in the keycards. The keycards are encrypted and only
|
|
|
- Christal Ryan
- 5 years ago
- Views:
Transcription
1

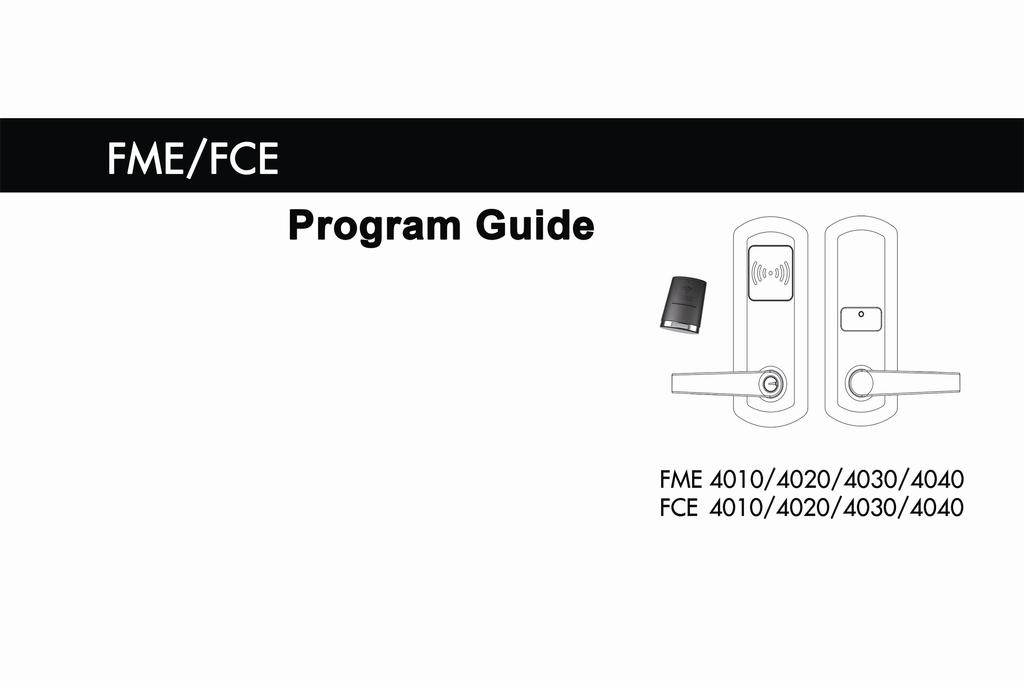
2 Index Keycards 02 The following is a description of the type of Keycards and function 03 Programming and Initialization of the RFID Lock 04 Procedure for Initialization 05 Programming- Adding Keycards and RCUs to the lock: 05 Programming- Deleting Keycards and RCUs from the lock: 07 Programming- Deleting Keycards and RCUs from the lock that are lost 08 Programming- Deleting all Keycards and RCUs from the lock except the Programming, Clear and Register Keycards 10 Factory Reset 11 Database Keycard Programming 12 Database Keycard- Exporting 12 Database Keycard- Importing 13 Lost Programming and/or Clear Keycard 14 Lost Register Keycard 14 Lost Programming, Clear and Register Keycards 15 Low Battery warning 17 Keycard Control 18 Swiping and holding the Keycards 18 Troubleshooting 19 FCC STATEMENT 19 Electronic Door Locking System - The Remote Control Unit 21-1-
3 The Security Door Lock FCE/FME is a standalone, battery operated, motorized lock with an encrypted reader, remote control unit (RCU) and applicable encrypted cards. The programming of the lock and Keycards is done using the reader of the lock. FCE model- RFID with a Grade 1 cylindrical lock body FME model- RFID with a Grade 1 mortise lock body Keycards: Keycards come with an imbedded RFID chip and antenna, there is no battery in the keycards. The keycards are encrypted and only these cards can be used and programmed to work with the security door lock. Encryption is on sector 1 of the cards, other sectors can be used for other purposes independent of the lock. Keycards are labeled with their type and function- a Keycard can only be programmed for their labeled function. Keycards exchange data with the lock by swiping the Keycard within the effective reading distance (0 to ½ ) of the lock reader surface that is located on the front face of the lock. The Keycard needs to be authorized (programmed) before use with the lock. For identification and Keycard control all Keycards have a unique serial number that is printed on the Keycard surface. Remote Control Unit (RCU)- should add a brief intro to the RCU 250 keycards (combined total of User, Office and Lockdown Cancel Keycards) can be programmed into each lock. 120 RCUs can be programmed into each lock. -2-
4 The following is a description of the type of Keycards and function: Construction Keycard- Used for opening the lock in the Factory Mode, the door will relock within 5 seconds after opening. The lock is shipped from the factory in Factory Mode, it is not programmed and any Factory Mode lock will work with any Construction Keycard. It is recommended that the locks be programmed as soon as possible. The Construction Keycard will not work in a programmed lock. User Keycard- Used to open the lock once it is programmed. Under normal conditions the lock will relock within 5 seconds after opening. During lockdown mode the User Keycard will open the lock and will relock within 2 seconds. Office Keycard- Used to open and lock the lock once it is programmed. Under normal conditions the Office Keycard will open the lock and it will remain open until the Office Keycard is used again and it will lock the lock. During lockdown mode the User Keycard will open the lock and will relock within 2 seconds. Remote Control Unit (RCU)- used to put lock in the Lockdown Mode. Hold the lockdown button for 2 seconds in the RCU manual will enter the lock in the Lockdown Mode. If the lock is open it will lock. In the Lockdown Mode the User and Office Keycards will only open the locks for 2 seconds before it relocks. Only the Lockdown Cancel Keycard can cancel the Lockdown Mode. The RCU also has an Office Keycard imbedded in the unit. This can be used and programmed exactly like the Office Keycard by swiping the RCU on the lock reader. Lockdown Cancel Keycard- Used to cancel the lockdown mode. The Lockdown Cancel Keycard does not open the lock after the lockdown mode is canceled. -3-
5 Programming Keycard- Used for programming User Keycards, Office Keycards, RCUs and importing information into the lock. Can only program 1 Programming Keycard per lock. Clear Keycard- Used for deleting User Keycards, Office Keycards, RCUs and exporting information from the lock. Can only program 1 Clear Keycard per lock. Register Keycard- Used as a backup in the event that the Programming and/or Clear Keycard(s) are lost. The Register Keycard can program a new Programming or Clear Keycard and makes the previous Programming or Clear Keycards inactive. Can only program 1 Register Keycard per lock. Database Keycard- Used to download and upload data to and from the lock. Database Keycard can be used to export information from 1 programmed lock and import that information into another programmed lock. Database Keycard has more memory than the other cards used. The Programming, Clear and Register Keycards are critical to the overall control of the lock system and it is recommended that these cards be kept in a secure location and controlled. If possible the Register Keycard should be kept in a separate location. Programming and Initialization of the RFID Lock: Initialization: The lock needs to be initialized using the Programming, Clear and Register Keycards. Once initialized the lock will not respond to the Construction Keycard or other Programming/Clear/Register Keycards. Once initialized the lock is ready for programming. -4-
6 Initialization can only be done on locks in Factory Mode. Procedure for Initialization: Swipe the keys in the listed order. Valid entry- Blue LED followed by a short and long beep. Invalid entry- Red LED followed by 3 short beeps. 1. Programming Keycard (swipe)- Blue LED followed by a short and long beep 2. Clear Keycard (swipe)- Blue LED followed by a short and long beep 3. Register Keycard (swipe)- Blue LED followed by a short and long beep IMPORTANT: All 3 Keycards must be used and accepted as valid to complete the Initialization. In all cases the Register Keycard must but used last. Once the unit is initialized it is ready for further programming. Programming- Adding Keycards and RCUs to the lock: This is to add /program Keycards (up to 250 per lock) and RCUs (up to 120 per lock) to the lock. Swiping the Programming Keycard will -5-
7 put the lock in Programming Mode. Programming Mode will continue for 8 seconds after the last valid card was swiped. When the Programming Keycard is swiped the Programming Mode is indicated by a long beep and a flashing blue LED (the LED will continue flashing until the lock is out of Programming Mode). During Programming Mode the Keycards and RCUs can be added (programmed into the lock). Swipe the keys in the listed order (steps 2 to 5 can be done in any sequence): 1. Programming Keycard (swipe)- Long beep and a continuous flashing blue LED 2. User Keycards (swipe)- Blue LED followed by a short and long beep - LED will continue flashing- can add as many User Keycards during this time as needed (remember- combined total of all the User, Office and Lockdown Cancel Keycards that can be added is 250). 3. Office Keycards (swipe)- Blue LED followed by a short and long beep - LED will continue flashing- can add as many Office Keycards during this time as needed (remember- combined total of all the User, Office and Lockdown Cancel Keycards that can be added is 250). 4. Lockdown Cancel Keycards (swipe)- Blue LED followed by a short and long beep - LED will continue flashing- can add as many Lockdown Cancel Keycards during this time as needed (remember- combined total of all the User, Office and Lockdown Cancel Keycards that can be added is 250). 5. RCUs (press emergency button)- Blue LED followed by a short and long beep - LED will continue flashing- can add as many RCUs during this time as needed (remember- total of all RCUs that can be added is 120). -6-
8 Lock will stop flashing 8 seconds after the last valid card is swiped. When the LED stops flashing it is out of programming mode. In order to put it back into programming mode again- swipe the Programming Keycard. The Keycards and RCUs can be added in any sequence when the lock is in programming mode. You cannot stack Keycards- the lock will not recognize stacked Keycards- you must swipe Keycards 1 at a time. Programming- Deleting Keycards and RCUs from the lock: This is to delete Keycards and RCUs (that are in your possession) from the lock. Swiping the Clear Keycard will put the lock in Delete Mode. Delete Mode will continue for 8 seconds after the last valid card was swiped. When the Clear Keycard is swiped the Delete Mode is indicated by a long beep and a flashing red LED (the LED will continue flashing until the lock is out of Delete Mode). During Delete Mode the Keycards and RCUs can be deleted (no longer valid). Swipe the keys in the listed order (steps 2 to 5 can be done in any sequence): 1. Clear Keycard (swipe)- Long beep and a continuous flashing red LED 2. User Keycards (swipe)- Blue LED followed by a short and long beep - red LED will continue flashing- can delete as many User Keycards during this time as needed. 3. Office Keycards (swipe)- Blue LED followed by a short and long beep - red LED will continue flashing- can delete as many Office Keycards during this time as needed. -7-
9 4. Lockdown Cancel Keycards (swipe)- Blue LED followed by a short and long beep - red LED will continue flashing- can delete as many Lockdown Cancel Keycards during this time as needed. 5. RCUs (press emergency button)- Blue LED followed by a short and long beep - red LED will continue flashing- can delete as many RCUs during this time as needed. Lock will stop flashing 8 seconds after the last valid card is swiped. When the LED stops flashing it is out of Delete Mode. In order to put it back into Delete Mode again- swipe the Clear Keycard. The Keycards and RCUs can be deleted in any sequence when the lock is in Delete Mode. You cannot stack Keycards- the lock will not recognize stacked Keycards- you must swipe Keycards 1 at a time. Programming- Deleting Keycards and RCUs from the lock that are lost: This is to delete Keycards and RCUs, which are not in your possession, from the lock. When you do not have the Keycard or RCU that you want to delete you have the ability to delete all Keycards of a certain type or RCUs from that specific lock. Swiping the Clear Keycard 2X will put the lock in this type of Delete Mode. Deleting a RCU in this manner will delete all RCUs programmed for this specific lock. Deleting a Lockdown Cancel Keycard will delete all Lockdown Cancel Keycards programmed for this specific lock. Deleting a User or Office Keycard will delete all User and Office Keycards programmed for this specific lock, User and Office Keycards are considered the same type of Keycard and will be deleted regardless if an Office or if a User Keycard is used for this deleting operation. When the Clear Keycard is swiped there is a long beep and a flashing red LED- swipe the Clear Keycard again and there is a short beep and the red -8-
10 LED will flash faster. Swipe (or push the lockdown button on the RCU) the Keycard type you are deleting and follow this with swiping the Clear Keycard. The red LED will stop flashing after the last Clear Keycard is swiped. Swipe the keys in the listed order (Clearing/Deleting all Office and User Keycards): 1. Clear Keycard (swipe)- short beep and a continuous flashing red LED 2. Clear Keycard (swipe)- longer beep and the red LED will flash faster. 3. Office or User Keycard (swipe)- Blue LED followed by a long beep - red LED will continue flashing. 4. Clear Keycard (swipe)- Blue and red LED followed by a short and long beep - red LED will stop flashing. Swipe the keys in the listed order (Clearing/Deleting all Lockdown Cancel Keycards) 1. Clear Keycard (swipe)- short beep and a continuous flashing red LED 2. Clear Keycard (swipe)- longer beep and the red LED will flash faster. 3. Lockdown Cancel Keycard (swipe)- Blue LED followed by a long beep - red LED will continue flashing. 4. Clear Keycard (swipe)- Blue and red LED followed by a short and long beep - red LED will stop flashing. Swipe the keys in the listed order (Clearing/Deleting all RCUs) 1. Clear Keycard (swipe)- short beep and a continuous flashing red LED 2. Clear Keycard (swipe)- longer beep and the red LED will flash faster. 3. RCU (press lockdown button extra ) - Blue LED followed by a long beep - red LED will continue flashing. -9-
11 4. Clear Keycard (swipe)- Blue and red LED followed by a short and long beep -red LED will stop flashing. After deleting the type of Keycard or RCU- the lost or misplaced keycard or RCU will no longer work on this lock. In order to re-program the lock to add the Keycards and/or RCUs that were deleted follow the instruction Programming- Adding Keycards and RCUs to the lock. The programming may, also, be done using the Database Card-follow the instruction Database Keycard Programming. Programming- Deleting all Keycards and RCUs from the lock except the Programming, Clear and Register Keycards: This is to delete all Keycards and RCUs from the lock. The lock does not delete the Programming, Clear or Register Keycards and the lock remains initialized. Swipe the keys in the listed order (Clearing/Deleting all Keycards and RCUs from the lock) 1. Clear Keycard (swipe)- short beep and a continuous flashing red LED 2. Programming Keycard (swipe)- short beep and the red LED will continue to flash. 3. Programming Keycard (swipe)- Blue LED followed by a short and long beep - red and blue LED will flash for 2 seconds. After deleting the Keycards (User, Office and Lockdown Cancel) the lock is still initialized and the Programming, Clear and Register Keycards still function. In order to re-program the lock to add the Keycards and/or RCUs that were deleted follow the instruction -10-
12 Programming- Adding Keycards and RCUs to the lock. The programming may, also, be done using the Database Card- follow the instruction Database Keycard Programming. Factory Reset: This is will delete all Keycards, RCUs and the lock is no longer initialized. The lock will be in Factory Mode and the Construction Keycard will open the lock. Swipe the keys in the listed order (puts lock into the Factory Mode) 1. Clear Keycard (swipe)- short beep and a continuous flashing red LED 2. Clear Keycard (swipe)- short beep and a continuous flashing red LED 3. Programming Keycard (swipe)- short beep and the red LED will continue to flash. 4. Programming Keycard (swipe)- Blue LED followed by a short and long beep - red and blue LED will flash for 2 seconds. In order to re-program the lock to add the Keycards and/or RCUs that were deleted follow the instruction Programming and Initialization of the RFID Lock and Programming- Adding Keycards and RCUs to the lock. The programming may, also, be done using the Database Card- follow the instruction Database Keycard Programming. -11-
13 Database Keycard Programming: The Database Keycard is used to import and export information. The Database Keycard can export or retrieve information from a programmed lock and this information can be imported or passed on to another lock to clone that lock. Each lock will have the same authorizations and the same Keycards/RCUs will work on both locks. Database Keycard- Exporting (retrieving information from a lock): Once a lock is programmed- you can use the Database Keycard to retrieve the information from the lock and store it on the Database Keycard. The information will stay on the Database Keycard until it is overwritten by using it again to export additional information from a lock to the card- the original data is overwritten and only the newest data is available. The Database Keycard is rated for 100,000 cycles minimum. Swipe the keys in the listed order (exports information from the lock to the Database Keycard) 1. Clear Keycard (swipe)- short beep and a continuous flashing red LED 2. Database Keycard (swipe and hold)- short beep and a continuous flashing blue LED- after approximately 5 seconds you will get 2 short beeps and a final blue LED. The Database Keycard needs to be held against the reader until all the information is exported to the card. The Database Keycard can -12-
14 now be used to import information into a lock or it can be used as an archive of the information in the lock. Database Keycard- Importing (transferring information to a lock): This will program the lock using the information on the Database Keycard. The lock can import information from the Database Keycard and the lock will be a clone of the lock that the Database Keycard retrieved its information from- it will be programmed as a clone in regard to Keycard and RCU authorizations (same initialization and programming). The information can be transferred to the lock if the lock is in Factory Mode or if it is already programmed. Lock is already programmed- Swipe the keys in the listed order (the lock imports information from the Database Keycard) 1. Program Keycard (swipe)- short beep and a continuous flashing blue LED 2. Database Keycard (swipe and hold)- short beep and a continuous flashing blue LED- after approximately 5 seconds you will get 2 short beeps and a final blue LED. Lock is in Factory Mode- Swipe the keys in the listed order (the lock imports information from the Database Keycard) 1. Database Keycard (swipe and hold)- short beep and a continuous flashing blue LED- after approximately 5 seconds you will get 2 short beeps and a final blue LED. -13-
15 The Database Keycard needs to be held against the reader until all the information is transferred to the lock. The Database Keycard can now be used to program additional locks as needed. Lost Programming and/or Clear Keycard: If a Programming or Clear Keycard is lost this will instruct you on how to make a new card and the lost cards will no longer be authorized. You must contact technical support (phone number and website is listed on all the Keycards) and obtain a new Programming or Clear Keycard to replace the lost Keycard. Once the new Keycard is received do the following: Swipe the keys in the listed order: 1. Register Keycard (swipe)- Long beep and a continuous flashing blue LED 2. New Programming or Clear Keycard (swipe)- Blue LED and a long beep - blue LED will continue flashing. 3. Register Keycard (swipe)- Short and long beep - blue LED will stop flashing. This will authorize the new Programming or Clear Keycard. No other Programming or Clear Keycard will now work with that lock. These are standalone locks and this must be done to each lock to authorize the new Keycard on each of those locks. Lost Register Keycard: -14-
16 If a Register Keycard is lost this will instruct you on how to obtain a new card and the lost card will no longer be authorized. You must contact technical support (phone number and website is listed on all the Keycards) and obtain a new Register Keycard to replace the lost Keycard. Once the new Keycard is received do the following: Swipe the keys in the listed order (1 st lock): 1. New Register Keycard (swipe)- Long beep and a continuous flashing blue LED 2. Programming or Clear Keycard (swipe)- Blue LED and a long beep - blue LED will continue flashing. 3. Register Keycard (swipe)- Short and long beep - blue LED will stop flashing. Swipe the keys in the listed order (subsequent locks): 1. New Register Keycard (swipe)- short and long beep and a continuous flashing blue LED 2. Programming or Clear Keycard (swipe)- Blue LED and a long beep - blue LED will continue flashing for 8 seconds. This will authorize the new register Keycard. No other register Keycard will now work with that lock. These are standalone locks and this must be done to each lock to authorize the new Keycard on each of those locks (1st lock programming is different from the subsequent locks). Lost Programming, Clear and Register Keycards: -15-
17 If all 3 Keycards are lost this will instruct you on how to obtain a new set of cards and the lost cards will no longer be authorized. If you have already used the Database Keycard and it has the information from 1 of the programmed locks you send the Database Keycard to the service center (technical support phone number and website is listed on all the Keycards). If you do not have a Database Keycard with the lock information: 1. Open the back cover 2. Press the Clear Button need an illustration or delete it - wait for 1 short beep and a continuous flashing blue LED 3. Swipe and hold the Database Keycard- short beep and a continuous flashing blue LED- after approximately 5 seconds you will get 1 short and 1 long beep and a final blue LED. This will program a Database Keycard with the information from the lock that was used. Send the Database Keycard to the service center. The service center will issue new Keycards. Once the Keycards are received do the following: Swipe the keys in the listed order (1 st lock): 1. New Register Keycard (swipe)- Short beep and a continuous flashing blue LED 2. New Programming Keycard (swipe)- Wait for short and long beep - blue LED will continue flashing. 3. Repeat steps 1 and 2 on all locks. -16-
18 Low Battery warning: The lock operates on 4 AA alkaline batteries only. Low battery warning will come on at approximately 4.8 volts. The only way to reset the lock and get out of low battery warning is to replace the batteries with new AA alkaline batteries. Important: Always replace all 4 batteries with new batteries. The following warnings will occur at different intervals: 1. The 1 st 50 times you open the door after the low battery threshold (~4.8 volts) is reached- Swipe an authorized Keycard- 3 beeps followed by 3 beeps (6 beeps total) and the lock unlocks 2. Using the lock times after the low battery warning threshold is reached- Swipe an authorized Keycard- 3 beeps followed by 3 beeps followed by 3 beeps (9 beeps total) and the lock unlocks 3. After 100 times or under very low voltage conditions- 3 beeps 4 times (12 beeps total) and then only the Programming Keycard will unlock the lock. Do not wait for the low battery warning- it is recommended under normal use that the batteries be changed every 12 months. If the low battery warning has started it is important to replace the batteries immediately to avoid any issues. Note: replacing or removing the batteries does not affect the lock memory. -17-
19 Keycard Control: Keycard control is important to maintain the integrity and security of the system. Each Keycard has a unique serial number printed on the face. Each Keycard is labeled with the type of Keycard (User, Office, Clear etc.). Keycards and the serial numbers should be logged. Each lock should have a database showing what Keycards/RCUs are authorized and the serial numbers of each Keycard. System and management Keycards- Programming, Clear, Register, Lockdown Cancel and Database Keycards-should be controlled by the department or person in charge of security. It is recommended that these Keycards be placed in a secure location to prevent any unauthorized use. It is important to report any lost or stolen Keycards and RCUs immediately and take the action necessary to reinstate new Keycards and RCUs. Swiping and holding the Keycards: Swiping a RFID Keycard in this context means placing the Keycard flat on the reader in front of the lock. It is recommended that the Keycard is placed so that the Keycard essentially covers the reader. This will ensure proper transfer of data and reduce programming errors. The Keycard should be left on for about 1 second or until the confirmation ( beeps ) is heard. In some cased the Keycard needs to be held- usually the Database Keycard- in order to ensure all the data is transferred. After the data transfer is complete there is a second confirmation ( beeps ) and the Keycard can be removed. -18-
20 Troubleshooting: If you have any issues please contact technical support (phone number and website is listed on all the Keycards). Some information and quick fixes: Look on on line for videos in regard to programming and troubleshooting (keywords- Townsteel and FCE 4000). In general- if you receive 3 beeps after swiping the Keycard it is not valid or the programming was incorrect. When having issues- stop and read the Programming Manual. When Initializing the lock- use the Programming, Clear and Register Keycards (in that order) and do not stop in the middle- complete this sequence. The Programming and Clear modes last for 8 seconds (signified by the flashing LED) after the last valid card was swiped- let it timeout before attempting something different. Read the manual before programming, have all the Keycards and RCUs organized and ready. FCC STATEMENT: This device complies with Part 15 of the FCC Rules. Operation is subject to the following two -19-
21 conditions: (1) This device may not cause harmful interference, and (2) This device must accept any interference received, including interference that may cause undesired operation. Warning: Changes or modifications not expressly approved by the party responsible for compliance could void the user's authority to operate the equipment. NOTE: This equipment has been tested and found to comply with the limits for a Class B digital device, pursuant to Part 15 of the FCC Rules. These limits are designed to provide reasonable protection against harmful interference in a residential installation. This equipment generates uses and can radiate radio frequency energy and, if not installed and used in accordance with the instructions, may cause harmful interference to radio communications. However, there is no guarantee that interference will not occur in a particular installation. If this equipment does cause harmful interference to radio or television reception, which can be determined by turning the equipment off and on, the user is encouraged to try to correct the interference by one or more of the following measures: Reorient or relocate the receiving antenna. Increase the separation between the equipment and receiver. Connect the equipment into an outlet on a circuit different from that to which the receiver is connected. Consult the dealer or an experienced radio/tv technician for help. -20-
22 Electronic Door Locking System - The Remote Control Unit The Remote Control Unit (RCU) is used to set an electronic door lock in alarm mode (RCU 315-1) or to open an electronic door lock from remote (RCU 315-2). The remote control unit is powered by an alkaline battery 27A 12VDC and uses 315MHz frequency. When the push button is pressed, the remote control unit sends a coded signal via the 315MHz RF circuits. Specification -21-
23 Dimensions: -22-

24 Operation Push the lockdown button and hold it for 2 seconds. Battery Low Alarm and Battery Change You should change the battery when the red LED flashes as alarm for battery low during pressing button. You can open the remote control unit easier with a slot type screwdriver. -23-
25
Schlage Control Smart Locks
 Schlage Control Smart Locks with Engage technology User guide Schlage Control Smart Locks with Engage technology User Guide Contents 3 Warranty 4 Standard Operation 4 Operation from the Inside 4 Operation
RF (RADIO FREQUENCY) WIRELESS PENDANT
 WIRELESS PENDANT") NOTE: The following information is an addition to the Operation section in the lift system owner s manual. It describes the RF wireless pendant for your lift system. You must read the lift system owner
NOTE: The following information is an addition to the Operation section in the lift system owner s manual. It describes the RF wireless pendant for your lift system. You must read the lift system owner
User Manual. Product Name:tablet Model Name:TM800A740M Brand Name:NuVision. Manufacture:Shenzhen Vastking Electronic Co.,LTD.
 User Manual Product Name:tablet Model Name:TM800A740M Brand Name:NuVision Manufacture:Shenzhen Vastking Electronic Co.,LTD. FCC Warning This device complies with part 15 of the FCC
CCR24T CCR24R. User s Guide WIRELESS TRANSMITTER SYSTEM WARRANTY SERVICE CARD WARRANTY CARD
 WARRANTY SERVICE CARD WARRANTY CARD PRODUCT NAME Wireless Transceiver System PERIOD MODEL NAME CCR24GEN YEAR PURCHASE DATE.. 200_ From the date of WARRANTY PERIOD.. 200_ purchase. CUSTOMER S ADDRESS :
WPR400 Wireless Portable Reader
 P516-098 WPR400 Wireless Portable Reader User guide Para el idioma español, navegue hacia www.schlage.com/support. Pour la portion française, veuillez consulter le site www.schlage.com/support. Contents
IMPORTANT: READ AND UNDERSTAND ALL INSTRUCTIONS BEFORE BEGINNING INSTALLATION
 INSTALLATI INSTRUCTIS Model: RB-G-K10 IMPORTANT: READ AND UNDERSTAND ALL INSTRUCTIS BEFORE BEGINNING INSTALLATI The Miller Edge RBand Monitored Gate Edge Transmitter/Receiver system is intended to provide
User Manual Digital Wireless Rain Gauge
 Rain Gauge Specifications: User Manual Digital Wireless Rain Gauge - Outdoor rain gauge transmitter measures the rainfall and transmits the data to an indoor rain monitor base unit which shows the rainfall
Instruction Manual. for Media Monkey. 1
 TM TM Instruction Manual for Media Monkey www.audioaperemote.com 1 Congratulations on acquiring your fine Audio Ape product Let s dive right in, getting up and running is a snap. Here are the components:
IMPORTANT: THIS DEVICE MUST BE PROFESSIONALLY INSTALLED. READ AND UNDERSTAND ALL INSTRUCTIONS BEFORE BEGINNING INSTALLATION.
 INSTALLATI INSTRUCTIS Model: RB-G-K10 IMPORTANT: THIS DEVICE MUST BE PROFESSIALLY INSTALLED. READ AND UNDERSTAND ALL INSTRUCTIS BEFORE BEGINNING INSTALLATI. The Miller Edge RBand Monitored Gate Edge Transmitter/Receiver
StealthLock is designed to install and program easily and offers: StealthLock is recommended for use on cabinets made from:
 Instruction Manual Thank you for purchasing StealthLock. StealthLock is an innovative solution for keyless invisible security. Using radio frequency technology, StealthLock allows you to secure almost
USER MANUAL MODEL: BM-162
 USER MANUAL MODEL: BM-162 Parents Unit: A. Name Power ON/OFF Key Music Key PTT Key Volume - Key Microphone Power & Low battery indicator LCD display Volume + Key Night Light and torch Key Speaker -Belt
MPRF01 Wireless 5uA Inductive Proximity Sensor RF System
 System Description; The MPRF01 is a simple ready to use Wireless Inductive. No programming is required; just insert 2, (1.5V) AA batteries into the Transmitter module. The RF receiver module is connected
Transponder Reader TWN4 MultiTech 3 Quick Start Guide
 Transponder Reader TWN4 MultiTech 3 Quick Start Guide Rev. 1.0 1. Introduction The transponder reader TWN4 is a device for reading and writing RFID transponders. There are different versions of TWN4 devices
CRUX II/BTGPS USER GUIDE. Model:D1598
 CRUX II/BTGPS USER GUIDE Model:D1598 0 Federal Communication Commission Interference Statement This equipment has been tested and found to comply with the limits for a Class B digital device, pursuant
HY737 Walkie talkie for kids
 HY737 Walkie talkie for kids ANTENNA SWITCH, VOLUME KNOB RED STATUS LIGHT MIC SPEAKER WWW.THEIPAR.CC WILLIAMWANG18@OUTLOOK.COM FCC ID: 2AJEM-HY737 ANTENNA ANTENNA SWITCH, VOLUME KNOB BELT BUCKLE PUSH TO
Innovation First, Inc. RS MHz Robot Controller User Manual
 RS-422 900 MHz Robot Controller User Manual 10.31.2006 www.innovationfirst.com Page 2 Table of Contents 1. Robot Controller Overview... 3 2. Installation... 3 3. Theory of Operation... 3 4. FCC / Industry
IMPORTANT: THIS DEVICE MUST BE PROFESSIONALLY INSTALLED READ AND UNDERSTAND ALL INSTRUCTIONS BEFORE BEGINNING INSTALLATION
 INSTALLATI INSTRUCTIS Models: RB-G-K10, RB-TX10 IMPORTANT: THIS DEVICE MUST BE PROFESSIALLY INSTALLED READ AND UNDERSTAND ALL INSTRUCTIS BEFORE BEGINNING INSTALLATI The Miller Edge RBand Monitored Gate
Model: VR-1A INSTALLATION AND OPERATING INSTRUCTIONS
 INTRODUCTI Model: VR-1A INSTALLATI AND OPERATING INSTRUCTIS SINGLE-FUNCTI WIRELESS CTROL SYSTEM FOR OPERATING HI/LOW SERVO MOTOR IF YOU CANNOT READ OR UNDERSTAND THESE INSTALLATI INSTRUCTIS DO NOT ATTEMPT
9RCT4334 Four Button. 2 3/4 X 1 3/8 X 9/16 (70mm x 35mm x 14mm) 2 3/4 x 2 1/8 x 1 (70mm x 55mm x 25mm)
 2 3/4 x 2 1/8 x 1 (70mm x 55mm x 25mm)") INSTALLATI 9RCR433/9RCT433 433MHz Transmitters & Receiver Description The 433MHz Series Transmitters and Receiver are ideal for the wireless activation and/or sequencing of automatic doors and remote access
INSTALLATI 9RCR433/9RCT433 433MHz Transmitters & Receiver Description The 433MHz Series Transmitters and Receiver are ideal for the wireless activation and/or sequencing of automatic doors and remote access
System Requirements: D-Link Systems, Inc.
 System Requirements: Minimum System Requirements: CD-ROM Drive Computers with Windows, Macintosh, or Linux-based operating systems Installed Ether net Adapter Internet Explorer version 6.0 or Netscape
Manual Unihan UPWL6025
 Manual Unihan UPWL6025 Federal Communications Commission Statement This device complies with FCC Rules Part 15. Operation is subject to the following i. This device may not cause harmful interference,
USER MANUAL. Sens it SENS IT 2.4
 USER MANUAL www.sensit.io Sens it SENS IT 2.4 SUMMARY SAFETY INSTRUCTIONS 4 I. CONTENT OF THE PACK 4 II. PRESENTATION 5 III. HOW TO START 8 IV. TECHNICAL SPECIFICATIONS 9 V. WARNING STATEMENTS 10 VI. CREDITS
Table of Contents. Mounting Diagram.. Wiring Information.. Setting the STR 1000 as a Repeater or a Transmitter. STR 1000 Frequently Asked Questions..
 STR 1000 Series Repeater Installation Manual (V 3.0) Table of Contents MOUNTING Mounting Diagram.. Page 2 WIRING INFORMATION Wiring Information.. Page 3 Setting the STR 1000 as a Repeater or a Transmitter.
WVP. Wireless Valve Programmer. Programmer for use with WVC Multi-Station Battery Powered Irrigation Controllers
 WVP Wireless Valve Programmer Programmer for use with WVC Multi-Station Battery Powered Irrigation Controllers Owner s Manual and Installation Instructions TABLE OF CONTENTS... Introduction...1 WVP Components...2
Operating Distance An operating distance (in conjunction with our GLR27 series receivers) of 350 metres is possible.
 of 350 metres is possible.") ELSEMA 27MHz HAND HELD GIGALINK TRANSMITTERS GLT2700, GLT2701, GLT2702, GLT2703, GLT2704 and GLT2708 Features Over 4 billion code combinations Can program any number of transmitters to a receiver High
ELSEMA 27MHz HAND HELD GIGALINK TRANSMITTERS GLT2700, GLT2701, GLT2702, GLT2703, GLT2704 and GLT2708 Features Over 4 billion code combinations Can program any number of transmitters to a receiver High
USER MANUAL Digital Wireless Gateway U9120-W4 (P/N: 44002G-01)
") USER MANUAL Digital Wireless Gateway U9120-W4 (P/N: 44002G-01) 19549P-82 (11-16) 2016 DAVID CLARK COMPANY INCORPORATED Cautions and Warnings READ AND SAVE THESE INSTRUCTIONS. Follow the instructions in
USER MANUAL Digital Wireless Gateway U9120-W4 (P/N: 44002G-01) 19549P-82 (11-16) 2016 DAVID CLARK COMPANY INCORPORATED Cautions and Warnings READ AND SAVE THESE INSTRUCTIONS. Follow the instructions in
Multi-Channel In-Out Thermometer with Cable Free Sensor and RF Clock
 Multi-Channel In-Out Thermometer with Cable Free Sensor and RF Clock MAIN FEATURES: MAIN UNIT GB MODEL: RMR182 USER'S MANUAL INTRODUCTION Congratulations on your purchase of the RMR182 Multi- Channel In-Out
Blue Point Engineering
 Overview Blue Point Instruction Board 2-CH Boards, Terminal Block and Ribbon Cable I Type: RF Radio (315 MHz) 1-2 Channels (FCC Part 15 Compliant Components). Operating Voltage: 6-15 VDC @ 1 Amp (Wall
Wireless Rain Station
 Wireless Rain Station For online video support: http://bit.ly/laxtechtalk Instructional Manual Model: T84237 DC:102017 Table of Contents 1 Button Function Explanation 8 NOW Rainfall Alert (silent) 2 Setup
Model: WS-7014CH-IT Instruction Manual DC: WIRELESS FORECAST STATION
 Model: WS-7014CH-IT Instruction Manual DC: 081815 WIRELESS FORECAST STATION Date Time + WWVB Indoor Temperature, Humidity + Comfort Forecast + Tendency Outdoor Temperature ºF/ºC + Channel Indicator Base
Model: WS-9066U-IT Instruction Manual DC: Wireless Weather Station with Moon Phase
 Model: WS-9066U-IT Instruction Manual DC: 051716 Wireless Weather Station with Moon Phase Contents Initial Setup... 2 Moon Phase... 2 Buttons... 2 LCD Features... 3 Settings Menu... 3 MIN/MAX Temperature
Wireless TFT LCD Monitor
 Wireless TFT LCD Monitor Description Screen Ratio: 16 : 9 Resolution: 800*RGB*480 TV: PAL / NTCS Voltage: 10--28V Rated Capacity: 5W Brightness: 450cd/m2 Contrast: 450:1 Operate temperature: -20~65 Display
EI-8899 Grades 1+ Ages 6+
 EI-8899 Grades 1+ Ages 6+ Notes: Math Whiz CONTENTS Why Is Math Whiz an Important Learning Tool?........... 2 Introduction to Math Whiz........................... 2 Special Features..................................
Focus Iris Manual Ver 1.1
 Focus Iris Manual Ver 1.1 Preston Cinema Systems 1659 Eleventh Street Santa Monica CA 90404 tel 310 453 1852 fax 310 453 5672 www.prestoncinema.com Table of Contents 1. Description 2. Operation 3. Specifications
TM14-2.4G/R6014FS/R608FS Radio Control Instruction Manual
 TM14-2.4G/R6014FS/R608FS Radio Control Instruction Manual INTRODUCTION Thank you for purchasing a FutabaR digital proportional R/C system. In order for you to make the best use of your system and to use
Radio Micro Force Manual v1.1
 Radio Micro Force Manual v1.1 Preston Cinema Systems 1659 Eleventh Street Santa Monica CA 90404 tel 310-453-1852 fax 310-453-5672 www.prestoncinema.com Table of Contents 1. Description 2. Operation 3.
TVT280 Visual IR Thermometer Operation Flow (rev 0.5)
") TVT280 Visual IR Thermometer Operation Flow (rev 0.5) A) Key Definition (6 keys) Front: Menu, Up, Down, Left, Right Back: Measure B) Operation Flow 1) Power ON: Press & Hold Left for 3sec [Opening Screen]
TVT280 Visual IR Thermometer Operation Flow (rev 0.5) A) Key Definition (6 keys) Front: Menu, Up, Down, Left, Right Back: Measure B) Operation Flow 1) Power ON: Press & Hold Left for 3sec [Opening Screen]
Ambient Weather WS-0270 Wireless Indoor / Outdoor Thermometer with Indoor Humidity User Manual
 Ambient Weather WS-0270 Wireless Indoor / Outdoor Thermometer with Indoor Humidity User Manual Table of Contents 1 Introduction... 1 2 Getting Started... 1 2.1 Parts List... 2 2.2 Recommend Tools... 2
S ENSORLINK INSTALLATION MANUAL
 S ENSORLINK INSTALLATION MANUAL The SensorLink Transmitter (#7610) and SensorLink Receiver (#7611) are designed to work with Davis Instruments Weather Monitor II and the Weather Wizard III to enable wireless
R PROFLAME Instruction Book Collection
 9.956.028 R00 584 PROFLAME Instruction Book Collection 4-17 18-29 584 PROFLAME System 30-39 Appendix: DIP SWITCH NUMBER (0=ON 1=OFF) 40-41 4-17 Fig. 1 The SIT is a device that allows, in conjunction with
SKY-6601 INSTALLATION AND OPERATING INSTRUCTIONS
 SKY-6601 INSTALLATI AND OPERATING INSTRUCTIS INTRODUCTI This SKYTECH remote control system was developed to provide a safe, reliable, and user-friendly remote control system for gas heating appliances.
USER MANUAL Universal Gateway U9921-GUV (P/N: 40994G-01)
") USER MANUAL Universal Gateway U9921-GUV (P/N: 40994G-01) 2012 DAVID CLARK COMPANY INCORPORATED Cautions and Warnings READ AND SAVE THESE INSTRUCTIONS. Follow the instructions in this installation manual.
USER MANUAL Universal Gateway U9921-GUV (P/N: 40994G-01) 2012 DAVID CLARK COMPANY INCORPORATED Cautions and Warnings READ AND SAVE THESE INSTRUCTIONS. Follow the instructions in this installation manual.
Instruction Manual. StealthLock, Keyless Invisible Security
 Instruction Manual 1 Thank you for purchasing StealthLock. StealthLock is an innovative solution for keyless invisible security. Using radio frequency technology, StealthLock allows you to secure almost
Wireless Keychain Remote Control
 Wireless Keychain Remote Control Model 3150C Operating Instructions and Owner s Manual Control Garage Door Opener and HomeSettings System from your car Thank you for purchasing the 3150C Wireless Keychain
Alchemy Systems L.P. SISTEM Radio Frequency Remote Control(8015-2R) & receiver(8015-2b) User Guide. Version: 2.4. Prepared by: Carlos A Acosta
 & receiver(8015-2b) User Guide. Version: 2.4. Prepared by: Carlos A Acosta") Alchemy Systems L.P. 8015 Shoal Creek Blvd., Suite 100 Austin, TX 78757 tel: 512-637-5100 fax: 512-637-5168 www.alchemysystems.com Alchemy Systems L.P. SISTEM Radio Frequency Remote Control(8015-2R) &
Alchemy Systems L.P. 8015 Shoal Creek Blvd., Suite 100 Austin, TX 78757 tel: 512-637-5100 fax: 512-637-5168 www.alchemysystems.com Alchemy Systems L.P. SISTEM Radio Frequency Remote Control(8015-2R) &
Driveway Alarm INSTALLATION MANUAL
 WIRELESS ACCESS CONTROLS Driveway Alarm INSTALLATION MANUAL Mounting post Transmitter Receiver Transformer Sensor Kit Includes: Transmitter Module Sensor Receiver Transformer Mounting post (3 pieces) Installation
Ambient Weather F007PF 8-Channel Wireless Water Thermometer User Manual
 Ambient Weather F007PF 8-Channel Wireless Water Thermometer User Manual Table of Contents 1 Introduction... 2 2 Getting Started... 2 Parts List... 2 2.1 Water Thermometer Sensor Set Up... 2 3 Glossary
PCK43302, PCK MHz Penta series Keyring Remotes with Frequency Hopping
 PCK43302, PCK43304 433MHz Penta series Keyring Remotes with Frequency Hopping FEATURES Small Size keyring remote with 2 or 4 buttons Dual Coding System, dip switch and encrypted code Transmission on 5
Quick Start Guide. Antenna Alignment Tool AIMWLLR0-35. QSG rev 7 AIMWLLR0-35 [NRB-0200] QSG.indd 1
![Quick Start Guide. Antenna Alignment Tool AIMWLLR0-35. QSG rev 7 AIMWLLR0-35 [NRB-0200] QSG.indd 1](/thumbs/86/94268876.jpg "Quick Start Guide. Antenna Alignment Tool AIMWLLR0-35. QSG rev 7 AIMWLLR0-35 [NRB-0200] QSG.indd 1") Quick Start Guide Antenna Alignment Tool AIMWLLR0-35 QSG-00097 rev 7 AIMWLLR0-35 [NRB-0200] QSG.indd 1 Welcome This quick start guide is designed to familiarize you with the features and use of the NetComm
Quick Start Guide Antenna Alignment Tool AIMWLLR0-35 QSG-00097 rev 7 AIMWLLR0-35 [NRB-0200] QSG.indd 1 Welcome This quick start guide is designed to familiarize you with the features and use of the NetComm
User s Manual. Magical Learn & Go. Disney Visit the Disney website at DisneyPrincess.com 2010 VTech Printed in China
 User s Manual Magical Learn & Go 4-7 Years Disney Visit the Disney website at DisneyPrincess.com 2010 VTech Printed in China 91-002484-001-000 INTRODUCTION Thank you for purchasing the VTech Magical Learn
Ambient Weather F007TH Wireless Thermo-Hygrometer User Manual
 Ambient Weather F007TH Wireless Thermo-Hygrometer User Manual Table of Contents 1 Introduction... 2 2 Getting Started... 2 2.1 Parts List... 2 2.2 Thermo-Hygrometer Sensor Set Up... 2 3 Remote Sensor Installation...
Firmware version 1.05 supports all CMOS sensor based digital backs IQ150, IQ250 and A- series IQ250.
 RELEASE NOTE January, 2015 Firmware version 1.05 for IQ150, IQ250 and A-series IQ250 Firmware version 1.05 supports all CMOS sensor based digital backs IQ150, IQ250 and A- series IQ250. New functionality
AUTOMATE Interior Sun Sensor
 AUTOMATE Interior Sun Sensor 433 MHz Internal sun sensor for automatic shade control. FEATURES: 3 Modes of operation: - Close Mode - Open / Close Mode - Shade Detect Mode 4 Light sensitivity levels INSTR.
Remote Control Outlets Operating Instructions
 Remote Control Outlets Operating Instructions - FOR INDOOR OR OUTDOOR USE - IMPORTANT SAFEGUARDS Signal Word Definitions NOTE: These are general definitions only; all may not pertain to the actual product
WLS-5500 Receiver (KSF & W26)
") WLS-5500 Receiver (KSF & W26) Installation Manual DN1869-0912 Warning! This manual contains information on limitations regarding product use and function and information on the limitations as to liability
WLS-5500 Receiver (KSF & W26) Installation Manual DN1869-0912 Warning! This manual contains information on limitations regarding product use and function and information on the limitations as to liability
Ambient Weather F007TP 8-Channel Wireless Probe Thermometer User Manual
 Ambient Weather F007TP 8-Channel Wireless Probe Thermometer User Manual Table of Contents 1 Introduction... 2 2 Getting Started... 2 2.1 Parts List... 2 2.2 Probe Thermometer Sensor Set Up... 2 3 Remote
ELSEMA. GLR2701 Single Channel 27MHz Gigalink Receiver with Timer Controlled Relay Output
 GLR2701 Single Channel 27MHz Gigalink Receiver with Timer Controlled Relay Output ELSEMA Features Wide supply connection 11.0 to 28.0 Volts AC/DC Highly sensitive receiver input stage. When used with GLT27.
Wireless AC Circuit Identifier
 User's Guide Wireless AC Circuit Identifier Models RT30 and RT30-E 99 Washington Street Melrose, MA 02176 Phone 781-665-1400 Toll Free 1-800-517-8431 Visit us at www.testequipmentdepot.com Back to the
USB RX Speed. Instructions for use Betriebsanleitung Mode d emploi Instrucciones para el uso Istruzioni per l uso
 USB RX Speed 19348 Instructions for use Betriebsanleitung Mode d emploi Instrucciones para el uso Istruzioni per l uso E L S U S B R X S p e e d M a n u a l 0 2. 0 2. 2 0 1 0 / / 7 3 3 2 4 English 1-8
Radio Controlled timekeeping. Receives 60KHz WWVB signal transmitted by NIST in Fort Collins, Colorado
 Congratulation on your purchase of an Atomix Radio Controlled clock. Radio Controlled technology allows for the most accurate time keeping available as well as automatic changes for Daylight Saving Time
User s Manual Buzz Lightyear Talk & Teach Phone
 User s Manual Buzz Lightyear Talk & Teach Phone Disney/Pixar Slinky Dog is a registered trademark of Poof-Slinky, Inc. Poof-Slinky, Inc. Visit the Disney Website at www.disney.com 2010 VTech Printed in
Ambient Weather WS-40 Wireless Indoor / Outdoor Thermometer
 Ambient Weather WS-40 Wireless Indoor / Outdoor Thermometer Table of Contents 1. Introduction... 1 2. Getting Started... 1 2.1 Parts List... 1 2.2 Thermometer Sensor Set Up... 1 2.3 Display Console Set
YDL100SF USER M A N U A L. Smart-Ashley. Smart-Ashley. Y D L S F N a m e and C a u t i o n. A u t u e n t i c a t i o n T y p e
 Smart-Ashley Smart-Ashley YDL100SF USER M A N U A L 1 2 3 4 5 6 Y D L 1 0 0 S F N a m e and C a u t i o n A u t u e n t i c a t i o n T y p e N o t i f i c a t i o n s F a c t o r y R e s e t C a u t i
Wireless Pressure Station with Backlight
 Wireless Pressure Station with Backlight FORECAST RELATIVE PRESSURE PRESSURE HISTORY inhg -24h -18h -12h -9h- 6h -3h0 h INDOOR For online video support: http://bit.ly/laxtechtalk Model: 308-1417BL DC:
USER GUIDE GREG KOCH GRISTLE-TONE PICKUP SET FOR TELECASTER
 USER GUIDE GREG KOCH GRISTLE-TONE PICKUP SET FOR TELECASTER Telecaster is a registered trademark of Fender Musical Instruments Corporation (FMIC) fishman.com Welcome Thank you for making Fishman products
P700WLS IoProx Receiver
 Installation Manual Warning! This manual contains information on limitations regarding product use and function and information on the limitations as to liability of the manufacturer. The entire manual
Connevans.info. DeafEquipment.co.uk. This product may be purchased from Connevans Limited secure online store at
 Connevans.info Solutions to improve the quality of life Offering you choice Helping you choose This product may be purchased from Connevans Limited secure online store at www.deafequipment.co.uk DeafEquipment.co.uk
Hi-Fi Shelf System *MFL * SIMPLE MANUAL
 ENGLISH SIMPLE MANUAL Hi-Fi Shelf System Please read this manual carefully before operating your set and retain it for future reference. To view the instructions of advanced features, visit http://www.lg.com
WIRELESS BARCODE SCANNER. User Guide.
 WIRELESS BARCODE SCANNER User Guide www.eskynow.com Thank you for choosing the Wireless Barcodes Scanner. Please read this manual carefully and keep it for future reference. If you need any further assistance,
Wireless SingStar Microphone Instruction Manual
 Wireless SingStar Microphone Instruction Manual 2008 Sony Computer Entertainment Europe. SingStar is a trademark or a registered trademark of Sony Computer Entertainment Europe. 2, PLAYSTATION and PlayStation
Wireless Color Weather Station
 Wireless Color Weather Station INSTRUCTION MANUAL MODEL: C85845V3 DC: 120518 FIND MANUALS, FAQS, AND MORE UNDER THE SUPPORT TAB HERE: bit.ly/c85845v3 TABLE OF CONTENTS 3. Power Up 3. LCD Features 4. Buttons
EcoSwitch Installation Guide SS8030
 EcoSwitch Installation Guide SS8030 Company Headquarters: Support Information: Sales Information: Telkonet, Inc. Toll Free: +1 (800) 380 9640 Toll Free: +1 (888) 703 9398 10200 W. Innovation Dr. Email:
DJT RC Transmitter Module 2.4 GHz Two-Way Series
 Manual Rev.0.1-5.05.201 2 made by David LABURTHE dlaburthe@free. fr DJT RC Transmitter Module 2.4 GHz Two-Way Series U S E R ' S G U I D E FrSky Electronic Co., Ltd - No. 1, Huize Road, Wuxi, 21 4081,
Contents. Page English 1. French. Spanish. Reset of MIN/MAX records 915 MHz Reception Mounting Care and Maintenance Warranty Information
 Contents Language Page English 1 French Spanish WIRELESS 915 MHz TEMPERATURE STATION Instruction Manual TABLE OF CONTENTS Topic Page Inventory of Contents Features Setting Up Battery Installation Function
MorningLinc INSTEON Morning Industry RF Doorknob/Deadbolt Controller
 MorningLinc INSTEON Morning Industry RF Doorknob/Deadbolt Controller Model : 2458A1 MorningLinc Owner s Manual MorningLinc Owner s Manual TABLE OF CONTENTS ABOUT MORNINGLINC... 2 Key MorningLinc Features...
x12 BATTERIES INCLUDED
 AGES 8+ 13744 x12 BATTERIES INCLUDED Replace with 12 x 1.5V AA or R6 size alkaline batteries. Phillips/cross head screwdriver (not included) needed to replace batteries. Standard, CRT TV only. Not for
Doc Rev - B. INSTALLATION AND PROGRAMMING INSTRUCTIONS FOR THE ClikCard NARROW BAND RESIDENTIAL GARAGE DOOR RECEIVER
 Doc - 6001238 Rev - B INSTALLATION AND PROGRAMMING INSTRUCTIONS FOR THE ClikCard NARROW BAND RESIDENTIAL GARAGE DOOR RECEIVER TABLE OF CONTENTS PART 1 INTRODUCTION AND BASICS...1 A. MOUNTING THE RECEIVER
WEATHER IN MOTION Model: BAR200 / BAR200U / BAR200A USER MANUAL
 WEATHER IN MOTION Model: BAR200 / BAR200U / BAR200A USER MANUAL Eu-declaration Of Conformity... 7 Fcc Statement... 8 Declaration Of Conformity... 8 EN CONTENTS Introdction... 2 Overview... 2 Front View...
RQT-xxx-RCVR Owner s Manual Quick Talk TM Wireless Voice Monitor & Alarm transmitter with factory installed MHz Keyfob Receiver
 RQT-xxx-RCVR Owner s Manual Quick Talk TM Wireless Voice Monitor & Alarm transmitter with factory installed 433.92 MHz Keyfob Receiver RQT-151-RCVR RQT-151M-RCVR RQT-451-RCVR RQT-152-RCVR RQT-152M-RCVR
VDBTLE24. BTLE Single Mode Module with USB. Description. Applications
 BTLE Single Mode Module with USB VDBTLE24 Description VDBTLE24, Bluetooth low energy single mode module is a single mode Bluetooth 4.0 device targeted for low power sensors and accessories. VDBTLE24 offers
WPR400 Wireless Portable Reader User guide
 *P516-098* P516-098 WPR400 Wireless Portable Reader User guide Para el idioma español, navegue hacia www.allegion.com/us Pour la portion française, veuillez consulter le site www.allegion.com/us Contents
USER MANUAL Wireless Belt Station U9913-BSW (P/N: 40992G-07)
") USER MANUAL Wireless Belt Station U9913-BSW (P/N: 40992G-07) 2014 DAVID CLARK COMPANY INCORPORATED Cautions and Warnings READ AND SAVE THESE INSTRUCTIONS. Follow the instructions in this installation
USER MANUAL Wireless Belt Station U9913-BSW (P/N: 40992G-07) 2014 DAVID CLARK COMPANY INCORPORATED Cautions and Warnings READ AND SAVE THESE INSTRUCTIONS. Follow the instructions in this installation
TARGETuner Antenna Management System for Screwdriver Antennas
 TARGETuner Antenna Management System for Screwdriver Antennas www.westmountainradio.com 1020 Spring City Drive Waukesha, WI 53186 262-522-6503 sales@westmountainradio.com 2014, All rights reserved. All
Model: WS-8418U-IT Instruction Manual DC: ATOMIC WALL CLOCK With Moon Phase and IN/OUT Temperature
 Model: WS-8418U-IT Instruction Manual DC: 062915 ATOMIC WALL CLOCK With Moon Phase and IN/OUT Temperature Front Time, Alarm, + WWVB Icon Indoor Temp, Month, Date, + Moon Phase Outdoor Temp + Weekday Buttons
User s Manual. Twist & Learn Gorilla Pals VTech
 User s Manual Twist & Learn Gorilla Pals 2009 VTech 91-101800-000-000 INTRODUCTION Thank you for purchasing the VTech Jungle Gym Twist & Learn Gorilla Pals! The VTech Jungle Gym Twist & Learn Gorilla
ORiNOCO AP-4000MR-LR and AP-4900MR-LR Access Points Safety and Regulatory Compliance Information
 IMPORTANT! Visit http://support.proxim.com for the latest safety and regulatory compliance information for this product. ORiNOCO AP-4000MR-LR and AP-4900MR-LR Access Points Safety and Regulatory Compliance
USER GUIDE GREG KOCH GRISTLE-TONE PICKUP SET FOR TELECASTER. Telecaster is a registered trademark of Fender Musical Instruments (FMIC)
") USER GUIDE GREG KOCH GRISTLE-TONE PICKUP SET FOR TELECASTER Telecaster is a registered trademark of Fender Musical Instruments (FMIC) Welcome Thank you for making Fishman products a part of your musical
USER GUIDE GREG KOCH GRISTLE-TONE PICKUP SET FOR TELECASTER Telecaster is a registered trademark of Fender Musical Instruments (FMIC) Welcome Thank you for making Fishman products a part of your musical
INSTALLATION MANUAL FOR SAL SERIES WIRELESS CLOCKS SPECIFICATIONS
 INSTALLATION MANUAL FOR SAL SERIES WIRELESS CLOCKS SPECIFICATIONS Time base: Quartz Power input: Battery (2 D cell) : Part # SAL-1BS-12R-0 95 135 VAC / 60 Hz: Part # SAL-1BS-12R-1 7 28 VAC / 60 Hz: Part
Super Switch Indoor Wireless Remote Control Wall Outlets
 Super Switch Indoor Wireless Remote Control Wall Outlets The Remote Control for Living Room, Kitchen & Bedroom Lights, Lamps, Fans and More Item/Art. 770742 Model #: SSW2-3-3322 Set of (3) Indoor Outlets
IRRIGATION 810-3R RECEIVER GUIDE
 IRRIGATION 810-3R RECEIVER GUIDE Pg. 2 HOT SHOT OVERVIEW 3 RECEIVER FUNCTION SWITCH SETTINGS 4 RECEIVER INDICATOR LIGHTS 4 SUPERVISION FEATURE 5 RECEIVER HOOKUP TO ENGINE DRIVEN WELL 6 RECEIVER HOOKUP
Manual Unihan UPWL6580
 Manual Unihan UPWL6580 Federal Communications Commission Statement This device complies with FCC Rules Part 15. Operation is subject to the following i. This device may not cause harmful interference,
Thermo Bluetooth-enabled Thermometer. Model: EMR211 USER MANUAL CONTENTS
 Weather@Home Thermo Bluetooth-enabled Thermometer CONTENTS Model: EMR211 USER MANUAL Introduction... 2 Overview... 2 Front view... 2 Rear view... 2 Remote Sensor (THN132N)... 3 Getting started... 3 Insert
3301 INSTALLATION AND OPERATING INSTRUCTIONS
 DOWN Cover Closed MODE UP Cover Open DOWN MODE TIMER TIME SET UP 3301 INSTALLATION AND OPERATING INSTRUCTIONS INTRODUCTION This SKYTECH remote control system was developed to provide a safe, reliable,
HORNET Remote Control Systems
 HORNET Remote Control Systems Up to 100metres Range 1 3 Button versions 12-30Vdc 0r 230Vac versions Reliable FM Technology Up to four 1000W Relay switches Waterproof Receiver (IP68) Momentary or Latching
AM/FM ARMBAND RADIO WITH CLOCK AND ALARM SAB-55A USER MANUAL
 AM/FM ARMBAND RADIO WITH CLOCK AND ALARM SAB-55A USER MANUAL PLEASE READ THIS USER MANUAL COMPLETELY BEFORE OPERATING THIS UNIT AND RETAIN THIS BOOKLET FOR FUTURE REFERENCE. A IMPORTANT SAFETY INFORMATION
900 MHz Digital Wireless Indoor/Outdoor Speakers
 4015007 900 MHz Digital Wireless Indoor/Outdoor Speakers User s Manual This 900 MHz digital hybrid wireless speaker system uses the latest wireless technology that enables you to enjoy music and TV sound
SRWF-1022 Series Low Power Wireless Transceiver Module User Manual
 SRWF-1022 Series Low Power Wireless Transceiver Module User Manual Page 1 of 6 I. SRWF-1022 SRWF-1022 User Manual (V1.1) SRWF-1022, the low-power wireless transceiver module is used as the wireless command
Manual Unihan UPWL6024
 Manual Unihan UPWL6024 Federal Communications Commission Statement This device complies with FCC Rules Part 15. Operation is subject to the following i. This device may not cause harmful interference,
Wireless Pressure Station
 Wireless Pressure Station FORECAST RELATIVE PRESSURE PRESSURE HISTORY inhg -24h -18h -12h -9h- 6h -3h0 h INDOOR For online video support: http://bit.ly/laxtechtalk Model: 308-1417 DC: 111517 Table of Contents
WS-7220U-IT 915 MHz Wireless Weather Station. Instruction Manual
 WS-7220U-IT 915 MHz Wireless Weather Station Instruction Manual 1 TABLE OF CONTENTS Introduction..3 Inventory of Contents 4 Quick Set Up 4 Detailed Set Up 4-5 Battery Installation....4-5 12 or 24 Hour