Armour Battles. Introductory World War Two Wargame Rules. Jim Bambra
|
|
|
- Marvin Isaac Bates
- 5 years ago
- Views:
Transcription
1 1

2 Armour Battles Introductory World War Two Wargame Rules Jim Bambra First published in 2015 by Wargames Design Jim Bambra. All rights reserved. Jim Bambra has asserted his right under the Copyright, Designs and Patents Act, 1988, to be identified as the author of this book. 2
3 TABLE OF CONTENTS Table of Contents... 3 Introduction... 6 Gaming Gear... 7 Essentials... 7 Markers... 8 Play Aids Armour Battles Basics Measuring Using Dice mm and 6mm Models Unit Statistics What Each Statistic Means The Game Turn Start of the Turn Dice Chains The First Command Pulse The Command Pulse End of Turn Movement Fixed and Variable Moves Multiple Moves Movement Orders Terrain Line of Sight Unit Morale Reaction Dice Disruption Points Dispersion Suppression Command Orders Command Groups Command Orders Defined Wild Dice
4 Staff Orders Initial Staff Orders Using Staff Orders Orders Summary Direct Fire Firing Reaction Checks Direct Fire Combat Results Opportunity Fire Indirect Fire Forward Observers Logistics Phase Off-Table Fire Missions Hit and Scatter Dice Smoke Missions Minor Obstacles Using a Dice Chain Hidden Units Ambush Fire Special Rules Sloped Armour Low Profile Reconnaissance Break-Off Shoot and Scoot Open-Topped US Units German Units Mission Briefings Explained Battle 1 - Meeting Engagement US Briefing - Battle US Unit Statistics German Briefing - Battle German Unit Statistics Battle 2 - Attack/Defend
5 US Briefing - Battle US Unit statistics - Battle German Briefing - Mission German Unit Statistics - Battle Battle 3 - Counter-Attack US Briefing - Mission US Unit Statistics - Battle German Briefing - Mission German Set-Up German Unit Statistics - Battle What Next? Armour Battles Expansion Credits About the Author
6 INTRODUCTION Armour Battles is an introductory set of World War Two wargame rules. Based on the larger Combat HQ rules, Armour Battles is a fully playable game. Armour Battles features three armoured battles set in Lorraine, France in 1944 as Patton s 3rd Army advances towards the Rhine. The first battle is a small meeting engagement between US and German tanks. The next battle has the Americans attacking the Germans. This is followed by the Americans attempting to break through the German positions as the Germans counter-attack with a Tiger I platoon. Game Facts Game Length: 2-3 hours. Unit Scale: The Platoon is the basic unit in the game and is represented by a model vehicle. Ground Scale: 1 equals 50 yards. Figure Scale: Plays equally well with 2mm, 6mm, 10mm, 15mm and 20mm figures. 28mm figures are possible, but a large table is required. Bases: No bases are required for vehicles. If you have based vehicle models, just make all measurements to the vehicle chassis and ignore the bases. Armour Battles Design Goals Armour Battles grew out of my desire to play a fast-moving World War Two miniatures game that not only required players to make decisions as army commanders, but also contained sufficient detail to capture the intricacies and complexities of World War Two armoured combat in a tense but fun game. My goal was to create a game that didn't follow a predictable I Go, You Go structure without having to rely on random cards or dice rolls to activate units. Alternate Command Pulses and the threat of a Command Failure make each turn different. During your turn you may not have enough Command Dice to do everything you want, and your opponent may also be using your own dice against you! Back to Contents 6

.")
7 GAMING GEAR To play Armour Battles you need an opponent and some model vehicles. For the first battle nine US tanks and seven German tanks are required. This increases to 12 US vehicles and 10 German vehicles for the second battle. For the third battle 15 US vehicles and 13 German vehicles. Although model vehicles are always best, you can try out the game with homemade cardboard counters. Grab a few pictures from the Internet and mount them on thin card roughly 40mm wide and 60mm long (or as needed). ESSENTIALS Tape Measures A tape measure for each player marked in inches and/or centimetres to measure movement and weapon ranges. Model Terrain You need a few hills, woods and hedges to play Armour Battles. These can be model terrain or be cut from coloured card or paper. Standard Dice 3D, four dice as 4D, and so on. Six-sided dice numbered from 1 6 are used for firing, checking reactions to fire, and rallying. Eight to twelve dice per player should cover most situations, but it never hurts to have more. Dice are referred to as D. When the rules state that you need to roll a single dice or multiple dice it is shown in this format: xd. One dice is shown as 1D, two dice as 2D, three dice as Command Dice Command Dice are standard six-sided dice used to determine how many orders a player can issue in a Command Turn. You don t need any special dice, but bigger dice, or dice of a different colour, or preferably both, will help avoid any confusion in the heat of battle. 7
: with a roll of 1 2 = 1, a roll of 3 4 = 2, and a roll of 5 6 = 3.")


8 D3 You need to roll a D3 each time a unit is Dispersed. You can buy special dice numbered 1, 2, 3. Or you can use a six-sided dice and half the result (rounding up): with a roll of 1 2 = 1, a roll of 3 4 = 2, and a roll of 5 6 = 3. Deviation Dice A special six-sided dice marked with Hit and directional arrows is used to check the accuracy of off-table artillery. Its use is not essential; the artillery section provides an alternative method for checking artillery accuracy. MARKERS Markers help keep track of information during the game. Disruption Markers Disruption Markers show the effects of combat on a unit. You can use micro dice, coins, coloured counters or glass beads to show a unit s current number of Disruption Points. Alternatively, Disruption Points can be tracked with pen and paper. Suppression Markers A Suppression Marker is placed on or next to a unit following an adverse Reaction result. A Suppression Marker can be as simple as a coloured counter or glass bead (red is good), or can be a specially created marker modelled to look like an explosion. Alternatively, a prone or dead figure works well. Fire Markers A Fire Marker shows that a unit has fired this turn. Cotton balls work very well, as do coloured beads or counters. 8


9 Staff Order Markers You can use counters or dice to keep track of Staff Orders. Alternatively, you can use Staff Figures and/or vehicles that are removed when orders are issued. Artillery Impact Markers Artillery Impact Markers show where your Staff Officers have targeted artillery missions. Use counters or other markers modelled to represent shell craters or explosions. Smoke Markers Similar to an Impact Marker, a Smoke Marker is used to show where a smoke mission has been plotted. White cotton wool glued to a washer or coin works well. Back to Contents 9


10 PLAY AIDS FREE Quick Reference Sheet, Unit and Battle Group cards for Armour Battles are available from: Quick Reference Sheet Unit Cards 10


11 You can either use them as reference sheets or cut out the cards and place them into card protectors. Battle Group Cards Handy reference cards for the battle groups featured in the three battles, plus a blank card for making your own battle groups. Back to Contents 11

12 ARMOUR BATTLES BASICS Basic game concepts are described in this section. MEASURING To measure the distance between units take the closest point of a vehicle s hull to the closest point of another vehicle s hull. USING DICE Armour Battles uses similar game mechanics for all actions (command, movement, combat and rallying). Success Rolls When determining whether an action is successful or not, between one to ten dice are rolled. Each dice needs to score the Target Number or more. The Target Number is referred to as TN. Most rolls start with a 4+ TN and are adjusted up or down from there. With a 4+ TN each roll of 4, 5 or 6 is a success; rolls of 1, 2 or 3 are failures. If the TN was 5+, then only those dice that score 5 or 6 are successes. Opposed Rolls Most rolls are opposed. Which means that your opponent rolls dice at the same time as you and the results are compared. With direct fire combat, you roll to hit your opponent s unit, and then he rolls to see how it reacts. If he gets the same or more successes, his unit isn t hit. When calling an artillery mission, you roll your Artillery Response Dice against dice rolled by your opponent. If you achieve more successes than your opponent, your artillery immediately fires for effect. 12


13 Playing in Centimetres If you want to use centimetres when playing with 15mm or larger models, it s relatively easy to do so. The most accurate way of converting is to multiply all distances by 2.5, but this can be a pain in the middle of a game. It s easier to multiply all distances by x2 - units move slightly less than they would when you measure in inches, but it doesn t make a lot of difference as all units move at the same relative speed. For example, a unit is Forced Back 6 +1D. A x2 multiplier converts this to 12cm +1Dx2cm. Ranges are easy to convert - just double them. A M4 75mm has a range of 7/14/28 in inches; this is increased to 14/28/56 when using centimetres. Alternatively you can multiply by x3 if you d like a bit more movement in your game and have a larger table. 2MM AND 6MM MODELS Armour Battles assumes that you are using 15mm or 20mm models. When playing with 2mm or 6mm models you have two options available: individual vehicles or multiple vehicles. Individual Vehicles You can use them as individual models and substitute centimetres for inches. A single model moving at average speed would move 6cm +1Dcm. A M4 75mm would have a range of 7/14/28cm. Multiple Vehicles You can mount 2 4 models on a base and play in inches as normal. This has the advantage of looking more like a real platoon. A base of multiple models would move 6 +1D. When using multiple models, all measurements should be taken from the edge of the base, not from the models themselves. 10mm Models 10mm sits happily between 6mm and 15mm and the larger scales. For a more visually true scale you can play in inches, or you can convert all distances into centimetres - useful if you have a small table. Back to Contents 13

14 UNIT STATISTICS Unit statistics are explained using the Sturmgeschütz III Assault Gun as an example. WHAT EACH STATISTIC MEANS Units have statistics that determine their performance. Some units have special abilities and these are listed in the notes section. Cohesion: All units in Armour Battles have a Cohesion of 3. They are Dispersed (removed from the table) when they have three Disruption Points. Training: All vehicles are Regular units. Type: The unit type and weight - AFV or Off-Table Artillery. Move: Move is how far a unit can move in inches in a single activation. Move comprises a Fixed Move and a Variable Move. A unit with a move of 6+1D moves 6 plus the result of 1D added to the 6 for a move of between 7 and 12. A unit with a move of 6+1Dx2, moves 6 plus the result of 1D doubled and added to the 6 for a move of between 8 and 18. Reaction: Reaction represents how well a unit is likely to respond in combat. Whenever a unit is hit, it makes a Reaction Check. The more armour a vehicle has, the more Reaction Dice it has. For example, a Panther tank has a 7D Reaction while the less armoured Panzer IV has 5D. The StuG III has the same armour as the Panzer IV, but has a low profile which makes it a harder target and gives it an extra Reaction Dice against Direct Fire. 14
15 Weapon: This lists the main weapon carried by the unit. Although most vehicles were also equipped with machine guns, no separate rating is given as the effects are included in the Fire rating. When using its Fire Dice the tank is firing its main gun and machine guns together. AT: AT is short for Anti-Tank Fire and shows the number of dice rolled when firing at armoured targets. All targets are armoured in Armour Battles. Range: These are the weapon s range bands in inches: short/effective/long. Short range fire is more accurate and units receive a 1 TN modifier. Effective range fire is unmodified. At long range units fire with a +1 TN penalty. Notes: Any additional information regarding a unit is listed here. For example, the Sturmgeschütz III is restricted to 180 fire arc as it does not have a turret, it can only fire to its front. It also has a low profile which makes it harder to hit than other vehicles. This increases its Reaction Dice to 6 against direct fire. Against artillery fire (the number in brackets) the StuG III has 5 Reaction Dice. Back to Contents 15

16 THE GAME TURN A turn consists of a variable number of Friendly and Enemy Command Pulses. Each turn players alternate using their Command Dice to issue orders. As the Command Dice results vary each turn, players have to adjust to the changing fortunes of war. The turn ends after both players have used all of their Command Dice. START OF THE TURN At the start of each turn, both players roll their Command Dice to determine the number of orders available. Command Failure If you roll more 1s than 6s, a Command Failure occurs. A Command Failure is a temporary breakdown in the army s dissemination of orders. It reduces the number of Command Dice available this turn and increases the enemy s Command Dice by an equal amount. All the 1s you rolled are given to your opponent who adds them to his Command Dice as Wild Dice. He gives the dice back to you at the end of the turn. A Command Failure also cancels Artillery and Smoke Missions (see the Indirect Fire section). It also prevents you from issuing Commit Reserves orders. Both Sides Roll a Command Failure If both players roll a Command Failure, the turn ends immediately. It doesn t matter how many 1s were rolled by either player, both failed to press the battle this turn. Both players artillery and smoke missions are cancelled. Rolls of Equal or Less 1s Than 6s If you roll the same or less number of 1s than 6s you avoid a Command Failure, but the 1s are discarded until next turn. While this is not as disastrous as a Command Failure, it reduces the number of available orders. Think of these discarded dice as orders you didn t have time to issue or orders that didn t get through. DICE CHAINS Dice Chains are made up of Command Dice of the same number. A Dice Chain therefore consists of one or more dice. The size of a Dice Chain is referred to by the number of dice it contains. One dice is a Single Dice Chain. Two dice form a Double Dice Chain. Three Dice form a Triple Dice Chain, and so on. The larger the Dice Chain, the more you can do with it. Laying Out Dice Chains After any 1s have been discarded the dice are arranged into Dice Chains and placed on the table where your opponent can see them. Dice Chains are formed by placing all dice with the same number together. If you rolled 6, 5, 5, 4, 3 you have four Dice Chains. Place the Dice Chains as shown here 16

17 If you rolled 5, 4, 3, 1, 1 you trigger a Command Failure and give your opponent the two 1s. You then have three Dice Chains available: THE FIRST COMMAND PULSE If a player rolled a Command Failure, his opponent automatically has the first Command Pulse. Otherwise, the player with the most 6s goes first. If both players have the same number of 6s, then the player with the most 5s goes first. If this is also tied, continue by comparing the number of 4s, then 3s, and if that fails 2s. If the result is still tied, both players re-roll all Command Dice again including any discarded 1s. THE COMMAND PULSE On your Command Pulse, you choose a Dice Chain to issue orders with. You are free to select any Dice Chain, but you must choose one; you cannot pass the Command Pulse to your opponent. If you choose a Single Dice Chain, you issue one order and your Command Pulse ends. If you choose a Double, Triple or larger Dice Chain, you must use all of the dice in the Chain. How you use a Dice Chain is up to you. With a Triple Dice Chain you could issue three single orders, or a double order and a single order, or use all three to issue a triple order. You may also use a multiple Dice Chain to increase your number of Staff Orders. Once you have used all of the dice in the Dice Chain, your Command Pulse ends, and your opponent now chooses a Dice Chain. Command Pulses alternate between players until all Command Dice have been used. Where one player has used all of his Dice Chains before his opponent, his opponent continues to choose and use Dice Chains until he has used them all. END OF TURN The turn ends after all Dice Chains have been used. Fire Markers are now removed from all units. The Turn Sequence Both Players Roll Command Dice The Player who rolls the most 6s goes first First Friendly Command Pulse First Enemy Command Pulse Second Friendly Command Pulse Second Enemy Command Pulse Command Pulses alternate until all Command Dice are used 17
18 End of Turn Remove Fire Markers Command Failure More 1s Rolled Than 6s A player who rolls a Command Failure automatically goes second If both players roll Command Failures the turn ends Artillery and Smoke Missions are cancelled Staff Orders may be used to maintain them Commit Reserves orders cannot be used Back to Contents 18
19 MOVEMENT Units move at varying speeds over different types of terrain. While it s possible to calculate how far a platoon of tanks would move over firm, level ground under normal conditions, in the middle of a battle movement is far more uncertain. The ground may be softer than it looks or covered in rocks. Also, units move as fast as they consider appropriate. A tank platoon could cross the ground at full speed, but it runs the risk of some of its vehicles throwing their tracks or failing to spot enemy units. As battle commander you can order units to their destination, but you can t accurately predict when they ll get there. If you want your units to move quickly, give them a double or triple move order. FIXED AND VARIABLE MOVES How far a unit can move is a combination of its Fixed and Variable Move distances. When calculating movement add the Variable Move to the Fixed Move. Average vehicles move 6+1D for a move of Fast vehicles move 6+Dx2. Roll a dice and double the result before adding it to the Fixed Move of 6 for a move of Command Groups: A Command Group moves at the speed of its slowest unit. For example, fast vehicles moving with average vehicles move at the average speed of 6+1D. Suppressed Units: Move at their Variable Move rate only. For example, Max s Panther platoon is suppressed. He activates it and moves it 1D. MULTIPLE MOVES When using a Dice Chain, total the Fixed Move distances and then roll the Variable Move dice. Average vehicles moving with a Double Dice Chain move 12 (6 +6 ), plus the results of 2D, for a movement distance of Fast vehicles moving with a Triple Dice Chain move 18 ( ), plus the results of 3Dx2 for a movement distance of A Dice Chain is allocated before dice are rolled for movement. You cannot wait to see how far a unit moves and then allocate more dice to it. MOVEMENT ORDERS A unit may move as part of an activated Command Group, but it s not required to move when other units in the Command Group move. For example, a Panther tank has been activated along with three Panzer IVs. The player decides that the Panther will remain stationary and fire at a M4 platoon before the Panzer IVs move. To issue a movement order indicate which units are moving and how many Command Dice are being used. You then place the Command Dice at the intended destination. 19
20 For example, the Panthers will move up to the edge of these woods. You can also nominate a specific point on the table and declare that your units are heading there. The Panzer IVs are moving up to here. Once you ve declared your movement orders, the units move the full rolled distance towards their objective. The units halt upon reaching their destination regardless of any movement remaining. You cannot decide to move somewhere else or not move at all if you don t like the results of the Variable Move. Command Group units that move must end their move within 6 of each other. You cannot activate a Command Group and have its units move in different directions. Movement orders are only in effect for the current turn. Moving and Firing Units may make a single move and fire with no penalty. If they use a Double Dice Chain, they fire with a -1D penalty, and if they use Triple Dice Chain they fire with a -2D penalty. For example, a Panzer IV has 8D AT. If it makes a double move this is reduced by -1D to 7D, and to 6D if it makes a triple move. Moving and Facing A unit faces the direction it moves in. When using opportunity fire, your opponent may be able to fire at the side or rear of your unit depending on the direction it faces during its move. A unit may change direction and facing any number of times to get to its destination. Once at its destination it may face in any direction desired. A Panzer IV has been ordered to move from the south of the wood to the north. It is currently facing east. The German player rolls his movement dice 6+1D for a total move of 11. More than enough to reach its destination. The Panzer IV first turns to face north and then moves 5 to the edge of the wood. It then faces north-east and moves 3 to its destination. The German player now changes the Panzer IV s facing from North-east to North. Sideways and Backwards Movement Vehicles move backwards at their Variable Move. They cannot move sideways without changing their facing. A Multiple Dice Chain cannot be used to move backwards without changing a unit s facing. Back to Contents 20

21 TERRAIN Terrain affects how quickly units move across the battlefield. Open Ground: Open ground provides a firm surface for movement. It includes grasslands, fields, pavements, orchards, and other hard surfaces. Units move normally over Open Ground. Broken Ground: In Armour Battles Broken Ground includes woods and hills. Units move at half speed over Broken Ground. Roll the Variable Dice, add it to the Fixed Dice then divide the total by 2. Moving In and Out of Terrain Types When moving from Open Ground to Broken Ground, move the unit to the edge of the Open Ground and then apply the movement penalty to any remaining movement. Similarly, when moving out into Open Ground, first apply any movement penalties, and then move the unit normally with its remaining movement. For example, a M4 platoon 9 from the edge of a wood (Broken Ground) is ordered to enter the wood and then move through it. It rolls a 5 (6+5 = 11 ) and moves 9 to the edge of the wood. It then moves 1 into the wood (half of the remaining 2 ). If the unit had rolled a 3, it could only have moved 9 and would have halted at the edge of the wood. Later the platoon is ordered to move through the wood (Broken Ground) into Open Ground. It is 4 from the edge of the wood. It rolls a 4 allowing it to move 10 (6+4). It costs 8 to move to the edge of the wood, leaving it with 2 to move into the Open Ground. If a 2 had been rolled, the unit would only have enough movement to get to the edge of the wood. It would have to wait until its next activation before moving into the Open Ground. On a roll of 1 it would have only moved 3 1/2 and would have remained within the wood. Back to Contents 21
22 LINE OF SIGHT Line of Sight (LOS) determines whether one unit can see another. It consists of drawing an imaginary line across the table from one unit to another. LOS is blocked if it passes through a solid object such as a tall wall or hedge, a building, hill or smoke screen. There are many different ways to check LOS. Some players prefer to stretch a length of string between the viewing unit and its target. Some prefer to use laser pointers, and some prefer to eyeball it by getting down to table level and sighting along the ground. All of these ways are fine. Just watch out for your opponent s eyes when using a laser pointer! For a unit to be in LOS at least half of the unit base must be visible to the unit drawing the LOS. It doesn t matter if the rest of the unit is hidden behind a building, wall, etc, it can still be seen. Terrain comes in so many different heights and sizes that it s impossible to provide LOS rules for all occasions. The following guidelines work well, and can be easily changed if both players agree. Woods: Woods always block LOS. Any unit within 1 of the edge of a wood can see out of the wood, and be seen by any other unit outside of the wood. Two units within a wood can see each other up to 1 away. Hills: Hills always block LOS. Only a higher hill can provide LOS over a lower one. Hedges: Hedges block LOS. But LOS may be drawn across hedges from a hill. Units adjacent to a hedge can see through it and be seen by other units. Friendly Units: Friendly units always block LOS unless the firing unit is on a higher elevation and the friendly unit is closer to the firing unit than its target. Back to Contents 22

23 This section describes how unit morale works. UNIT MORALE REACTION DICE Reaction Dice are used to determine how units react in combat. Reaction Checks are made every time a unit takes one or more hits. Unsuppressed units have a 4+ TN. Suppressed units have a 5+ TN. DISRUPTION POINTS Disruption represents the psychological impact of combat on a unit. As casualties build up and combat fatigue sets in troops become less willing to fight. Each hit not cancelled by a Reaction Check results in the unit taking a Disruption Point. Removing Disruption Points Disruption Points can be removed by rallying units with Command Dice (covered later when Command Orders are discussed). Suppressed StuG III with two Disruption Points. DISPERSION A unit is Dispersed as soon as it has three Disruption Points. The unit is removed from the table and D3 Army Morale Points are lost. SUPPRESSION Enemy fire can suppress a unit. When suppressed a unit s officers may have been hit, or part of the platoon may have panicked. A suppressed unit keeps its head down and is reluctant to engage the enemy. 23
24 Causes of Suppression Suppression may occur each time a unit takes fire. Any time you roll one or more 6s when firing at an enemy unit, you may suppress it. Unless your opponent rolls as many 6s with his Reaction Dice as you rolled, his unit is suppressed. It doesn t matter if his units don t take any hits. Unless he matches or exceeds your number of 6s, his unit is suppressed. Effects of Suppression Suppressed units cannot fire. This occurs as soon as the unit is suppressed. A unit that has just been activated, which is then suppressed by opportunity fire, cannot fire. A suppressed unit cannot be activated as part of a Command Group. A suppressed unit can be activated on its own, but no other unit can be included in this activation. The unit remains suppressed after being activated. A suppressed unit cannot be rallied. A suppressed unit loses its Fixed Move as its troops are reluctant to advance quickly. It only uses its Variable Move. Removing Suppression Prior to Activation Before a unit is activated a Remove Unit Suppression order removes suppression from one unit. Removing Suppression After Activation After a unit has been activated, suppression can only be removed with a Wild Dice or Staff Order. For example, three Panzer IVs are activated and they move towards a group of M4 75mm. The M4s use opportunity fire and suppress one of the Panzer IVs. The player uses a Wild Dice to remove the suppression: the Panzer IV can now fire. Forced Back A unit may be Forced Back. A unit is Forced Back when it becomes suppressed and takes at least one Disruption Point from the fire. Forced Back units move directly back 6 plus an additional 1D for each unmatched 6. A unit with one unmatched 6 is Forced Back 6+1D. If it has two unmatched 6s, it is Forced Back 6+2D. Units are Forced Back facing the enemy. Units may move into or behind cover as part of their Forced Back move. They halt on moving behind or into the cover. If a unit is Forced Back into a friendly unit, it moves through the friendly unit. If a Forced Back move would move a unit so that it ends the move on top of a friendly unit, it is moved through the unit and placed behind it. If a unit is Forced Back into an enemy unit, the Forced Back unit is Dispersed. If a unit is Forced Back so that it would move off the table, it halts at the table edge. Back to Contents 24


25 COMMAND ORDERS Command Orders are used to activate or rally units. Double or larger Dice Chains can be used to increase the number of Staff Orders or issue multiple move orders. COMMAND GROUPS Each Command Dice lets you activate one Command Group. Command Groups are based on historic company formations but are not restricted to them. Combat HQ uses a flexible command system that lets you decide which units follow your orders. You activate Command Groups one at a time, completing all actions with one Command Group before activating another. When you activate another Command Group, you cannot go back to a previous one, so be sure you have performed all actions with a Command Group before activating another. Creating a Command Group Nominate any unit on the table as a leader. This unit can activate itself and up to three other units within 6 (measure from the centre of the unit to the closest point on the models you want to activate). Command Group activated with a Single Dice Chain. Command Group activated with a Triple Dice Chain. 25
26 Command Groups are flexible and can be changed each turn. Activation Restrictions No unit may be activated more than once per turn. Therefore, it s not possible to include a unit in more than one Command Group as that would activate it twice. A suppressed unit may not be included in a Command Group. It must be activated on its own or first have its suppression removed (this does not count as activation) and then be included in a Command Group. Forming a Command Group Choose one unit to be the leader Place Command Dice next to it The Command Unit activates itself and up to three other units * No unit can be activated more than once per Command Pulse * Suppressed units may not be included in a Command Group COMMAND ORDERS DEFINED A Command Group can be given a variety of orders. Move and Fire This order is the basic activation used to move and fire with units. Activated units may move and fire, or they fire and then move. They can also be activated to fire, but not move. They may make a normal move without a penalty to firing, but suffer penalties when making multiple moves. Commit Reserves This order commits a Command Group held in reserve to enter the table with a triple move. Units already on the table cannot be included in a reserve move. Reserves are committed by selecting a reserve Command Group and placing the units on the Friendly Table Edge. The Command Group can now make a triple move for only one Command Dice. It is subject to opportunity fire as normal. A Commit Reserves order cannot be used in a turn in which you roll a Command Failure. Disengage Group Units may disengage directly backwards. They move their full distance back and end their move facing the enemy. Disengaging units may halt on entering or moving behind cover. Otherwise, they move back as far as their total rolled move. Disengaging units pay any Fixed Move penalty for crossing obstacles and move at 1/2 speed in Broken Ground. If a disengaging unit is fired at with opportunity fire it gains +2 Reaction Dice. Disengaging units may make multiple moves with a Dice Chain, but must move directly backwards. They cannot manoeuvre when disengaging. A disengaging unit cannot fire, but may use opportunity fire in an Enemy Command Pulse. 26
27 Rally Group A Rally Group order allows a Command Group to attempt to rally. Successful rally attempts remove Disruption Points from units (see Morale). When rallying, form a Command Group as you would for movement. All non-suppressed units within 6 of the nominated leader, as well as the leader, are eligible to be rallied. Suppressed units cannot be rallied. The suppression has to be removed first with a Remove Unit Suppression order. A Command Group that receives a rally order cannot be activated this turn, but it may use opportunity fire. How to Rally Each unit in a Command Group is rallied individually. You can attempt to rally units in any order you want. Nominate a unit and roll your Rally Dice. Your opponent rolls one dice for each Disruption Point your unit has. Your opponent has a 4+ TN. One Disruption Point is removed for each of your successes. Your TN for Rallying is determined by the distance of the unit from the closest enemy unit. Measure the range to the closest enemy unit and look up the Target Number on the Rally Table. Rally Table Your opponent has a 4+ TN. Distance Rally TN Distance: How far your unit is from the nearest enemy unit. Rally TN: The TN required for a success. Cover: Units who are in or behind cover are easier to rally and gain +1D. No LOS to Enemy: If your unit cannot see the enemy, you gain +1D. Remove Unit Suppression This order is given to a single unit and removes a suppression marker from it. The unit may now be included in a Command Group. For example, a US M4 platoon is suppressed. Tom uses a Command Dice to remove the suppression marker. He then uses another Command Dice to activate it along with two other units. Removing Suppression After Activation: A unit that has been suppressed after it has been activated can have its suppression removed with a Wild Dice or Staff Order. It can then fire. 27

28 WILD DICE A Wild Dice is a roll of 6 when rolling Command Dice. It represents a lucky break: an opportunity for the Combat HQ to influence the battle directly. A Wild Dice can be combined with other dice to create a larger Dice Chain, be added to any combat roll, used as a Variable Move dice, or used to improve a Rally Order attempt. Except when creating a Dice Chain, only one Wild Dice may be used per action, but you can, for example, activate a unit using a Wild Dice, and then add another Wild Dice to its AT Dice. A Wild Dice can also be used as a normal Command Dice; you don t have to use it as a special dice. Create a Larger Dice Chain A Wild Dice may be added to any other dice to make a Double, Triple or larger Dice Chain. For example, you roll two 1s, one 4, one 5, and two 6s. The two 1s are discarded. The two Wild Dice allow you to create a Dice Chain of two 6s. Or you can combine the Wild Dice with the 4 and the 5 to create two Double Dice Chains. You can use both Wild Dice to create a Triple Dice Chain by adding them to the 4 or the 5. Add to a Combat Roll A Wild Dice may be used to add one dice to one unit s AT dice. Add to a Reaction Roll A Wild Dice may be used to add one dice to one unit s Reaction Dice. Add to a Rally Roll A Wild Dice may be used to add one dice when rallying a Command Group. 28
29 Replace a Variable Move Dice You may use a Wild Dice to replace a Variable Move dice allowing a Command Group to move its maximum distance. Instead of your fast vehicle moving 6+1Dx2, it would automatically move 18. As with other actions, you may only do this once, so if a double or triple move is made, only one Wild Dice can be used. Instant Staff Orders Staff Orders are described later. Usually when you add a Staff Order it s not available until your next turn. If you use two or more Wild Dice, you can issue a Staff Order that is instantly available. You get one instant Staff Order for two Wild Dice; two instant Staff Orders for three Wild Dice 6, and so on. Think of instant Staff Orders as an urgent request for your staff to act immediately. Wild Dice Table Create a Larger Dice Chain Add to a Combat Roll Add to a Reaction Roll Add to a Rally Roll Replace a Variable Move Dice Double, triple or more 6s can be used to issue instant Staff Orders Back to Contents 29
30 STAFF ORDERS Each Combat HQ is supported by a team of Staff Officers dedicated to the running of the army. As the Combat HQ you re concerned with ordering and motivating your troops while your Staff Officers coordinate the support needed to win. Staff Officer abilities are tracked using Staff Orders and can be used to call artillery missions (available in Battles 2 & 3), and for ordering and rallying units. INITIAL STAFF ORDERS The initial number of Staff Orders are listed in the Mission Briefings for each battle group. Restocking Staff Orders As the game progresses, you ll run low of Staff Orders. The briefing you gave before the battle is represented by the initial Staff Orders, but as they call artillery, Commit Reserves and help you issue orders, their knowledge of your requirements is reduced. Unless you take the time to update your staff officers on the current situation, they ll become distanced from your needs. A Double Dice Chain allows you to add one Staff Order. A Triple Dice Chain allows you to add two Staff Orders, a Quadruple Dice Chain allows you to add three Staff Orders, and so on. You cannot use Staff Orders in the same turn that you restock them - it takes time for the orders to be assimilated (but see Instant Staff Orders). Stocking Staff Orders with Wild Dice As well as allowing Instant Staff Orders, Wild Dice allow Staff Orders to be restocked on a one-to-one basis. Each Wild Dice may be converted into directly into a Staff Order. Wild Dice used this way cannot be used to issue Instant Staff Orders - they may only be used on your next turn. Maximum Number of Staff Orders You may have as many Staff Orders as you have Command Dice. Instant Staff Orders Any Dice Chain consisting of Wild Dice lets you issue instant Staff Orders. Instead of storing them for later, you can use the Staff Orders immediately. USING STAFF ORDERS Staff Orders may be used in the Logistics Phase to adjust artillery missions, and at any point after the Logistics Phase for other orders. 30
31 Command Staff Orders Command Staff Orders are identical to Command Orders. You can use Staff Orders instead of or in addition to Command Dice. Move & Fire Commit Reserves Disengage Group Rally Group Remove Unit Suppression Staff Orders Only The following orders are available as Staff Orders. Create a Larger Dice Chain Staff Orders may be used to create Double or Triple Dice Chains. You can combine them with Command Dice to create one or more chains, or you can use multiple Staff Orders. You must, however, create the Dice Chain before rolling to see how effective it is. Wild Dice A Staff Order is effectively a Wild Dice. It can add +1D to any Reaction Check, Direct Fire roll or Rally attempt. This bonus can be used at the same time as a Command Wild Dice, giving you a +2D bonus. Off-Table Assets The rules for artillery are presented later. The rules here describe how Staff Officers direct off-table assets. You don t need these rules to play Battle 1. Call Artillery Mission This order calls an Artillery Mission for an artillery battery. Call Smoke Mission This order calls a Smoke Mission for an artillery battery. Adjust Artillery Using a Staff Order, the Impact Marker of a battery may be adjusted up to 4 in any direction before it fires for effect in the Logistics Phase. The unit acting as the battery s Forward Observer must be able to see the new location. After adjusting the Impact Marker, roll the Deviation Dice. Maintain Artillery & Smoke Missions Artillery and smoke missions are cancelled when a Command Failure occurs, but may be maintained with a Staff Order. This is useful when your artillery has been called, but hasn t fired for effect yet. Cancel Fire Mission A fire mission may be cancelled for free: it doesn t need a Staff Order. A new fire mission may be plotted next turn. 31
32 Opportunity Staff Orders The following Staff Orders may be used during an Opponent s Command Pulse: Remove Suppression Increase Combat Dice Increase Reaction Dice ORDERS SUMMARY Command and Staff Orders Move and Fire Commit Reserves Disengage Group Remove Unit Suppression Rally Group Staff Orders Only Call Artillery Mission Call Smoke Mission Maintain Artillery Maintain Smoke 6s = Wild Dice Create/Add to Dice Chain Instant Staff Order Add to Combat, Reaction or Rally Dice Replace Variable Move Dice Back to Contents 32

33 DIRECT FIRE Direct fire is ranged fire with Anti-Tank weapons. The firing unit rolls its AT Dice, the opponent then rolls his Reaction Dice, and the results are compared. FIRING When activated a unit may fire without moving, or it can move and fire, or fire and move. It may not fire while moving. A unit may also use opportunity fire during an enemy Command Pulse whenever an enemy unit moves or fires within its LOS. All firing is done on a unit by unit basis. Resolve the shooting of one unit before going on to resolve the shooting of another. Fire Markers Units that have fired are marked with a Fire Marker. A unit cannot fire again until next turn. Fire Markers are removed at the end of the turn. Arc of Fire A unit s arc of fire determines in which directions it can fire. Most units in Armour Battles have turrets and can fire in any direction with a 360 arc of fire. The StuG III doesn t have a turret and is restricted to a 180 arc of fire. It can fire to its front only. When activated a unit may pivot on its centre to face any direction. This, however, counts as moving for the purpose of triggering opportunity fire. How to Fire To fire a unit needs LOS to its target. The range to the target is then measured. If this is out of the weapon s range, the unit fires, but misses. Target Priority A target is declared before the dice are rolled. Nominate which one of your units is firing at which enemy unit. Your unit must fire at the closest enemy unit. After firing one unit, nominate another unit and carry out its attacks. You are not required to make multiple attacks against the same target, but you can do so if you want to. Once a unit has been fired at you can then fire at the next closest unit, and so on. 33

34 As the Combat HQ, you order your units to engage the enemy and assume that they will perform to the best of their abilities. This means that your units target enemies immediately to their front and don t take the time to decide whether a more distant target is a greater threat. A Command Group can be ordered to concentrate on one target or to spread its fire, but it cannot be ordered to ignore the closest units in favour of ones further away. Armour Battles doesn t require you to deploy your units into formal formations, however, the target allocation rules make it advantageous to do so. For Example, Tom s M4s are set up in a two up, one down formation. He has two 75mm M4s in the front and a 76mm M4 in the rear. Max fires at Tom s M4s with three Panzer IVs. Max wants to target the 76mm M4 as this is the biggest threat, but he has to target the two M4s at the front of the formation first. He can then target the 76mm M4 with his third tank. If Max had four tanks, he could target the 76mm M4 twice. Fire Modifiers The Target Number required to hit a target at effective range is 4+. A unit s Anti-Tank Dice and TN are modified according to the situation. Suppression: A suppressed unit cannot fire. Target Number Modifiers The following modify the unit s TN. Range: A unit s ability to hit decreases at long range and improves at short range. Short Range 1 TN Effective Range +0 TN Long Range +1 TN Flank and Rear Attacks: Units are more vulnerable to fire against their flanks and rear. When firing at the flank or rear of a unit the firing unit's TN is reduced by -1. Movement and Flank/Rear Attacks: A flank/rear attack can be made when a firing unit begins its activation completely behind the front base edge of the target unit. A unit that makes a single move from the front to the flank/rear of its target must still fire against the 34
35 front of the unit. However, a unit making a double or triple move may move behind the front facing of the enemy unit and fire into the flank/rear. Multiple Move A unit making multiple moves has its number of AT dice reduced: Double Move -1D Triple Move -2D REACTION CHECKS After applying any Fire Modifiers, and deducting any dice for movement, roll the unit s AT Dice. If you score any successes, your opponent makes a Reaction Check with a 4+ TN. This increases to TN 5+ if the target unit is suppressed. If you fail to score any successes, your opponent doesn t need to make a Reaction Check. Cover Dice Cover obscures the target and provides protection. Only light cover is described in Armour Battles and is represented by woods and hedges. Light Cover increases a unit s Reaction Dice by +1D. Light Cover +1D For example, a unit of Panzer IVs in a wood (light cover) gains a +1D to their Reaction Dice. When fired at they roll 6D, instead of their usual 5D. Units hit by indirect fire don t gain any bonus from light cover (indirect fire is explained later). Target Uphill A target that is uphill from the firing unit gains +1 Reaction Dice. Target Uphill +1D 35
36 DIRECT FIRE COMBAT RESULTS After both players have rolled, compare the results. Each hit not cancelled by a Reaction Check results in the target unit taking a Disruption Point. Firing unit rolls more successes than target Target takes 1 Disruption Point for each uncancelled success Check for suppression if the attacker rolled one or more 6s Firing unit rolls same or fewer successes than target Target takes no Disruption Points Check for suppression if the attacker rolled one or more 6s Suppression Check As mentioned previously in the Unit Morale section, each time a unit is fired on and the attacker rolls one or more 6s, the target unit becomes suppressed if it fails to roll the same or more 6s than the attacker. If the unit takes any Disruption Points, it is Forced Back its Fixed Move plus 1D" for each unmatched 6. Back to Contents 36
37 OPPORTUNITY FIRE Opportunity fire is a powerful means of controlling the battlefield as it allows units to fire in an Enemy Command Pulse. Note: You cannot use opportunity fire during your own Command Pulse - you have to activate a unit before it can fire. Units That Can Use Opportunity Fire A unit is eligible to use opportunity fire if it doesn't have a Fire Marker or is suppressed. The unit must also be present on the table. Therefore off-table artillery cannot use opportunity fire. The unit must also have LOS to the target. A Fire Marker is placed next to the unit when it uses opportunity fire. Targets That Trigger Opportunity Fire An enemy unit that fires or moves in LOS triggers opportunity fire. Opportunity Fire Against a Firing Target When your opponent says that one of his units is firing but not moving, you may use opportunity fire against it. You must declare this before your opponent rolls his AT Dice. You cannot wait to see what the effects of his fire are - your fire occurs simultaneously with his. For convenience, let your opponent roll his dice first, but don t apply the results until after you've fired back. You may then use opportunity fire against the firing enemy unit with any of your other eligible units. You choose a unit and conduct its fire before deciding whether any more of your units are going to fire. You can keep selecting units and firing until you decide to stop or you run out of firing units. Opportunity Fire Against a Moving Target When your opponent moves a unit that is within or enters LOS of one of your units you can request that he halts the unit s movement while you fire at it. A unit that is suppressed by your fire halts where it is - it cannot advance any further. Measure any Forced Back results from where it was halted. A unit that is not suppressed completes its move after all opportunity fire has been resolved. In the event of the unit entering the LOS of another of your units, this unit may also use opportunity fire. For example, Max is moving three Panther tanks towards three American M4 tanks. Tom decides to use opportunity fire against the German tanks when they enter effective range at 14. One Panther is suppressed and stops moving immediately. The second is suppressed and takes a Disruption Point. It halts and is Forced Back 6+1D. The third Panther isn t hit and completes its move 6 away from the Americans. As two of the German tanks are suppressed, only one can fire. Back to Contents 37
38 INDIRECT FIRE Indirect fire ignores intervening terrain and troops. Indirect fire artillery batteries are situated off the table behind the Friendly Table Edge. FORWARD OBSERVERS Armour Battles doesn t require figures for Forward Observers. It s assumed that Forward Observers are operating alongside the army s platoons. As long as one of your platoons has a LOS to an enemy unit, it can act as a Forward Observer and be used to target indirect fire. Note: A suppressed unit cannot function as a Forward Observer. LOGISTICS PHASE The indirect fire rules add a new phase to a turn. The Logistics Phase occurs as the first action of a player s first Command Pulse. You can t call any new artillery or smoke missions until after the Logistics Phase, but you can adjust the fire mission (see Adjusting Fire Missions). During the Logistics Phase any batteries with a placed Impact Marker fire for effect. Impact Markers are removed after a battery fires. The Enemy Logistic Phase occurs at the start of his first Command Pulse. OFF-TABLE FIRE MISSIONS Fire missions are called with Staff Orders - Command Orders cannot be used. A fire mission is a single round of artillery fire. The battery fires for effect once and its Impact Marker is removed. A fire mission costs one Staff Order. Calling Off-Table Fire Missions To call a fire mission, you use a Staff Order and indicate which unit is acting as the battery s Forward Observer. Place an Impact Marker on the table. Artillery Response Check To determine if the artillery starts firing with immediate effect, make an Artillery Response Check. Roll the Artillery Response Dice with a 4+ TN. Your opponent rolls 3D, also with a 4+ TN. If you roll more successes than him, your battery fires for effect immediately. If you fail to fire with immediate effect, the battery fires for effect during your next Logistics Phase providing you don t roll a Command Failure. Deviating Fire Missions When your battery fires for effect, it may deviate from its Impact Marker. Roll a Deviation Dice. If you get a Hit result, it lands where you placed the Impact Marker. 38


39 A hit is rolled - the targetted StuG III is hit along with the other two StuGs. If an arrow is rolled the fire deviates in the direction of the arrow. Roll 1D and move the Impact Marker the distance rolled in inches. The Impact Marker is moved 5 in the direction of the arrow. Only one StuG III is hit. Firing for Effect Batteries have a burst radius of 4. Measure 4 from the centre of the Impact Marker to the closest point on any nearby units. This is similar to measuring ranges in direct fire, except that the fire originates from the centre of the Impact Marker. Off-table artillery has a 4+ TN when firing for effect. This TN is not adjusted by range - offtable artillery always fires at effective range. 39

40 When firing for effect, roll to hit each unit individually and apply the results. Any unit Forced Back by the artillery fire moves towards its Friendly Table Edge. Adjusting a Fire Mission At the start of your Logistics Phase, you can use a Staff Order to move an Impact Marker 4 in any direction - a unit acting as Forward Observer must be able to see the new impact location. You move the Impact Marker before the battery fires. After moving it you still need to roll for deviation. Light Cover and Artillery Units under fire from off-table artillery do not gain Reaction Dice for light cover. Suppression From Artillery When a unit is hit by artillery fire and 6s are rolled by your opponent, you must roll more 6s or become suppressed. The chance of being suppressed by artillery fire is therefore higher than when hit by direct fire where you only have to equal the number of 6s. Units are Forced Back from artillery fire as normal if they take any Disruption from the attack. If no Disruption is taken, they are suppressed where they are. Command Failure and Fire Missions A Command Failure cancels all artillery and smoke missions. Missions may be kept active with Staff Orders. HIT AND SCATTER DICE If you don t have a Deviation Dice, you can use two dice of different colours. Nominate one as the Hit Dice and the other as the Scatter Dice. Roll both dice. If the Hit Dice rolls a 5 or a 6, the fire mission hits without deviating. The black dice is the Hit Dice. A 5 is rolled - a hit! 40

41 On a roll of 1 4 the fire mission deviates the distance rolled in inches on the Scatter Dice. Check the angle of the Scatter Dice relative to the Hit Dice and move the Impact Marker towards, onto, or past the Scatter Dice depending on its location and the amount rolled. A 3 is rolled on the Hit Dice - the fire deviates 4" in the direction of the Scatter Dice. Back to Contents 41


42 SMOKE MISSIONS Smoke Missions are similar to artillery missions. A Staff Order is used to request a smoke mission. Place a Smoke Marker and roll to see if the smoke arrives this Command Pulse. If it doesn t, it arrives in your next Logistics Phase. Smoke missions always land on the Smoke Marker - they never deviate. Off-table artillery creates a 1 wide by 12 long smoke screen centred on the Smoke Marker. The smoke screen can be orientated in any direction. A smoke mission blocks line of sight and lasts until the start of your next Logistics Phase. Back to Contents 42

43 MINOR OBSTACLES Hedges are minor obstacles. Crossing a hedge costs a vehicle its Fixed Move - a vehicle only moves the distance rolled on its Variable Dice. When moving to cross an obstacle, if a Command Group doesn t roll enough to reach the obstacle it may use its Fixed Move to move up to, but not over the obstacle. For example, a Panzer IV platoon is 5 away from a hedge and has been ordered to cross it. It moves at its Variable Move only (1D ). It rolls a 6, allowing it to move 5 up to the hedge. As it as only used 5 of its 6 inches, it is placed on the other side of the hedge. If it had rolled a 5, it would only have moved up to the hedge. If it had rolled a 4 or less, it wouldn t have reached the hedge. In this case, it could have used its Fixed Move of 6 to move up to the hedge, ready to cross it on its next activation. 43
44 USING A DICE CHAIN Using a multiple Dice Chain makes it easier to cross obstacles. For Minor Obstacles, the Fixed Move is deducted only from the first movement; the second Fixed Move is unaffected. The easiest way to calculate this is to deduct the Fixed Move before moving. For example, a Panzer IV platoon is 5 from the hedge and has been ordered to cross it. This time it's using a Double Dice Chain which normally allows it to move 12 +2D. It deducts one of its Fixed Moves to cross the hedge, leaving it with a move of 6 +2D. It rolls an 8 for a total move of 14. It moves up to the hedge (5 ), crosses it, then moves 9 beyond it. Back to Contents 44

45 HIDDEN UNITS Presented here is a simple system for using hidden units in Armour Battles. Hidden units are marked on the player s map before the game begins. They cannot move or fire without being spotted and placed on the table. Hidden units are also placed on the table when an enemy unit ends its move within 15" of them. AMBUSH FIRE Hidden units may use ambush fire when they are activated or as opportunity fire. When using ambush fire a unit gains +1D bonus to its AT Dice. The vehicle is placed on the table when it uses ambush fire. Hidden units that are activated to use ambush fire can be fired at with opportunity fire. This opportunity fire always occurs after the hidden units have fired it s never simultaneous. Back to Contents 45
46 Special rules for units include: Sloped Armour Low Profile Reconnaissance Break-Off Shoot and Scoot Open-Topped SPECIAL RULES SLOPED ARMOUR Sloped armour increases a unit s Reaction by 1D against frontal attacks. When fired at in the flanks/rear, or when hit by artillery, its Reaction is reduced. This is shown as two numbers. Reaction: 7D/6D Use the first number for frontal attacks and the second for all other attacks. LOW PROFILE Units with a low profile gain +1D Reaction Dice against direct fire. A low profile provides no benefit against artillery fire. Reaction: 6D (5D) Use the first number against direct fire and the number in brackets against artillery fire. RECONNAISSANCE One reconnaissance unit may be added to a Command Group without affecting the Command Group limit of four. This allows a Command Group to contain five units. Only one reconnaissance unit gains this benefit, so if two reconnaissance units are included, the second unit counts against the Command Group limit. BREAK-OFF Units with the Break-off ability may immediately move backwards a normal move when fired at by direct fire or artillery. A vehicle gains +2D to its Reaction Dice when breaking off. Measure the range to the target vehicle s original position, not its final one. No fire is allowed by the breaking off unit, but it may use opportunity fire in a subsequent enemy Command Pulse. A unit that Breaks-off cannot be activated again this turn. However, it may Break-off multiple times even if it has been already been activated, or has already Broken-off. SHOOT AND SCOOT Vehicles with this ability can fire and immediately move backwards a normal move. A vehicle that shoots and scoots can be either activated to fire or it may use opportunity fire. When activated it may Shoot and Scoot, but it cannot move before doing so. 46
47 When using opportunity fire, a vehicle that has been previously activated may Shoot and Scoot, providing it doesn t have a Fire Marker. Enemy units may fire at a vehicle as it scoots. The target vehicle gains a +2D bonus to its Reaction when Shooting and Scooting. See the rules for Break-off earlier for how to calculate enemy fire. Shoot and Scoot units can always Break-off when under fire - they do not have to fire. OPEN-TOPPED Vehicles with open turrets are more vulnerable to enemy artillery. When fired at by artillery an open-topped vehicle s Reaction Dice is reduced by 1D. Reaction: 5D (O) Back to Contents 47
48 US UNITS These units are used in Armour Battles. More are available in the Armour Battles Expansion. M4 75mm Mass produced and mechanically reliable, the M4 is under-gunned compared to the German armour. Often the best tactic is to close with the Germans to offset their superior anti-tank fire. Type: Medium AFV Move: Average Reaction: 5D Weapon: 75L38 Gun Range: 7/14/28 AT: 7D M4 76mm Available in limited numbers, the M4 76mm places the Americans on an equal footing with the Panzer IV, but is no match for the Panther. Try to protect your M4 76mm by positioning it behind your M4 75mm tanks. Type: Medium AFV Move: Average Reaction: 5D Weapon: 76L52 Gun Range: 8/16/32 AT: 8D M5 Light Tank The M5 is fast, but its 37mm gun is severely under-powered against the German armour. Use the M5s to locate hidden enemy units and then use their Break-off ability to pull back when fired at. Once the enemy s location is known use the M5s speed to try and outflank the Germans and close to short range. Type: Light AFV Move: Fast 6+1Dx2 Reaction: 5D Weapon: 37L53 Gun Range: 6/12/24 AT: 5D Notes: Break-off. 48
49 M10 Tank Destroyer The late production M10 tank destroyer and has the ability to Shoot and Scoot. This allows it to move backwards after firing. Its 76mm gun is a match for the Panzer IV, but it lacks armour penetration against the Panther and Tiger I. Use the M10 to manoeuvrer into the flank and rear of the German armour. Because it has an open-top, the M10 is vulnerable to enemy artillery. Type: Medium AFV Move: Average Reaction: 5D (O) Weapon: 76L52 Gun Range: 8/16/32 AT: 8D Notes: Shoot and Scoot. Break-off. Open-topped. M7 Howitzer Motor Carriage The M7 HMC provides off-table artillery with its 105mm howitzer. Use it to suppress and knock out the lighter Pumas, Panzer IVs and StuG IIIs. Or use both batteries against the Panthers. Alternatively, use smoke screens to block fire from the German vehicles. Type: Off-table Artillery Move: Reaction: Weapon: 105mm howitzer Range: Off-Table AT: 4D Notes: Artillery Suppression. Units must roll more 6s than your artillery to avoid being suppressed. Back to Contents 49
50 GERMAN UNITS These units are used in Armour Battles. More are available in the Armour Battles Expansion. Tiger I The Tiger I is a formidable heavy tank. Armed with an 88L56 gun, the Tiger can pick off enemy armour from long range and its heavy armour provides excellent protection against anti-tank weapons and artillery. Prone to breaking down when it makes double or triple moves, the Tiger is best moved slowly. Type: Heavy AFV Move: Average Reaction: 7D Weapon: 88L56 Gun Range: 10/20/40 AT: 10D Notes: Poor reliability. The Tiger I is mechanically unreliable. If it rolls more 1s than 6s on a double or triple move, it breaks down and cannot move this turn. It may still fire. Next turn it can be repaired using a Command Dice or a Staff Order. It cannot move on the turn it s repaired, but it may move again the following turn. Panther Ausf G Powerful and rightly feared by the Americans, the Panther is well armed and armoured. While resistant to damage, the Panther is not invulnerable when fighting superior numbers of enemy tanks. Try to avoid letting the US tanks manoeuvrer into your flank and rear zones. Type: Medium AFV Move: Average Reaction: 7D/6D Weapon: 75L70 Gun Range: 9/18/36 AT: 9D Notes: Sloped Armour. Panzer IV H The workhorse of the German army, the Panzer IV is a good all round tank. Its 75L48 gun has good anti-tank ability that is superior to the M4 75mm, and is a match for the M4 76mm. Type: Medium AFV Move: Average Reaction: 5D Weapon: 75L48 Gun Range: 8/16/32 AT: 8D 50
51 Sturmgeschütz III Designed with a low profile, the StuG III benefits from an increased Reaction Dice over the Panzer IV against direct fire. However, its lack of a turret restricts it to a 180 fire arc. As the StuG often has to move so that it can fire at units it is likely to trigger opportunity fire. Because of this the StuG is best used to support the Panzers rather than fighting in the front line. Type: Medium AFV Move: Average Reaction: 6D (5D) Weapon: 75L48 Gun Range: 8/16/32 AT: 8D Notes: Restricted to 180 fire arc. Low Profile. SdKfz 234/2 Armoured Car (Puma) Fast and armed with a 50L60 gun, the Puma lacks the armour protection of the Panzers. The Puma is good for moving around the enemy s flanks, and it can use its Break-off ability to get itself out of trouble when attacked. Type: Light AFV Move: Fast 6+1Dx2 Reaction: 4D Weapon: 50L60 Gun Range: 7/14/28 AT: 6D Notes: Recon. Break-off. 105L28 Howitzer The 105mm howitzer provides off-table artillery support. Use it to suppress and knock out the lighter US tanks or use a smoke screen to block fire from the American vehicles. Type: Off-table Artillery Move: Reaction: Weapon: 105L28 howitzer Range: Off-Table AT: 4D Notes: Artillery Suppression. Units must roll more 6s than your artillery to avoid being suppressed. Back to Contents 51
52 MISSION BRIEFINGS EXPLAINED This section explains the information contained in the mission briefings. Units: The number of units in the battle group including off-table artillery (present in Battles 2 & 3). Command Dice: The number of Command Dice rolled each turn. Staff Orders: How many initial Staff Orders a battle group has. A battle group can store as many Staff Orders as it has Command Dice. Rally Dice: The number of dice rolled when rallying units. Army Morale Points: How many Army Morale Points a battle group starts with. Initial Forces: Which units are placed on the table at the start of the game. Reserves: Units that enter the table as Reserves from the second turn onward. Deployment: Where initial forces are deployed on the map. First Command Pulse: How to determine which side gets the first Command Pulse. Victory or Defeat: How the winner and loser are determined. Back to Contents 52

53 BATTLE 1 - MEETING ENGAGEMENT Type: Meeting Engagement Time: 0700 hours, 20th September 1944 Location: Near Lezey, Lorraine The morning mist clears revealing an attacking German battle group. American tank companies are hurriedly pushed forward to drive the Germans off. This introductory battle takes just over an hour to play. Battle 1 Map The map is for a 6 x4 table and shows the layout of the terrain for the battle. Don t worry about reproducing it exactly near enough is good enough. The important thing is that the woods and hills break up line of sight. If you are playing with a larger or smaller table add or remove some terrain. Woods: The woods are Broken Ground (half speed) and provide light cover (+1D). Hills: The hills are Broken Ground (half speed). Deployment Zones: The German Deployment Zone is at the top of the map and the American one at the bottom. Vehicles are placed along the table edges in their respective Deployment Zones. Victory or Defeat: The game is won by the player who reduces the other to zero Army Morale Points. 53
54 US BRIEFING - BATTLE 1 Time: 0700 hours, 20th September 1944 Location: Near Lezey, Lorraine You have rapidly crossed France and are now in Lorraine near Lezey. The morning mist has cleared revealing an attacking German Battle Group. You are ordered to engage and drive off the enemy. US Battle Group Statistics Units: 9 Command Dice: 4 Staff Orders: 2 Rally Dice: 4 Army Morale: 9 Battle Group Units You have three companies of M4s available. Tank Company M4 75mm M4 75mm M4 76mm Tank Company M4 75mm M4 75mm M4 76mm Tank Company M4 75mm M4 75mm M4 76mm US Set-Up Initial Forces: All your units are present on the table. Reserves: None. Deployment: You deploy your companies after the German Player has deployed his. Your companies may be deployed anywhere in your Deployment Zone. First Game Turn: Both players roll their Command Dice. The first Command Pulse goes to the player who rolls the most 6s, etc. Army Morale: You start with nine Army Morale Points. You lose 1D3 Army Morale Points each time one of your units is Dispersed. Victory or Defeat: You win if you reduce the Germans to zero Army Morale Points. You lose if the Germans reduce you to zero Army Morale Points. 54
55 US UNIT STATISTICS M4 75mm Type: Medium AFV Move: Average Reaction: 5D Weapon: 75L38 Gun Range: 7/14/28 AT: 7D M4 76mm Type: Medium AFV Move: Average Reaction: 5D Weapon: 76L52 Gun Range: 8/16/32 AT: 8D 55
56 GERMAN BRIEFING - BATTLE 1 Time: 0700 hours, 20th September 1944 Location: Near Lezey, Lorraine The Americans have pushed into Lorraine and are threatening Germany s borders. You are to advance and engage the enemy in the vicinity of Lezey. German Battle Group Statistics Units: 7 Command Dice: 3 Staff Orders: 2 Rally Dice: 4 Army Morale: 7 German Battle Group Units You are in command of a composite armour battalion. Panzer Company Panther Ausf G Panther Ausf G Assault Gun Company Sturmgeschütz III (StuG III) Sturmgeschütz III (StuG III) Panzer Company PzKwf IV H PzKwf IV H PzKwf IV H German Set-Up Initial Forces: All your units are present on the table. Reserves: None. Deployment: You deploy before the American Player. You can place your companies anywhere in your Deployment Zone. First Game Turn: Both players roll their Command Dice. The first Command Pulse goes to the player who rolls the most 6s, etc. Army Morale: You start with seven Army Morale Points. You lose 1D3 Army Morale Points each time one of your units is Dispersed. Victory or Defeat: You win if you the reduce the Americans to zero Army Morale Points. You lose if the Americans reduce you to zero Army Morale Points. 56
57 GERMAN UNIT STATISTICS Panther Ausf G Type: Medium AFV Move: Average Reaction: 7D/6D Weapon: 75L70 Gun Range: 9/18/36 AT: 9D Notes: Sloped armour. Sturmgeschütz III Type: Medium AFV Move: Average Reaction: 6D (5D) Weapon: 75L48 Gun Range: 8/16/32 AT: 8D Notes: Restricted to 180 fire arc. Panzer IV H Type: Medium AFV Move: Average Reaction: 5D Weapon: 75L48 Gun Range: 8/16/32 AT: 8D Back to Contents 57

58 Type: Attack/Defend BATTLE 2 - ATTACK/DEFEND Time: 1300 hours, 20th September 1944 Location: Near Lezey, Lorraine Reinforced by a company of M5 light tanks, the Americans are ordered to attack the German forward positions. This battle introduces rules for off-table artillery, smoke, hidden units and obstacles. Battle 2 Map The map is for a 6 x4 table and shows the layout of the terrain for the battle. Deployment Zones: The German Deployment Zone is at the top of the map and the American one at the bottom. Victory or Defeat: The game is won by the player who reduces the other to zero Army Morale Points. 58
59 US BRIEFING - BATTLE 2 Time: 1300 hours, 20th September 1944 Location: Near Lezey, Lorraine US Battle Group Statistics Units: 14 Command Dice: 5 Staff Orders: 4 Rally Dice: 4 Artillery Response Dice: 4 Army Morale: 12 US Battle Group Units You have been reinforced with a company of M5 light tanks and two batteries of M7 Howitzer Motor Carriages. Your M7 HMCs provide off-table artillery support. Use Staff Orders to call and adjust artillery missions. Armour Company M4 75mm M4 75mm M4 76mm Armour Company M4 75mm M4 75mm M4 76mm Armour Company M5 Light Tank M5 Light Tank M5 Light Tank Off-Table Artillery M7 Howitzer Motor Carriage M7 Howitzer Motor Carriage Armour Company M4 75mm M4 75mm M4 76mm US Set-Up Initial Forces: The M5 light tanks are deployed after the Germans have placed their hidden units. The M5s deploy any where along the Friendly Table Edge in the US Deployment Zone. Reserves: The remaining armour companies may be committed as Reserves from the second turn. Each company is a separate Command Group. They may enter anywhere along the Friendly Table Edge within the US Deployment Zone. No Reserves may be committed during a turn in which you roll a Command Failure. First Command Pulse: The US player automatically has the first Command Pulse even if he rolls a Command Failure. Victory or Defeat: You win if you the reduce the Germans to zero Army Morale Points. You lose if the Germans reduce you to zero Army Morale Points. 59
60 US UNIT STATISTICS - BATTLE 2 M5 Light Tank Type: Light AFV Move: Fast 6+1Dx2 Reaction: 5D Weapon: 37L53 Gun Range: 6/12/24 AT: 5D Notes: Break-off. M7 Howitzer Motor Carriage Type: Off-table Artillery Move: Reaction: Weapon: 105mm howitzer Range: Off-Table AT: 4D Notes: Artillery Suppression. M4 75mm Type: Medium AFV Move: Average Reaction: 5D Weapon: 75L38 Gun Range: 7/14/28 AT: 7D M4 76mm Type: Medium AFV Move: Average Reaction: 5D Weapon: 76L52 Gun Range: 8/16/32 AT: 8D 60
61 GERMAN BRIEFING - MISSION 2 Time: 1300 hours, 20th September 1944 Location: Near Lezey, Lorraine The Americans are attacking our forward positions. Your StuG IIIs start the game hidden and may use ambush fire against the Americans. German Battle Group Statistics Units: 11 Command Dice: 4 Staff Orders: 3 Rally Dice: 4 Artillery Response Dice: 4 Army Morale: 10 German Battle Group Units Your battle group has been reinforced by a StuG III platoon, and two SdKfz 234/2 (Puma) platoons. You have one battery of 105mm howitzers to provide off-table artillery support. Use Staff Orders to call and adjust artillery missions. Panzer Company Panther Ausf G Panther Ausf G Panzer Company PzKwf IV H PzKwf IV H PzKwf IV H Recon Company SdKfz 234/2 Puma SdKfz 234/2 Puma Off-Table Artillery 105L28 Howitzer Assault Gun Company StuG III StuG III StuG III German Set-Up Initial Forces: The StuG IIIs are deployed as hidden units. They can be placed behind the hedges surrounding the fields or at the edges of the woods. The StuG IIIs are placed as a company. Mark their location on the map. The Pumas may be deployed on your Friendly Table Edge any where in your Deployment Zone or they can be added to your Panzer companies. Reserves: The two Panzer companies may be committed as Reserves from the second turn. Each Panzer company is committed as a separate Command Group. They may enter anywhere along the Friendly Table Edge within the German Deployment Zone. No Reserves may be committed during a turn in which you roll a Command Failure. 61
62 First Command Pulse: The US player automatically has the first Command Pulse even if he rolls a Command Failure. Victory or Defeat: You win if you the reduce the Americans to zero Army Morale Points. You lose if the Americans reduce you to zero Army Morale Points. GERMAN UNIT STATISTICS - BATTLE 2 SdKfz 234/2 Armoured Car (Puma) Type: Ligth AFV Move: Fast 6+1Dx2 Reaction: 4D Weapon: 50L60 Gun Range: 7/14/28 AT: 6D Notes: Recon. Break-off. 105L28 Howitzer Type: Off-table Artillery Move: Reaction: Weapon: 105L28 howitzer Range: Off-Table AT: 4D Notes: Artillery Suppression. Panzer IV H Type: Medium AFV Move: Average Reaction: 5D Weapon: 75L48 Gun Range: 8/16/32 AT: 8D Sturmgeschütz III Type: Medium AFV Move: Average Reaction: 6D (5D) Weapon: 75L48 Gun Range: 8/16/32 AT: 8D Notes: Restricted to 180 fire arc. Panther Ausf G Type: Medium AFV Move: Average Reaction: 7D/6D Weapon: 75L70 Gun Range: 9/18/36 AT: 9D Notes: Sloped armour. Back to Contents 62

63 Type: Counter-Attack BATTLE 3 - COUNTER-ATTACK Time: 0800 hours, 21st September 1944 Location: Near Lezey, Lorraine As the US armour attempts to break through the German lines, the Germans commit one of their few Tiger platoons to push the Americans back. Battle 3 Map The map is for a 6 x4 table and shows the layout of the terrain for the battle. Deployment Zones: The German Deployment Zone is at the top of the map and the American one at the bottom. Victory or Defeat: The game is won by the player who reduces the other to zero Army Morale Points. 63
64 US BRIEFING - MISSION 3 Time: 0800 hours, 21st September 1944 Location: Near Lezey, Lorraine You have been reinforced with a company of M10 Tank Destroyers. You are to attack the Germans and eradicate their armour. US Battle Group Statistics Units: 17 Command Dice: 6 Staff Orders: 4 Rally Dice: 4 Artillery Response Dice: 4 Army Morale: 15 US Battle Group Units Armour Company M4 75mm M4 75mm M4 76mm Armour Company M4 75mm M4 75mm M4 76mm Armour Company M4 75mm M4 75mm M4 76mm Armour Company M5 Light Tank M5 Light Tank M5 Light Tank Tank Destroyer Company M10 Tank Destroyer M10 Tank Destroyer M10 Tank Destroyer Off-Table Artillery M7 Howitzer Motor Carriage M7 Howitzer Motor Carriage US Set-Up Initial Forces: The M5s are deployed after the Germans have placed their hidden units. The M5s deploy anywhere along the Friendly Table Edge in the US Deployment Zone. All other units enter as Reserves. Reserves: The remaining armour companies and tank destroyer company may be committed as Reserves from the second turn. Each company is a separate Command Group. They may enter anywhere along the Friendly Table Edge within the US Deployment Zone. No Reserves may be committed during a turn in which you roll a Command Failure. First Command Pulse: The US player automatically has the first Command Pulse even if he rolls a Command Failure. Victory or Defeat: You win if you the reduce the Germans to zero Army Morale Points. You lose if the Germans reduce you to zero Army Morale Points. 64
65 US UNIT STATISTICS - BATTLE 3 M10 Tank Destroyer Type: Medium AFV Move: Average Reaction: 5D (O) Weapon: 76L52 Gun Range: 8/16/32 AT: 8D Notes: Shoot and Scoot. Break-off. Opentopped. M5 Light Tank Type: Light AFV Move: Fast 6+1Dx2 Reaction: 5D Weapon: 37L53 Gun Range: 6/12/24 AT: 5D Notes: Break-off. M4 75mm Type: Medium AFV Move: Average Reaction: 5D Weapon: 75L38 Gun Range: 7/14/28 AT: 7D M4 76mm Type: Medium AFV Move: Average Reaction: 5D Weapon: 76L52 Gun Range: 8/16/32 AT: 8D M7 Howitzer Motor Carriage Type: Off-table Artillery Move: Reaction: Weapon: 105mm howitzer Range: Off-Table AT: 4D Notes: Artillery Suppression. 65
66 GERMAN BRIEFING - MISSION 3 Time: 0800 hours, 21st September 1944 Location: Near Lezey, Lorraine The Americans are close to breaking through our lines. A Tiger I platoon is on its way to your position. Destroy the enemy armour. Show the Americans that Germany can still fight. German Battle Group Statistics Units: 14 Command Dice: 5 Staff Orders: 4 Rally Dice: 4 Artillery Response Dice: 4 Army Morale: 12 German Battle Group Units Panzer Company Panther Ausf G Panther Ausf G Panther Ausf G Panzer Company PzKwf IV H PzKwf IV H PzKwf IV H Recon Company SdKfz 234/2 Puma SdKfz 234/2 Puma SdKfz 234/2 Puma Assault Gun Company StuG III StuG III StuG III Heavy Tank Platoon Tiger I Off-Table Artillery 105L28 Howitzer GERMAN SET-UP Initial Forces: The StuG IIIs are deployed as hidden units any where in the German Deployment Zone. One to three Pumas (your choice) are deployed as a company on your Friendly Table Edge any where in your Deployment Zone. Any Pumas that are not deployed may be added to your Panzer companies (one Puma per company). Reserves: The Panzer companies may be committed as Reserves from the second turn. They may enter anywhere along the Friendly Table Edge within the German Deployment Zone. The Tiger I may be committed as a reserve from the third turn. It enters anywhere along the Friendly Table Edge within the German Deployment Zone. No Reserves may be committed during a turn in which you roll a Command Failure. 66
67 First Command Pulse: The US player automatically has the first Command Pulse even if he rolls a Command Failure. Victory or Defeat: You win if you the reduce the Americans to zero Army Morale Points. You lose if the Americans reduce you to zero Army Morale Points. GERMAN UNIT STATISTICS - BATTLE 3 Tiger I Type: Heavy AFV Move: Average Reaction: 7D Weapon: 88L56 Gun Range: 10/20/40 AT: 10D Notes: Poor reliability. SdKfz 234/2 Armoured Car (Puma) Type: Light AFV Move: Fast Reaction: 4D Weapon: 50L60 Gun Range: 7/14/28 AT: 6D Notes: Recon. Break-off. 105L28 Howitzer Type: Off-table Artillery Move: Reaction: Weapon: 105L28 howitzer Range: Off-Table AT: 4D Notes: Artillery Suppression. Panther Ausf G Type: Medium AFV Move: Average Reaction: 7D/6D Weapon: 75L70 Gun Range: 9/18/36 AT: 9D Notes: Sloped armour. Panzer IV H Type: Medium AFV Move: Average Reaction: 5D Weapon: 75L48 Gun Range: 8/16/32 AT: 8D Sturmgeschütz III Type: Medium AFV Move: Average Reaction: 6D (5D) Weapon: 75L48 Gun Range: 8/16/32 AT: 8D Notes: Restricted to 180 fire arc. Back to Contents 67
68 WHAT NEXT? You can replay the battles with all of the forces for Battle 3, but decide where and when units are deployed. You can start with all vehicles on the table, or have them enter as Reserves from the first turn onwards. Both sides may deploy one or two hidden Command Groups. You can also form your own Command Groups at the start of the game. For example, the US player might want to group his three M4 76mm tanks into the same Command Group, and to add one M5 to each of his M4 companies. Similarly, the German player might want to add one or two Pumas to his panzer or Stug III Command Groups. You might also like to increase the amount of artillery so the US starts with three M7 HMCs and the Germans with two 105mm howitzers. Add one Army Morale Point and one Staff Order to each side, if you take this option. Also play around with the terrain to create different battlefields. The main thing when placing terrain is to provide cover and to block Lines of Sight so that vehicles are forced to manoeuvrer. Back to Contents 68

69 ARMOUR BATTLES EXPANSION Would you like more Armour Battles? Get a FREE rules expansion Armour Battles by visiting the Wargames Design website. The Armour Battles Expansion includes: New Rules Hidden Movement Additional Rules for Artillery Vehicle Reliability Unit Special Rules New Missions Meeting Engagement Attack/Defend Flank Attack Hold the Line Counter-Attack New Battle Groups May Battle of France Commonwealth, French & German December Operation Compass Commonwealth & Italian February Sonnenblume Commonwealth & German May-June Brevity to Battleaxe Commonwealth, German & Italian November Operation Crusader Commonwealth, German & Italian Late War 1944 Commonwealth, German, Soviet, US 69
70 CREDITS Game Design: Jim Bambra Editing: Catherine Bambra Playtesting: Alan Stringer, Hugh Attwood, Ian Westworth, Chris Bambra. The Wargames Design Recon Team Peter D. Antill, Steve Applegate, John Aston, Don Bailey, Vidal Bairos, Steve Barber, Sean Bartholome, Si Brooks, Rodrick Campbell, Dan Clancy, Richard Coffland (1LT, ARNG Ret), Scott Collingwood, Dom Cook, Joe Corsaro, Rick Cox, John Eagles, Clay Ellis, Alex Filewood, Glenn Foden, Emery Gallant, Rob Goodfellow, Paul de Haan, Roy J. Harter, Jim Hayes, Keith Hershey Jr, Martin A. Johncock, Shane Johnson, Brett Kvisle, Derek Paul Ler, Stephen Luscombe, Gary McKenzie, Jim McLarty, Martin Mitchell, Justin Penwith, Richard Radgoski, Andrew Rees, Dean N Rogers, Vitaly Simakov aka SunCat, Ian Skinner, Neil Smith, Martin Stein, Alex Stoddart, Dave Strebe, Robert Taylor, Keith Tracton, Ted Triandafilou III, James Turner, Keith Tracton, Paul Wright. Thanks for your support, guys. It s greatly appreciated! Special Thanks Special thanks to Alan Stringer, veteran of countless games ranging from the deserts of Egypt to the Normandy bocage and the steppes of Russia. Did You Like Armour Battles? Thank you for reading Armour Battles. If you like the rules, won t you please take a moment to leave me a review at your favourite retailer? Thanks! Jim Back to Contents 70
71 ABOUT THE AUTHOR Jim Bambra is an award winning designer who has worked extensively on roleplaying games, table-top games and video games. Some of his previous credits include Warhammer Fantasy Battles, Warhammer 40K and Star Wars Miniatures, Dungeons & Dragons, StarFrontiers, Warhammer Fantasy Roleplay, Star Wars Roleplaying Game, TORG, and GURPS. Video games include Special Forces, Fields of Glory, The Legacy, Warzone 2100, the Great Escape, Conflict: Desert Storm, Conflict: Desert Storm II, Conflict: Vietnam and Conflict: Global Storm. Back to Contents 71
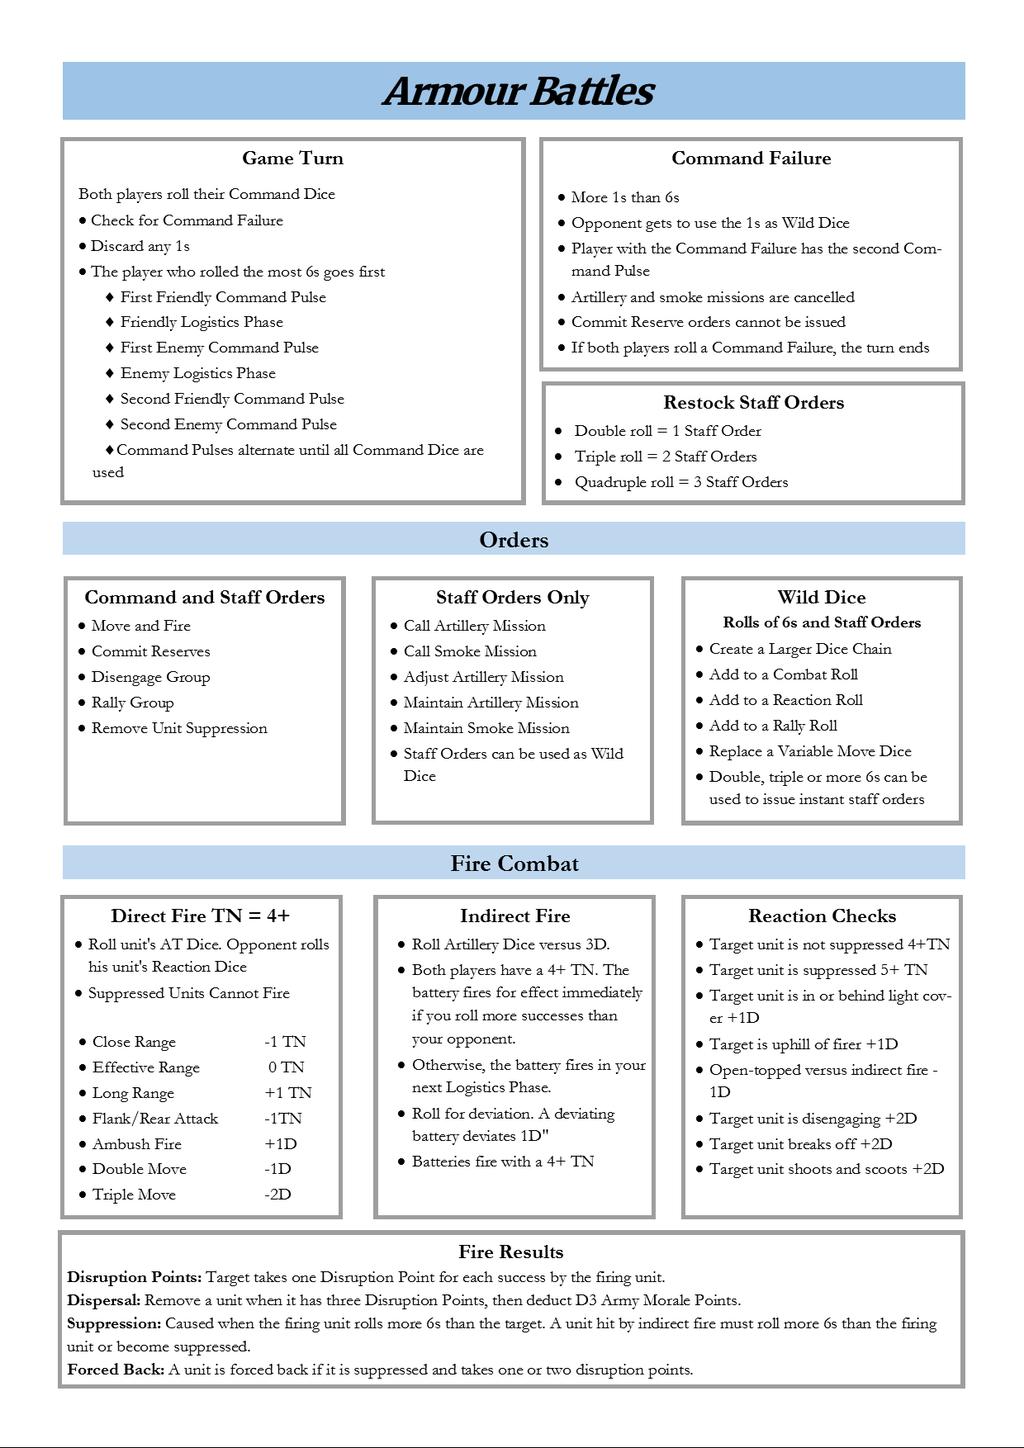
72 72
Field of Glory - Napoleonic Quick Start Rules
 Field of Glory - Napoleonic Quick Start Rules Welcome to today s training mission. This exercise is designed to familiarize you with the basics of the Field if Glory Napoleonic rules and to give you experience
Frontier/Modern Wargames Rules
 Equipment: Frontier/Modern Wargames Rules For use with a chessboard battlefield By Bob Cordery Based on Joseph Morschauser s original ideas The following equipment is needed to fight battles with these
Conflict Horizon Dallas Walker Conflict Horizon
 Conflict Horizon Introduction 2018 Dallas Walker Conflict Horizon Welcome Cadets. I m Sargent Osiren. I d like to make it known right now! From that moment you stepped foot of the shuttle, your butts belonged
ARMY COMMANDER - GREAT WAR INDEX
 INDEX Section Introduction and Basic Concepts Page 1 1. The Game Turn 2 1.1 Orders 2 1.2 The Turn Sequence 2 2. Movement 3 2.1 Movement and Terrain Restrictions 3 2.2 Moving M status divisions 3 2.3 Moving
RESERVES RESERVES CONTENTS TAKING OBJECTIVES WHICH MISSION? WHEN DO YOU WIN PICK A MISSION RANDOM MISSION RANDOM MISSIONS
 i The Flames Of War More Missions pack is an optional expansion for tournaments and players looking for quick pick-up games. It contains new versions of the missions from the rulebook that use a different
Command Phase. Setup. Action Phase. Status Phase. Turn Sequence. Winning the Game. 1. Determine Control Over Objectives
 Setup Action Phase Command Phase Status Phase Setup the map boards, map overlay pieces, markers and figures according to the Scenario. Players choose their nations. Green bases are American and grey are
Portable Wargame. The. Rules. For use with a battlefield marked with a grid of hexes. Late 19 th Century Version. By Bob Cordery
 The Portable Wargame Rules Late 19 th Century Version For use with a battlefield marked with a grid of hexes By Bob Cordery Based on some of Joseph Morschauser s original ideas The Portable Wargame Rules
RANDOM MISSION CONTENTS TAKING OBJECTIVES WHICH MISSION? WHEN DO YOU WIN THERE ARE NO DRAWS PICK A MISSION RANDOM MISSIONS
 i The 1 st Brigade would be hard pressed to hold another attack, the S-3 informed Bannon in a workman like manner. Intelligence indicates that the Soviet forces in front of 1 st Brigade had lost heavily
command efficiency table
 sequence of play 0. PRE-GAME ORGANIZATION PHASE. 1. POSTURE DETERMINATION PHASE 2D6 + Cohesion. Highest total has initiative in this phase. Mark required stands or groups in movement posture. [6.01.01]
Introduction. Nothing can be done contrary to what could or would be done in actual war. Revised Rules for the NAVAL WAR GAME (1905) Fred T.
 Fred T.") Design Parameters Introduction These rules have been developed so that it is possible to fight small World War II Ostfront battles between Axis and Soviet forces. The battles last about an hour or two
Design Parameters Introduction These rules have been developed so that it is possible to fight small World War II Ostfront battles between Axis and Soviet forces. The battles last about an hour or two
WARHAMMER LEGENDARY BATTLES
 WARHAMMER LEGENDARY BATTLES Welcome Most games of Warhammer are two player games between armies with equal points values of anywhere from 500 to 3000 points. However, while games like these are great fun,
CONTENTS INTRODUCTION Compass Games, LLC. Don t fire unless fired upon, but if they mean to have a war, let it begin here.
 Revised 12-4-2018 Don t fire unless fired upon, but if they mean to have a war, let it begin here. - John Parker - INTRODUCTION By design, Commands & Colors Tricorne - American Revolution is not overly
PROFILE. Jonathan Sherer 9/30/15 1
 Jonathan Sherer 9/30/15 1 PROFILE Each model in the game is represented by a profile. The profile is essentially a breakdown of the model s abilities and defines how the model functions in the game. The
A Marvellous Victory! Copyright. Trevor Raymond. November 2015 (Exodus 20:15 - Thou shall not steal.") Version 2
 Version 2") Page 1 of 30 A Marvellous Victory! Copyright. Trevor Raymond. November 2015 (Exodus 20:15 - Thou shall not steal.") Version 2 The first abstraction: A Marvellous Victory are an abstract set of wargame
Page 1 of 30 A Marvellous Victory! Copyright. Trevor Raymond. November 2015 (Exodus 20:15 - Thou shall not steal.") Version 2 The first abstraction: A Marvellous Victory are an abstract set of wargame
On the day you also need to bring :
 In this pack you will find everything you will need to do and know, to prepare for and play in the OMG Bolt Action Tournament. Tournament Organiser: Jeff Black Players Pack/ Tournament Rules writer: Jeff
Aperitif Game for Gentlemen, By Pierre Laporte
 Belle Epoque Aperitif Game for Gentlemen, By Pierre Laporte Belle Epoque Aperitif Game for Miniature Battles in the Victorian Era and Early 20 th Century EQUIPEMENT NEEDED Small coloured counters, ordinary
French and Indian Wars Skirmish Rules. Tyneside Wargames club October Version 3.4
 French and Indian Wars Skirmish Rules Tyneside Wargames club October 2016 Version 3.4 Page 2 of 11 Index: Introduction:... 4 Troop Classifications:... 4 Loyalty:... 4 Weapons:... 4 Play Sequence:... 4
22.0 Extended Examples of Play
 Last Hundred Yards ~ Playbook 11 22.0 Extended Examples of Play 22.1 Infantry and Mortars Situation: Early dawn, October 1944, southwest of Kohlscheid, Germany. A German outpost, dug-in on Hill 192, has
When it comes to generic 25mm Science Fiction skirmish games, there are really only two choices.
 1 of 6 When it comes to generic 25mm Science Fiction skirmish games, there are really only two choices. Stargrunt II, which is a gritty, realistic simulation of near-future combat. And ShockForce, which
BRONZE EAGLES Version II
 BRONZE EAGLES Version II Wargaming rules for the age of the Caesars David Child-Dennis 2010 davidchild@slingshot.co.nz David Child-Dennis 2010 1 Scales 1 figure equals 20 troops 1 mounted figure equals
Sequence of Play This rulebook is organized according to this Sequence of Play.
 Introduction...1 Sequence of Play...2 Campaign Set-Up...2 Start of Week...10 Pre-Combat...11 Combat...14 Post-Combat...19 End of Week...20 End of Campaign...22 Optional Rules...22 Credits...22 Sample Game...23
Primo Victoria. A fantasy tabletop miniatures game Expanding upon Age of Sigmar Rules Compatible with Azyr Composition Points
 Primo Victoria A fantasy tabletop miniatures game Expanding upon Age of Sigmar Rules Compatible with Azyr Composition Points The Rules Creating Armies The first step that all players involved in the battle
Battle of Prokhorovka
 Perform Action Move/Fire according to action chosen Fire machine Guns (tanks only) Fire all eligible machine guns Rally (infantry only) Leader stand may attempt to rally pinned units Rifle stand - 1 die
Getting Started with Panzer Campaigns: Budapest 45
 Getting Started with Panzer Campaigns: Budapest 45 Welcome to Panzer Campaigns Budapest 45. In this, the seventeenth title in of the Panzer Campaigns series of operational combat in World War II, we are
A Great Victory! Copyright. Trevor Raymond. April 2013 (Exodus 20:15 - Thou shall not steal.")
") A Great Victory! Copyright. Trevor Raymond. April 2013 (Exodus 20:15 - Thou shall not steal.") Page 1 of 27 A Great Victory is a basic set of rules designed for the table-top wargaming battles in the ancient
A Great Victory! Copyright. Trevor Raymond. April 2013 (Exodus 20:15 - Thou shall not steal.") Page 1 of 27 A Great Victory is a basic set of rules designed for the table-top wargaming battles in the ancient
Getting Started with Modern Campaigns: Danube Front 85
 Getting Started with Modern Campaigns: Danube Front 85 The Warsaw Pact forces have surged across the West German border. This game, the third in Germany and fifth of the Modern Campaigns series, represents
I-95 GAMERS. Domination Missions
 I-95 GAMERS Domination Missions I-95 GAMERS Domination Missions Design notes Domination special rules Domination Frontline Domination Blind Domination Blitzkrieg Domination Early war Blitzkrieg Domination
Solitaire Rules Deck construction Setup Terrain Enemy Forces Friendly Troops
 Solitaire Rules Deck construction In the solitaire game, you take on the role of the commander of one side and battle against the enemy s forces. Construct a deck, both for yourself and the opposing side,
Under fire: If a unit or vehicle has been hit in the previous turn, whether the hit caused damage or not, that unit is under fire.
 Featherstone Like WW2 Rules These rules are very similar to the Featherstone/Bath mass combat rules you can find for Ancient and 18 th Century combat. They have been adapted for a massed skirmish game
PROFILE. Jonathan Sherer 9/10/2015 1
 Jonathan Sherer 9/10/2015 1 PROFILE Each model in the game is represented by a profile. The profile is essentially a breakdown of the model s abilities and defines how the model functions in the game.
2.0 The Battlefield. 2.1 Terrain Hexes. 2.2 Terrain Types. 3.0 Command Cards (10 each) 3.1 Order Cards (7 each)
 3.1 Order Cards (7 each)") Advanced Vive l Empereur Introduction Advanced Vive l Empereur is a Histo Command Dice System Game and allows you to simulate on a grand-tactical level the battles of the Napoleonic era. The player is
Advanced Vive l Empereur Introduction Advanced Vive l Empereur is a Histo Command Dice System Game and allows you to simulate on a grand-tactical level the battles of the Napoleonic era. The player is
LATE 19 th CENTURY WARGAMES RULES Based on and developed by Bob Cordery from an original set of wargames rules written by Joseph Morschauser
 LATE 19 th CENTURY WARGAMES RULES Based on and developed by Bob Cordery from an original set of wargames rules written by Joseph Morschauser 1. PLAYING EQUIPMENT The following equipment is needed to fight
Mythic Battles: Pantheon. Beta Rules. v2.5
 Mythic Battles: Pantheon Beta Rules v2.5 Notes: Anything with green highlighting is layout notes, and is NOT FOR PRINT. Anything with yellow highlighting is not yet finished. 1 Game Terms & General Rules
COMPONENT OVERVIEW Your copy of Modern Land Battles contains the following components. COUNTERS (54) ACTED COUNTERS (18) DAMAGE COUNTERS (24)
 ACTED COUNTERS (18) DAMAGE COUNTERS (24)") GAME OVERVIEW Modern Land Battles is a fast-paced card game depicting ground combat. You will command a force on a modern battlefield from the 1970 s to the modern day. The unique combat system ensures
GAME OVERVIEW Modern Land Battles is a fast-paced card game depicting ground combat. You will command a force on a modern battlefield from the 1970 s to the modern day. The unique combat system ensures
Axis & Allies Miniatures Contested Skies Errata
 Axis & Allies Miniatures Contested Skies Errata Compiled by Mons Johnson, Robert Mull, Justin Webb, and Steve Winter Document last modified March 5, 2006 In order to accommodate the addition of Aircraft
UNITS Hidden Units Formed Units Fighter Commander
 COLONIAL ADVENTURE UNITS Each unit consists of 5 to 20 figures. Additionally units may contain leaders (maximum 2 per unit), musicians (maximum 1 per unit) and color bearers (maximum 1 per unit). Each
Introduction. Your Commanders gain Experience with every battle, but they also gain Stress. Each Week, you must decide how hard to push your men.
 Introduction...1 Sequence of Play...2 Campaign Set-Up...2 Start of Week...9 Pre-Combat...10 Combat...12 Post-Combat...16 End of Week...17 End of Campaign...19 Optional ules...19 Credits...19 Sample Game...20
Airborne Landings For WWII MicroArmour :The Game
 Airborne Landings For WWII MicroArmour :The Game by Leif Edmondson. The WWII rulebook presents some parachute landing rules in scenario #3 A Costly Setback and in the Modern MicroArmour rule book as well.
CONTENTS. A WWII tactical and operational strongpoint defense game. PAGE 1 Introduction. PAGE 2 Setup minutes ages: players
 CONTENTS A WWII tactical and operational strongpoint defense game PAGE 1 Introduction PAGE 2 Setup PAGE 3 Counters and Cards PAGE 4 Playing the Game PAGE 5 Soviet Card Phase PAGE 9 Wehrmacht Card Phase
Montelimar: Anvil of Fate Scenario 1 -Opening Blows - The Feint
 Montelimar: Anvil of Fate Scenario 1 -Opening Blows - The Feint Introduction This is an after action report of a play test game of Monlimar: Anvil of Fate. Please note that the Vassal module and graphics
Mythic Battles: Pantheon. Beta Rules. v2.8
 Mythic Battles: Pantheon Beta Rules v2.8 Notes: Anything with green highlighting is layout notes, and is NOT FOR PRINT. Anything with yellow highlighting is not yet finished. 1 Appearance There are many
HEXBLITZ GENERAL INFORMATION
 GENERAL INFORMATION SCALES: The following time and ground scales are used in battles fought with 20mm or 15mm scale figures and models: Time scale: Each daylight turn represents approximately 2 hours of
Stargrunt II Campaign Rules v0.2
 1. Introduction Stargrunt II Campaign Rules v0.2 This document is a set of company level campaign rules for Stargrunt II. The intention is to provide players with the ability to lead their forces throughout
LATE 19 th CENTURY WARGAMES RULES Based on and developed by Bob Cordery from an original set of wargames rules written by Joseph Morschauser
 LATE 19 th CENTURY WARGAMES RULES Based on and developed by Bob Cordery from an original set of wargames rules written by Joseph Morschauser 1. PLAYING EQUIPMENT The following equipment is needed to fight
The Emperor Titan is the largest type of Imperial Titan, consisting of two classes: the Imperator and Warmonger.
 The Warmonger Titan Table of Contents Introduction...4 Points Cost:...4 Set Up...5 Warmonger Titan Weapons...5 Sensorium Guns...5 Secondary Weapons...5 Point Defence...5 Flak Batteries (4):...5 Doom strike
The Glory that was GREECE. Tanagra 457 BC
 The Glory that was GREECE Tanagra 457 BC TCSM 2009 The Glory that Was Vol. I: Greece Rulebook version 1.0 1.0 Introduction The Glory that was is a series of games depicting several different battles from
Down In Flames WWI 9/7/2005
 Down In Flames WWI 9/7/2005 Introduction Down In Flames - WWI depicts the fun and flavor of World War I aerial dogfighting. You get to fly the colorful and agile aircraft of WWI as you make history in
Notes about the Kickstarter Print and Play: Components List (Core Game)
") Introduction Terminator : The Board Game is an asymmetrical strategy game played across two boards: one in 1984 and one in 2029. One player takes control of all of Skynet s forces: Hunter-Killer machines,
Introduction Terminator : The Board Game is an asymmetrical strategy game played across two boards: one in 1984 and one in 2029. One player takes control of all of Skynet s forces: Hunter-Killer machines,
IV. TROOPS FAQ SPECIALIZED UNITS 2
 IV. TROOPS FAQ STANDARD UNITS 1 7 8 8 Infantry Move 0-1 and battle, or move 2 no battle May Take Ground on successful Close Assault Armor Move 0-3 and battle May Overrun on successful Close Assault Artillery
Lest We Forget A Solitaire Small Scale Ground Combat Game from WWI to Present Rules of Play
 Lest We Forget A Solitaire Small Scale Ground Combat Game from WWI to Present Rules of Play c Wesley H. Fung Version. Introduction An infantry card with HIT. Lest We Forget (abbrev LWF) is a solitaire
ARMOR DIAGRAM ARMOR DIAGRAM. Mech Data. Mech Data BATTLEMECH RECORD SHEET BATTLEMECH RECORD SHEET. Weapons Inventory.
 BATTLEMECH RECORD SHEET Left Torso Head Right Torso ARMOR DIAGRAM Type: HER-2S Hermes II Tonnage: 40 Points: Walking: 6 Running: 9 Weapons Inventory Mech Data Type Location Damage Short Med. Long 1 Autocannon
Preparing the Warband for Battle
 Preparing the Warband for Battle Deployment: Dividing the Warband Each player should divide his warriors into three Battle Groups, and three Detachments as follows: (Battle groups consist of 0-4 models
Napoleon s Triumph. Rules of Play (draft) Table of Contents
 Table of Contents") Rules of Play (draft) Table of Contents 1. Game Equipment... 2 2. Introduction to Play... 2 3. Playing Pieces... 2 4. The Game Board... 2 5. Scenarios... 3 6. Setting up the Game... 3 7. Sequence of Play...
Rules of Play (draft) Table of Contents 1. Game Equipment... 2 2. Introduction to Play... 2 3. Playing Pieces... 2 4. The Game Board... 2 5. Scenarios... 3 6. Setting up the Game... 3 7. Sequence of Play...
Version 0.1 Beta July TACTICbeta
 These rules can be freely duplicated and distributed but only in their complete unchanged original format! Version 0.1 Beta July 2012 Written by C. Berni original concept by Stefano Cavané 2012 Baueda
SERIES RULEBOOK. Game Design by Mark S. Miklos. Version: June 2017 TABLE OF CONTENTS. Great Battles of the American Revolution
 1 SERIES RULEOOK Game Design by Mark S. Miklos Version: June 2017 TALE OF CONTENTS 1. Introduction... 2 2. Components... 2 3. Game Scale and Terminology... 2 4. How To Win... 3 5. Sequence of Play Outline...
Henry Bodenstedt s Game of the Franco-Prussian War
 Graveyard St. Privat Henry Bodenstedt s Game of the Franco-Prussian War Introduction and General Comments: The following rules describe Henry Bodenstedt s version of the Battle of Gravelotte-St.Privat
Welcome to the eve of war; a conflict that will rip galaxies apart and this is where it begins. Playing the Game
 Welcome to 2175 Events have been set in motion that is drawing the human race into their first major conflict for over a 100 years; and it could possibly be their last. Welcome to the eve of war; a conflict
Game Rules. The Great Battles of the Napoleonic Era. Giovanni Crippa. version October v.1.1. A game by: GIOGAMES
 The Great Battles of the Napoleonic Era Game Rules v.1.1 version 1.2 - October 2013 GIOGAMES A game by: Giovanni Crippa 23900 LECCO (Italy) Introduction Advanced Vive l Empereur is a game system that allows
Mythic Battles: Pantheon. Beta Rules. v2.4
 Mythic Battles: Pantheon Beta Rules v2.4 Notes: Anything with green highlighting is layout notes, and is NOT FOR PRINT. Anything with yellow highlighting is not yet finished. 1 Game Terms & General Rules
FRIDAY APRIL 1 ST 8:00AM - 6:00PM
 FRIDAY APRIL 1 ST 8:00AM - 6:00PM Do not lose this packet! It contains all necessary missions and results sheets required for you to Participate in today s tournament. It is your responsibility to hold
WARHAMMER 40K COMBAT PATROL
 9:00AM 2:00PM ------------------ SUNDAY APRIL 22 11:30AM 4:30PM WARHAMMER 40K COMBAT PATROL Do not lose this packet! It contains all necessary missions and results sheets required for you to participate
1. Introduction 2. Army designation 3. Setting up 4. Sequence of play 25cm three
 Blades of Bronze Fast play rules for 15mm Ancients Contents 1. Introduction. 2. Army designation. 3. Setting up. 4. Sequence of play. 5. Orders. 6. Classification tables. 7. Conclusion 1. Introduction
Operation Blue Metal Event Outline. Participant Requirements. Patronage Card
 Operation Blue Metal Event Outline Operation Blue Metal is a Strategic event that allows players to create a story across connected games over the course of the event. Follow the instructions below in
Components Locked-On contains the following components:
 Introduction Welcome to the jet age skies of Down In Flames: Locked-On! Locked-On takes the Down In Flames series into the Jet Age and adds Missiles and Range to the game! This game includes aircraft from
FORCE ON FORCE QUICK START RULES
 FORCE ON FORCE QUICK START RULES Welcome to today s training mission. is exercise is designed to familiarize you with the basics of Force on Force and give you experience in commanding troops on the tabletop.
TAC MYTHOS. Byakhee Attack. 0 CP Any. Mythos Influence Level increases by one. always attacking the nearest unit. The
 TAC Flash of Inspiration Play during the TAC Step of the Pre-Turn Phase. An Officer of your choice gains D3 additional Command Points this Turn. 0 CP Any MYTHOS Byakhee Attack One or more Byakhee models
Some Un-official Optional Rules for COH
 2/22/2009 Page1/10 Some Un-official Optional Rules for COH The Simplicity and Power of COH COH is the most recent small scale tactical board game of WWII warfare on the eastern front. It is easy to learn,
DIGITAL. Manual. Copyright 2017 Lock n Load Publishing, LLC. All Rights Reserved
 DIGITAL Manual Copyright 2017 Lock n Load Publishing, LLC. All Rights Reserved Introduction on, Digital edition is a low-complexity, Second World War armored combat game, modeled after the Lock n Load
Budget Battle. Phil West
 Budget Battle Phil West This set of rules was inspired by some sets of cheap toy soldiers with interesting pairings such as Army men vs Cavemen, Ninja vs Robots and so forth. These reminded me of the running
7:00PM 12:00AM
 SATURDAY APRIL 5 7:00PM 12:00AM ------------------ ------------------ BOLT ACTION COMBAT PATROL Do not lose this packet! It contains all necessary missions and results sheets required for you to participate
Maida 1806: Stuart vs. Reynier
 Table of contents. 1.0 Introduction... 2.0 Components... 3.0 Gameplay... 4.0 Leaders... 5.0 Infantry in Column... 6.0 Infantry in Line... 7.0 Square... 8.0 Skirmish order... 9.0 Cavalry... 10.0 Artillery...
MATERIALS. match SETUP. Hero Attack Hero Life Vanguard Power Flank Power Rear Power Order Power Leader Power Leader Attack Leader Life
 Pixel Tactics is a head-to-head tactical battle for two players. Each player will create a battle team called a unit, which consists of a leader and up to eight heroes, and these two units will meet on
Game Turn 11 Soviet Reinforcements: 235 Rifle Div can enter at 3326 or 3426.
 General Errata Game Turn 11 Soviet Reinforcements: 235 Rifle Div can enter at 3326 or 3426. Game Turn 11 The turn sequence begins with the Axis Movement Phase, and the Axis player elects to be aggressive.
Getting Started with Panzer Campaigns: Stalingrad 42
 Getting Started with Panzer Campaigns: Stalingrad 42 Welcome to Panzer Campaigns Stalingrad 42. As winter began to close, the instruction came forward from OKH to von Paulus and the Sixth Army capture
BOLT ACTION COMBAT PATROL
 THURSDAY :: MARCH 23 6:00 PM 11:45 PM BOLT ACTION COMBAT PATROL Do not lose this packet! It contains all necessary missions and results sheets required for you to participate in today s tournament. It
Comprehensive Rules Document v1.1
 Comprehensive Rules Document v1.1 Contents 1. Game Concepts 100. General 101. The Golden Rule 102. Players 103. Starting the Game 104. Ending The Game 105. Kairu 106. Cards 107. Characters 108. Abilities
A Fistful of Tripods. Miniature Wargame Rules for The War of the Worlds Copyright 1998 By Ty Beard
 A Fistful of Tripods Miniature Wargame Rules for The War of the Worlds Copyright 1998 By Ty Beard 1. INTRODUCTION...2 THE GAME... 2 SCALE... 3 MEASURING... 3 2. THE SEQUENCE OF PLAY...3 OVERVIEW... 3 THE
Dune Express Alliances Dune express variant Originally Designed by FNH Game
 Dune Express Alliances Dune express variant Originally Designed by FNH Game Variant designed by Eric Pietrocupo Version 1.0.0 March 15 th 2010 Since there are so many variants out there, I needed to give
Wardens of the West. New Commanders. Contents. Tyrion Lannister. On Using This Expansion
 Wardens of the West Inside this Battles of Westeros (BOW) expansion are more troops and commanders for players to add to their Lannister army. In addition to new rules and components, this expansion also
A Clash of Arguments
 A Clash of Arguments A set of rules for the lazy gamers of this world. (Or Horse and Musket?) By Craig Grady Phases each turn consists of the following five phases Initiative Move Shoot Hand to Hand Moral
3rd Edition. Game Overview...2 Component Overview...2 Set-Up...6 Sequence of Play...8 Victory...9 Details of How to Play...9 Assigning Hostiles...
 3rd Edition Game Overview...2 Component Overview...2 Set-Up...6 Sequence of Play...8 Victory...9 Details of How to Play...9 Assigning Hostiles...23 Hostile Turn...23 Campaigns...26 Optional Rules...28
Getting Started Tutorial for Modern War
 Getting Started Tutorial for Modern War Welcome to the latest edition to the Squad Battles series of games, Modern War (MW). This title covers the two recent conflicts in Afghanistan and Iraq. You will
terms and concepts Cover Example Facing & Measuring Movement Active Model: The model as chosen by the Active Player currently resolving its action.
 The Rules terms and concepts Active Model: The model as chosen by the Active Player currently resolving its action. Active Player: The player who is Controlling the Active model. Base to Base: A model
Range Example. Cards Most Wanted The special rule for the Most Wanted objective card should read:
 Range Example FAQ Version 1.2 / Updated 9.30.2015 This document contains frequently asked questions, rule clarifications, and errata for Star Wars: Armada. All changes and additions made to this document
Designed by Uwe Eickert, Gunter Eickert, John Butterfield. v58
 Designed by Uwe Eickert, Gunter Eickert, John Butterfield v 'Solo Mission - Search and Destroy' Setup and Layout To assist you in learning the Solo System for Awakening the Bear, set up Solo Mission listed
CONTENTS CONTENTS 1 INTRODUCTION 3 ACKNOWLEDGEMENTS 3 UNIT REPRESENTATION 4 WHAT DO TROOP STANDS REPRESENT? 4 RECOMMENDED TROOP STAND SIZES 4
 CONTENTS CONTENTS CONTENTS 1 INTRODUCTION 3 ACKNOWLEDGEMENTS 3 UNIT REPRESENTATION 4 WHAT DO TROOP STANDS REPRESENT? 4 RECOMMENDED TROOP STAND SIZES 4 BEFORE BATTLE COMMENCES 5 THE PRIMARY RULE OF WARGAMING
Warhammer 40K Golden Rhino Tournament
 CREATED BY IAN PIETILA FOR USE AT THE HIGHLAND PUBLIC LIBRARY Warhammer 40K Golden Rhino Tournament JULY 28TH 1ST ANNUAL List Requirements and Structure INSIDE YOU LL FIND Army list requirements and structure.
Recon 1 Air Power Counter Attack Counter Attack Recon 1 Air Power Recon 1 Recon 1 Air Strike Air Power Air Power Air Strike Memoir 44 FAQ
 VIII. COMMAND FAQ Q. If someone can use a Recon 1 card as an Air Power, can the other player Counter Attack the effect or just the card? A. The rule is that a Counter Attack is only allowed to counter
Range Example. CARDS Most Wanted The special rule for the Most Wanted objective card should read:
 Range Example FAQ Version 1.1.1 / Updated 7.24.2015 This document contains frequently asked questions, rule clarifications, and errata for Star Wars: Armada. All changes and additions made to this document
Fields Of Fire Quick Start Guide V 1.2
 Fields Of Fire Quick Start Guide V 1.2 Fields Of Fire Quick Start Guide... 1 Introduction... 2 What To Do First... 2 Terrain... 3 LOS... 3 Elevation... 4 Preparing Your Armies... 5 Unit VOF, Ammo, and
Sample file WRITTEN BY ED TEIXEIRA DIGITALLY EDITED BY CRAIG ANDREWS
 WRITTEN BY ED TEIXEIRA DIGITALLY EDITED BY CRAIG ANDREWS CHAIN REACTION 1 TABLE OF CONTENTS 3 PROLOGUE 2.0 INTRODUCTION 3.0 YOUR ROLE.0 NEEDED TO PLAY The Dice.1.1 Passing Dice.1.2 Counting Successes.1.3
VANGUARD. THE FANTASY SKIRMISH GAME Beta Playtest
 THE FANTASY SKIRMISH GAME Beta Playtest 2018-03-08 1 WHAT YOU WILL NEED Models Table and Terrain Mantic Games supply a range of ready-made Warbands for Vanguard so it s easy to start your collection and
Remember the Alamo!* By George Knapp Version 6, 31 Jan 2000
 Remember the Alamo!* By George Knapp Version 6, 31 Jan 2000 *Please accept my apologies for the title. I do not mean to infringe upon any copyrighted material using the same name. These rules are for home
RULES OF PLAY Living Rules
 Ukraine 43 2nd Edition 2ND EDITION RULES OF PLAY Living Rules 7-4-5 TABLE OF CONTENTS. Introduction... 2 2. Contents... 2 3. Sequence of Play... 3 4. Stacking... 4 5. Movement... 4 6. Zones of Control...
TRY-TO-SURVIVE-ASAURUS
 I minatriassicmess GETTING STARTED Produced by LKM Direct Limited, Unit 24J, Wincombe Business Park, Shaftesbury, Dorset Telephone: +44(0)1747 855607 www.quickreactionforce.co.uk SCALE You require: A table
AXIS AND ALLIES 1914 OPTIONAL RULE: RESEARCH AND DEVELOPMENT
 AXIS AND ALLIES 1914 OPTIONAL RULE: RESEARCH AND DEVELOPMENT Using this rule, you may attempt to develop improved military technology. If you decide to use Research & Development, it becomes the new phase
1-4 8 T A C T I C beta
 These beta rules can be freely duplicated and distributed but only in their complete unchanged original format! by C. Berni 2016 Baueda Wargames Sas All right reserved 1-4 8 T A C T I C beta Version 2.0
Brothers at Arms. 1 P a g e
 On the 12 th April 1861 America went to war with itself, North against South, Brother against Brother. A few months earlier Abraham Lincoln had won the race for President of the Union of States (US) and
CEDAR CREEK BY LAURENT MARTIN Translation: Roger Kaplan
 CEDAR CREEK BY LAURENT MARTIN Translation: Roger Kaplan Cedar Creek 1864 simulates the Civil War battle that took place on October 19, 1864 and resulted in a Union victory. It uses many of the rules of
TWO PLAYER RULES Introduction
 TWO PLAYER RULES Introduction Congratulations on purchasing the Kickstarter version of Moongha Invaders. Your reward is a two-player game pitting a team of heroes against a horde of rampaging monsters.