Combat Captain World War II Tactical Wargame Rules
|
|
|
- Amberlynn May
- 6 years ago
- Views:
Transcription


1 Combat Captain World War II Tactical Wargame Rules January 1, 2010 revision By David Raybin


2
3 COMBAT CAPTAIN! World War II Tactical Wargame Rules ( JANUARY 1 Revision) 2010 David Raybin Introduction These rules are a highly stylized recreation of World War II tactical combat with 28 millimeter model solders and appropriately scaled, tank, and cannon. You could use 15mm troops if desired or, arguably, larger scaled miniatures. The game uses a you go I go turn sequence with the passive player having a limited opportunity fire to keep one side from dominating the other as well as keeping the passive player on his toes while the other fellow is moving about the board. Against the grain of most modern rule sets which use a multitude of charts, this set has but a single fire chart. Everything else is factored into the number of dice cast for a particular activity. The six-sided dice are used to their maximum effect by allowing some activities only on even rolls and other activities only on odd numbers. Because there are more even pips than odd, this permits a chance variation without cumbersome charts. For example long range fire effects are calculated only on odd dice, medium on even rolls and both even and odd when firing at close range. Our rules were first used during wargame conventions. The minimum of charts and simple mechanics were designed to achieve a faster paced game which could be played in less than three hours. Organization of Troops A company (called a unit) consists of up to eight squads which, in these rules, are called sub-units. The majority of the squads (usually four or five) are rifle squads of five men each. A company may be supported by one to six heavy weapon squads (machine guns and mortars). In this game the minimum company composition is 5 rifle squads and, except in rare cases such as militia, 2 heavy weapon squads. Tanks companies are two to five vehicles. One to three on-board artillery pieces is a battery and is considered company sized. Off-board artillery is a low probability, random event as is the air strike. In these rules a company-sized unit is called a unit. The parts of the company are called sub-units. Thus a squad is a sub-unit. An individual model tank is a sub-unit. Page 1 of 35


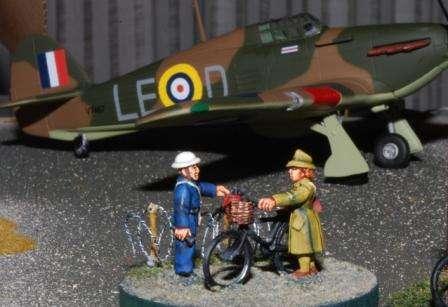
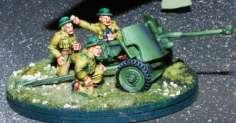
4 One subunit in each unit is the leader. Such leader units which otherwise operate for all purposes as regular subunits-- do nothing more than serve as the center of mass of the unit since a subunit more distant than leadership control radius rating (8, 16, or 24 ) from the leader subunit is considered isolated. Below is a picture of a British infantry company made of five infantry squads and two heavy weapon squads. Thus this company is made up of 7 sub-units. In our game the smaller, crew-served, heavy weapons are mounted on 2 diameter stands. Large, very heavy, crew-served weapons, such as an anti-tank gun, operate as an independent company or they may be attached to an infantry company. In our game the large crew-served, heavy weapons are mounted on 3 diameter stands such as depicted on the left below. To the right is a photo of a tank company with three tank sub-units. Page 2 of 35
.")
5 Discussion Casualties are discussed in detail later. In general, each figure is removed when there is a hit and the figure fails a saving roll (a saving roll is only possible if the subunit was in cover). Model tanks require a greater number of hits to be destroyed in close combat and, in fire combat, are killed only if it fails to roll a kill number. In this game a subunit (or tank) operates at full strength until it is wiped out. Since subunits consolidate losses as they occur only one subunit can be operating at less than full strength, and thus it is not necessary to worry about modifiers for under-strength subunits. Speed of the game is a primary concern. Lastly you will notice the photos of the troops use skirmish movement stands manufactured by Litko. Individual figures can be removed as casualties are inflicted. We find these stands to be very useful to indicate subunits but these stands are not mandatory. Dice All dice are six-siders. We count the pips for a normal event such as firing at short range. We count only the even numbers for medium range and odd numbers for long range. This convention does away with a host of charts. Movement is dictated by die roll. We use the full, even, odd dice convention for movement: more difficult terrain uses only odd dice numbers and certain units only move on even dice. Game scale One figure represents 2-3 men and one model vehicle is 2 3 vehicles. For range, eight inches equals about 100 meters (with long, effective range for rifles being 24" or 300 meters). Game Sequence: The Turn After everything is set up and ready to go, the players first roll to see who goes first this turn. The first player takes his turn with all his troops. Then the other fellow goes Page 3 of 35

6 and then the turn has been completed. The players then see if victory conditions are met; if not, they play another turn. General Course of play: The players alternate activity during a turn. The players first dice to see which side has the initiative. This dictates who goes first this turn. The side who goes first is now the initial, active player. This first active player plays all his units. Then the other side plays all his units. This ends the turn. The play consists of one side: 1. First pulling all unused hold fire markers UNLESS you were the last active player last turn and you are the second active player this turn, in which case the markers stay, and then, 2. Activating all of his units (essentially moving, shooting. and conducting certain other activities such as regaining morale or building cover), and then, 3 Engaging his eligible units in close combat with enemy units, and then, 4. Attempting a random event, and then, 5. Making a reinforcement move with eligible units. While all this is going on the passive player can fire those of his units which have held fire from the just-completed time he was the active player. The passive player also has the ability to save some casualties if the subunit was subject to fire. The passive player may also elect to retreat if attacked at some substantial risk. Once the active player has completed his side of the turn, the play goes to the opposing player who performs the same activities. The initial active player is passive but can fire his units which have held fire and conduct very limited activity as addressed earlier. When that is finished then the players see if victory conditions are met; if not, they play another turn. Discussion: In this game the sides alternate play. In other words one side is active and the other side is passive except for exercising hold fire markers and certain other limited defensive actions. Page 4 of 35
7 The side winning the initiative chooses whether his side or the enemy will activate first this turn. As with a coin toss in football, a prevailing team can allow the other side to go first for a variety of reasons to gain some advantage or it can make the first activation itself. Once an activated player finishes all his offensive operations, the opposite side then activates his units. When it comes his turn the active player elects which company or battery or other company-sized unit may activate first on his side. The first unit such as an infantry company then plays its activity dice by moving, firing, improving morale and/or taking or leaving cover. Subject to certain limitations the other passive player can fire if he has held fire with his unit. A hold fire marker allows a shot and once used. is expended. The active player can then activate any other unit of his choice unit but he cannot go back and fiddle with the first unit. He continues on activating company sized units one at a time. The passive player can fire with hold fire units as they chose while the active player is playing each unit. Once the player has activated all his units, his eligible units may then engage in close combat. Friendly units in contact with enemy units other go at it with bayonets and hand grenades to gain disputed ground. This is quick, brutal, and produces a decisive result one way or the other. Once close combat has been resolved for that player, then that player may roll on the random events chart. This determines if the active player will be allowed any airstrikes or off-board bombardment which is dictated by a die roll. Once the random events have been ascertained the active player may make a reinforcement move. Certain Units beyond 40 of any enemy may make a reinforcement move. Once the active player finished his reinforcement move he is done for that turn. The other side now activates all his units, engages in close combat, attempts a random event and moves a reinforcement move. The previously active player assumes the role of the passive player and may now only fire with units who have hold fire markers. Once both players have finished they see if victory conditions are met; if not, they play another turn. Page 5 of 35

8 Initiative Each side rolls one die + modifiers. The highest die has the initiative this turn and chooses who will go first this turn. Initiative Modifiers: +1 for EVERY enemy sub-unit destroyed last turn. +2 won initiative last turn; +3 for EVERY close combat won last turn; Discussion: In this game he who has the initiative tends to keep it. It rewards the aggressive player who kills a host of his enemies and wins close combats. In most games the initiative winner will elect to go first this turn.. Once it is determined who goes first that player is now the active player and plays all his units. The passive player does not move but can fire those of his units which have held fire from the just-previous time he was the active player. Removal of Hold Fire Markers When your active turn comes around the first thing you do is pull any unused hold fire markers UNLESS you were the last active player last turn and you are the last active player this turn, in which case the markers stay. You cannot carry unused hold fire markers past the enemy s active phase. If you want to generate hold fire markers for later use when you become the passive player you need to pay for them in your active phase using activity dice. Activity Dice An activating unit has an activity dice limit usually three which can be used for the activity for EACH sub-unit that turn. The activity dice number (usually 3) dictates the upper limit of activity dice EACH sub-unit can expend that turn. Thus, a unit with an activity dice limit of three means EACH sub-unit can use three dice worth of activity that turn. ALL the sub-units of the unit conduct activity to completion before moving to the next sub-unit. Page 6 of 35

9 For example: a sub-unit uses two dice for movement and one for fire. Another sub-unit uses all three for movement. Another sub-unit takes cover with 2 dice and holds fire with a third dice. When the sub-units have used all their dice then you move to the next unit on your side and you cannot go back and do anything with the first unit. In multiplayer games we allow each player on a side to activate their units independently of each other to move the game along. Activity per Unit Sub-units of a unit may conduct various and different Offensive (or prospectively, defensive) activities with the combat dice up to the activity dice limit for that unit. The activity dice limit in these rules is always assumed to be three (although game events may dictate more or less dice). Dice not used in the turn are not carried over to the next turn. Discussion: The use of the activity dice compels some forethought as to what may happen in a turn. Blindly moving all your sub-units through open ground with three dice can be a good thing if you are far from the front and there is little chance of enemy fire. However, you could be surprised by an enemy machine gun nest and have nothing left for defensive fire ( hold fire markers) in which case the captain may have quite a few letters to write to the families of his casualties. Exception to Activity Dice Limit The activity dice limit for each company-sized unit is dictated at the beginning of the turn. In these rules it is always assumed to be a three dice limit per unit. Occasionally a unit may gain (or lose) activity dice for certain bonus activity or as a result of some adverse event. There is one temporary addition to activity dice. If all the sub-units in a unit conduct the exact same activity with all its dice at the exact same time then the unit (all sub-units) gains an extra dice for the sub-units to exercise. For example, the unit has three activity dice but elects to move all sub-units. With the extra die gained by this common activity, the sub-units cast 4 dice and the sub-units may move up to that many inches as per the movement rules. Of course that consumes the unit s entire activity for the turn but the unit will move further by engaging in a common unified activity. Page 7 of 35
10 For example, the unit desires to use all dice for shooting, in which case it uses four dice for fire: a deadly volley to be sure! Use of Activity Dice (pay attention folks; this is the guts of the game) When the unit is activated the unit can use activity dice to remove morale markers for the unit as a whole. Each morale marker costs one die and reduces by one the number of dice each subunit can use for activity. When the unit is activated each sub-unit can use three dice (unless reduced by unit consumption of dice for the removal of morale markers) for activity such as moving, firing, taking or removing cover, or holding fire. The subunits can use the activity dice as they desire for the same or different activity. Offensive Activity Dice FOR EACH SUB-UNIT is used when each sub-unit Moves, Fires, Takes Cover, Removes from Cover, or Holds Fire consistent with the number of activity dice available to the unit. The unit activity dice limit is always assumed to be three for each subunit (unless reduced by unit consumption of dice for the removal of morale markers) for activity such as moving, firing, taking or removing cover, or holding fire. When a company-sized unit is activated, EACH sub-unit can conduct offensive operations with all its dice (usually three per sub-unit which is the unit s upper limit for each sub-unit). Offensive Activity Dice can be used by EACH sub-unit for some or all of the following events: (1) A die or dice can be used for Movement, and/or (2) A die or dice can be used for Fire (offensively) and/or (3) A die or dice can be used to Move out of Cover into an aggressive, more mobile stance (one Cover marker is removed per dice) and/or (4) A sub-unit can take cover (Cover markers are placed; one per die expended) which means when enemy fire produces potential casualties subunits which have taken cover during this or during a prior turn can roll to save possible hits (there is no limit to how many times the save rolls can be used), and/or (5) A dice or dice can be intentionally SAVED for future fire activities when the player NEXT becomes the passive player; the sub-unit Holds Fire. ( hold fire markers are placed for each sub-unit desiring to hold fire), Page 8 of 35
11 Offensive Activity Dice FOR THE ENTIRE UNIT is used when Unit removes Morale Markers. Offensive Activity Dice can be used by the ENTIRE UNIT for the following as long as EACH sub-unit contributes a die to the activity: A dice or dice can be allocated to pull a morale marker or markers from the unit since a morale marker affects the ENTIRE unit even it was triggered by some bad behavior of a single sub-unit. Discussion: A morale marker can be pulled as long as ALL the sub-units contribute a die to the activity since all the sub-units are impacted by the horrid morale marker. Limitation of Offensive Activity Dice for Heavy Weapons Heavy weapons such as mortars, machineguns and field guns, may not fire in a turn where the weapons moved or took cover or removed cover during that turn. Conversely a heavy weapon may not move or take cover or remove from cover if it fires this turn. A heavy weapon may move and take or remove from cover in the same turn. Discussion: Heavy, crewed weapons take time to set up and to acquire a target. They are just not as flexible as regular infantry who only have small arms. Thus any heavy weapon movement or taking cover precludes firing. Once the heavy weapon unit is in place to fire however: watch out! Defensive Activity Dice AFTER Offensive Activation Play is over HOLD FIRE can be used for Defensive Fire (sub-units which held some or all of their fire during offensive operations during activation can now return fire as enemy troops fire at them or the sub-unit fires at enemy troops whose movement present targets of opportunity) When the player NEXT becomes the passive player he can exercise any hold fires. IMPORTANT: Note that if a side is the second active player this turn he can use the hold fire markers when he next becomes the passive player next turn IF he is not the first active player next turn. If he is the first active player next turn he gathers up the hold fire markers and essentially forfeits them. Discussion: Hold fire is always a post-activation activity. Since it is possible to carry hold fire markers into the next turn this may impact your decision as to who goes first should you win the initiative. Page 9 of 35
12 The number of times a sub-unit can fire defensively is dictated by the number of hold fire markers the sub-unit has placed. One die for each activity die. Thus a sub-unit can have a maximum of three hold fire markers. When firing, the sub-unit can shoot all its hold fire markers at once at a common target or can fire them one at a time at different targets. When do you use the hold fire dice? When your opponent is moving one of his sub-units you call out your shot whenever you desire. When your opponent takes a shot at your sub-unit you can fire back at any enemy subunit of the firing enemy unit if you have a hold fire marker. However your opponent gets to assess casualties first in this exchange. The fire is NOT simultaneous. In this game preference ALWAYS goes to the more active, offensive unit. Using the Activity Dice per Sub-unit A sub-unit (of an activated unit) may use its activity dice as it sees fit up to the number of the [remaining] activity dice limit for that unit. The activity dice limit for a unit in this game is usually three and thus each subunit can employ up to three dice for activity in a turn. For example a sub-unit with 3 activity dice can move 1 die, fire with 1 die and then move with the remaining die. The dice number rolled for one sub-unit does not impact the roll for the next sub unit. A sub-unit may use all the dice it intends (or is allowed to) use that turn before the next sub-unit conducts activities. Alternatively a sub-unit can play one dice, then another sub-unit in the same company can play three dice and then the first sub-unit can play its second and third die and so forth. To keep track of allowed activity dice each sub-unit can be allocated a marker for the activity dice limit and -- as each is used -- the maker is inverted. We use a penny: heads for three dice remaining dice. Tails for two dice remaining dice. When the third die is used the penny is removed which also indicates the sub-unit has finished its permitted activity. [Hold fire markers remain on the appropriate sub-units ] Recently we used spent.22 shells as markers which looked great! Discussion: This rule allows a company a fair amount of flexibility during its offensive operational activation. The sub-units can move and fire and, if needed, fire again or even move backwards out of harm s way. Needless to say the other player may be able to respond with defensive fire IF it has allocated hold fire for this eventuality. When Page 10 of 35
13 and how to play activity dice gives the player something to be thinking about and indeed is the essence of this game. Major Discussion: Enough has been said about offensive dice and defensive dice so the flow of the game should be apparent. A friendly unit is activated. Each sub-unit in the company moves one die and takes cover with a second die. An enemy unit [which had the good sense to hold fire when it was activated] perceives several of your sub-units are now in range and elects to fire a defensive volley of three dice since it has previously held fire. You sustain an unacceptable number of possible hits but you had taken cover which reduces your casualties. You are extraordinarily lucky and sustain minimal losses. With one die remaining you fire at the enemy unit who had the temerity to shoot at you. Your rounds find their mark and there are far fewer enemy troops to harm you. After you have played all your units it is now the enemy s turn opportunity to activate a unit and tank shells drop around your unit; you wish you had taken even deeper cover for the unexpected barrage but you couldn t since you committed your dice to movement, minimal cover and a single volley of rifle fire. Using Activity Dice for Shooting. (this will be addressed in more detail later) Firing activity dice offensively. Consistent with the above rule regarding the three-dice limit on activity, sub-units of a common unit may fire at a common target at the same time. Indeed, units will want to combine fire to increase the probability of a casualty. For example two sub-units want to fire at an enemy. The sub-units can cast as many as three dice each to determine fire points. Then they combine the score and then cast the variable dice. Discussion: Remember that if all sub-units conduct the same activity and use all their activity dice at the same time they get a one die bonus each. Thus, all five rifle squad sub-units of a company can fire all at once with four dice each. There is no requirement that they fire at the same target or that the even all have a target; however this burns all the activity dice for that turn. When multiple sub-units fire at a common target, at the same instant, they may do so (and add their fire factors together.) Firing dice defensively (Hold Fire) When holding fire the unit uses the dice defensively at a time AFTER the offensive activation is over. This is called variously in other games: overwatch fire. A player cannot hold defensive dice over to another active or subsequent passive turn; use it or lose it. Page 11 of 35

14 Discussion: Deciding how many if any defensive dice to hold back is part of the strategy of this game. Taking Cover or Leaving Cover To Take Cover To Take Cover, the sub-unit commits an activity die or dice to this function. In essence the sub-unit is spending time and movement to find cover and take up ever-increasing levels of protection such a entering buildings and erecting improvised field defenses. You do not need to roll to take cover; you just burn a die which could have been used for another activity. A unit in a given level of cover can acquire better cover by burning a die (in this or a later turn) for the next better level of cover up to level 3. Discussion: Burning a die for cover activities represents a temporal event when the unit could have been doing something else. The more time spent finding adequate cover dictates better cover and more protection but less time for shooting or moving. Discussion: When the sub-unit has Taken Cover, dice are used to conduct saving rolls against possible casualties but the unit has already paid the price to be in cover by the expenditure of offensive dice. Cover can be used when enemy units fire offensively or if enemy units fire defensively. Leaving Cover Once a unit is in cover, it must leave cover to move again. Leaving cover is the opposite of taking cover; you burn a die to leave a level of cover. Discussion: This cover rule represents the time it takes a unit to acquire or leave cover and reorganize itself for mobile offensive activity. The more dug in the unit, the more time (and dice) it takes for the unit to find its men, don their gear and get ready to go. Levels of Cover There are 5 levels of cover; Level 1 is where the sub-unit simply goes prone to present a smaller target. A sub-unit employs a cover stick which is placed in front of the sub-unit to indicate Level 1. Level 1 cover provides 270 protection (front and flanks). Page 12 of 35

15 Level 2 is where the sub-unit takes more time to hide behind trees, walls and rocks or other cover. Two cover sticks denote level 2. Level 2 cover provides 270 protection (front and flanks). Level 3 is where the sub-unit enters buildings and takes up firm defensive positions which do not include field works. Three cover sticks denote level 3. Level 3 cover provides 360 protection (front, rear, and flanks). Level 3 cover can only occur within 16 inches of a model building. Levels 4 and 5 are where there are previously prepared positions existing prior to game play. Units may not create these during the time allotted for the game. These levels are represented by models of trenches or pillboxes and the like. Levels 4 and 5 cover provide 360 protection (front, rear and flanks).the exact level is determined prior to game play. Effect of Cover As we learn later when we get to casualties, a level of cover allows for a saving roll. A level 1 cover allows for a save on possible kill with a roll of 1. A sub-unit in cover STAYS in cover until such time as it moves out of cover. It can stay in cover from turn to turn at no cost in dice. When a sub-unit has taken cover of any sort it cannot voluntarily move, until all cover sticks are removed. Removing Cover It takes 1 die worth of activity dice to pull one cover stick. Units may leave Level 4 and 5 cover by expending three activity dice. Example: A sub-unit already in level 3 cover would need to burn all three dice in its activation phase or in several phases in later turns to get itself together so offensive activity could be commenced in the next, following turn. Discussion: In this game buildings only block line of sight. They are obstacles to movement in the sense that you have to move through the house which is considered odd terrain. You don t actually enter a house and fight from within. Thus the buildings are, in effect, only representative of a built-up area. If you want to gain the defensive benefit of something as stout as a house, you pay 3 three dice for the three Page 13 of 35
16 cover points. Then you lay the cover sticks in front of your sub-unit to denote level three cover. This is kind of letting the terrain come to you instead of you coming to the terrain. In terrain devoid of houses we prohibit level 3 cover. Questions: Q. Why do you make units burn dice to exit cover? I would think jumping up and running out of cover would be much, much faster than digging in. A. First of all not everybody is eager to jump up and run toward a machine gun. Moreover, jumping up is one thing; figuring out where your buddies are and getting reorganized for offensive, mobile operations is something else again. It takes time to get everybody up and together and that is why the rules are as they are. Besides, level 3 is not digging in. You are finding cover in houses, overturning trucks and pulling over a few logs. It is not a foxhole. Emergency Cover Departure If any or all of the sub-unit desire to break cover without paying the necessary die or dice it may do so BUT the entire unit takes a MORALE marker for making a break cover. Remember, when that happens, deduct a pip from every die until the Morale marker gets pulled. Only one morale marker is placed even if multiple subunits break cover. Vehicles in Cover Vehicles can achieve Only Level 2 cover and can never be in level one cover [tanks do not go prone!] If there is only a level one cover because that is all that can be acquired that turn, the cover level has no effect in combat or fire but, next turn, another cover level could be acquired which would bring the tank up to Level 2. Discussion: The time factor is a function of finding adequate cover to protect something as big as a tank such as behind a small hill, in a hull down position. Tanks in cover can ONLY fire with their primary weapon and not with machine guns which are considered obstructed by the concealment. Discussion: Armor units in cover are protected not as much by rubble and the like but by concealment. Terrain Cover Terrain in this game only affects line of sight and restricts movement. It never-- by itself provides cover. You want cover, you pay for it. Page 14 of 35
17 Moving over hedges and walls with infantry can be done on an odd die roll. So if you are coming up on such a terrain piece, sort of creep up to it a die at a time so it is clear that you are eligible to cross with that odd die roll. Destruction of Cover Level 4 and Level 5 cover can be destroyed by enemy action targeting the cover itself. The firing unit announces he is shooting at the cover instead of the men inside. Four hits destroy a level four cover and five hits a level five cover. When destroyed, replace the model pillbox or foxhole with three cover sticks to denote that enemy is now defending in the rubble. Cannons and mortars can destroy level 4 or level 5 cover from their normal ranges. Infantry can destroy level 4 or level 5 only when firing at close range. The subunits are assumed to have engineers and demolition troops available at least at company level. You cannot destroy level 1, 2, or 3 cover. Unit Cohesion - Leaders One subunit in each unit is the leader. Such leader units which otherwise operate for all purposes as regular subunits-- do nothing more than serve as the center of mass of the unit since a subunit more distant than the leadership control radius rating (variously: 8, 16, or 24 ) from the leader subunit is considered isolated. Sub-units need to stay together. Any sub-unit which is outside the unit leader s control radius at the beginning of the turn is isolated. An isolated subunit cannot move or fire offensively this turn but it may hold fire. An isolated subunit may take cover or remove from cover. If the leader subunit happens to take casualties and evaporates, then simply promote the closest subunit as the new leader and carry on. Using Activity Dice for Movement When can you move? Except for withdrawing units, (i.e. retreating) a sub-unit can only move when activated. Page 15 of 35
18 How do you move? To move, the unit uses an activity die or dice. In summary the sub-unit throws the die or dice and moves that many inches dictated by the roll: for example: three pips are three inches. The unit moves three inches. The unit need not move all the inches dictated by the dice. Discussion: Three dice will allow the sub-unit to move up to 18 inches (if you are lucky enough to roll three 6 s) but it will not be firing or taking cover since there are no dice left over for these functions. Even Dice Movement dice for infantry All regular infantry and heavy weapons can move ONLY on even dice. Odd die rolls are ignored. Discussion: Even die numbers equal 12 on a single die ( ) so, on average, an infantry sub-unit will move 2 inches per die: an average of 6 inches for three dice. An infantry sub-unit may have a catastrophic die roll (all 1 s) and not move at all; lost orders, sergeant killed by a sniper or the troops don t feel like moving. Conversely the sub-unit could be lucky and move 24 if all the sub-units elect to commit all dice to movement (an extra die) and the sub-unit rolls four sixes! Just assume they caught a ride on a passing truck. Either extreme is rare: fortunes of war. The company commander does not have total control you see. Total Die Rolls for Vehicles Vehicles move on any die number. Discussion: This is 10.5 inches per turn on average for three dice. Movement penalties Odd Terrain Certain terrain creates odd impediments to movement such as a bog, a forest, certain rubble, dense brush, or burning buildings. To account for movement restrictions in this odd terrain the normal movement rates and dice combinations are suspended. ALL UNITS in odd terrain will now move ONLY on odd numbers. In other words everybody moves only with an odd number on the die except all-tracked vehicles which move on an even number. Discussion: This is a cruel rule but removes the necessity of dividing and calculating movement restrictions and wasting a ton of time. Thus, on average a non-all-tracked vehicle unit moves in odd terrain but 4.5 inches -- on average -- with three dice; a snail s pace. We allow the all-tracked vehicles to move on even dice in odd terrain; a contradiction in terms if there ever was one. Page 16 of 35
19 Transport Trucks and other like vehicles can transport troop and guns at a faster speed. These vehicles are only representative. If destroyed the company loses the transport but is not otherwise harmed EXCEPT that the company draws a Morale Marker. When things get hairy and the transport is at risk the company may detach the transport and move it a foot away. The transport then functions as its own company until needed again. If needed, the troops and transport must come adjacent. The transport is then considered part of the company albeit that the troops are dismounted. A company may mount into its vehicles but this takes the entire turn. A company may dismount from its vehicles and assume a combat formation but this takes an entire turn. The exception is that a line of half-tracks moving abreast where the width is as great as the depth, can dismount the troops at a cost of one die expenditure each per foot subunit and half-track. A company is either mounted or dismounted. You cannot have some troops riding and others on foot. Trucks Trucks can only move on roads (or what pass for roads on the battlefield). Two model trucks are representative of the transportation to move an entire company. The more trucks (beyond the required two) then the more that can be killed and still keep the company on wheels. In other words a company which has three trucks is considered still mounted when one truck is destroyed. Thus, you will want to have multiple trucks if possible. When there is but one truck the company is considered dismounted. You might use the truck to hook up with another orphan truck. When trucks are in use the model troops are put in a sort of column with one truck at the head and another at the tail. ( and any extra trucks tucked in the line). When suffering enemy fire it takes two hit points to kill the truck. If below the required two-truck minimum the company suffers no harm albeit it there is a morale marker taken. The company is considered involuntarily dismounted in place and may conduct no further offensive activity that turn.. Half-tracks Half-tracks operate as to trucks and perform the same function with several exceptions. First, unlike trucks which are road-bound, half-tracks can move anywhere. Half-tracks need not operate as a column of vehicles although they may if they desire. Alternatively Half-tracks can operate in a line, left to right or in Page 17 of 35
20 some depth (if there are enough models allotted to the company). Essentially the half-tracks move abreast, cross-country with the company on board. Half-tracks may be armed with machine guns if the model vehicle is so equipped and can provide some fire support whether there are troops on board or not. However, remember that a die used for movement cannot be used for fire support. When suffering enemy fire it takes three hit points to kill the half-track. If below the required two-vehicle minimum the company suffers no harm albeit it there is a morale marker taken. The company is considered involuntarily dismounted in place and may conduct no further offensive activity that turn. Terrain Obstacles A wall or hedge is odd terrain albeit very narrow. You might consider rolling dice individually as you approach so the odd dice requirement can be met. Movement penalties Night To move in normal terrain at night use only odd die. One can move in odd terrain at night only on a die roll of 1 or 3 (that many inches). Other Movement Penalties and Rules Other than the even/odd dice conventions remember that a sub-unit cannot move while in cover until it removes the cover markers (which consume dice, i.e. time). Also remember that heavy weapons which fire cannot move. Also remember that a morale marker is a minus 1 deduction for EACH dice rolled; nasty that, what. Road Movement This game is tactical combat at close range and no unit is going to be in road formation. However, units more distant than 40 inches from the enemy can conduct a reinforcement move after all the units on both sides have activated and combat concluded. Reinforcement Move. Units beyond 40 of any enemy may make a reinforcement move. This is a move in addition to the earlier regular move during activation. The unit must not have engaged in combat this turn or fired this turn, have no morale markers and must begin the move more than 40 away from any enemy unit and in taking a move may not move closer than 40 to any enemy unit. It can conduct no action other than a move during the reinforcement move. Page 18 of 35
21 Formations There are no formation rules in this game, thank goodness. Morale Take one morale marker for the ENTIRE UNIT for any of following events at the instant one of these events occur: 1. A sub-unit is destroyed. 2 The unit loses a transport vehicle. 3. Unit (as a whole) fails to charge into close assault after all charges are attempted. 4. Unit WITHDRAWS. 5. Unit loses a CLOSE COMBAT. 6. A sub-unit or all subunits make an emergency brake cover. (one marker per unit not per subunit; marker is placed when first subunit makes brake cover. ). Impact of a Morale Marker: Each morale chit is -1 on every die EVERY sub-unit (in the unit) throws for everything but the unit may otherwise act normally. Note that this subtraction does not effect the even/odd convention. A throw of three is an odd number (for movement let us assume) but the sub-unit can only move 2 inchs with a morale marker in place. In other words an odd number thrown is still an odd number albeit that there are deductions for morale markers. Discussion: The morale markers remove a host of charts and weird calculations. Anyone can subtract one from a die roll. Also the additive effects of the morale markers are subtle..if you want you can operate with several moral markers but you will not be moving very far or shooting very well. When the number of chits for the unit as a whole equals six (OR equals the number of remaining non-vehicle subunits) whichever is LESS the unit ROUTS on the spot and vacates the field of combat. In the case of vehicles add the number of all remaining vehicles in the unit and double that number; use THAT number to determine morale marker rout status. In other words if the armored unit has two remaining vehicle, then four morale markers will cause a rout. Discussion: In some instances the unit may return to the field after appropriate alone time in the discretion of the game master or by the scenario rules. Page 19 of 35
22 Removing the Dreaded Moral Markers A unit may pull a Morale Marker at any time during the offensive activation phase but this consumes a single die for ALL the sub-units since the morale marker impacts all the subunits. A Morale Marker can only be pulled IF there is an unused activity die available for all sub-units in the unit. Multiple Morale Markers can be pulled if there are enough dice available. Remember this rule: it can save you unit in a pinch. Casualties Except for successful saving rolls for cover, one casualty is one man lost for non-vehicle subunits. The owner pulls a man from the sub-unit affected. There are no strength modifications for sub-units which have suffered casualties. Until the sub-unit is wiped out it operates at full strength. Partial losses from several sub-units are consolidated so that 4 men lost from 1 subunit and 1 man lost from another sub-unit results in the loss of an entire sub-unit. Fairness dictates that the sub-unit which lost 4 men is the one that evaporates; put the survivor over on the other sub-unit. Remember, sub-units are required to consolidate casualties so there is never more than one subunit with a few men missing. The possibility of Consolidation occurs at the moment a figure is lost so pay attention. Also the process of consolidation may trigger the loss of a subunit; the unit draws an immediate morale marker!!! Heavy weapon stands are removed when ALL figures are casualties. Vehicles Casualties from enemy fire. A non-armored vehicle requires 2 hit points to be killed. A half-track requires 3 hit points to be killed. The Number in the fire chart is the Kill Number for armored Targets. IF a further die roll equals or is less than the Kill number the armored unit is destroyed.. Casualties in Close Combat The number of hits produced by the close combat calculation (addressed in the close combat rules) is the number of kills for foot figures: one hit, kills a man; 2 hits kills a vehicle; three a half-track, and five an armored subunit. Page 20 of 35
23 If the leader subunit happens to take casualties and evaporates, then simply promote the closest subunit as the new leader and carry on. Saving Casualties for Being in Cover Each time a sub-unit takes a possible kill such as from fire or melee the sub- unit may try to save the loss by rolling to SAVE for EACH possible kill. If the sub-unit rolls the required number or less, the loss is ignored for each potential kill. You need to remember to try to save for each kill for sub-units in cover. A sub-unit with level 1 cover saves on a 1 (clever boy: now we know why the cover levels are numbered!) Level 1 cover is 270 degrees. A sub-unit with level 2 cover saves on a 2 or less. Level 2 cover is 270 degrees. A sub-unit with level 3 cover saves on a 3 or less. Level 3 cover is 360 degrees. A sub-unit with level 4 cover saves on a 4 or less. Level 4 cover is 360 degrees. A sub-unit with level 5 cover saves on a 5 or less. Level 5 cover is 360 degrees. Using Activity Dice for Firing at the Enemy (it s why you play the game!) A sub-unit fires with activity dice. When you fire you first determine the weapon type and range to target. Then you figure out if there is a line of sight to the target unobstructed by terrain or troops. A laser pointer is helpful. Then, assuming the target is in the line of sight, you get ready to fire. Now armed with the range, you roll a dice for each activity die allocated for fire. A short range you count the pips and that tells you how many fire points you have. Then you go to the weapon chart which is basically a weapon type vs. target type: either nonarmored or armored. Then you throw another dice and cross-reference this variable roll with the fire points (from the first roll) on the chart which tells you how many hits you inflicted on the enemy. Discussion: We use white dice for the fire point s roll and a red die for the variable die and throw them at once; faster that way. Example: The sub-unit fires at an enemy in short range and throws three dice and gets a 9 which means there are 9 fire points. It is shooting with regular small arms so there are no modifiers. Then cast the red die which is a 6 which results in 2 hits off the chart. When multiple sub-units fire at a common target, at the same instant, they may do so (and add their fire factors together.) You WANT to do this since the damage increases. Page 21 of 35
24 The Weapon Charts There is one weapon chart. There are a few simple modifiers depending on weapon type and target.. Range Modifiers At short range all the pips on the fire point dice count. At medium range only count the even numbers on the fire point dice. At long range only count the odd numbers on the fire point dice. That s it? Yes, sir. WEAPON RANGES SHORT MEDIUM LONG Bazookas Rifles and Other Small Arms Mortars and Crewed Machine Guns Cannon Other Modifiers: Remember that a morale marker subtracts 1 from EVERY die. Number of Hits. The cross-referenced Number in chart is the potential kill points. A non-armored vehicle requires 2 hit points to be killed. A half-track requires 3 hit points to be killed. The cross-referenced Number in chart is the Kill Number for armored Targets. IF a further die roll equals or is less than the Kill number then the armored unit is destroyed..in all cases The number of actual casualties on the enemy is subject to a saving roll if the enemy is under some species of cover. Firing Tanks Tanks are a special case because they have multiple weapons and can fire and move in the same turn. Discussion: Crew-served heavy weapons such as crew-served cannons or heavy machine guns either move or shoot. Tanks can do both in a turn: tanks a lot! A tank has a primary cannon and a non-crewed machine gun. If a die is used for movement it cannot be used for weapons fire. If a die (or dice) is used for weapons fire instead of movement the tank uses the same roll (die number result) for cannon fire and ALSO for the machine gun. The cannon can fire at target A and the machine gun can Page 22 of 35
25 fire at target B or both can fire at the same target. They are separate weapons but can combine their fire or fire at separate targets.. Example: A tank casts 1 die for movement and sees a dandy target: an enemy tank with some supporting infantry. The tank fires the remaining two dice at the enemy targets which are both in close range and gets an 8. The tank s main gun now has 8 fire points which are allocated to the enemy tank and the tank s machine gun has 8 fire points which are allocated to the enemy infantry. Example: Assume the previous example but there is only an enemy tank. Here the machine gun fire is useless because it can have no effect on a tank. Angle of Fire A subunit can fire 360 degrees. Measuring Fire Weapons fire is measured from the center of the sub-unit (or tank commander hatch) to the closest edge of the enemy stand or closest point on the vehicle other than the barrel of any weapon. Line of Sight Troops and vehicles block line of sight as do houses and higher terrain. Forests block line of sight. Units can only see enemy units on edge of forest. Line of sight where both sides are IN a forest is 8 inches; but treat ALL fire combat as if it were in long range. Effect of casualties There are no game related modifications for sub-unit containing casualties. Vehicles A non-armored vehicle requires 2 hit points to be killed. A half-track requires 3 hit points to be killed. The cross-referenced Number in chart is the Kill Number for armored Targets. IF a further die roll equals or is less than the Kill number then the armored unit is destroyed. Discussion: Wait a moment, haven t you forgotten something? Most tactical games require you to determine if your unit actually spots the enemy. If you want to waste Page 23 of 35

26 time with such foolishness go ahead but we don t here because the fire probabilities are so variable. Spotting is sorta built in so we don t worry about it. Questions: Q. Is the target of a group firing at the same time a sub-unit or the whole unit? A. The target is a subunit. You pick your target which is a subunit. Q.. If the target is a sub-unit, should the fire point charts go high enough to cause more casualties than the stand holds? In the fire charts, you can cause 17 casualties, but no sub-unit has that many figures. A. True, but suppose you fire at some fellow who is under level 3 cover. Even ten hits on a five-man stand may not kill him off since he could be lucky and you might need 17 hits to be fairly certain you kill him off. Close Assault Sub-Units can move as per the movement rules. However, no sub-unit may move within 6 inches of an enemy unit unless it attempts a close assault. This is functionally a charge to assault a dwelling or defensive position or to occupy terrain the enemy holds dear. During all the moving and shooting the active player may not move within six inches of the enemy but if the sub-unit wants to attempt a close assault the subunit may attempt to move within six inches of the enemy as part of the use of the activity dice. Doing so constitutes a close assault IF the unit actually moves adjacent to an enemy unit by sufficient dice rolls. To close assault during the offensive activity, the player announces Charge! (in an appropriate tone of voice) and the sub-unit throws some or all of its activity dice to move toward the enemy. If the distance thrown (considering odd terrain, morale markers and such) allows the sub-unit to contact an enemy sub-unit the entire unit MUST engage in close combat in the later close combat phase as long as one sub-unit is still in contact when the close combat phase comes around. The Charging sub-unit can do other things with its dice if it desires (and has sufficient dice available) other than moving to connect. For example, a subunit could fire one die and, because it was already fairly close to the enemy, cast but two dice to attempt to come adjacent to the enemy in a close assault. Doing so is fraught with peril since the two dice might not traverse the intervening distance to Page 24 of 35
27 connect with the enemy; better to use all the dice to have a better chance of success. Under the close assault process the sub-unit moves adjacent to the enemy or as close as possible such as where the enemy is behind some terrain piece such as a wall. The attacking sub-unit does not have to pay movement penalties to come to grips with the enemy who happens to be behind some terrain feature; just coming adjacent is sufficient. Discussion: As we shall see, during the close assault phase, entire units are functionally mixing it up with bayonets and hand grenades. Even if only one sub-units contact the enemy ALL sub-units in the attacking unit still can do whatever they wish during the offensive phase such as firing or moving or trying to bring more sub-units into contact. However, when the close assault resolution comes around and at least one sub-unit remains adjacent to an enemy sub-unit then ALL the sub-units of the attacking force engage in close assault with all the defending sub-units in the attacked unit. This is so EVEN if only one sub-unit manages to connect BUT still remains connected (adjacent) to an enemy sub-unit when the close assault resolution phase takes place. The close assault is successful as long as one sub-unit has announced charge and has contacted the enemy AND remains in contact by the end of ALL activation by ALL the friendly units (which will then trigger the close combat phase portion of the turn). As just stated, the unit is eligible to close assault in the later close assault phase once a sub-unit has connected with the enemy and one sub-unit remains adjacent when the close assault phase occurs. Other sub-units can also attempt to connect but they do not need to yell charge unless the initial contacting unit has been blown away by some enemy defensive activity during the attacking unit s offensive activity. Discussion: Other sub-units will want to connect since if there is, for example, a single sub-unit in contact with the enemy and that sub-unit gets wiped out later in the turn 9 usually by enemy hold fire) the unit no longer qualifies as having made a successful charge and thus cannot conduct close assault. Indeed, the unit draws a Morale Chit because it has failed to close into close assault. When the close assault phase occurs, if no sub-unit which has attempted a close assault remains adjacent or sub-units attempting to come adjacent have not even managed to come adjacent ( such as a failure to garner enough inches on the movement dice) then the close assault attempt fails. The sub-units closer than 6 inches are pushed back to 6 inches from the enemy and the enemy sub-units within range get a free one-die shot at these departing subunits for good measure. Moreover, the unit as a whole draws a morale chit. Page 25 of 35

28 Under all circumstances, when faced with a charge, an attacked enemy unit can chose to withdraw. If the enemy unit withdraws the ENTIRE UNIT throws four dice and runs for it; this does not count as the unit s activation when the unit s active phase comes round next. This is the ONLY time a unit can move while being the passive player. You decide to withdraw or not the second AFTER the other fellow yells charge. You can elect to withdraw (if eligible) every time an enemy sub-unit tries to connect; in other words if you don t withdraw when the first enemy hits you, you can still withdraw later in the turn when other enemy troops hit you. BUT once you do withdraw you cannot withdraw again in that turn. One withdrawal per turn per unit. It should come as no surprise that a unit which WITHDRAWS also draws a morale marker. Discussion: Remember that, as the attacker, if none of your sub-units contact the enemy after yelling charge you draw a morale chit. If, as the defender, you chicken out and withdraw you also draw a morale chit. As we shall see later, the loser of the close combat also draws a morale chit: also known as the Oh Chit! Questions and Answers: Q. I'm assuming that the attacker does not have to pay to enter defensive cover just merely reach it in their move? A. TRUE. Indeed there is no defensive cover that impacts movement; just odd terrain which inhibits movement.. You make your own cover by paying dice to get into it. Q. If a unit reaches the enemy to force close combat, but the turn is not finished and the attacker is shot at by a defender not from the close assaulted unit, is there a chance the defender can be hit by friendly fire? (i.e. shooting into a melee). A. NO, the melee hasn t actually happened yet. Q. I understand that the defender from the assault could possibly fire before combat resolution with his hold fire marked units, just wondering about others influencing the fight. A. SURE they can, the other friendly units (from hold fire eligible units) will be blasting away to pick off enemy close assaulting units to prohibit contact and thus remove the precondition for the close assault Page 26 of 35
29 Combat resolution After ALL units are activated for the active player the close combat is resolved. If a unit is in close assault, even if only one sub-unit connected, ALL sub-units in both the attacking company and defending company are in close combat. Let s say that again because most games say that only units in literal contact are in combat. In this game if ONE subunit is in contact when close combat comes round then ALL the sub-units in that unit are functionally in the fight. The other subunits of the attacking and defending unit just stay where they are at the moment of close combat but are still considered part of the close combat. Once victory is determined there will be some adjusting of troops as will be addressed later. Discussion: ALL subunits roll for combat results whether they are in contact or not as long as one sub-unit is in contact when it comes time for close assault. Why? In this game there is no extra charge movement per se. However, because of the unit cohesion rule which requires that sub-units remain relatively proximate to one another, they are close enough to the enemy to be part of the hand-to-hand fight when that comes round. Just think of it as a last minute rush to reinforce those who have made contact. To resolve combat, each sub-unit throws a die; each half-track throws a die; armored throw three per subunit. ( vehicles such as cars and trucks cast no dice but suffer casualties). Attackers cause the number of hits consistent with the number of pips on all even dice. (remember: defenders get a saving roll if they are in cover!) Defenders cause the number of hits consistent with the number of pips on all odd dice. The number of hits is the number of kills for foot figures; one per man; 2 hits kills a vehicle; three a half-track, and five an armored subunit. AFTER deducting casualties, and removing eliminated sub-units (which may cause moral chits), each remaining sub-unit throws a die or dice: ADD ODD die for EACH attacking sub-unit including half-tracks (but none for trucks and cars) and three odd dice for each armored subunit and get a total. ADD EVEN dice for EACH defending sub-unit including half-tracks (but none for trucks and cars) and three even dice for each armored subunit and get a total. The defender gets an extra point for each level of cover for each sub-unit in the who-wins calculation. Higher total WINS the close combat. Page 27 of 35

30 LOSER withdraws 4 dice and is burdened by 1 moral chit for withdrawal and another chit for losing the combat, the so-called Oh Chit. The winner of the close combat may acquire the territory vacated by the vacating enemy. A winning attacker may move into the vacated area OR the winning troops can stay where they are or a combination of both. A winning defender, at his option, may move up to 6 inches forward (i.e. The Local Counter-Attack don t you know). Questions and Answers Q. A defender is usually felt to be at the advantage, wouldn t it be better to allow the defender to count even pips and the attacker counts the odd. In the Army we were always told to try and achieve a 3 to 1 superiority upon a defender, so I think at it should apply here too? A. Actually it is BOTH. You will see that, as they go in, the attacker counts even die for enemy casualties and the defender counts odd BUT when it comes to determining the actual winner of the close assault a separate, subsequent calculation the defender counts even die and the attacker odd dice. In the final hand-to-hand the defender has the advantage. Q. You say "Under all circumstances when faced with a charge an attacked enemy unit can chose to withdraw. If the enemy unit withdraws it throws four dice and runs for it;" Does that mean the unit gets multiple retreats if it is charged multiple times? A. GREAT question.it has never come up because everybody stands and fights. BUT the answer is no. You run for it and if you are attacked again you have to fight albeit with the coward s moral marker on you. Q. If an attacker wins a close combat, can the entire unit move into the position, or is it just the sub-unit(s) in contact? A. The entire unit moves into position. This is one of the abstractions in the game and is why we have no separate extra charge move. Let s say most of my subunits are 10 Page 28 of 35
31 inches away from most of yours but one brave fellow has made it adjacent and stays there when close combat comes round. Essentially all his fellows are considered to have moved up to effective contact and your fellows have moved up as well which is why we are in one big fight. If I win my guys are theoretically already there and thus the entire victorious unit can move in. Again this abstraction is why there is no extra charge move and such; its all built in. Who is the attacker? It is conceivable that there might be confusion who is the attacker. In a close combat melee, the attacker is the active player during the phase when close combat comes round. Effect of casualties There are no modifications for casualties on a sub-unit. A sub-unit is always at full strength even if down to the last man. If you want to be a bean counter, go play someone else s game. Sub-units are required to consolidate casualties so there is never more than one subunit with missing men. Active Player Random Airplane or Off-board Artillery Event Random Events After the player has activated all his units and finished all close combat the player then has the option of trying for off-board artillery or airstrikes. Roll two dice if you feel lucky or your back is to the wall. 2 opposing player gets his choice of artillery fire or airplane strikes on the spot!. 3 low ammunition: on next activation phase the player casting the dice still gets his normal dice for activation but only two of which can be used for fire, the other die or dice may only be used for non-fire activities. 4-9 nothing happens 10 player casting the dice gets off-board artillery fire. 11 player casting the dice gets strafing run. 12 player casting the dice gets a bombing run. Off-Board Artillery Fire Roll one dice. The number of pips allows that many off-board artillery shells. These are cotton balls thrown from behind the board WITH YOUR EYES CLOSED! Where they land dictates enemy (or friendly!) casualties. Whatever the cotton ball touches when it comes to rest is a possible casualty subject only to saves for being in cover. Discussion: There are those who question the lack of different caliber off-board artillery weapons. To accommodate these purists we believe that heavier guns should get Page 29 of 35

32 bigger cotton balls. After 50 years of wargaming during which time I have seen a zillion off-board artillery rules, this rule does the trick. No calculation of drift of shells and all sorts of time-wasting foolishness. It is also fun. Airplanes Strafing Run Roll a dice; 1 or 2 is one plane; 3 or 4 is two planes and 5 or 6 is three planes. If planes are shot down on earlier turns you cannot bring back more; three is the maximum. Whenever an airplane appears for a strafing run, place a 36 tape across the battlefield at any angle the player desires. Every infantryman crossed by the tape is a possible casualty on a roll of 5 or 6 subject only to a saving roll for being in cover. A roll of 1 of the strafing die assumes the infantryman manages a return shot, which strikes the strafing plane. Roll 1 die for effect: A return shot for effect of 1, 2, or 3 is a bullet through the wing, no effect. A 4 or 5 is a bullet in the vitals of the plane, the plane breaks off the attack but can return on later turns if allowed. A 6 is a bullet in the vitals of the pilot, the plane crashes and cannot return for remainder of the game (the maximum you can acquire from now on is two planes) The airplane can voluntarily terminate the strafing run at any time. Once the strafing run is finished the plane flies away and returns only when appropriate unless it has been shot down by ground fire. Bombing Run. This is exactly the same as strafing. But here, each plane carries but one bomb. Pick a target, drop the bomb: 1 the bomb misses and the enemy shoots the plane down; serves it right. 2, 3 or 4 bomb misses; in the confusion the plane gets away. 5 or 6 boom (!!!) target destroyed and plane gets away; who ever saw an enemy plane shot down after blowing up its target? Page 30 of 35
33 END of Turn Events At the end of the turn determine if the victory conditions have been met; if not, fight on! Organization of Armies. In this game the most common company composition is 8 rifle squads and 4 heavy weapon squads. Frequently we will augment the heavy weapons with as many as 6 heavy weapons such as 2 machine guns, 2 bazookas and 2 mortars. Tanks companies are two to five vehicles but we always strive for three vehicles and in rare cases four. One to three on-board artillery pieces is a battery and is considered company sized. Admittedly these organizations are essentially composite representations of tactical combat groups which are under close if not actual, personal control of a single leader. In World War II, at least, my sense is that this would be a company commanded by a captain. In an earlier age tighter formations would allow a single commander to exercise such dominant control of an entire regiment or perhaps as much as a brigade in the American Civil War. Above these levels the more senior commanders the colonels and brigadier generals in WWII -- have to be farther back and are not in the firing line as it were. They communicate by radio and seldom have direct contact with their own troops once the battle begins. This game assumes multiple combat groups who are tasked with significant tactical objectives: take this town and the airfield beyond. In a multiplayer game, a fellow commanding even a single company can have a good time figuring out how to maneuver his subunits and which ones to fire at a given time. However we have found the game far more enjoyable if each person has perhaps three units under his command. This allows for some significant coordination problems particularly were mixed units are prohibited for a single player. For example one player can command three infantry companies and another player on the same side has two tank units. The tanker may think he is General Patton and charge off with no infantry support! An overall commander is desirable but certainly not essential. Page 31 of 35


34 Leadership Figures We designate at least one subunit in each unit as the leader. Such leader units which otherwise operate for all purposes as regular subunits-- do nothing more than serve as the center of mass of the unit since a subunit outside the leader subunit s control radius is considered isolated. If the leader subunit happens to take casualties and evaporates, then simply promote the closest subunit as the new leader and carry on. Thus there is no advantage in targeting a particular leader subunit. The control radius is, of course, a function of the leadership and quality of the unit. A Russian militia leader needs to keep his troops close so he can force them to respond. A veteran American Ranger unit can be more spread out since the leader doesn t need to urge his troops on at pistol point. A subsidiary consequence of the leader rule is that a larger unit cannot simply string out in a single line across the entire board since the unit cannot be longer than the diameter of the control radius of a leader. This at least forces some depth to a unit which is more in keeping with the tactics of modern combat. Designers Notes My earliest rules such as the Charge of the Light Brigade were primarily devoted to combat in the mid to late nineteenth century with significant numbers of battalions roaming the battlefield. Trench warfare came next which is where the off-board artillery rules originated. More recently I toyed with Pirates and even Ironclads when I was in my water mood. An impetuous acquisition of some early WWII British and German troops put me square in the need of some tactical rules for that period. I looked for some suitable rules and found most were vastly too complicated. Other rules compelled the use of assorted-sized dice which has never appealed to me. And so, like most of us, I rolled my own: rules that is. Page 32 of 35


35 The limitation of six-sided dice dictated a host of charts and variables which made my first attempts as complex as all the other tactical games on the market. In a dream, I suppose, I hit upon the full, even, odd dice convention that plays prominently in the range and movement rules. I then decided that dice could represent not only distance and fire combat but that dice could substitute for time itself. Paying so many dice to conduct an activity would permit a delay in movement for example while the unit engaged in some other event such as seeking cover. This took a long time to conceptualize but once I understood the relationship the various factors became more apparent. The incidental benefit was the elimination of as many charts as possible. Hitting on three as the magic number of dice per turn was by default. Fewer dice made things too slow and more allowed a side to get too much of a jump on the other side. The fire rules are an evolution of my musket-era charts albeit with far more variables that seem to be required in modern era games. We can agree I suppose that shooting is what WWII games are all about. A single chart would be tolerated if it was devoted to the killing of enemy units from afar. The morale rule is a variation of that used in my other games. It is gradual and if you want to run about with morale markers affixed to your troops so be it. Again there are no charts and anybody can subtract one pip from every die as a penalty. The cover rules flowed naturally from the need to avoid complex terrain modifications. Instead of you going to the terrain, the terrain comes to you as a function of the time it takes to get into the several degrees of cover. At the end of the day the game was designed for fun at our wargame conventions or where some stalwart souls want to engage in the pastime of our wonderful hobby. Carry on. David Raybin, January 2010, Nashville. Page 33 of 35
ARMY COMMANDER - GREAT WAR INDEX
 INDEX Section Introduction and Basic Concepts Page 1 1. The Game Turn 2 1.1 Orders 2 1.2 The Turn Sequence 2 2. Movement 3 2.1 Movement and Terrain Restrictions 3 2.2 Moving M status divisions 3 2.3 Moving
PROFILE. Jonathan Sherer 9/30/15 1
 Jonathan Sherer 9/30/15 1 PROFILE Each model in the game is represented by a profile. The profile is essentially a breakdown of the model s abilities and defines how the model functions in the game. The
Henry Bodenstedt s Game of the Franco-Prussian War
 Graveyard St. Privat Henry Bodenstedt s Game of the Franco-Prussian War Introduction and General Comments: The following rules describe Henry Bodenstedt s version of the Battle of Gravelotte-St.Privat
Under fire: If a unit or vehicle has been hit in the previous turn, whether the hit caused damage or not, that unit is under fire.
 Featherstone Like WW2 Rules These rules are very similar to the Featherstone/Bath mass combat rules you can find for Ancient and 18 th Century combat. They have been adapted for a massed skirmish game
CONTENTS INTRODUCTION Compass Games, LLC. Don t fire unless fired upon, but if they mean to have a war, let it begin here.
 Revised 12-4-2018 Don t fire unless fired upon, but if they mean to have a war, let it begin here. - John Parker - INTRODUCTION By design, Commands & Colors Tricorne - American Revolution is not overly
Solitaire Rules Deck construction Setup Terrain Enemy Forces Friendly Troops
 Solitaire Rules Deck construction In the solitaire game, you take on the role of the commander of one side and battle against the enemy s forces. Construct a deck, both for yourself and the opposing side,
BRONZE EAGLES Version II
 BRONZE EAGLES Version II Wargaming rules for the age of the Caesars David Child-Dennis 2010 davidchild@slingshot.co.nz David Child-Dennis 2010 1 Scales 1 figure equals 20 troops 1 mounted figure equals
RESERVES RESERVES CONTENTS TAKING OBJECTIVES WHICH MISSION? WHEN DO YOU WIN PICK A MISSION RANDOM MISSION RANDOM MISSIONS
 i The Flames Of War More Missions pack is an optional expansion for tournaments and players looking for quick pick-up games. It contains new versions of the missions from the rulebook that use a different
Napoleon s Triumph. Rules of Play (draft) Table of Contents
 Table of Contents") Rules of Play (draft) Table of Contents 1. Game Equipment... 2 2. Introduction to Play... 2 3. Playing Pieces... 2 4. The Game Board... 2 5. Scenarios... 3 6. Setting up the Game... 3 7. Sequence of Play...
Rules of Play (draft) Table of Contents 1. Game Equipment... 2 2. Introduction to Play... 2 3. Playing Pieces... 2 4. The Game Board... 2 5. Scenarios... 3 6. Setting up the Game... 3 7. Sequence of Play...
PROFILE. Jonathan Sherer 9/10/2015 1
 Jonathan Sherer 9/10/2015 1 PROFILE Each model in the game is represented by a profile. The profile is essentially a breakdown of the model s abilities and defines how the model functions in the game.
Frontier/Modern Wargames Rules
 Equipment: Frontier/Modern Wargames Rules For use with a chessboard battlefield By Bob Cordery Based on Joseph Morschauser s original ideas The following equipment is needed to fight battles with these
Battle of Prokhorovka
 Perform Action Move/Fire according to action chosen Fire machine Guns (tanks only) Fire all eligible machine guns Rally (infantry only) Leader stand may attempt to rally pinned units Rifle stand - 1 die
Command Phase. Setup. Action Phase. Status Phase. Turn Sequence. Winning the Game. 1. Determine Control Over Objectives
 Setup Action Phase Command Phase Status Phase Setup the map boards, map overlay pieces, markers and figures according to the Scenario. Players choose their nations. Green bases are American and grey are
Sequence of Play This rulebook is organized according to this Sequence of Play.
 Introduction...1 Sequence of Play...2 Campaign Set-Up...2 Start of Week...10 Pre-Combat...11 Combat...14 Post-Combat...19 End of Week...20 End of Campaign...22 Optional Rules...22 Credits...22 Sample Game...23
A Marvellous Victory! Copyright. Trevor Raymond. November 2015 (Exodus 20:15 - Thou shall not steal.") Version 2
 Version 2") Page 1 of 30 A Marvellous Victory! Copyright. Trevor Raymond. November 2015 (Exodus 20:15 - Thou shall not steal.") Version 2 The first abstraction: A Marvellous Victory are an abstract set of wargame
Page 1 of 30 A Marvellous Victory! Copyright. Trevor Raymond. November 2015 (Exodus 20:15 - Thou shall not steal.") Version 2 The first abstraction: A Marvellous Victory are an abstract set of wargame
UNITS Hidden Units Formed Units Fighter Commander
 COLONIAL ADVENTURE UNITS Each unit consists of 5 to 20 figures. Additionally units may contain leaders (maximum 2 per unit), musicians (maximum 1 per unit) and color bearers (maximum 1 per unit). Each
Conflict Horizon Dallas Walker Conflict Horizon
 Conflict Horizon Introduction 2018 Dallas Walker Conflict Horizon Welcome Cadets. I m Sargent Osiren. I d like to make it known right now! From that moment you stepped foot of the shuttle, your butts belonged
RANDOM MISSION CONTENTS TAKING OBJECTIVES WHICH MISSION? WHEN DO YOU WIN THERE ARE NO DRAWS PICK A MISSION RANDOM MISSIONS
 i The 1 st Brigade would be hard pressed to hold another attack, the S-3 informed Bannon in a workman like manner. Intelligence indicates that the Soviet forces in front of 1 st Brigade had lost heavily
Primo Victoria. A fantasy tabletop miniatures game Expanding upon Age of Sigmar Rules Compatible with Azyr Composition Points
 Primo Victoria A fantasy tabletop miniatures game Expanding upon Age of Sigmar Rules Compatible with Azyr Composition Points The Rules Creating Armies The first step that all players involved in the battle
French and Indian Wars Skirmish Rules. Tyneside Wargames club October Version 3.4
 French and Indian Wars Skirmish Rules Tyneside Wargames club October 2016 Version 3.4 Page 2 of 11 Index: Introduction:... 4 Troop Classifications:... 4 Loyalty:... 4 Weapons:... 4 Play Sequence:... 4
COMPONENT OVERVIEW Your copy of Modern Land Battles contains the following components. COUNTERS (54) ACTED COUNTERS (18) DAMAGE COUNTERS (24)
 ACTED COUNTERS (18) DAMAGE COUNTERS (24)") GAME OVERVIEW Modern Land Battles is a fast-paced card game depicting ground combat. You will command a force on a modern battlefield from the 1970 s to the modern day. The unique combat system ensures
GAME OVERVIEW Modern Land Battles is a fast-paced card game depicting ground combat. You will command a force on a modern battlefield from the 1970 s to the modern day. The unique combat system ensures
Damned Wobbly Gentlemen. Zuluwar 'Lite.'
 Damned Wobbly Gentlemen. Or Zuluwar 'Lite.' Version:2 12/01/09 by PDE Empress Miniatures 28mm Rules for Colonial skirmishes. The following rules are a set of simple fast play rules to get you started.
SERIES RULEBOOK. Game Design by Mark S. Miklos. Version: June 2017 TABLE OF CONTENTS. Great Battles of the American Revolution
 1 SERIES RULEOOK Game Design by Mark S. Miklos Version: June 2017 TALE OF CONTENTS 1. Introduction... 2 2. Components... 2 3. Game Scale and Terminology... 2 4. How To Win... 3 5. Sequence of Play Outline...
Introduction. Nothing can be done contrary to what could or would be done in actual war. Revised Rules for the NAVAL WAR GAME (1905) Fred T.
 Fred T.") Design Parameters Introduction These rules have been developed so that it is possible to fight small World War II Ostfront battles between Axis and Soviet forces. The battles last about an hour or two
Design Parameters Introduction These rules have been developed so that it is possible to fight small World War II Ostfront battles between Axis and Soviet forces. The battles last about an hour or two
I-95 GAMERS. Domination Missions
 I-95 GAMERS Domination Missions I-95 GAMERS Domination Missions Design notes Domination special rules Domination Frontline Domination Blind Domination Blitzkrieg Domination Early war Blitzkrieg Domination
A Clash of Arguments
 A Clash of Arguments A set of rules for the lazy gamers of this world. (Or Horse and Musket?) By Craig Grady Phases each turn consists of the following five phases Initiative Move Shoot Hand to Hand Moral
Portable Wargame. The. Rules. For use with a battlefield marked with a grid of hexes. Late 19 th Century Version. By Bob Cordery
 The Portable Wargame Rules Late 19 th Century Version For use with a battlefield marked with a grid of hexes By Bob Cordery Based on some of Joseph Morschauser s original ideas The Portable Wargame Rules
LATE 19 th CENTURY WARGAMES RULES Based on and developed by Bob Cordery from an original set of wargames rules written by Joseph Morschauser
 LATE 19 th CENTURY WARGAMES RULES Based on and developed by Bob Cordery from an original set of wargames rules written by Joseph Morschauser 1. PLAYING EQUIPMENT The following equipment is needed to fight
Stargrunt II Campaign Rules v0.2
 1. Introduction Stargrunt II Campaign Rules v0.2 This document is a set of company level campaign rules for Stargrunt II. The intention is to provide players with the ability to lead their forces throughout
ARMOR DIAGRAM ARMOR DIAGRAM. Mech Data. Mech Data BATTLEMECH RECORD SHEET BATTLEMECH RECORD SHEET. Weapons Inventory.
 BATTLEMECH RECORD SHEET Left Torso Head Right Torso ARMOR DIAGRAM Type: HER-2S Hermes II Tonnage: 40 Points: Walking: 6 Running: 9 Weapons Inventory Mech Data Type Location Damage Short Med. Long 1 Autocannon
Montelimar: Anvil of Fate Scenario 1 -Opening Blows - The Feint
 Montelimar: Anvil of Fate Scenario 1 -Opening Blows - The Feint Introduction This is an after action report of a play test game of Monlimar: Anvil of Fate. Please note that the Vassal module and graphics
2.0 The Battlefield. 2.1 Terrain Hexes. 2.2 Terrain Types. 3.0 Command Cards (10 each) 3.1 Order Cards (7 each)
 3.1 Order Cards (7 each)") Advanced Vive l Empereur Introduction Advanced Vive l Empereur is a Histo Command Dice System Game and allows you to simulate on a grand-tactical level the battles of the Napoleonic era. The player is
Advanced Vive l Empereur Introduction Advanced Vive l Empereur is a Histo Command Dice System Game and allows you to simulate on a grand-tactical level the battles of the Napoleonic era. The player is
Free Shipping for all USA orders!
 Free Shipping for all USA orders! The Game Board The game board shows New York City and surrounding land and water areas. Locations are on land areas. Game units are placed on locations during game play.
Fleet Engagement. Mission Objective. Winning. Mission Special Rules. Set Up. Game Length
 Fleet Engagement Mission Objective Your forces have found the enemy and they are yours! Man battle stations, clear for action!!! Mission Special Rules None Set Up velocity up to three times their thrust
The Glory that was GREECE. Tanagra 457 BC
 The Glory that was GREECE Tanagra 457 BC TCSM 2009 The Glory that Was Vol. I: Greece Rulebook version 1.0 1.0 Introduction The Glory that was is a series of games depicting several different battles from
Remember the Alamo!* By George Knapp Version 6, 31 Jan 2000
 Remember the Alamo!* By George Knapp Version 6, 31 Jan 2000 *Please accept my apologies for the title. I do not mean to infringe upon any copyrighted material using the same name. These rules are for home
1880 s LEND ME YOUR COAT, AFGHAN
 1880 s LEND ME YOUR COAT, AFGHAN Equipment needed: D4 D6 D8 D10 D12 Ruler in inches 25/28mm figures on 1 diameter bases (infantry and artillery) Mounted on 2-1 diameter bases 1 terrain board 6 x 4 No bases
LATE 19 th CENTURY WARGAMES RULES Based on and developed by Bob Cordery from an original set of wargames rules written by Joseph Morschauser
 LATE 19 th CENTURY WARGAMES RULES Based on and developed by Bob Cordery from an original set of wargames rules written by Joseph Morschauser 1. PLAYING EQUIPMENT The following equipment is needed to fight
IV. TROOPS FAQ SPECIALIZED UNITS 2
 IV. TROOPS FAQ STANDARD UNITS 1 7 8 8 Infantry Move 0-1 and battle, or move 2 no battle May Take Ground on successful Close Assault Armor Move 0-3 and battle May Overrun on successful Close Assault Artillery
The Esoteric Order of Gamers
 The Esoteric Order of Gamers www.orderofgamers.com High quality materials for the dedicated devotee of immersive, thematic tabletop games. Game rules summaries, foamcore box plans, articles, interviews,
command efficiency table
 sequence of play 0. PRE-GAME ORGANIZATION PHASE. 1. POSTURE DETERMINATION PHASE 2D6 + Cohesion. Highest total has initiative in this phase. Mark required stands or groups in movement posture. [6.01.01]
When it comes to generic 25mm Science Fiction skirmish games, there are really only two choices.
 1 of 6 When it comes to generic 25mm Science Fiction skirmish games, there are really only two choices. Stargrunt II, which is a gritty, realistic simulation of near-future combat. And ShockForce, which
A Great Victory! Copyright. Trevor Raymond. April 2013 (Exodus 20:15 - Thou shall not steal.")
") A Great Victory! Copyright. Trevor Raymond. April 2013 (Exodus 20:15 - Thou shall not steal.") Page 1 of 27 A Great Victory is a basic set of rules designed for the table-top wargaming battles in the ancient
A Great Victory! Copyright. Trevor Raymond. April 2013 (Exodus 20:15 - Thou shall not steal.") Page 1 of 27 A Great Victory is a basic set of rules designed for the table-top wargaming battles in the ancient
CEDAR CREEK BY LAURENT MARTIN Translation: Roger Kaplan
 CEDAR CREEK BY LAURENT MARTIN Translation: Roger Kaplan Cedar Creek 1864 simulates the Civil War battle that took place on October 19, 1864 and resulted in a Union victory. It uses many of the rules of
Gazala: The Cauldron Table of Contents
 Gazala: The Cauldron Table of Contents 1.0 Introduction... 1 2.0 Components... 1 2.1 Game Scale... 1 2.2 Playing Pieces... 1 2.2.1 Action Chits (see 4.0)... 1 2.2.2 Tactical Chits (see 4.0)... 1 2.2.3
Introduction. A. What You Need. WWII Miniatures Skirmish Game. by Don Bailey
 WWII Miniatures Skirmish Game by Don Bailey Introduction Paper Tigers II expands on the original Paper Tigers rules adding depth and detail without adding a great amount of complexity. It is intended to
Gettysburg 77 Errata. 1 of 5 RULES CORRECTIONS. Advanced Union Order of Appearance
 RULES CORRECTIONS 1) p.1 Object of Game Culp s hill is U40 not U41. 2) p. 7 Combat Qualifications Rule 3 is (.see 5) not ( see 6) 3) p.8 Retreat rule 2. Change to read: If the retreating unit is adjacent
Field of Glory - Napoleonic Quick Start Rules
 Field of Glory - Napoleonic Quick Start Rules Welcome to today s training mission. This exercise is designed to familiarize you with the basics of the Field if Glory Napoleonic rules and to give you experience
TAC MYTHOS. Byakhee Attack. 0 CP Any. Mythos Influence Level increases by one. always attacking the nearest unit. The
 TAC Flash of Inspiration Play during the TAC Step of the Pre-Turn Phase. An Officer of your choice gains D3 additional Command Points this Turn. 0 CP Any MYTHOS Byakhee Attack One or more Byakhee models
Introduction. Your Commanders gain Experience with every battle, but they also gain Stress. Each Week, you must decide how hard to push your men.
 Introduction...1 Sequence of Play...2 Campaign Set-Up...2 Start of Week...9 Pre-Combat...10 Combat...12 Post-Combat...16 End of Week...17 End of Campaign...19 Optional ules...19 Credits...19 Sample Game...20
Game Rules. The Great Battles of the Napoleonic Era. Giovanni Crippa. version October v.1.1. A game by: GIOGAMES
 The Great Battles of the Napoleonic Era Game Rules v.1.1 version 1.2 - October 2013 GIOGAMES A game by: Giovanni Crippa 23900 LECCO (Italy) Introduction Advanced Vive l Empereur is a game system that allows
1.0 INTRODUCTION FORTRESSES COMPONENTS REPLACEMENTS GAME TERMS SEQUENCE OF PLAY VICTORY CONDITIONS
 RULES OF PLAY INDEX 1.0 INTRODUCTION... 2 2.0 COMPONENTS... 2 3.0 GAME TERMS... 3 4.0 SEQUENCE OF PLAY... 4 5.0 SET UP... 5 6.0 REINFORCEMENTS... 5 7.0 LOGISTICS AND INITIATIVE... 5 8.0 COMMAND... 5 9.0
22.0 Extended Examples of Play
 Last Hundred Yards ~ Playbook 11 22.0 Extended Examples of Play 22.1 Infantry and Mortars Situation: Early dawn, October 1944, southwest of Kohlscheid, Germany. A German outpost, dug-in on Hill 192, has
Recon 1 Air Power Counter Attack Counter Attack Recon 1 Air Power Recon 1 Recon 1 Air Strike Air Power Air Power Air Strike Memoir 44 FAQ
 VIII. COMMAND FAQ Q. If someone can use a Recon 1 card as an Air Power, can the other player Counter Attack the effect or just the card? A. The rule is that a Counter Attack is only allowed to counter
FORCE ON FORCE QUICK START RULES
 FORCE ON FORCE QUICK START RULES Welcome to today s training mission. is exercise is designed to familiarize you with the basics of Force on Force and give you experience in commanding troops on the tabletop.
Armour Battles. Introductory World War Two Wargame Rules. Jim Bambra
 1 Armour Battles Introductory World War Two Wargame Rules Jim Bambra First published in 2015 by Wargames Design. 2015 Jim Bambra. All rights reserved. Jim Bambra has asserted his right under the Copyright,
Nfejfwbm!Cbuumft!!! Mfhobop! 3:ui!Nbz!2287!
 NfejfwbmCbuumft Mfhobop 3:uiNbz2287 2008 1 Battles of the Middle Ages Battle of Legnano 1176 Rulebook version 1.0 1.0 Introduction Battles of the Middle Ages is an easy to learn wargaming system that tries
Operation Blue Metal Event Outline. Participant Requirements. Patronage Card
 Operation Blue Metal Event Outline Operation Blue Metal is a Strategic event that allows players to create a story across connected games over the course of the event. Follow the instructions below in
A Thunderbolt + Apache Leader TDA
 C3i Magazine, Nr.3 (1994) A Thunderbolt + Apache Leader TDA by Jeff Petraska Thunderbolt+Apache Leader offers much more variety in terms of campaign strategy, operations strategy, and mission tactics than
Campaign Introduction
 Campaign 1776 Introduction Campaign 1776 is a game that covers the American Revolutionary War. Just about every major battle of the war is covered in this game, plus several hypothetical and "what-if"
Getting Started Tutorial for Red Victory
 Getting Started Tutorial for Red Victory Welcome to the latest edition to the Squad Battles series of games, Red Victory (RV). This title covers the last half of the Eastern Front conflict where Advance
and a view from the Confederate lines which gives a better impression of the contours:
 The Battle of Bull Run Feeling the need to get away from painting and preparation for a day and to play a quick game with stuff that I already have prepared, and coincidentally next in my project list,
ALAMO Thirteen Days of Glory A GAME BY FRANCK YEGHICHEYAN Translation: Roger Kaplan
 ALAMO Thirteen Days of Glory A GAME BY FRANCK YEGHICHEYAN Translation: Roger Kaplan Alamo is a solitaire game depicting the Sunday, March 6, 1836 climax of the thirteenday siege of the Alamo Mission that
Version 0.1 Beta July TACTICbeta
 These rules can be freely duplicated and distributed but only in their complete unchanged original format! Version 0.1 Beta July 2012 Written by C. Berni original concept by Stefano Cavané 2012 Baueda
Napoleon s Triumph. Rules of Play (draft) Table of Contents
 Table of Contents") Rules of Play (draft) Table of Contents 1. Parts List... 2 2. Introduction... 2 3. Playing Pieces... 2. The Game Board... 2 5. Scenarios... 3 6. Setting up the Game... 3 7. Order of Play... 3 8. Corps...
Rules of Play (draft) Table of Contents 1. Parts List... 2 2. Introduction... 2 3. Playing Pieces... 2. The Game Board... 2 5. Scenarios... 3 6. Setting up the Game... 3 7. Order of Play... 3 8. Corps...
Aperitif Game for Gentlemen, By Pierre Laporte
 Belle Epoque Aperitif Game for Gentlemen, By Pierre Laporte Belle Epoque Aperitif Game for Miniature Battles in the Victorian Era and Early 20 th Century EQUIPEMENT NEEDED Small coloured counters, ordinary
IWO JIMA RAGE AGAINST THE MARINES 1. INTRODUCTION 2. COMPONENTS 2.1 COUNTERS. Operations Special Issue #1
 1. INTRODUCTION Iwo Jima. The only battle of World War Two that saw the United States Marines suffer more casualties than they inflicted on the enemy. It was a battle that would define a war and would
3rd Edition. Game Overview...2 Component Overview...2 Set-Up...6 Sequence of Play...8 Victory...9 Details of How to Play...9 Assigning Hostiles...
 3rd Edition Game Overview...2 Component Overview...2 Set-Up...6 Sequence of Play...8 Victory...9 Details of How to Play...9 Assigning Hostiles...23 Hostile Turn...23 Campaigns...26 Optional Rules...28
Lest We Forget A Solitaire Small Scale Ground Combat Game from WWI to Present Rules of Play
 Lest We Forget A Solitaire Small Scale Ground Combat Game from WWI to Present Rules of Play c Wesley H. Fung Version. Introduction An infantry card with HIT. Lest We Forget (abbrev LWF) is a solitaire
WARHAMMER LEGENDARY BATTLES
 WARHAMMER LEGENDARY BATTLES Welcome Most games of Warhammer are two player games between armies with equal points values of anywhere from 500 to 3000 points. However, while games like these are great fun,
Game Turn 11 Soviet Reinforcements: 235 Rifle Div can enter at 3326 or 3426.
 General Errata Game Turn 11 Soviet Reinforcements: 235 Rifle Div can enter at 3326 or 3426. Game Turn 11 The turn sequence begins with the Axis Movement Phase, and the Axis player elects to be aggressive.
On the day you also need to bring :
 In this pack you will find everything you will need to do and know, to prepare for and play in the OMG Bolt Action Tournament. Tournament Organiser: Jeff Black Players Pack/ Tournament Rules writer: Jeff
Maida 1806: Stuart vs. Reynier
 Table of contents. 1.0 Introduction... 2.0 Components... 3.0 Gameplay... 4.0 Leaders... 5.0 Infantry in Column... 6.0 Infantry in Line... 7.0 Square... 8.0 Skirmish order... 9.0 Cavalry... 10.0 Artillery...
QUICK-START RULES QUICK-START RULES
 QUICK-START RULES Strap yourself into the ultimate suit of armor the BattleMech. Thirty feet tall and weighing up to a 100 tons, this humanoid engine of destruction is a walking arsenal, with enough firepower
Angola! Rules of Play
 Angola! 1 Rules of Play 2 Angola! Table of Contents Errata 2 1 Introduction 3 1.1 Learning the Game 3 1.2 Definitions 3 1.3 Game Components 3 2 Game Overview 3 2.1 Factions 3 2.2 Playing the Game 3 2.3
Empires at War. 2. Win conditions Your main objective is destroy all unit cards of the opposing player. You can recognize unit
 Empires at War 1. About game Empires at War is a competitive card game set during I World War. Players create unique decks and take control over armies of conflicted nations. To win, you have to break
1. Introduction 2. Army designation 3. Setting up 4. Sequence of play 25cm three
 Blades of Bronze Fast play rules for 15mm Ancients Contents 1. Introduction. 2. Army designation. 3. Setting up. 4. Sequence of play. 5. Orders. 6. Classification tables. 7. Conclusion 1. Introduction
CONFEDERACY GAME OVERVIEW. Components 60 Troop tiles 20 double sided Order/Wound Tokens 2 player aids 6 dice This ruleset
 MODERN #1 CONFEDERACY GAME OVERVIEW Pocket Battles is a series of fast and portable wargames. Each game comes with two armies that can be lined up one versus the other, or against any other army in the
FLASHBURN HYPER SIMPLE SCIENCE FICTION SKIRMISH WARGAMES RULES FREE! Pz8. Playtest & Ideas: Martin Nortman & The Southern Rebels
 FLASHBURN HYPER SIMPLE SCIENCE FICTION SKIRMISH WARGAMES RULES By Pz8 FREE! Playtest & Ideas: Martin Nortman & The Southern Rebels Players take the same number of miniatures (for example 10) and roll one
Red Parachutes. Extended Player Aid Sheet by Richard J. Vohlers. Includes advanced rules; optional rules in italics.
 Red Parachutes Extended Player Aid Sheet by Richard J. Vohlers Includes advanced rules; optional rules in italics. S = Soviet; G = German; B = Both; P = Phasing; NP = Non-phasing; OOS = Out of Supply;
HORUS HERESY: BETRAYAL AT CALTH BOX BASH
 THURSDAY :: MARCH 23 8:00 AM 8:30 PM HORUS HERESY: BETRAYAL AT CALTH BOX BASH Do not lose this packet! It contains all necessary missions and results sheets required for you to participate in today s tournament.
Fleet Engagement. Mission Objective. Winning. Mission Special Rules. Set Up. Game Length
 Fleet Engagement Mission Objective Your forces have found the enemy and they are yours! Man battle stations, clear for action!!! Mission Special Rules None Set Up velocity up to three times their thrust
Air Deck Rules and Use
 Air Deck Rules and Use Note: This is a first draft of the Air Deck rules. Any problems or suggestions can be posted in the forum thread or mailed to PanzerRunes on the Days of Wonder site. Suggestions
WARHAMMER 40K COMBAT PATROL
 9:00AM 2:00PM ------------------ SUNDAY APRIL 22 11:30AM 4:30PM WARHAMMER 40K COMBAT PATROL Do not lose this packet! It contains all necessary missions and results sheets required for you to participate
FRIDAY APRIL 1 ST 8:00AM - 6:00PM
 FRIDAY APRIL 1 ST 8:00AM - 6:00PM Do not lose this packet! It contains all necessary missions and results sheets required for you to Participate in today s tournament. It is your responsibility to hold
Airship! Airship Creation
 Airship! The Steampunk Adventure Table Game Captain? It s been some time. Thank you for agreeing to meet with me. There s trouble out west. The kind of trouble you specialize in solving. We re giving you
2.0 game components support Units. color to make them easier to pick out. Each player has two types of game units: Combat Units Support units
 basic rules Somme 1918 - Bloody Spring is a wargame that simulates the German spring offensive of 1918 that was aimed at separating the British and French armies. Players will find themselves in the role
Campaign Notes for a Grand-Strategic Game By Aaron W. Throne (This article was originally published in Lone Warrior 127)
") Campaign Notes for a Grand-Strategic Game By Aaron W. Throne (This article was originally published in Lone Warrior 127) When I moved to Arlington, Virginia last August, I found myself without my computer
Campaign Notes for a Grand-Strategic Game By Aaron W. Throne (This article was originally published in Lone Warrior 127) When I moved to Arlington, Virginia last August, I found myself without my computer
Budget Battle. Phil West
 Budget Battle Phil West This set of rules was inspired by some sets of cheap toy soldiers with interesting pairings such as Army men vs Cavemen, Ninja vs Robots and so forth. These reminded me of the running
Getting Started with Panzer Campaigns: Budapest 45
 Getting Started with Panzer Campaigns: Budapest 45 Welcome to Panzer Campaigns Budapest 45. In this, the seventeenth title in of the Panzer Campaigns series of operational combat in World War II, we are
Getting Started Tutorial for Modern War
 Getting Started Tutorial for Modern War Welcome to the latest edition to the Squad Battles series of games, Modern War (MW). This title covers the two recent conflicts in Afghanistan and Iraq. You will
LITTLE BIGIIORH 2015 Legion Wargames, LLC
 TlI:J BATTL:J OF TlI2 LITTLE BIGIIORH 2015 Legion Wargames, LLC v1.3 IHDIAR WARS OF TH= AM=RICAR mst VOLUM= III 1. INTRODUCTION.fWJ\w '""' '"'" The Battle of the Little Bighorn, also known as Custer's
Axis & Allies Pacific FAQ
 Setup Axis & Allies Pacific FAQ December 11, 2003 Experienced players sometimes find that it s too easy for Japan to win. (Beginning players often decide that it s too hard for Japan to win it s all a
Introduction to Combat and Ranged Attacks. Introduction. Anatomy of a Combat Unit
 Most units have two step strengths, with their CS (especially) and RAS somewhat reduced on their reduced strength side. Reduced infantry units may attempt to recover to full strength by using the Recovery
Airborne Landings For WWII MicroArmour :The Game
 Airborne Landings For WWII MicroArmour :The Game by Leif Edmondson. The WWII rulebook presents some parachute landing rules in scenario #3 A Costly Setback and in the Modern MicroArmour rule book as well.
IMPERIAL ASSAULT-CORE GAME RULES REFERENCE GUIDE
 STOP! This Rules Reference Guide does not teach players how to play the game. Players should first read the Learn to Play booklet, then use this Rules Reference Guide as needed when playing the game. INTRODUCTION
DIGITAL. Manual. Copyright 2017 Lock n Load Publishing, LLC. All Rights Reserved
 DIGITAL Manual Copyright 2017 Lock n Load Publishing, LLC. All Rights Reserved Introduction on, Digital edition is a low-complexity, Second World War armored combat game, modeled after the Lock n Load
NO DICE DARK AGES RULES get the kids involved. ANY SIZED FIGURES but if not
 NO DICE DARK AGES RULES get the kids involved ANY SIZED FIGURES but if not 28mm Foot 15mm frontage Depth 15mm,18mm,20mm depending on figure Cavalryman 25mm frontage Depth 40mm,50mm,60mm depending on figure
Fields Of Fire Quick Start Guide V 1.2
 Fields Of Fire Quick Start Guide V 1.2 Fields Of Fire Quick Start Guide... 1 Introduction... 2 What To Do First... 2 Terrain... 3 LOS... 3 Elevation... 4 Preparing Your Armies... 5 Unit VOF, Ammo, and
NapoleoN-The Game Beta Version 1.1
 «Napoleon» is a rule system to simulate big battles of the napoleonic era. The number of troops and units involved in those battles were huge. Nevertheless, these rules intend to keep things simple, allowing