Where Eagle s Dare Table of Contents
|
|
|
- Gary Gordon
- 6 years ago
- Views:
Transcription
1
2
3 Where Eagle s Dare Table of Contents 1.0 Night and Weather Night Fog Terrain Clear Polder Orchard Woods Roads Railroads Villages Towns Cities Fortified Streams Rivers Crests Impassable Bridges Raised Roads/Railroads The Culvert Ferries Sand Dunes Swamp Paradrops and Glider Landings Drops and Drop Numbers When to Drop Where to Drop How to Drop Supply Drop Zones Changing the Drop Location The Club Route Terms Establishing Club Route Effects of the Club Route marker Off-Map Movement German Formation Movement on the Off-Map Display Tracking the Allied Flanking Corps Advance...17 S1.0 Artillery Parks...18 S2.0 Road Blocks and Rearguards...18 S3.0 Random Events...18 S3.1 Events...18 S4.0 Piggyback Mode...19 S4.1 Starting in Piggyback Mode...19 S4.2 Exiting Piggyback Mode...20 S4.3 Restrictions on Piggyback Mode...20 S4.4 Piggyback Mode and Combat...20 S5.0 German Special Rules...20 S5.1 German Reorganization...20 S5.2 The Eindhoven Air Raid...20 S5.3 Divisional Trucks...20 S5.4 German Flak Units...21 S5.5 KG Huber...21 S6.0 Allied Special Rules...21 S6.1 Allied Supply...21 S6.2 Allied Dispatch Point Discounts...21 S6.3 Divisional Jeeps...21 S6.4 Night Turn Restrictions on Guards Armored and 43rd Infantry...21 S RTR and the 15/19 KRH...21 S st Airborne Non Formation Command...21 S6.7 American Telephones...21 S6.8 Self Command...21 S6.9 Heroes...21 S st Brigade...22 O1.0 Covering Fire...22 O2.0 Alternate Chit Draw Mechanism...22 O3.0 German Lost Rule...22 O4.0 Airborne Tanks...22 Scenario General Comments...22 A Drive in the Country...23 Son with the Wind...24 The Best Laid Plans...25 Hell s Highway...26 Campaign Game...30 S7.1.0 German movement and attack restrictions...34 S7.2.0 XXX Corps Units exit from the Where Eagles Dare map...34 S7.3.0 Emergency request for XXX Corps reinforcements...34 S7.4.0 Voluntary German Rout...34 Victory Conditions...34 The Allied Player gains Victory Points by:...34 The German Player gains Victory Points by:...35 Operation Market-Garden...35 Special Rules...35 MG 1.0 Events...35 MG 2.0 Club Route...36 MG 3.0 Household Cavalry...37 MG 4.0 German Air Strikes...37 MG 5.0 Rout...37 MG 6.0 Guards Armored...37 MG 7.0 Heroes...37 MG 8.0 Additional Deployment Restrictions:...37 MG 9.0 Counter Limits...37 MG 10.0 Errata...37 MG 11.0 Victory Conditions...38 Historical Notes...39 It s not Slicky Wicky...39 Hell s Highway Today...41 Credits...45 Version 1.1: February 8th,

4 Countersheets 1 & 2 IMPORTANT! Before punching the countersheets, please note that countersheets 1 & 2 contain the Unit counters and Events for the scanerios, not the campaign game. The counters for each of the four scenarios are shown below and on the next page. Scenario 3 Scenario 2 Scenario 1 Scenario 4 Scenario Multi Man Publishing, Inc.

5 Scenario 4 Campaign Scenario 4 Version 1.1: February 8th,

6 Countersheet 11 Countersheet 11 contains counters for use with The Devil s Cauldron. 18 of the counters are errata and replacement counters originally inculded in Operations: Special Issue #1. The other counters are for the Where Eagles Dare and The Devil s Cauldron combined campaign game. TDC Errata TDC Campaign Multi Man Publishing, Inc.
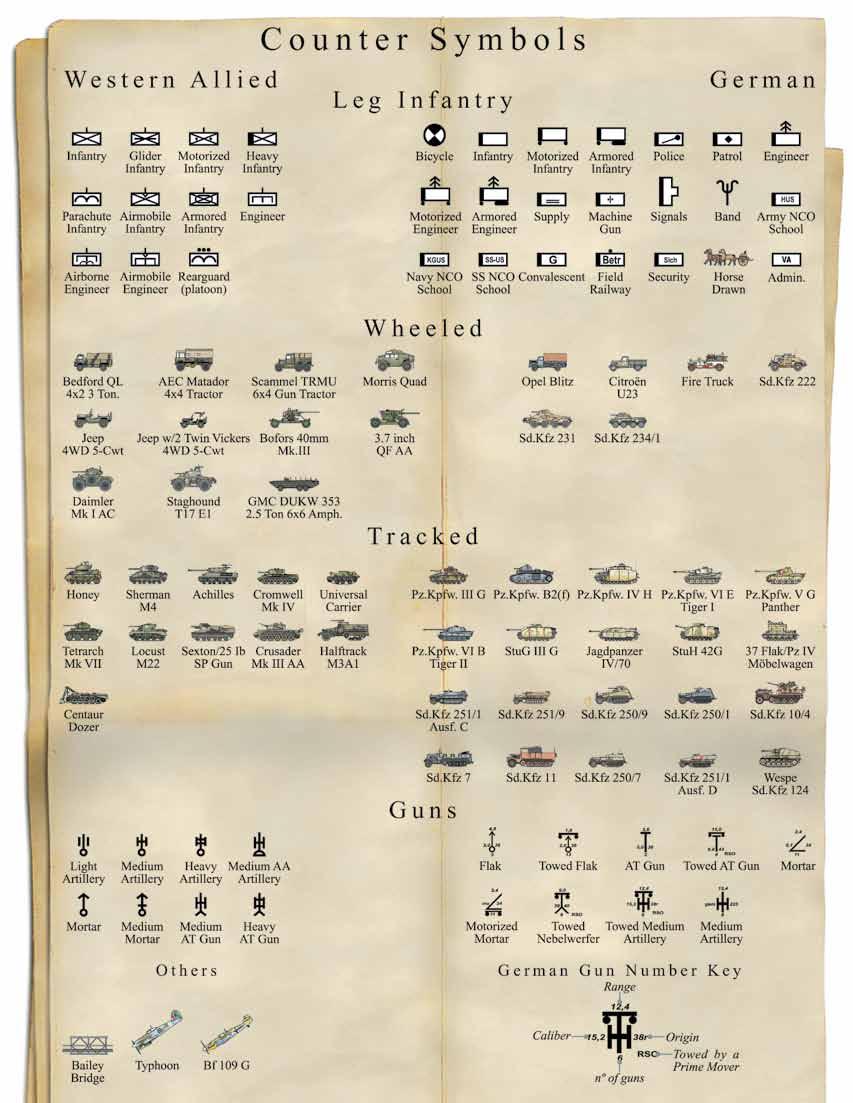
7 Components Series Rulebook Series Rules Summary Exclusive Rulebook 6 Player Aid Cards Turn Record Chart and Weather Table 2 x combat Result Table/Terrain Effect Chart 5 Map Sheets 11 Counter Sheets 4 ten sided dice Counter Symbols The Unit counter symbols are shown on page two. The only Unit counter symbol that has any effect on the game is the engineer symbol. All other symbols are for historical interest because the values, the colors of the values, and the colors around the values define all the other game functions. Each Leg Unit is company size, with the exception of the Rearguard Units, which are platoon size. The background color of each Unit counter shows the Division the Unit belongs to. The colors are green (101st Airborne Division), tan (Guards Armored Division), brown (43rd Wessex Infantry Division), light grey (Eindhoven Regional Command and later, KG Chill), blue (59th Infantry Division), and gray (KG Walther). The 1900 Turn Several new mechanics have been added to the game and are performed during the 1900 turn. Here is the updated applicable sequence of play for the entire 1900 turn: 1. Advance the Club Route Marker 2. Roll for XXX Corps release (not on the September 17th turn) 3. Set the Club Route Status marker on the Guards Divisional Display to Open 4. Move German Formations Off-Map 5. Roll for Allied Flank Corps advance 6. Spend Dispatch Points to buy Formation Activation Chits. 7. Place Reinforcements. 8. Put eligible chits into the coffee mug. 9. Perform the Activation Phase. 10. Remove all barrage markers. 11. Move the turn record marker up a box. Exclusive Rules The following are the exclusive rules for use with The Where Eagles Dare game. There are also special rules that apply to just some of the scenarios and special rules that combine The Devil s Cauldron and Where Eagles Dare together for one grand campaign game of Market Garden. 1.0 Night and Weather 1.1 Night The night turn begins the turn after the 1900 turn. 1.2 Fog If fog was rolled on the Weather Table during the Check Weather Phase at the beginning of the day, there is a chance that it may clear in the morning. At the start of the 0900 turn, roll a die. If the result is equal to or less than the fog number, the fog clears and the weather is clear for the rest of the day; if the roll is more than the fog number the fog remains for the 0900 turn. Repeat this procedure on the 1100 turn. If the die roll on the 1100 turn does not clear the fog, the weather becomes overcast and stays that way for the rest of the day. Example: The 0700 weather die roll is a 3, which produces fog with a clear number of 5. This means that a die is rolled on the 0900 turn, and if the roll is 5 or less, the fog clears. If the roll is greater than 5, the fog stays for that turn. If the fog stays, another roll is made on the 1100 turn. 2.0 Terrain The types of terrain in the game are: Clear Roads City Crests Culvert Polder Railroad Fortified Impassable Sand Dunes Orchard Village Stream Bridge Swamp Woods Town River Raised Road All are described in full below. Each hex type is defined by the color of the dot in the center of the hex (and for City and Fortified hexes, the color of the hexsides). For example, if the hex has a green center dot, then it s a woods hex. Some hexes contain water features that have no effect. In other hexes, the water features do have an effect, and this is indicated by an impassable portion (grey) in the hex. Play note: The map was drawn for realism so the terrain in certain hexes may not be obvious. As an example of how Units move into hexes with rivers, they can move from to because of the portion of land that extends into However, Units cannot move from to If the players are unable to agree on movement between other hexes they should roll a die. 2.1 Clear Clear terrain has a white circle in the center of the hex. A Leg Unit can enter a clear hex for 2 movement points if not in Column, or 1 movement point if in Column. Wheeled Units can enter a clear hex for 3 movement points if not in Column, or 2 movement points if in Column. Tracked Units can enter a clear hex for 2 movement points if not in Column, or 1 movement point if in Column. Clear terrain is not Blocking Terrain, and does not modify the Fire Rating of Units firing into the hex. 2.2 Polder Polder terrain has an aqua circle in the center of the hex. A Leg Unit can enter a polder hex for 2 movement points if not in Column, or 1 movement point if in Column. Wheeled Units Version 1.1: February 8th,
8 can enter a polder hex for 5 movement points if not in Column, or 3 movement points if in Column. Tracked Units can enter a polder hex for 3 movement points if not in Column, or 2 movement points if in Column. Polder is not Blocking Terrain, and does not modify the Fire Rating of Units firing into the hex. 2.3 Orchard Orchard terrain has a yellow circle in the center of the hex. A Leg Unit can enter an orchard hex for 2 movement points if not in Column, or 1 movement point if in Column. Wheeled Units can enter an orchard hex for 8 movement points if not in Column, or 2 movement points if in Column. Tracked Units can enter an orchard hex for 4 movement points if not in Column, or 1 movement point if in Column. An orchard hex is not Blocking Terrain on its own, but a Line of Sight traced through two orchard hexes is blocked. (Line of sight can be traced through one orchard hex and into a second.) Orchards modify the Fire Rating of Units firing into the hex by Woods Woods terrain has a green circle in the center of the hex. A Leg Unit can enter a woods hex for 3 movement points if not in Column, or 2 movement points if in Column. Wheeled and Tracked Units cannot enter a woods hex unless they are in Column and traveling along a Road (in which case they pay the Road movement coat). Woods are Blocking Terrain, and modify the Fire Rating of Units firing into the hex by -2. This modifier is ignored if the Weapon Class is Mortar, Indirect HE or Direct HE. A Wheeled or Tracked Unit in a Woods hex may not leave Column. 2.5 Roads Roads allow Units in Column to move faster. Any Unit in Column that enters a hex along a road can do so for ½ movement point. The Unit can decide not to use the road and instead pay the base terrain cost, as indicated by the circle in the center of the hex. A Unit not in Column, or not entering or exiting the hex along a road, must pay the base terrain cost. Where two Roads share the same hex but do not cross, a Unit must pay the base terrain cost to go from one Road to the other. The Roads have no effect on Line of Sight. Play note: The capitalized word Road is a defined term in these rules that includes railroads, raised roads, and so on. The uncapitalized word road means the specific terrain type that is a road. 2.6 Railroads Railroads allow Units in Column to move faster. Any Leg Unit in Column that enters a hex along a railroad can do so for ½ movement point. A Wheeled Unit in Column pays 2 movement points, and a Tracked Unit in Column pays 1 movement point. The Unit can decide not to use the railroad and instead pay the base terrain cost, as indicated by the circle in the center of the hex. A Unit not in Column, or not entering or exiting the hex along a railroad, must pay the base terrain cost. Where two railroads share the same hex but do not cross, a Unit must pay the base terrain cost to go from one railroad to the other. Railroads have no effect on Line of Sight. 2.7 Villages Village terrain has a beige circle in the center of the hex. A Leg Unit can enter a village hex for 2 movement points if not in Column, or 1 movement point if in Column. Wheeled Units can enter a village hex for 6 movement points if not in Column, or 1 movement point if in Column. Tracked Units can enter a village hex for 4 movement points if not in Column, or 1 movement point if in Column. Villages are not Blocking Terrain, and modify the Fire Rating of Units firing into the hex by Towns Town terrain has a brown circle in the center of the hex. A Leg Unit can enter a town hex for 2 movement points if not in Column, or 1 movement point if in Column. Wheeled and Tracked Units cannot enter a town hex if not in Column, but may enter for 1 movement point if in Column. Towns are Blocking Terrain, and modify the Fire Rating of Units firing into the hex by -2. A Wheeled or Tracked Unit in a Town hex may not leave Column. 2.9 Cities City terrain has a black circle in the center of the hex and a white border around the hex. A Leg Unit can enter a city hex for 2 movement points if not in Column, or 1 movement point if in Column. Wheeled and Tracked Units cannot enter a city hex if not in Column, but may enter for 1 movement point if in Column. City hexes are Blocking Terrain, and modify the Fire Rating of Units firing into the hex by -3. A Wheeled or Tracked Unit in a City hex may not leave Column. Cities may be reduced to rubble. If an artillery attack rolls a 0 when attacking a City hex, place a rubble counter on that hex. If the hex as a OP, that OP is no longer considered to be in the hex. Additionally, add one to the defensive terrain value of the hex Fortified Fortified terrain has a black circle in the center of the hex and a grey border around the hex. A Leg Unit can enter a Fortified hex for 2 movement points if not in Column, or 1 movement point if in Column. Wheeled Units cannot enter a Fortified hex if not in Column, but may enter for 3 movement points if in Column. Tracked Units cannot enter a Fortified hex if not in Column, but may enter for 2 movement points if in Column. Fortified hexes are Blocking Terrain, and modify the Fire Rating of Units firing into the hex by -4. A Wheeled or Tracked Unit in a Fortified hex may not leave Column. Fortified hexes may be reduced to rubble. If an artillery attack rolls a 0 when attacking a Fortified hex, place a rubble counter on that hex. If the hex has an Observation Post or a Strongpoint, that Observation Post or Strongpoint is no longer considered to be in the hex. Additionally, add one to the defensive terrain value of the hex Multi Man Publishing, Inc.
9 2.11 Streams Streams are thin blue lines that run along hexsides. A Leg Unit that leaves a hex across a stream without using a Road pays 2 additional movement points if the Unit is not in Column, or 1 additional movement point if the Unit is in Column. Wheeled and Tracked Units may not cross streams except when using a Road (and must of course be in Column to do so). Note that the Roads that cross streams have map graphics showing bridges, but these are not considered bridges in game terms (i.e. they are not controlled, cannot be wired) and are treated just like Roads. There are however 4 of these bridges over streams that might not be able to take vehicular traffic and players will have to check for their stability. They are in hexsides /56.201, /63.186, / and /87.118, and they are marked with a graphic. The most southern of these will be checked by the A RIde in the Country scenario. If the Allied Player is unable to win this scenario, it is always considered unstable. The remaining three bridges are checked the moment a vehicle of any type (and either German or Allied), or the instant Club Route is traced across that bridge. The crossing player rolls a die and should he roll a 9, the bridge is considered unstable and in need of repair. Any other roll and the bridge is treated as any other bridge over a stream is treated. There are no modifiers to this roll. If a bridge is unstable, no vehicles may cross it nor may Club Route be traced through it until it is repaired. To repair an unstable bridge, if there are no German Fire Zones on either hex of the unstable bridge, the Allied player may place one if his Bulldozer units on the southern hex of the bridge hexside during his next Guards Divisional Activation Impulse. Only one Bulldozer may be placed per unstable bridge. He may then (during that impulse) roll a die. Should he roll a 2, 1 or 0, the bridge is considered stable now and remains so for the remainder of the game. Should this roll fail, he may add a Men at Work counter and receive that marker s modifier and roll every succeeding Guards Divisional Activation Impulse until the bridge is fixed. This is an Engineering action and is performed normally. The Bulldozer Unit may not be attacked but is eliminated the moment an enemy Unit moves into the hex. The Bulldozer marker(s) remains on the map until it has successfully repaired the bridge but remember to account for it s modifier on the following 1900 turn for XXX Corps release. A Bulldozer Unit can only be placed on Club Route, or the Club Route Marker, and once placed, may never move 2.12 Rivers Rivers are wide blue lines, and can only be crossed at bridges or with ferries. If a single hex contains terrain on both sides of a river, one side will be marked as impassable, and the terrain of the other side will determine the terrain type of the overall hex. A Unit can enter such a hex providing it does not do so via a hexside portion that has impassable terrain Crests Crest hexsides block Line of Sight unless the crest hexside is part of the firing Unit s hex or the target Unit s hex. Crest hexsides have no effect on movement or fire combat (other than LOS) Impassable Impassable terrain is grey. If an entire hex is impassable, it is entirely grey, does not have a center circle, and cannot be entered by any Unit. If only part of a hex is impassable, the impassable portion is grey, meaning that no Unit can enter and/or leave the hex by passing over the impassable portion. An exception to this is if a Road or ferry is used to pass through impassable terrain, in which case a Unit using the Road or ferry legally can move through the impassable hex portion. Impassable hex portions are most commonly seen in hexes containing rivers. Impassable terrain has no effect on Line of Sight or fire combat Bridges Bridges in the game are all named, and have a marker to show whether they are wired or not. Note that the graphics on the map for roads that cross over streams are not considered bridges for the game in terms of the following rules. Any Unit in Column in a hex with a bridge hexside suffers an additional terrain modifier of +2 and ignores the hex s original terrain Crossing Bridges A Unit must be in Column to cross a bridge, and the cost is the same as for normal movement. This means only one Unit can Assault across a bridge, and if a Unit not in Column is forced to run away, it cannot do so across a bridge Road Blocks and Bridges Road blocks cannot be placed in any same hex that has a bridge hexside Railroad Bridges Vehicles cannot cross railroad bridges unless the railroad bridge is improved. To improve a railroad bridge, an engineer Unit must pass a Troop Quality Check in one of the two hexes sharing the railroad bridge hexside (this is an Engineer Action, so no Command Points can be spent on it, the engineer Unit can t be in Column, it triggers Opportunity Fire, and Men at Work markers can be placed). If a Unit with Organic Transport crosses a railroad bridge that hasn t been improved, the Unit forever loses its transport capabilities, and an abandoned transport marker is placed on the Unit as a reminder Line of Sight Bridges block Line of Sight in the same was as Raised Roads (see 2.16) Control of Bridges Why do you even want to control a bridge? Well, you can t demolish it unless you wire it and you can t wire it unless you control it. See below for the demolition rules. Either you control a bridge, or your enemy controls the bridge, or neither of you controls the bridge, in which case the bridge is contested. If you want to control a bridge, one of your Units must have been the last to enter both of the two hexes that share the bridge hexside, and neither of these two hexes Version 1.1: February 8th,

10 can be in an enemy Fire Zone. Note that it doesn t have to be the same Unit that enters the hexes, and the Unit doesn t have to stay in the hex, nor do you have to move the Unit or Units through during the same activation. You can keep track of this with blank chits if you wish Bridge Demolition You can only demolish a bridge if you first wire it for demolition. There are two ways a bridge is wired for demolition. The first is if the scenario rules tell you it is, in which case the rules will also say which side wired it. Remember, only the side that wired a bridge can demolish it. The second way a bridge can be wired is by one of your engineer Units. To do this: You must control the bridge (see above). Your engineer Unit must begin its Action in one of the two hexes that share the bridge hexside. Your engineer Unit must pass a Troop Quality Check (no Command Point for an automatic pass here; the Unit cannot be in Column; a Men at Work marker may be placed in case of failure); this is an Engineer Action so it can trigger Opportunity Fire. If your engineer Unit passes the Troop Quality Check the bridge is wired for demolition. Flip the marker on the bridge to the wired side. Once you have a bridge wired you may try to demolish it when an enemy Unit enters one of the two hexes sharing the bridge hexside and the bridge becomes contested. You need a die roll of 5 or less if you don t project a Fire Zone into one of the two hexes that shares the bridge hexside, or a 6 or less if you do project a Fire Zone into one of the two hexes that shares the bridge hexside. If you demolish a bridge, place a destroyed marker on it, and the enemy Unit cannot get across. If you miss the roll, flip the bridge marker over to the non-wired side. You ll have to start all over now, and you can only wire the bridge again if you regain control of the bridge. Note: he Best Railroad Bridge in hex may never be wired for demotion and may not be destroyed. It may never be Improved to allow for vehicular traffic. All other rules apply Bridge Repair Only the Allied Player may repair demolished bridges. To do so, he declares he is using a Bailey Bridge Unit (either the 11 Bridge, RE or the 14 Field Sqn, RE if no 43rd Infantry Formations have been released yet. After any Formation of the 43rd Infantry Division has been released, he may also used either the 128 Bridge, RE or the 15 Bridge, RE) at the start of any turn following a turn in which a bridge was demolished by the German player. During the next Guards Divisional Activation Impulse (if it is a Guards Bailey being used) or during the 43rd Infantry Divisional Activation (if a 43rd Infantry Bailey Bridge is being used), the Allied player simply places the Bailey Bridge counter on the southern hex of the Demolished Bridge hexside if there are no German Fire Zones on either hex of the bridge hexside. It is placed truck side up. This is considered a movement action. A Bailey Bridge Unit can only be placed on Club Route, or the Club Route Marker. In any subsequent activation the Unit must pass a Troop Quality Check as an Engineer Action (just like any other Engineer Action you may not spend a Command Point to pass, the engineer Unit can t be in Column, it might trigger enemy Opportunity Fire, and Men at Work markers can be placed). If the bridge is repaired, remove the destroyed marker and flip the Bailey Bridge counter to it s Bridge side. The Bridge Unit now acts as the bridge, but unlike a normal bridge, it is a Unit and may be targeted by enemy fire. If the Bridge Unit becomes Suppressed or takes a Cohesion Hit, it cannot act as a bridge until it Rallies. If the Bridge Unit is eliminated, remove it from play, and the destroyed marker returns. Example: A bridge is demolished during the 0900 turn Bridge Blowing Example The British tank has been activated and wishes to cross the contested Arnhem Road Bridge, which has been wired by the German player. The tank gets into Column for 1 MP, and moves adjacent to the bridge for ½ MP. At this point the German player gets to roll to try and demolish it. As the German Unit to the North of the bridge projects a Fire Zone into one of the hexes that shares the bridge hexside, the die roll has to be a 6 or less. If the German Unit was not there, the die roll would need to be a 5 or less to demolish it. The die roll is a 3 and the bridge is blown. The bridge marker is removed, and replaced with a Destroyed marker. As the bridge has been destroyed, the British tank does not get to cross the bridge, but it is still active and has 11 ½ MP remaining Multi Man Publishing, Inc.


11 after the 43rd Infantry Division Activation has passed. On the 1100 turn and during a 43rd Infantry Division Activation Impulse, the Allied player can declare that he is bringing in the 128th Bridge Unit. Just place the Bailey Bridge counter, truck side up and you may activate it on a subsequent activation and roll for repair.. The Allied Player may only bring in one Bailey Bridge per Impulse Raised Roads/Railroads Raised Roads/Railroads are elevated road and railroad tracks that pose a significant hindrance to movement and also block Line of Sight. A Unit in Column can enter a hex with a Raised Road/Railroad if there is no road block in the Raised Road/Railroad hex, and the Unit enters the Raised Road/Railroad hex through a hexside that the Raised Road/Railroad touches. Similarly, a Unit in Column can only leave the Raised Road/ Railroad hex through a hexside that the same Raised Road/ Railroad touches. This means that if there are two Raised Roads/Railroads running through the same hex and they do not cross, you must remember which one the Unit is on, because it cannot jump from one to the other. A Vehicle Unit on a Raised Road/Railroad cannot exit Column formation while in a Raised Road/Railroad hex. If the Vehicle Unit is forced to retreat, it must follow the Raised Road/Railroad and if it cannot do so, the Vehicle Unit is eliminated. The Vehicle Unit suffers a terrain modifier of +2 when fired on, in addition to the +2 modifier for being in Column. If a Unit dismounts from its Organic Transport while it is on a Raised Road/Railroad, the vehicles are lost. Place an abandoned transport Marker on the Unit after it dismounts. Note that Vehicle Units not in Column can never enter a hex with a Raised Road/Railroad. A Leg Unit that is not in Column can enter a hex with a Raised Road/Railroad from any hexside (even if there is a road block in the hex), but it must pay double the terrain cost of the other terrain in the hex; when not in Column the Leg Unit can leave the Raised Road/Railroad hex by any hexside. If fired on when not in Column, the Leg (and immobile) Unit suffers the +2 terrain modifier for the Raised Road, and also benefits (or suffers from) the terrain modifier of the hex s original terrain. A Leg Unit not in Column in a Raised Road/ Railroad hex may get in Column for 1 movement point. Remember that Vehicle Units not in column can never enter a hex with a Raised Road/Railroad. A Leg Unit may get off a Raised Road/Railroad by exiting Column formation; this costs one movement point or the Leg Unit must take a Cohesion Hit. Once the Leg Unit is not in Column, it may leave the Raised Road/Railroad hex by any hexside. If a Leg Unit in Column is forced to retreat from the Raised Road/Railroad hex, it must follow the Raised Road/ Railroad and if it cannot, the Leg Unit is eliminated. A Leg Unit in Column in a Raised Road/Railroad hex suffers a terrain modifier of +2 when fired on, in addition to the +2 modifier for being in Column. Raised Roads/Railroads create a special Line of Sight situation. A Raised Road/Railroad is Blocking Terrain, but only if the Line of Sight actually passes through the Raised Road/ Railroad graphic. For this purpose a raised Road/Railroad in the same hex as a target Unit or a firing Unit is never blocking terrain. In addition a Line of Sight can pass through a hex with a Raised Road/Railroad as long as it does not cross the Raised Road/Railroad. Raised Road Example 1 In the example shown on the right, the Vehicle Unit labeled A cannot enter the Raised Road hex, as it is not entering along the road. It doesn t matter that the Unit is in Column or not. Vehicle Unit labeled B first moves into the hex next to the Raised Road, gets into Column, and now can move onto the Raised Road because it is entering in Column from a connecting Road. Raised Road Example 2 In the example on the left, the British para Unit is activated, and wants to move North. First it gets into Column for 1 MP. It then moves up 1 hex. As the Unit is in Column, and entering the Raised Road hex on the Raised Road, this costs ½ MP. It then moves another hex North, and as it attempts to do so, this triggers Opportunity Fire from the German Unit. Assuming the German Unit passes the Troop Quality Check in order to take the shot, the Fire Rating for the German Unit is modified from 5 to 12 (Fire Zone to Fire Zone movement is +3, +2 Raised Road even though in Column, +2 for being in Column), so anything but a 9 will hit. The die roll is a 4 and the para Unit takes a Cohesion hit, but completes it s movement. Version 1.1: February 8th,

12 2.17 The Culvert There is a Culvert in hexside / The Culvert is marked with arrows that show which hexes are connected by the Culvert. Any Unit adjacent to the Culvert can move directly to the hex on the other side of the Culvert for the movement cost shown below in addition to the cost to enter the hex; remember to follow the arrows. A Unit must be in Column to use a Culvert. Any Opportunity Fire against a Unit moving through the Culvert receives an additional +3 modifier in addition to the other modifiers that would normally apply (such as the +2 for being in Column). If the Unit triggers Opportunity Fire as it leaves the hex after the Culvert, this +3 modifier still applies. Movement through the Culvert costs the following in addition to the terrain cost of entering the hex adjacent to the viaduct on its opposite side: Leg: +2 movement points Wheeled: +6 movement points Tracked: +4 movement points A Unit on one side of the Culvert can Assault an enemy Unit on the other side of the Culvert. The Assaulting Unit must be in Column, and suffers the +3 modifier to Opportunity Fire for moving through the Culvert (in addition to the +2 modifier for being in Column) at the start of the Opportunity Fire procedure Ferries Engineer Units can ferry other Units across otherwise impassable water hexsides in a destroyed Bridge hexside (this applies only on the Where Eagles Dare map). Only hexes that are currently Destroyed Bridge hexsides can be used to create ferries. Only Leg Units can use a ferry. If a destroyed Bridge has been repaired and is now replaced by a Bailey Bridge, remove the Ferry counter from the map. There are no improved Ferries in Where Eagles Dare but the backs still have Improved on them for possible use in The Devil s Cauldron. Ferry Example In the situation shown, the German engineer Unit starts its Activation in a ferry hex, and wishes to build a ferry. This is an engineer Action, so the Troop Quality Check has to be rolled. The German engineer Unit rolls a 1, so the ferry has been built (and a ferry marker is placed on top of the engineer Unit). At a later time, a German Leg Unit starts its Activation in Column and wants to ferry across the river, as shown here. This takes the entire Action for the Unit, and it triggers Opportunity Fire from the British Gun Unit. The Gun Unit rolls a 1 for its Troop Quality Check, so it will take the shot. The Fire Rating is modified from 4 to 8 (+2 for being in Column, +2 for using the ferry, -2 for range, +3 Fire Zone to Fire Zone movement). The die roll is a 6, and this eliminates the German Unit (but it has no effect on the ferry). When the British Gun unit is activated, it can perform Direct Fire at the ferry. After the gun unit passes a Troop Quality Check for the Company bonus, the fire rating is modified from a 4 to a 6 (+3 defense rating, -2 range, +2 Company Bonus). The die roll is a 3, and the ferry takes a Cohesion Hit. This stops the ferry from ferrying Units until it rallies (which it can try and do the next time the engineer Unit is Activated either at night or not in an enemy Fire Zone). The final situation is as shown Multi Man Publishing, Inc.
13 Creating a Ferry You can create a ferry in either hex in which the there is a destroyed bridge counterdestroyed bridge used to exist. An engineer Unit must begin an activation in the applicable hex. Announce that your engineer Unit wants to be a ferry [insert your inappropriate joke here]. This is an Engineer Action. The engineer Unit now rolls a Troop Quality Check (a Command Point cannot be spent here) and may be Opportunity Fired if applicable. If it passes, it is now a ferry put a ferry marker on the one of the two hexes that the destroyed bridge spanned with the arrow pointing to the other hex of the former bridge span, and put the engineer Unit under the ferry marker. The engineer Unit does not count towards the stacking limit of the hex now, but does count against the mass modifier if the hex is fired upon. The engineer Unit has now completed its Action for that activation and the ferry may begin ferrying Units from this point onward. If the engineer Unit fails the Troop Quality Check, it is done for the activation and it doesn t get to be a ferry; you may place a Men at Work marker. Your engineer Unit may try again to become a ferry during its next activation Using Ferries Remember that only Leg Units may use a ferry. A friendly Unit in Column that begins its activation in a hex containing a ferry can move into the hex pointed at by the ferry symbol; alternately, a friendly Unit in Column that begins its activation in the hex pointed at by the ferry symbol across the river can move to the hex containing the ferry marker. This is the Unit s entire activation and it is a Movement Action (so a Unit cannot move into a ferry hex and then use the ferry as a Second Action). Note that when a Unit uses a ferry it is not an activation for the ferry. Remember, the ferry does not work if the ferry is Suppressed. Units that have Wheeled or Tracked Organic Transport may use a ferry but they must abandon their vehicles to do so. Place an abandoned transport marker on the Unit to show that it can never again use Organic Transport (this only applies to ferries, not improved ferries). You cannot use a Command Point to ferry a Unit (so no Second Actions can be used to ferry Units). The hex the Unit is being ferried into must not contain any enemy Units, otherwise the ferrying may not take place Removing a Ferry A ferry remains in place until the engineer Unit moves, or the ferry takes a Step Loss or Eliminated result - or the Allies have successfully placed a Bailey Bridge. A ferry can be the target of enemy fire just like any other Unit, and may be Assaulted as well. If the ferry becomes Suppressed, it remains in place, but it cannot actually ferry Units until it Rallies (place a Suppression marker on top of the ferry marker). If the ferry takes a Step loss, the ferry marker is removed, and the engineer Unit takes the Step loss. If it suffers an Eliminated result, remove the ferry and eliminate the engineer Unit. If the ferry takes a Cohesion Hit, it is marked on the ferry, and if the engineer Unit moves away, the result is transferred to the engineer Unit. If a ferry is Assaulted, the ferry and engineer Unit are eliminated at the same step in the Assault procedure when zero step Units are eliminated. The ferry is removed the instant a Bailey Bridge has been successfully places in the hex Ferries and Opportunity Fire If a Unit being ferried takes Opportunity Fire as it leaves its hex, it suffers a +2 modifier for being ferried (in addition to the +2 for being in Column). This fire does not affect the ferry Sand Dunes Sand Dunes terrain has a light brown circle in the center of the hex. A Leg Unit can enter a sand dune hex for 2 movement points if not in Column, or 1 movement point if in Column. Wheeled Units can enter a sand dune hex for 4 movement points if not in Column, or 3 movement points if in Column. Tracked Units can enter a sand dune hex for 3 movement points if not in Column, or 2 movement point if in Column. Sand Dunes terrain is not Blocking Terrain, and modify the Fire Rating of Units firing into the hex by Swamp Swamp terrain has a blue dot in the center of the hex. A Leg Unit can enter a swamp hex for 4 movement points if not in Column, or 3 movement point if in Column. Wheeled and Tracked Units cannot enter a swamp hex unless they are in Column and traveling along a Road (in which case they pay the Road movement coat). Swamp terrain is not Blocking Terrain, and modify the Fire Rating of Units firing into the hex by +1 (it is a disadvantage to be fired on if in swamp) 3.0 Paradrops and Glider Landings Play note: The tricky thing here is the unpredictability of Allied airborne reinforcements. There are two variables that affect their arrival: the availability of their assigned drop zones (the enemy might get in the way), and the weather. The reinforcement schedule tells you the order in which airborne troops must arrive and when they become available, but it won t tell you exactly when they will arrive. So imagine a mass of airborne troops waiting in line for the word to go. The landing rules simulate this. 3.1 Drops and Drop Numbers Each daily delivery of Allied airborne troops is called a drop. There is never more than one drop per day. Drop One always happens on the first turn of the game during the special first turn drop phase. All drops are numbered sequentially after Drop One, so the drop after Drop One is always Drop Two and so on. But Drop One is the only drop that must happen on schedule. All subsequent drops are scheduled but may or may not happen when they are supposed to. All of the Allied airborne Units are assigned drop numbers on the reinforcement schedule. A Unit s drop number tells you which drop the Unit is in. So all Units designated with drop number two must arrive, if at all, in Drop Two. Version 1.1: February 8th,
14 3.2 When to Drop Units scheduled to drop arrive during the reinforcement phase of their scheduled drop turn. As noted above, Drop One always happens on the first turn of the game during the special first turn drop phase. Thereafter, there is only one drop per day and it will occur, if it occurs, on the second or third turn after the first clear weather turn of that day. Here s what you do: 1. determine the weather for the day in accordance with the weather rules; 2. if the weather is rain or overcast, then move on, there will be no drop this day. Move all drops forward 1 day; 3. if the weather is clear, then the day s drop will happen on the 0900 turn or the 1100 turn (it is the Allied player s choice see below for more on this) 4. if the weather is fog, then the drop happens only if the fog clears; if the fog clears, the drop will happen two or three turns after the fog clears (it is the Allied player s choice see below for more on this). If there will be a drop, the Allied player always has the choice of when to make it (i.e., either the 0900 or 1100 turn in clear weather, or the second or third turn after the fog clears). The Allied player has two counters. Both counters say Air Drop? on one side. The flip side of one counter says Air Drop! and the other says No Drop. After the Allied player decides which turn he wants to drop he places the Air Drop counter Air Drop? side up on the Turn Record Track for that turn; he places the No Drop counter Air Drop? side up on the Turn Record Track for the other turn. When the time for the first possible drop comes, the Allied player flips the Air Drop? counter, reveals his intentions and conducts his drop or not. Both players now have a hearty chuckle to relieve the unbearable tension. Play example: If the weather is clear on the weather check on the second day, Drop Two will happen on the 0900 turn or the 1100 turn (and the Allied player makes his choice and places his Air Drop? counters accordingly). But if the weather is fog, then the drop can only happen two or three turns after the fog clears (if the fog clears). Let s say the fog clears on 0900 (i.e., 0900 is the first clear weather turn of the day). The next drop will be on the 1300 or 1500 turn (and the Allied player makes his choice and places his Air Drop? counters accordingly). If the weather had been rain, there would be no drop that day and the Allied player would have to wait until the third day to try and make Drop Two. 3.3 Where to Drop The map has numerous marked airborne zones, designated by letter, which are either drop zones (DZ meant for paratroops; glider Units landing in drop zones may suffer), or landing zones (LZ fine for either paratroops or glider troops). The hexes for the drop zones are: DZ A1: , , 71.25, , DZ A: , , , , , , , , DZ B: , , , , , , , , , , , , , , DZ C: , , , , , , , , , , , , LZ W: consists of both DZ B and DZ C combined The Historical Drop Scenario All drop numbers and airborne zones are on the reinforcement schedule just follow that. Note that even though the term sticks is used to refer to all the drops in a hex, we are aware that these are not really sticks, rather the term is used to add flavor The Free Drop Scenario Before the game starts, the Allied player secretly assigns all of his airborne Formations a drop number and a Division airborne zone. Only one Formation can use an airborne zone each turn! That means one Formation per airborne zone per drop number. (All Units of a Formation must of course drop in the same airborne zone on the same turn.) Units belonging to an Independent Formation may be designated to drop in any Division airborne zone as long as that airborne zone is being used that turn by another Formation of the Independent Formation s Division; however, Units belonging to an Independent Formation do not all have to arrive in the same airborne zone. 3.4 How to Drop Place one or more Units in any hex in the appropriate airborne zone. There are no stacking restrictions, but Units cannot drop in Column (they can drop mounted if they wish). Each Unit that drops gets a glider/paradrop marker placed on top of it (except for the Units placed on Drop One); in addition, a Unit adds an extra glider/paradrop marker for each delay it has suffered (more on this below). Dropped Units can be fired at during subsequent enemy activations, but the drop itself does not trigger Opportunity Fire. To help with stacking, orange glider/paradrop markers are included that represent two glider/ paradrop markers. When instructed to remove a glider/paradrop marker, replace this orange marker with the normal yellow marker The Drop Table All Units that drop must have their fate decided with a die roll on the Drop Table. Roll for Units in Drop One as soon as they drop. Roll for Units in subsequent drops the first time they activate after the drop. The Drop Table has various results, which include elimination, Step loss, activation delays, and no effect. Note the numerous modifiers on the Drop Table. Glider troops that are landing in drop zones (DZs) (instead of landing zones (LZs)) suffer a +2 modifier on the Drop Table. Note also that some airborne zones on the map are marked with an * ; glider troops landing in these airborne zones suffer an additional +1 modifier on the Drop Table. A Unit landing in an airborne zone also suffers a Multi Man Publishing, Inc.
15 Drop Table modifier for every German Unit in the airborne zone, another +1 modifier for every German flak Unit (not 88) that projects a Fire Zone into the airborne zone, and a further +2 modifier for every German 88 flak Unit that projects a Fire Zone into the airborne zone. All of these modifiers are cumulative Glider/Paradrop Markers Each glider/paradrop marker on a Unit takes the Unit one Action to remove. Removing a glider/paradrop marker is an Action but does not trigger Opportunity Fire. A Unit with a glider/paradrop marker on it may perform no other Actions until all the markers have been removed. 3.5 Supply Drop Zones Every day, there is a supply drop for the 101st Airborne Division. The drop takes place at the same time any reinforcements arrive that day for the Division. If the Division will not be receiving any reinforcements (either due to the weather or the reinforcement schedule) a supply drop will take place at either 1300 or Indicate the time of this drop using the Air Drop? markers. The scenarios will tell you which drop zone is designated as the supply drop zone. If an enemy Unit is in the supply drop zone at the time of the supply drop, then the supply drop is interdicted. Place the SDZ Closed marker on the player aid chart for the Division whose supply drop was interdicted. All Units of this Division suffer a -1 Troop Quality Rating modifier until the next supply drop the next day. Once the Sea Tail for an Airborne Division has be released, that Airborne Division is always in supply and the Supply Drop Zone Procedure is ended for that division. To be released, the Club Route marker must have advanced to a specific Club Route Stop hex or farther to the north for the release to be successful. If the Club Route marker has not advanced to that hex or past and the Sea Tail has been released, just ignore the Sea Tail and move to the next Formation to be released. The Sea Tail will never arrive for that Division. Sea Tail release hexes (either this Club Route Stop hex or beyond): 101st Airborne Division: nd Airborne Division: or st Airborne Division: 49.30, or Changing the Drop Location You can try to change future drop locations for a Division during the reinforcement phase of any 0700 turn. To change drop location, roll on the Drop Zone/Landing Zone Changing Table. If successful, you can replan all remaining drops for the rest of the game for the Division and also reassign the supply drop zone for the Division. All the rules for planning a free drop at the start of a game start (see Exclusive Rule 3.3.2) still apply. Any drops for that day that were replanned will come in on the 1500 or 1700 turn (the Allied player picks as described above). Future drops all take place at the normal time. If you roll abort, you do not change your drops and all your scheduled drops are delayed 24 hours for that Division. If you roll no effect, there is, well, no effect. Just carry out your drops as planned. 4.0 The Club Route Club Route is the vital road that the entire XXX Corps uses to travel north across the map and on to victory. The road that might be Club Route is marked on the map. The Allied Player will determine what the actual Club Route will be as the game is played. It is important to recognize the difference between those road hexes that could potentially be Club Route and those road hexes that have actually been designated as Club Route. Club Route (and not potential Club Route) consists of all Club Route road hexes starting from one hex south of the End of Club Route Marker (hereafter Club Route Marker) and all contiguous Club Route hexes to the south of the marker to hex For example, the Club Route marker starts the game in hex Potential Club Route is hex and all marked Club Route hexes to the north of the marker. Club Route itself consists of and all connected Club Route road hexes to hex As the game progresses, the Allied Player moves the Club Route Marker northward and its placement determines all actual Club Route road hexes. Remember, the marker itself is not a Club Route hex. Club Route starts the first hex south of the marker. Players should think of Club Route as a massive traffic jam with every Club Route road hex as packed with vehicles waiting to advance to the front of the line. The marker itself is a floating Reinforcement hex that the Allied Player uses to place his newly arriving reinforcements from XXX Corps (though there are exceptions to this see the reinforcement schedule). 4.1 Terms Potential Club Route: any Club Route road hex north of the actual Club Route marker. Club Route: any Club Route road hex (as determined by the Allied Player) that is south of the Club Route Marker. Club Route Marker: the counter that determines the farthest advance north on potential Club Route road hexes. Club Route Stop hex: marked on the map and an eligible hex on which a Club Route Marker may be placed. Formation Reinforcement Marker: the marker that goes on the Guards Armored Divisional Display to show the order of Formations currently on Club Route. Version 1.1: February 8th,
16 4.2 Establishing Club Route During the 1900 turn of every game day, the Allied player determines where to place the Club Route Marker. To do this, find the Club Route Marker and its current placement. Then trace potential Club Route road hexes north to the next Club Route Stop hex. If that trace encounters an enemy Fire Zone, a destroyed bridge, an unstable bridge or an enemy unit, move the Club Route Marker back to the last Club Route Stop hex. Continue moving the marker north to the next Stop hex until it cannot be moved further north. The Allied player need not move the marker at all, or he may keep at it any intermediate Stop hex even if hexes further north are available, except if he has cleared the entire length of Club Route on the Where Eagles Dare map. Once established as Club Route, the Club Route can never change. Once placed, the Allied player may not retreat the Club Route marker to a hex farther south at any point during the game. Note that there are two spurs for Club Route: one that uses the Best Bridge and one that uses the Son Bridge. The Allied player must choose which direction to take Club Route as the game progresses but the not chosen spur may never be Club Route later in the game. 4.3 Effects of the Club Route marker Release of new units On the 1900 turn of each game day (except the 1st day) during Step 5 of the play sequence (the Reinforcement Phase), new XXX Corps units may be released from the off-board Club Route display on the Guards Armored Divisional Display and placed on the map as reinforcements in the Club Route Marker s hex. Players use the off-board display to determine which Formation is next in line, starting with Group Hot. The first Formation listed in line is always released automatically. On the 1900 turn of September 18th, the remainder of Group Hot would be released and the Allied player would roll for release of Group Cold. For the next Formation, roll one die and modify the die roll by the appropriate modifier listed below. Should that die roll with any modification be equal to or less than the number on the Formation Reinforcement Marker, that entire Formation is placed on the Club Route Marker and is treated as an arriving reinforcement Formation (note stacking limits are suspended for the reinforcement hex). If the Formation is Auto, you don t roll for it, just release the Units and place them in the appropriate hex. You might have many Units in that one hex after this procedure. They must arrive in column and if fired upon, mass modifiers apply. All units must enter the game in the furthest advanced Club Route hex (the current hex in which the Club Route marker is placed (with certain exceptions listed on the reinforcement schedule - these are all the units that are noted as Auto on the Guards Armored Divisional Display). The Allied Player must roll for the second Formation in line on the off-board Club Route display - he may not delay entry. If that roll is successful, he must roll for the next Formation in line and may continue to roll until he fails an entry roll. After that, he must wait until the next 1900 turn to try again. Place all released Formation Reinforcement Markers in the Released Formations box on the Guards Armored Divisional Display. Formations marked Auto on the 16 display have no markers and do not count towards victory. Thus, there is no need to track which of these are released. Note that only Guards Armored units may be placed on the maps for Where Eagles Dare. All 43rd Infantry Division units, Sherwood Foresters and The Royal Dragoons are for The Devil s Cauldron only and may only be placed as reinforcements on that game s maps. The Allied player still rolls for release of these 43rd Infantry Division formations as they are counted towards final victory in Where Eagles Dare. If the Club Route Marker has not advanced past the Where Eagles Dare map, no 43rd Infantry Division Units, the Sherwood Foresters, Royal Dragoons or the 82nd Airborne Sea Tail may be released. The Allied Player must suspend release until the Club Route marker is off the map. The Sea Tail for 1st Airborne Division is always bypassed and not used in Where Eagles Dare. It is assumed you have not reached the correct Club Route Stop hex. This may not be the case in a Devil s Cauldron and Where Eagles Dare combined game. Should the Allied player have all potential Club Route road hexes clear of enemy Fire Zones, destroyed bridges, unstable bridges and enemy units from hex to hex when he is advancing the marker, he must remove the Club Route Marker from the game and no more Guards Armored reinforcements may enter the Where Eagles Dare game (with exceptions noted on the reinforcement schedule). Note the day in which this happens as the Allied player will gain Victory Points. The Allied player still releases Formations normally and earns victory points for each released Formation. The units themselves just no longer appear on the Where Eagles Dare maps. Example: It s the 1900 turn of September 20th and Guards Art. is the next Formation on Club Route on the Guards Armored Division Display. That one you get automatically (first one is automatic). 44 RTR, Sherwood Foresters and Royal Dragoons are Auto so those come into play on their reinforcement hex (this would likely not be on the Club Route marker). Nothing else releases until you can release the Auto ones in their correct hex. If you haven t advanced the Club Route marker off the map, you stop here and have to wait until the Club Route marker catches up. If you have advanced the Club Route marker off the map, you would now be rolling for the 101st Sea Tail (with a -4 modification for all those others that were just released) Die Roll Modifiers for Release Placement of each Bailey Bridge Unit during the preceding Game Day: +2 Placement of each Bulldozer Unit during the preceding Game Day: +1 If the Club Route Marker is on its Cut side: +2 For each successful entry of a friendly Formation this turn (including the initial one): +1 For each Dispatch Point paid by the Parent Formation of the releasing unit (up to a maximum of 4): Multi Man Publishing, Inc.
17 In Where Eagles Dare, the 43rd Infantry Division has no Dispatch Points to spend but they always receive the benefit of -4 (for assumed Dispatch Points spent) when they roll for release. Note: Dispatch Points paid only apply to the current unit that is attempting to be released. Each subsequent unit will need additional Dispatch Points paid for it to apply. All modifiers are cumulative. Some units are automatically released and no die roll is needed they do however require all those before them on Club Route to be released before they enter the game. These units do count as a successful entry of a unit for the modification above for any additional not automatic Formations rolled for later Attacking Club Route The German Player may attack any hex of Club Route (not Club Route potential road hexes). Should he direct fire (and not roll a 9 on the Direct Fire) or place a Light Barrage marker on any Club Route hex, place a Club Route Attacked Marker in the Hell s Highway box on the Guards Armored Divisional Display. If he successfully places a Heavy Barrage marker on any Club Route hex, or should he have an actual German unit (of any type) on a Club Route hex at any time during the Game Turn, place a Club Route Closed Marker in the Hell s Highway box on the Guards Armored Divisional Display. Note that attacking empty hexes is perfectly acceptable. The German Player may receive a maximum of one Attacked and one Closed marker per Game Turn. Any additional markers are ignored (exception, the Eindhoven Air Raid). Example, a German unit is currently on a Club Route hex and fires at an adjacent empty Club Route hex (without rolling a 9 in the fire) i. The German would get 1 Club Route Attacked Marker and one Club Closed Marker (for the one German on the Club Route hex at any point during the game turn). Even if the fire was at an Allied Unit and there was no effect from the Fire, it is the act of firing that matters here. These markers accumulate Victory Points for the German player. See the scenario rules for their effect. These markers are accumulated in the Hell s Highway box until the German Player wishes to attempt a status check on Club Route. Anytime the Guards Armored Division Activation comes up and the German wants a status check, add up the number of Attacked markers and then double the number of Closed markers. Roll a die. Should the German Player roll that number or less, flip the Club Route Status marker on the Guards Display to it s Cut side. All Guards Armored Units are now considered out of supply for rule S6.1.2 Once the German attempts the status check and regardless if he succeeds or fails, all the Closed and Attacked markers are placed to the side to note they can t be used for a status check again. He must use all the markers in the box for this check (even if more than 9) and may not hold some back for later use. For example, the German has 2 Closed markers and 3 Attacked markers in the Hell s Highway box that have not been used to demand a status check on Club Route. It s the 0900 turn and he s hoping to cut the highway for the majority of the turn (the Allies won t be able to flip it back until the 1900 turn). He adds up the markers and gets a value of 7. Anything but an 8 or 9 and Club Route will be Cut until the 1900 turn. Regardless if he succeeds or fails, all the markers are placed to the side to note that they may not be used again. The Club Route marker is also immediately placed on its Cut side if there is a bridge that has been destroyed anywhere along Club Route and will continue to stay cut until that bridge has been repaired and under Allied control. 5.0 Off-Map Movement On the three German Divisional Displays are off-map schematics to track the progress of the Allied XII and VIII corps on the flanks of the game map as well as German movement around the fringes of the map. This display is kept secret from the Allied Player although the Allied Player is always informed of the progress of his two friendly flanking corps. The schematics have the brownish areas that are directly east and west of the game map and have transit areas for the Germans to enter into the game. With the exception of the two markers representing the flanking Allied Corps, the Allied player may never enter the off-map display. 5.1 German Formation Movement on the Off- Map Display The German player may move formations of the Eindhoven Regional Command, KG Chill and KG Walther during the 1900 Game Turn. All units that are in play (not counting any previously destroyed Units) must all stay in the same box on the off-map display. You may not split them up. You may move from one box to an adjacent box or you may move from the off-map box to the map display on the Divisional Chart (but not both). Units in the map display on the chart will automatically arrive on the 0700 turn of the next game day. The offmap display is kept secret from the Allied Player. 5.2 Tracking the Allied Flanking Corps Advance At the start of play for the Campaign Game, place each Allied Corps in it s respective start box. These two markers may advance from south to north on the chart as the game progresses. On each 1900 turn of the Campaign Game and after the German Player has moved any formations on the off-map display, roll one die to see if the Corps advances to the next box. To succeed, each Corps must roll equal to or less than the number in the one way, reddish arrow (subject to modification below). Should the Corps pass, advance the Corps marker into the next space. Corps may only advance one box per 1900 roll. No German reinforcements may arrive if the reinforcement hex is now behind the Allied Flanking Corps advance. For example, reinforcement B on the KG Chill display is behind Version 1.1: February 8th,
18 the Allied advance if the Flank Corps marker occupies the Oirschot box. Modifiers to the Allied Corps Advance Die Roll: For each unsuccessful attempt to advance (use Men at Work counters to track this): -1 For each German Formation currently in the box that the Corps is attempting to advance into: +1 If the Club Route marker is off the map (advanced north onto the TDC map) : -4 Special Rules The following are special rules that are used in some scenarios. S1.0 Artillery Parks 18 Several Divisions have one or more artillery park markers. During the reinforcement phase any of these Divisions can place its artillery park marker on the map. An artillery park marker with a non-zero value must be placed in its Divisional reinforcement hex. An artillery park marker with a zero value can be placed in any hex that is within the Command Range of a Leader of its Division and not in an enemy Fire Zone. When Indirect HE Units are in the same hex as the artillery park marker, they can be removed from the map and placed in the Artillery Park Box on the player aid chart. At their next activation they may start to perform Indirect Fire. Like the Roach Motel, Units can never leave an Artillery Park after they have entered it. Units in an Artillery Park may never perform Direct Fire. Units in the Artillery Park Box are always In Command. When calculating the range from an Indirect HE Unit in the Artillery Park Box to a target hex, count from the artillery park marker to the target, and add the number printed on the artillery park marker. Use this method to determine both maximum and minimum range. If an enemy Unit enters the hex with an artillery park marker, all the Indirect HE Units in the Artillery Park Box are eliminated. Artillery parks are not Units, and may never be targeted by enemy fire. Once an artillery park marker has been placed on the map, it cannot be moved. S2.0 Road Blocks and Rearguards Unless a scenario states otherwise, the number of road blocks and Rearguards available to a player is limited by the counter mix. S3.0 Random Events Random Events occur when a Player rolls a 9 on the Combat Results Table to resolve a Unit s fire (but not for any rolls triggered by or arising from an Assault Action). Complete any results from the Fire and then immediately draw an Event Chit from the Event Cup belonging to the Player that just rolled the 9. That player is termed the Friendly Player in the following rules. At the start of play, place all the Where Eagles Dare Events in two opaque containers - tan for the Allies and grey for the Germans - and place both of these to the side so that each container is handy when needed. The fronts of these Chits are colored coded to determine to which side they belong. When a 9 is rolled by a player, that player draws an Event Chit and immediately applies the result. Note that in the scenarios, Events drawn from the Event Cup are not placed back in the drawing player s Cup. In the Campaign game, they are returned back to that Cup according to the rules below. S3.1 Events Air Strike Roll a die, halve the roll (rounding down) and give the Allied Player that number of Typhoons (he may receive no strikes should he roll a 1 ). Immediately resolve any attacks and place the Chit back in the cup. If it is currently night, overcast, or foggy, treat as a no event and just return the Event back to the Event cup. To resolve an Air Strike, choose a Allied Formation. You may then place one or more Typhoon Air Strikes (up to the total number you are allowed for this event) on any hex that is within 10 hexes of the leader of the chosen Formation. Resolve as a 6 white Fire Power attack on any unit on that hex. No modifiers apply to this attack. Place all Typhoons on chosen hexes before any attack rolls take place. You don t have to declare your target (should multiple units be in the hex) but you do have to declare the hex you are attacking prior to any attack resolutions. Rout When this Event is picked, the enemy player picks a Formation and declares that formation has routed. He may chose either a friendly or an enemy formation. At least one Unit of the Formation must be in an Enemy Fire Zone to be chosen and that Formation must have at least one Step Loss on any one of it s Units (not including Independent Units). All Units belonging to that Formation are now considered routed. Consult the descriptions below to determine what action to take. Any Independent Units that are stacked with the affected Formation are treated as Units of that Formation for this rule. Additionally, if a Unit must retreat by the rules below but cannot (i.e., it is in an enemy Fire Zone and can move one hex to a hex that isn t in an enemy Fire Zone), it is eliminated (a gun with no movement or * movement for example). If a 101st Airborne or a Guards Armored Formation is routed: If the affected Unit is not in an enemy Fire Zone, it is not moved and does nothing and nothing is placed on it. All affected units that are in an enemy Fire Zone must move one hex so that they are not in a Fire Zone. The enemy may not Opportunity Fire at the Allied units during this one hex move. If a unit cannot leave a Fire Zone by moving one hex, the unit must stay in the hex it currently occupies. Place an Entrenched marker on it. The enemy may not Opportunity Fire on this unit when the marker is placed. Play continues normally after this is performed and the Rout Event is placed back in the Event Cup. If any German Formation that isn t part of the 59th Infantry Division is routed: 2014 Multi Man Publishing, Inc.
19 All German units that are routed are moved one hex so that they are not in an enemy Fire Zone. The enemy may not Opportunity Fire at the German units during this one hex move. All of these units (including any losses but remove any Cohesion or Suppression markers) are then taken off the map and placed to the side of the respective Division Display. These units may reenter play in any eligible off map box on their Division Chart of the owning player s choosing on the following 7am turn. Note that if a unit routs on the 1700, 1900 or Night turn, it will be two days before it may return to the Off-Map display (you must wait for the second 0700 turn to come). Any German Units remaining from the routed Formation on the map (those that couldn t retreat one hex and not be in an enemy Fire Zone) are now eliminated from the game. If a Formation of the 59th Infantry Division is routed: Count up the number of step losses that Formation has suffered to this point and roll a die. If you roll that number or less, the Formation has routed and is removed from play. All Independent Units within range of the Leader of that Formation are also removed from play. Once removed, 59th Infantry Division Units never return to play. After the effects of the Rout have been completed, return the Rout Chit to the Event Cup. Heroic Place the Heroic Chit on any one friendly unit. That unit now has a TQ of one more and a defense of one less than its face value. This Chit stays with this one unit until the friendly player rolls another event. At that time, it is removed from the attached unit and placed back in the event cup before a new Event is chosen so that it may be drawn again. Once the Heroic Chit is removed from the Unit, its effects no longer apply to that unit. Intelligence The friendly player may add 6 command points and 2 dispatch points to any one parent formation. Place the marker back in the cup. Rally Remove any 4 suppression or cohesion steps from any one formation regardless of the presence of enemy fire zones. Any excess suppression or cohesion steps are ignored. Place the Rally Chit back in the cup. Lost The enemy player may pick one friendly unit. The chosen Unit is moved by the enemy player in any manner he wishes up to the Unit s full movement allowance and according to all normal movement and Opportunity Fire rules (Opportunity Fire would only take place if the lost Unit begins its movement by the enemy player in an enemy Fire Zone). As different Units move differently and pay different costs, this movement continues until one Unit in the stack runs out of Movement Points. However, this lost movement ends as soon as the lost stack enters an enemy Fire Zone. At the end of movement and after any Opportunity Fire is resolved, all Units that were lost are Suppressed. During this lost movement the enemy player can put the Unit into or out of Column but he may not force march any Units in the stack. After this has been completed, return the Lost Chit back to the Events Cup. Dutch The friendly player may place the Dutch Chit in any city or town hex. Any Unit (friendly or enemy) that is currently in that hex, or enters the hex at any point in which the Dutch Chit is in that hex, may not leave that hex via a movement action. Stacking in this hex is unlimited while the Chit is in play. Once placed, each time an Allied Division Activation chit is drawn, the Allied player rolls a die. On a roll of a 1 or lower, the marker is removed and placed back in the cup, otherwise it remains in place. If the roll us unsuccessful add a Men At Work marker to the Dutch marker, and subtract 1 from the die toll for each Men at Work makrer that has been placed. Mulitlpe Men at Work markers may be placed, one each time the roll fails. All effects of the Dutch Chit are removed the moment it is taken off the map. Explosion The enemy player may attack any friendly Artillery Unit or Artillery Park as if he had an artillery unit with a 3 white FP attack within range and is capable of firing (i.e. not being towed currently). No Modifiers apply to this attack. If there are other units in the hex (but only the attacked unit is not in an Artillery Park), they are subject to rule If the attacked Unit is in an Artillery Park, only that Artillery Unit is attacked. Place a heavy barrage marker in the attacked hex (no Barrage is placed on an Artillery Park). After this effect has been completed, the event is placed back in the cup. Minefield The friendly player may place a minefield marker in any hex within 3 hexes of one of his units. All units (friendly or not) must pass a TQ check to leave that hex while it is in play. An engineering unit may remove the Minefield by performing an engineering action in the Minefield hex. If placed in a Club Route hex, the German player earns a Club Route Closed marker. Place the Minefield Chit back in the cup. The Minefield marker stays in the chosen hex until removed by an engineer unit. Reinf The friendly player may choose one formation and recover 2 step loses from any unit of that formation regardless of enemy fire zones. If there is one step lost in total from that Formation and the owner of the Chit is the 101st player, he may bring in one step of Lost 82nd AB units in his formation leader s hex. He may bring in a two step unit if there are no losses in this particular formation. The number of Lost 82nd AB units is finite and new units may not be created. The German Player (and the 101st Player if all Lost 82nd units are in play) loses any additional recovered lost steps if there are none left to replace. After the players complete the event, the Event Chit is placed back in the cup. Ambush The enemy player may attack any friendly unit within 3 hexes of an enemy unit with a 6 white FP attack. No Modifiers apply to this attack. Place the event back in the cup. S4.0 Piggyback Mode Infantry Units without Organic Transport may piggyback ride on Vehicle Units of their Formation. S4.1 Starting in Piggyback Mode To mount up Piggyback, the two Units must start in the same hex and it takes an entire movement action by both units to Piggyback. When a Unit starts in piggyback mode, the two Units move as one, but only when the Vehicle Unit is activated. Version 1.1: February 8th,
20 S4.2 Exiting Piggyback Mode During the Vehicle (not the Infantry) Unit s activation, the two Units can exit piggyback mode if the Vehicle Unit expends half of its printed movement allowance. The Infantry Unit is then dismounted and the Vehicle Unit completes its activation. The now dismounted Infantry Unit may not be in Column. Dismounting is a Movement Action performed by the Vehicle Unit and does trigger Opportunity Fire. The Opportunity Firing player gets to decide when to shoot, i.e., before or after the dismounting. If the Opportunity Fire takes place after dismounting, only the Infantry Unit is the target, otherwise the Vehicle Unit is the target and Rule S4.4 applies. The infantry Units being carried in piggyback mode are never active. When the active vehicle Unit dismounts the inactive infantry Unit, the infantry Unit cannot perform any Actions until its next Activation. The active vehicle Unit may perform a Second Action if eligible, after the infantry Unit dismounts S4.3 Restrictions on Piggyback Mode One Infantry Unit can piggyback on one Vehicle Unit at a time. A Vehicle Unit cannot carry an Infantry Unit unless the Vehicle Unit has at least as many Steps as the Infantry Unit. Vehicle and Infantry Units in piggyback mode together count as one Unit for stacking purposes, but both count against the mass modifier. Infantry Units in piggyback mode can perform no Actions. The Vehicle Unit cannot perform any Action other than move while in piggyback mode (and yes this restriction includes Assault and performing Opportunity Fire) and dismounting the Infantry Unit. Infantry Units with an Organic Transport can never piggyback. S4.4 Piggyback Mode and Combat When fired on by Direct or Indirect Fire (and airstrikes), Units in piggyback mode both count for the mass modifier. Both the Infantry Unit and the Vehicle Unit suffer the same fire combat die roll as if they were fired on separately, i.e., just apply the roll first to one and then to the other. Any terrain modifiers or marker modifiers for the Vehicle Unit also apply to the Infantry Unit. If either Unit takes a fire result (remember that passing an S? is no effect), the Infantry Unit must dismount (this does not trigger Opportunity Fire) immediately, and the combat results are then applied. This mandatory dismount ends the Activation of the Vehicle Unit. If the dismount causes overstacking in the hex, eliminate the Infantry Unit. The Infantry Unit may not be in Column when it dismounts. If the Units are Assaulted, the Infantry Unit must dismount (and this does not trigger Opportunity Fire) when the Assault is declared, and then perform the Assault procedure as normal, starting with Opportunity Fire from the Units being Assaulted. If this dismount causes overstacking, eliminate the Infantry Unit. If the Vehicle Unit in piggyback mode is the target of Indirect Fire, and this causes a mandatory dismount, the Infantry Unit suffers the result of the Indirect Fire die roll along with the Vehicle Unit but does not also take the S? result that other Units in the hex have to take. 20 S5.0 German Special Rules S5.1 German Reorganization S5.1.1 Eindhoven Regional Command/KG Chill Replace the Eindhoven Regional Command display with the KG Chill display at the start of the /20 turn. Any Formations on the Eindhoven Display are placed in the same place on the KG Chill display. All German TQ ratings anywhere on the Where Eagles Dare map are all increased by one and all German white (and only white) assault ratings are increased by one. S5.2 The Eindhoven Air Raid At the start of the game, the German player secretly places his 3 raid markers on the game turn track on the 18th, 19th and 20th turns. Two are not raids and are decoys but one is the actual raid. Reveal each marker during the Reinforcement Phase on either the corresponding Night Turn of the 18th, 19th or 20th. Until the Allied player spends a total of 4 Dispatch Points to stop this, each time an Allied player pulls the 101st Airborne or Guards Armored Division Activation chit, immediately (before he rolls for new Command or Dispatch Points) add a Club Route Closed marker to the Hell s Highway box. The Allied Player may spend Dispatch Points to stop this effect when an Allied Divisional Activation chit is picked from the cup and after he has rolled for more Dispatch Points. When subsequent Divisional Activation chits (either the 101st or the Guards Armored) are picked, if the 4 total Dispatch Points have not yet been spent, add one more Club Route Closed marker to the Hell s Highway box. The Dispatch Points do not all need to be spent at once but until a 4 total Dispatch Points are spent, the German will keep adding Club Route Closed markers to the Hell s Highway box when either the 101st or Guards Division Activation is chosen. This Club Route Closed marker is in addition to a Club Route Closed marker that might occur from a German Unit or Heavy Barrage. S5.3 Divisional Trucks There is a series of Units labeled Divisional Trucks and these appear at the start of play or as reinforcements. These are kept off the map until used. If In Command, a Unit of the owning Division may use these assets. As an Action the Leg Unit may mount just as if it had Organic Transport. Place the Divisional Truck on top of the Unit now mounted in the trucks. The Unit is now treated as an Independent Formation Unit until it dismounts. When it dismounts, remove the Divisional Truck from the map, and it is kept off map until used again. If eliminated or abandoned, these assets are removed from the game, otherwise they can be reused an unlimited number of times. The counter mix is an absolute limit and players may not create more Multi Man Publishing, Inc.
21 S5.4 German Flak Units At the start of the game, the German player randomly places his immobile flak Units face down in the hexes designated in the scenario setup rules. The flak Units are flipped over on the first turn of the game during step 5 of the sequence of play. S5.5 KG Huber There are two sets of Units for KG Huber on the countersheet and they are marked with an asterisk. The Units of KG Huber can be either part of the 59th Infantry Division or KG Chill - but not both. On the Night, September 17th Turn, the German player choses which Division will control KG Huber. If he chooses the 59th Infantry Division, KG Huber enters on the 0700, September 18th and is considered a 59th Infantry Formation. If he chooses KG Chill, KG Huber enters on the Night, September 21st Turn and is considered a KG Chill Formation. Place the not chosen Formation to the side and it is not used in the game. S6.0 Allied Special Rules S6.1 Allied Supply S6.1.1 Interdicted Drop Zones If a German Unit occupies a hex in a Division s supply drop zone at the time of the supply drop, then all Units of that Division have their Troop Quality Rating reduced by 1 until the next non-interdicted supply drop. S6.1.2 Club Route Closed If Club Route is closed, Guards Armored Division Units have their Troop Quality Rating reduced by 2. S6.2 Allied Dispatch Point Discounts For the 101st Airborne if the Allied player purchases two Formation Activation Chits of the same Division at the same time, he may add into the mug the Independent Formation and Artillery Formation Activation Chits of the Division at no additional cost in Dispatch Points. For the Guards Armored Division, if the Allied player purchases both the Group Hot and the Group Cold Formation Activation Chits at the same time, he may add the Guards Armored Independent Formation and Guards Armored Artillery Formation Activation Chits at no additional cost in Dispatch Points. S6.3 Divisional Jeeps There is a series of Units labeled Divisional Jeeps and these appear as reinforcements. These are kept off the map until used. If In Command, a Unit of the owning Division may use these assets. As an Action the Leg Unit may mount just as if it had Organic Transport. Place the Divisional Jeep on top of the Unit now mounted in the jeeps. The Unit is now treated as an Independent Formation Unit until it dismounts. When it dismounts, remove the Divisional Jeep from the map, and it is kept off map until used again. If eliminated or abandoned, these assets are removed from the game, otherwise they can be reused an unlimited number of times.the counter mix is an absolute limit and players may not create more. S6.4 Night Turn Restrictions on Guards Armored and 43rd Infantry The Allied player may not purchase any Formation Activation Chits for the Guards Armored Division and the 43rd Infantry Division to play it during a night turn. If one of those chits is drawn as the last chit on a 1900 turn it is wasted and not played during the night turn (and the first chit in play for that night turn is the first chit drawn from the mug). S RTR and the 15/19 KRH These Units are Independent Units of the 101st Airborne Division in all ways. S st Airborne Non Formation Command 101st Airborne Division Units are considered In Command if they are within Command Range of any 101st Airborne Division Leader and not just their Formation Leader. However, if a 101st Airborne Division Unit is In Command by a Leader other than its Formation Leader, it must pay 2 Command Points for an Action that would otherwise cost 1 Command Point. Not withstanding this rule, a 101st Airborne Division Unit that is in the Command Range of another 101st Airborne Division Leader does not become Active if the Formation Activation Chit of the other 101st Airborne S6.7 American Telephones An American Unit is In Command if both the Unit and Leader are in a town, city, fortified hex, strongpoint or an observation post and the Leader has a telephone symbol on his counter. The two hexes can be anywhere on the map. S6.8 Self Command The following Allied Units are always considered to be in Command, no matter how far they are from any Leader: A/2 HHC B/2HHC C/2 HHC D/2 HHC 101 Recon S6.9 Heroes Only one Hero is included for Where Eagles Dare. The remainder are used in The Devil s Cauldron. These markers are one time use markers. You use them for their effect and they are removed. The effect is immediate and may be played at any time during movement or after a die roll as been made as applicable. Should a Unit of the 502 PIR suffer a 1 Step Loss or an E result in any combat, the Allied Player may play the PFC Joe Mann marker to negate the combat loss immediately after the roll has been made that caused the loss. Additionally, all Version 1.1: February 8th,

22 disruptions or Suppressions that are in the Allied hex just fired upon are removed as well (even if from previous combat). Mann may only be played in The Best Laid Plans scenario or the Campaign game. S st Brigade Units of the 231st Brigade may never move north of Deployment Limit 231st Brigade line on the Eindhoven Map for any reason. If for any reason they are north of this line, eliminate the Unit immediately as it crosses the line. Additional, in Where Eagles Dare, while this Formation is a 43rd Infantry Division, the Guards Armored may pay Command Points and Dispatch Points for this Formation. Optional Rules The following are optional rules than may be used if both players agree to them. O1.0 Covering Fire This rule was suggested by David Hoskins, a playtester. We include it here as an optional rule. When a friendly unit triggers Opportunity Fire, if one or more friendly non-mortar Units, that are not also triggering Opportunity Fire, are adjacent to the enemy Unit that is firing, a -1 modifier applies to the enemy s Fire Rating. O2.0 Alternate Chit Draw Mechanism The Grand Tactical Series game system was created to attempt to follow actual battlefield pacing as much as possible. We fully recognize that some of the system might strike the true cardboard warrior as a little too limiting. For those players that want more fighting and a more dynamic game, we offer this alternative way of playing. Discard the Direct Command chit from the game and disregard all the movement and fire restrictions on the Division Activation. Play the remainder of the game as per the rules. This will be a more standard wargame. likely Locust tanks. One type of tank should be selected for use. These tanks land in Drop One in any landing zone in use during that drop, with each Unit arriving as a separate stick. Each Unit is placed under a delay marker. Scenarios General Comments For the scenarios, please remember the following: All Units start at full strength, unless otherwise noted. Units may start piggy-backed. Leaders stack with any of their Units at set up, unless otherwise noted. All Units may set up mounted or not, in Column or not (observing stacking limits) at the owning player s choice, except when otherwise noted. Improved positions, entrenchments, road blocks, and Rearguard Units are only set up where noted. No artillery contact markers are placed at set up, unless otherwise noted. Reinforcements and air drops may arrive overstacked. Reinforcements may arrive at any of their divisional reinforcement hexes, unless noted otherwise Leaders arrive with the first Unit of their Formation, unless otherwise noted. The last chit drawn for a turn becomes the first chit in play the next turn, except when otherwise noted. If mentioned, Scenario Boundary Markers are placed to determine the area of play in the scenario. No units may move outside this area when so noted. These boundary markers determine a square like so: Losses should skyrocket so you might want to play this method with the replacements optional rule as well. No promises on historical accuracy and timing here but it should be a lot of fun to play. O3.0 German Lost Rule The following rule is suggested in order to prevent some highly mobile German Units from roaming in an ahistorical manner. Anytime a German Unit is more that twice the range from a Leader that can Command it, the Unit must make a Troop Quality Check each time it attempts to move to a hex that maintains or increases this distance. If the Unit fails the Troop Quality check it becomes lost, and the Allied player gets to move the Unit following the Lost random event rules. Once the Allied player starts moving the Unit, no more Troop Quality Checks need to be made. O4.0 Airborne Tanks Players can see if having armor would have mattered. Included for the 101st Airborne are 2 companies of both more plausible Tetrarch tanks, and more capable and less Multi Man Publishing, Inc.
23 A Drive in the Country /11/ /11/44 Introductory Scenario #1 After Joe s Bridge was captured on September 10th, the front stabilized but the Allies knew that time wasn t on their side. It was decided that a reconnaissance deep into German lines was needed to see how far in depth the Germans were in The Netherlands. In addition, the condition of the first bridge over the Dommel south of Valkenswaard needed to be determined if the British were to resume the advance. So at 1pm, D squadron of 2/HHC was ordered to charge through enemy lines and reconnoiter the Bridge. They sped through the front lines at 60 miles an hour and completely surprised the Germans. Several minutes later they had come to the bridge and saw a PzIV sitting right on top of span. Seeing tanks did just fine on the bridge, they turned around and headed home. The squadron even enjoyed a cup of tea at a local cafe and chatted with some Dutch on the way back. The Germans were alerted upon their return and each vehicle was shot up as they stormed back home - but they returned safely to give the Allied commanders the reassurance about the German s position. Market Garden was given the go ahead for the following Sunday. Set-up The map to be used for this scenario is the Valkenswaard Map. Place scenario boundary markers on hexes , , and The first turn of the scenario is 1300, on September 11. Only steps 6 through 9 of the sequence of play are used in this scenario. The weather is clear, and does not change. Allied All the Allied Units are found on the first counter sheet. Use these counters and not their campaign game counterpart. D(-)/2HHC (in column) in hex King s/1 GG in hex /1 GrenGds in hex S(Mtr)/1 GG in hex B/55 Fld, RA in hex German All the German Units are found on the counter tree as marked here for Scenario 1. Use these counters and not their campaign game counterpart. 3/FJ and 1/FJ in hex /FJ in hex PzErs in hex Events Randomly select one Event marker from the counter mix for Scenario 1 and place it in hex This event is triggered when the D(-)/2HHC unit enters the hex. After the D(-)/2HHC unit leaves the hex, randomly select and place another Event marker in the hex (so it will trigger an event on the way up and then on the way back). Events: No effect Nothing happens. Cafe The Brits stop for a spot of tea. Roll a die and multiply the result by 4. The D(-)/2HHC unit must expend that number of movement points before it can leave the hex. After the amount has been deducted, the unit may move as normal. Note that it may take more than one impulse to pay the entire movement points cost incurred by this event. Dutch The Brits are welcomed by a mob of happy Dutch civilians. The D(-)/2HHC unit must immediately end it s activation and may move no more this impulse. HK Team Immediately attack the D(-)/2HHC unit with a 4 firepower, dual purpose (white) shot. Apply the results immediately and then continue with the D(-)/2HHC s impulse. No Modifiers apply to this attack. Command Values Dispatch Points are not used this scenario, only Command Points. No Activation chits will be purchased. For the Guards Armored Division the Command Rating is 3. The division starts with 4 Command Points. The German player receives no Command Points. Reinforcements None Chits The following chits are placed in the mug and randomized: Guards Independent Formation Activation, the Allied Direct Command, Guards Armored Artillery, Guards Divisional Activation. The first chit in play is determined by drawing a chit out of the cup. Play proceeds until all Chits have been drawn and all impulses completed or the Victory conditions have been met by either side. No chits are purchased in this scenario. Victory Conditions Allied Victory: The D(-)/2HHC unit must move to hex and then return the Unit to hex German Victory: The German Player wins if the Allied Player doesn t achieve his victory condition. Scenario Special Rules The German Player does not receive the +3 Fire Zone to Fire Zone modifier until the D(-)/2HHC unit has entered hex Once entered, all modifiers now apply. No units except D(-)/2 HHC may move. D(-)/2HHC unit may not leave the marked Club Route road that runs from hex to hex All Units are always in Command at all times. No road blocks may be created or Rearguard Units deployed during this scenario by either player. The Allied artillery Unit can perform Indirect Fire with nonminimum range restriction Version 1.1: February 8th,
24 Son with the Wind /20/ /20/44 Introductory Scenario #2 This was the moment when the Germans had the best chance to win the entire battle. As elements of the 107th Panzer Brigade arrived in the area, they began massing to attack the corridor that held the life line for all of Market-Garden. Pressed to attack before he felt he was ready, Major von Maltzahn launched his attack in the late morning of the 20th. The Major s reticence would be telling later. His initial plan was to drive over the Dommel (at hex ) and attempt to cut off the Allies to the south. As he approached the battlefield, he was told by a Dutch Farmer that the bridge over the Dommel was too weak to support the German tanks. The Major redirected his attack and as luck would have it, it now was approaching the most vulnerable point on the entire Allied Front. He approached just to the north of the Wilhelmina Canal and came across a culvert. He went under the canal and popped out just 500 meters from the Bailey Bridge at Son. To the German s shock, there right in front of them was vital Bailey Bridge. Victory for the entire operation was within their grasp. American forces frantically scraped up anything near by and threw themselves at the advancing Panthers. 10 men Bazooka teams were thrown in and anything else that could be found. In the end, while the Dutch Farmer had inadvertently helped the location of the German advance by his warning about the Dommel bridge, the tentative Germans had wasted so much time regrouping that the final attack came so late in the day that there wasn t enough time to attack the Bailey. A few miles to the south, the Germans also attacked to secure the town of Nuenan and it s important location to launch further attacks to the south. Defending the town was the famous Easy company of the 506th Regiment and a squadron of British tanks. Here the Germans were more successful and the town was secured. 107 Panzer Brigade s Panthers would withdraw with the coming of night and would later choose to meekly attack to the south from the Nuenan bastion using standoff weapons over the next few days. Although disruptive to XXX Corps supply lines, the 107th was ultimately unsuccessful in the south and would have to wait until the major attack at Veghel on the 22nd for their next opportunity to win this battle. Set-up This scenario uses the Son Map. Place scenario boundary markers on hexes , , and The first turn is 1500, on September 20th. Play begins with step 5 of the sequence of play, and steps 1 through 4 will not apply throughout this scenario. Weather is Clear for the entire scenario. Play ends on the 1700 turn when there are no more chits left in the cup (the last chit is in play for this scenario). Allied All the Allied Units from countersheet st Airborne Division, Independent: Bazooka squads are placed in hexes , , ; 14 Fld Sqn, RE (Bailey Side up); B/81 AB AA/AT are placed in hex ; 101 HQ is placed in hex st Airborne Division, Independent: Easy/2/506 and B/15/19 KRH are placed in hex German The German Units from countersheet 1. KG Walther, Independent: 1./Pz 2107 (with 2/FJ Regt.21 piggybacked) is placed in hex ; 4./Pz 2107 (with 1./ FJ Regt.21 piggybacked) and 1./PG 2107 is placed in hex Markers Neither player may build any road blocks, or deploy any Rearguard Units during the scenario. Command values Each Division has a Command Rating of 4. Dispatch Points are ignored for this scenario, and the activation chits to be used are already determined (see below). The Command Points at the start of the scenario are: KG Walther 6 Command Points. 101st Airborne 2 Command Points. Events Whenever either player rolls a 9 in any Opportunity or Direct Fire (but not Assault Fire), draw one Event from the Event Cup. Once drawn, it is placed to the side and may not be drawn again. Reinf! (with the US Infantry image) Place 3 Glider Pilots and A(-)/1/506 in hex Reinf! (with US Armor image) Place A/15/19 KRH in hex Reinf! (with German Infantry image) Place all of KG Klemm in hex Dutch Farmer - Reduce the number of German Command Points by 1/2 (round fractions down). Note: should any reinforcement arrive in a FIre Zone, this is an Opportunity Fire trigger. Reinforcements Arrive via Events above. Chits The following chits are placed in the mug and randomized: KG Walther Division Activation, 101st Division Activation, Allied Direct Command. The German Direct Command chit is not placed in the mug, Multi Man Publishing, Inc.
25 as it will be the first chit in play for the first turn of the scenario. Place these same chits back in the cup for the second turn. The last chit drawn for the first turn is put into play for both turns of the scenario. Victory Conditions If by the end of the scenario (when the last chit is drawn on the second turn), the German Player has destroyed the Bailey Bridge, he wins. If he is the sole occupier of hex , it is a draw. Any other result is an Allied Victory. Special Scenario Rules All Units are considered In Command throughout the scenario. The German Panther Unit (1./Pz 2107) may not leave Column or exit a road hex throughout the scenario. The Allied Units in hex may not move throughout the scenario and will rout and be taken off the board if either Unit takes one Step Loss. Hex is treated as a reinforcement hex. Additionally, there is no need to bring in the leader for KG Klemm, as all Units are In Command for the scenario. If KG Klemm arrives as a reinforcement, immediately add the 59th Infantry Division Division Activation Chit into the cup. KG Klemm can spend the Command Points of KG Walther. The Best Laid Plans /18/ /19/44 Intermediate Scenario On the 17th, the Allies sent a lone company to secure the reserve bridge at Best. This company at first got lost and veered into the town itself and were met head on by strong elements of the quickly arriving 59th Infantry division. After a sharp fight, a small detachment made it to the bridge and held out as the Allies rallied more force to try and take the bridge (now made far more important when the Son Bridge was blown). Eventually, this battle would occupy more than half of the 101st for the next few days and would leave other vital areas with little force to protect Hell s Highway. It was only after Allied air power broke the German s back that the battle was decided. Set-up This scenario uses the Son Map, the Eindhoven Map and the Veghel Map (yeah, sorry about that). Place scenario boundary markers on hexes , , and The first turn is 0700, on September 18. Play begins with step 5 of the sequence of play, and there is no need to perform steps 1 or 3 throughout the game. The weather is clear for the duration of the scenario. Select randomly four 59th Division flak Units and place them face down on the map in the hexes listed below. 59th Infantry Division: , , , After these have been randomly placed, flip them to their front sides. Place the following two-step flak Unit on the map: 59th Infantry Division, Independent: s.flak Abt 424 is placed in hex German All German Units are from from countersheet 1. 59th Infantry Division, Independent: Ers, 1./Pio 159 are placed in hex th Infantry Division, KG Dewitz: 1./I/1036/59 is placed in hex ; 2./I/1036/59 is placed in hex ; 3./I/1036/59 is placed in hex ; 5./II/1036/59 is placed in hex ; 7./II/1036/59 is placed in hex ; 6./II/1036/59 is placed in hex ; Gr.W./ II/1036/59 is placed in hex ; Gr.W./I/1036/59 is placed in hex Leader/KG Dewitz may be placed with any Unit of his command. 59th Infantry Division, Artillery: II./159/59 is placed in the 59th Infantry Division Artillery Park. Allied All Allied Units are from Scenario 3 from countersheet 1 (except for the 3 US Airborne Artillery, these are taken from the scenario 4 counters). 101st Airborne Division, 502 PIR: Wzbwski (entrenched) is placed in hex st Airborne Division, 502 PIR: H/3/502 (IP) is placed in hex st Airborne Division, 502 PIR: I/3/502; G/3/502, S(Mtr)/3/502 is placed in hex st Airborne Division, 502 PIR: Leader/502; D/2/502, E/2/502; F/2/502; S(Mtr)/2/502 are all placed in hex Markers Place the Best Road Bridge (not wired) marker on the map. The Bridge is currently contested. The Allied player can build road blocks and deploy Rearguard Units, up to the limit of the counter mix. Command values For the 101st Airborne Division, the Command Rating is 5 and the Dispatch Rating is 3. The Division starts with 9 Command Points and 2 Dispatch Points. For the 59th Infantry Division, the Command Rating is 6 and the Dispatch Rating is 3. The Division starts with 3 Command Points and 0 Dispatch Points. Events Whenever either player rolls a 9 in any Opportunity or Direct Fire (but not Assault Fire), draw one Event from the Event Cup. Once drawn, it is placed to the side and may not be drawn again. Lost The German player may pick one Allied stack or unit. The chosen stack (or Unit) is moved by the German player in Version 1.1: February 8th,
26 any manner he wishes up to the Stack s full movement allowance and according to all normal movement and Opportunity Fire rules (Opportunity Fire would only take place if the lost Unit begins its movement by the German player in a German Fire Zone). As different units move differently and pay different costs, this movement continues until one unit in the stack runs out of Movement Points. However, this lost movement ends as soon as the lost stack enters a German Fire Zone. At the end of movement and after any Opportunity Fire is resolved, all Units that were lost are Suppressed. Air Strike 2 Typhoons may attack any German Unit in play. No modifiers apply to this attack. Ammo The German player may remove up to 5 cohesion hits that are currently on any of his Units. Rout? The Allied Player may choose any German Formation and roll a die. Should he roll a number LESS than the number of step losses that Formation has sustained, that Formation is routed and removed from the map. Any Independent Units within range of the affected Leader are also removed. Farm Carts The Allied player may take any three Units that have taken a step loss and flip them back to their full strength side. Blown The Best Bridge has been blown if it is currently German controlled and not contested. Place a destroyed bridge marker on the hex If it is contested, ignore the Event and place the Event to the side. It may not occur again. Reinforcements Allied Reinforcements September 18th st Airborne, Independent: B/2 HHC; C/2/HHC are placed in hex st Airborne Division, 502 PIR: C/326 Eng is placed in any hex of LZ W 101st Airborne Division, 327 GIR: A/1/401; B/1/401; C/1/401; S(Mtr)/1/401 are placed in any hex of LZ W st Airborne Division, 327 GIR: D/2/327; E/2/327, F/2/327; S(Mtr)/2/327 are placed in any hex of LZ W September 19th st Airborne, Independent: B/15/19 KRH; C/15/19 KRH are placed in hex st Airborne Division, Artillery: Leader/101 Artillery; 377 Para Fld Bn; 321 Gldr Fld Bn; 907 Gldr Fld Bn are placed in any hex of LZ W st Airborne Division, Artillery: A/86 Medium is placed in any hex of LZ W German Reinforcements September 18th Infantry Division, KG Klemm: Leader/KG Klemm; 1./I/1034/59; 2./I/1034/59; 3./I/1034/59; Gr.W/I/1034/59; 5./II/1034/59; 6./II/1034/59; 7./II/1034/59; Gr.W/II/1034/59 are placed in hex th Infantry Division, Artillery: I./159/59; III./159/59 are placed in the 59th Infantry Division Artillery Park Chits The following chits are placed in the mug and randomized: 101st Airborne Division Activation, 59th Infantry Division Activation, German Direct Command, Allied Direct Command. The 502/PIR Formation Activation chit is not placed in the mug, as it will be the first chit in play for the first turn of the scenario. All chits are used in the coffee mug. No chit is left at the end of the Activation Phase. Randomly choose a new chit at the start of the next Activation Phase. PFC Joe Mann is available for use in this scenario. Victory Conditions If the German Player has any Units in hex and hex or the Best Bridge has been blown, the German Player has won the scenario. Any other result is an Allied win. Special Scenario Rules Hex is treated as a reinforcement hex. Hell s Highway /22/44 Night 9/23/44 Advanced Scenario The moment of truth for Hell s Highway came on September 22nd and 23rd. The Germans massed everything they could to attack the highway in several places hoping to overwhelm the Allied forces spread throughout the battlefield. They choose to attack Veghel and the road north of the town but they had plenty of other options. The Germans hoped that a combined thrust from both the east and west would overwhelm the American defenders and cut the highway for a long enough period to allow the Allied forces farther to the north to be destroyed. The 107th Panzer Brigade planned a three pronged attack. The main drive was to hit north of Veghel and, after having cut the road there, to move to the south and destroy the numerous bridges in and around Veghel. The northernmost force succeeded in cutting the road and destroying numerous supply vehicles that were bumper to bumper on Hell s Highway. The situation was so dire that a significant force from XXX Corps was detached from the important fighting in Arnhem to move south and secure the road. The road would be cut for almost all of the 22nd Multi Man Publishing, Inc.
27 To the west, the German forces there were still disorganized from continual American spoiling attacks over the past 2 days and weren t able to march on the highway until early the next morning. Although stretched almost to the breaking point, the Paratroopers cleared the road to the north and fought off the attacks from the west. The first turn is 0700, on September 22. Play begins with step 5 of the sequence of play, and there is no need to perform steps 1 or 3 throughout the game. The weather is clear for the duration of the scenario. Set-up This scenario uses all the maps except the Valkenswaard map. Place scenario boundary markers on hexes , , , In this case, the draw a line directly from the left to the right and all areas in that hexrow and all areas below and above the two lines are in play for this scenario. Allied (sets up first) All Allied Units are in the Scenario 4 set on the countersheet. You ll need the Divisional Jeeps from the Campaign game countermix. Units must be placed unmounted, not in IP and not in Column unless specifically noted. Any Rearguards not specifically mentioned are available for use. 101st Airborne Division, 506 PIR: Leader/506; S(Mtr)/2/506 are placed in hex st Airborne Division, 506 PIR: Easy/2/506 (in IP) is placed in hex st Airborne Division, 506 PIR: Rearguard (in IP) is placed in hex st Airborne Division, Independent: A/2 HHC is placed in any hex within Command Range of Leader/506] 101st Airborne Division, 501 PIR: S(Mtr)/2/501 is placed in hex st Airborne Division, 501 PIR: D/2/501; E/2/501; F/2/501 are placed within 5 hexes of Any Units may be placed in an IP 101st Airborne Division, Independent: B/81 AB AA/AT (mounted and in column) is placed in hex st Airborne Division, Independent: E/81 AB AA/AT (mounted and in column) is placed in hex st Airborne Division, Independent: D/81 AB AA/AT (mounted and in column) is placed in hex st Airborne Division, Independent: 165 Hvy AA, RA may be placed on any hex of Club Route 101st Airborne Division, 501 PIR: Rearguard is placed in The Unit may be placed in an IP 101st Airborne Division, 501 PIR: Rearguard may be placed The Unit may be placed in an IP 101st Airborne Division, 501 PIR: Rearguard is placed in The Unit may be placed in an IP 101st Airborne Division, 501 PIR: Leader/501, S(Mtr)/1/501 are placed in hex st Airborne Division, 501 PIR: A/1/501; B/1/501; C/1/501; G/3/501; H/3/501; I/3/501; S(Mtr)/3/501 are placed within 5 hexes of the Leader/ st Airborne Division, Independent: C/44 RTR; Recce/44 RTR; A/81 AB AA/AT are placed within 5 hexes of Leader/ st Airborne Division, 502 PIR: Leader/502 is placed in st Airborne Division, 502 PIR: A/1/502; B/1/502; C/1/502; S(Mtr)/1/502; D/2/502; E/2/502; F/2/502; S(Mtr)/2/502; G/3/502; H/3/502; I/3/502 S(Mtr)/3/502 are placed within 5 hexes of hex st Airborne Division, Independent: A/44 RTR is placed within 5 hexes of hex st Airborne Division, 502 PIR: Rearguard placed in , and Any Units may be placed in an IP 101st Airborne Division, Artillery: Leader/Artillery; 377 Para Fld; 321 Gldr Fld; 907 Gldr Fld may be placed within one hex of st Airborne Division, 327 GIR: Leader/327 is placed in hex st Airborne Division, 327 GIR: A/1/401; B/1/401; C/1/401; S(Mtr)/1/401; D/2/327; E/2/327; F/2/327; S(Mtr)/ 2/327; AT/327 are placed within 5 hexes of hex st Airborne Division, Independent: B/44 RTR (in Column) is placed in hex st Airborne Division, Independent: F/81 AB AA/AT (mounted and in Column) is placed in hex All Divisional Jeeps are available for use but are not in play at the start of play. All Rearguards and Roadblocks not in play are available for use. German All German Units are in the Scenario 4 set on the countersheet. You ll need the Divisional Trucks from the Campaign game countermix. Units must be placed unmounted, not in IP and not in Column unless specifically noted. KG Walther, Pz-Brig. 107: KG Roestel; KG 3./Richter (piggybacked and in Column) are placed in hex KG Walther, Pz-Brig. 107: 5./PG 2107 (mounted and in Column) is placed in hex KG Walther, Pz-Brig. 107: 3./Pz. 2107; 2./KG Richter (Piggybacked and in Column) are placed in hex KG Walther, Pz-Brig. 107: 2./PG (Mounted and in Column) is placed in hex KG Walther, Pz-Brig. 107: Leader/Pz.Brig. 107 is placed in hex KG Walther, Pz-Brig. 107: 1./Pz. 2107; 2./Pz. 2107; 4./ Pz. 2107; HQ/Pz.Brig. 107; 1./KG Richter; 1./PG. 2107; 3./ PG. 2107; 4./PG. 2107; Gr.W./PG are placed within Version 1.1: February 8th,
28 one hex of hex KG Walther, Artillery: Leader/Artillery; 2./Krause (Mounted and in Column) are placed in hex KG Walther, Artillery: 1./Krause (in Column) is placed in hex KG Walther, Pz-Brig. 107: 1./KG Voss; 2./KG Voss; 3./KG Voss are placed within one hex of KG Chill, Artillery: 9./III/185; 14./III/HG; 17SS/II/185; 10SS/11/185 are placed in the KG Chill Artillery Park KG Chill, KG Huber: Leader/KG Huber; 2./559 PzJgr; 4./ KG Huber (piggybacked, one-step side) are placed in hex These Units must be placed in Column Place the KG Chill Artillery Park in hex All Divisional Trucks are available for use. Reinforcements may arrive already mounted on Divisional Trucks (if available). Markers Place the Veghel Bridge in hex It is Allied controlled and not wired. Events Whenever either player rolls a 9 in any Opportunity or Direct Fire (but not Assault Fire), draw one Event from the Event Cup. Once drawn, it is placed to the side and may not be drawn again. If all Events have been played, just ignore any future applicable 9 rolls. For players that would prefer a less random game, the Luck Mitigation rule for Events is strongly encouraged. German Reinf (1st one drawn): KG Chill; KG Huber: Leader; KG Huber; 1./ KG Huber; 2./KG Huber; 3./KG Huber; 5./ KG Huber; 6./KG Huber; 7./KG Huber; 8./KG Huber; 9./KG Huber; Gr.W/KG Huber; 1.//559 PzJgr; 2./559 PzJgr are placed on Reinforcement Hex C: Add an additional 4 Command Points to the KG Chill track German Reinf (2nd one drawn): KG Chill, KG vd Heydte: 1./III/HG; 2./III/HG; 3./III/HG; 4./III/HG; Gr.W/III/HG; 1./KG Finzel; 2./KG Finzel; 3./KG Finzel; 4./KG Finzel; 1./2 FJ; 2./2 FJ; 3./2 FJ; Gr.W/1/H2 2FJ; are placed on Reinforcement hex D (hex ) KG Chill, KG vd Heydte: 15.Pionier; AA KG vdh; 1./I; 2./I; 3./I; 4./I; 9./III; 10./III; 11./III; 12./III; Flak/10; 14./Gr.W./ IV; Pz.Jgr/IV; 2./III/185; 16./III/HG; 4./975 are placed on Reinforcement Hex D(51.115) Leader/vd Heydte may be placed on either Reinforcement Hex. Immediately add the KG vd Heydte Formation chit to the cup. It may be drawn for this turn. Add 5 Command Points and 1 Dispatch Point to the KG Chill Division Display. Allied Reinf (1st one drawn): 101 Airborne Division, 506 PIR: A/1/506; B/1/506; C/1/506; S(Mtr)/1/506; D/2/506; F/2/506; G/3/506; H/3/506; I/ 3/506; S(Mtr)/3/506 are placed in hex Airborne Division, Independent: C/81 AB AA/AT; C/15/19 KRH are placed in hex Immediately add the 506 PIR Formation Activation chit to the cup. It may be drawn this turn. Allied Reinf (2nd one drawn): Guards Armored, Group Cold: place all Units of Group Cold on hex st Airborne, Artillery: A/64 Medium, RA; B/64 Medium, RA; C/64 Medium are placed on hex immediately add the Guards Armored Division Activation and the Group Cold Formation Activation chit to the cup. Guards Armored Division now has 8 Command Points and 2 Dispatch Points on it s Divisional Chart. Air Strike The Allied Player may attack with 4 Typhoon Air Attack markers. Just place the 4 markers on any applicable hex and conduct a 6 (white) Fire attack. These markers must all be placed before any attack is resolved, in a hex that can be seen by an Allied Unit. No Modifiers apply to this attack. Rout? The Allied Player may choose any German Formation and demand a Rout check. The German Player must roll a die and should his roll be LESS than the number of steps that have been lost in this scenario, the Formation has routed and is removed from the board. Any Independent Units within range of the Formations Leader will also be removed from play. AA Gun The Allied Player may fire on any German Unit that is within one hex of Club Route with a 3 (yellow) FP. No Modifiers apply to this attack. Rations Place on any Allied Formation in play. That Formation may not perform any Movement Action until 3 Dispatch Points are paid during the 101st or Guards Divisional Activation (as applicable to the Formation chosen). Lost 82AB The 82nd Company on the marker is placed with any 101st Airborne Leader and is now in play. It may not be placed in a Fire Zone. Command Values For the 101st Airborne Division the Command Rating is 7 and the Dispatch Rating is 3. The Division starts with 8 Command Points and 5 Dispatch Points. For KG Walther the Command Rating is 8 and Dispatch Rating is 4. The Division starts with 12 Command Points and 4 Dispatch Points. For KG Chill the Command Rating is 5 and the Dispatch Rating is 4. The Division starts with 4 Command Points and 1 Dispatch Points Multi Man Publishing, Inc.
29 Reinforcements Allied Reinforcements All Allied Reinforcements arrive via Events. German Reinforcements All German Reinforcements arrive via Events. Chits The following chits are placed in the mug and randomized: 101st Division Activation, 101st Artillery Formation Activation, Allied Direct Command, KG Chill Divisional Activation, KG Walther Division Activation, KG Walther Artillery Activation, German Direct Command, 501 PIR Formation Activation 502 PIR Formation Activation. The Pz-Brig.107 Formation Activation chit is not placed in the mug and is the first in play. The last chit in the cup is not played and will become the first chit for the next turn. Victory Conditions Play continues until the last impulse has been played on the Night Turn of the 23rd. After that, the German Player checks his Victory Point total and Players determine the victor for the scenario. The German Player gains Victory Points for the following: For each Club Route Stop hex entered by any German Unit: 5 Victory Points For each Club Route Attacked marker gained in play: 1 Victory Point For each Club Route Closed marker gained in play: 2 Victory Points For each OP entered by any German Unit: 3 Victory Points If Club Route is Cut on at the 1900 turn of either day: 5 Victory Points The German Player loses Victory Points for the following: For each Guards Armored Command Point on the Guards Armored Divisional Chart: -1 Victory Points For each Guards Armored Dispatch Point on the Guards Armored Divisional Chart: -2 Victory Points For each game turn that no Club Route Closed markers have been scored by the German Player: -1 Victory Points If there are no German Units with a Fire Zone on any hex of Club Route at the end of play (assume it is daylight, clear weather turn for this check): -10 Victory Points For each Panther Step lost: -4 Victory Points Add up the total and if it is over 30, the Germans are the winner. If 29 or fewer, the Allies are the winner. Should the German Player enter either Veghel Bridge hex ( or ) throughout the scenario, the scenario immediately ends and the German is the Victor. Scenario Special Rules The Units that arrive with the German reinforcement event with the pale blue stripe (1./2 FJ; 2./2 FJ; 3./2 FJ; Gr.W/1/ H2 2FJ), if they are In Command by any German Leader, 2 Command Points may be spent for an Action instead of the typcial 1 Command Point to activate a Unit. Alled Units may not move within three hexes of the German Artillery Park Weather The weather is clear for both days. Night effects All US Airborne Units have both Assault values increased by one throughout both Night Turns. Luck Mitigation Rule If Players would prefer to have the Events happen in the actual historical order, do not draw an Events chit from the cup when an Event occurs. When an Event occurs, they occur in the following order: 1. Allied Reinf 2. German Reinf 3. AA Gun 4. Rout? 5. Lost 82AB 6. German Reinf 7. Air Strike 8. AA Gun 9. Allied Reinf 10. Rout? 11. Rations (Group Cold was the historical Formation affected) 12. Air Strike 13. AA Gun 14. Rout? KG Chill effect The effects of the addition of KG Chill has already been applied to the counter values. Club Route Club Route runs from to , The Best Spur is not in play. Version 1.1: February 8th,
30 30 Campaign Game Where Eagles Dare /17/44 Night 9/24/44 This is the grand campaign of the events that occurred south of the Maas River during Operation Market-Garden. Set-up The game is played with all five maps included in the game. Play Scenario One (A Drive in the Country) to determine the status of the bridge in hex / If the Allied win the scenario, the Bridge is considered stable. If the Allies lose the scenario, it is automatically considered unstable. If Players wish to skip this, the Bridge is considered stable for the game (the historical result). The first turn is 1500, on September 17. On the first day steps 1 and 3 of the sequence of play are ignored. For the remaining turns all the steps in the game are used in this scenario. The weather is clear for September 17. It will be rolled for on the 0700 turn of the other days. The Allied Player must plan out his artillery strikes. He gets 10 total strikes for the 1500, 1700 and 1900 turn. Just jot down the turn and hex you wish to strike. That s ten total, not ten per turn. You can place as many as you like in a hex. The only catch is you must be able to see the hex with a XXX Corps Unit when the Strike occurs. If you can t see the hex, the strike doesn t occur and the marker is wasted. Treat as a normal indirect fire (orange) and perform a Troop Quality Check (and you can pay a Command Point to guarantee passing the check) for possible Company Bonus. No negative modifiers apply to this attack. On the first turn of the Game, perform Artillery Strikes after all units have been set up but before any chits have been drawn After the first turn, perform Artillery Strikes as the first thing you do when you draw the Guards Division Activation Marker. The weather is automatically clear for the first day of the game. The Allied Player may now chose if he wishes the Group Hot Formation chit or the 231st Brigade to be the first Activation of the game. The one not chosen is placed in the cup. Place the German flak Units randomly face down in the following hexes: Eindhoven Regional Command: , , , , , , , , , , , KG Walther: , , , , , , th Division:, , , , , , , Place the following named flak Units on the map: 59th Division, Independent: s.flak Abt 424 (hex ) KG Walther, Independent: s.flak Abt 647 (hex ), Flak Koeppel (hex ) Eindhoven Regional Command, Independent: 1./Flak koeppel (hex ), 2./Flak koeppel (hex ), 3./Flak koeppel (hex ), s.flak Abt 424 (hex ) German (sets up first) Eindhoven Regional Command: Independent: randomly place the 6 Garrison units in hexes , , , , , Flip them to their known side as soon as they have been placed. Place Pz-Ers (hex ), PzErs (this Unit is treated as an immobile Unit) (hex ) I./II./E.u.A. Rgt HG and II./II./E.u.A. Rgt HG (hex ); Ers Pio/1 (hex ); Ers Pio/2 (hex ); 3./559 PzJgr (hex ); Fleiger Rgt 93 (hex ). KG Walther: KG von Hoffman: Gr.W./II/Kerutt (placed in hex ); 6./II./Kerutt (placed in hex ); 5./II./ Kerutt (placed in hex ); 7./II//Kerutt (placed in hex ); 1./Bew z.b. V 6 (placed in hex ); 3./Bew z.b. V 6 (placed in hex ); 2./Bew z.b. V 6 (placed in hex ); 4./Bew z.b. V 6 (placed in hex ); 1./I./ Kerutt and 2./I./Kerutt (placed in hex ); 3./I./Kerutt (placed in hex ); Gr.W./I/KG Kerutt (placed in hex ), Leader KG Hoffman may be placed with any Unit above. All non-mortar Units are in IP. KG Walther, KG Heinke: 3./KG Segler (placed in hex ); 1./KG Segler (placed in hex ); 2./KG Segler (placed in hex ); 2./KG Richter (placed in hex ); 3./KG Richter (placed in hex ); 1./KG Richter (placed in hex ); Leader KG Heinke may be placed with any Unit above. All Units are in IP. KG Walther, KG von Hoffman: 14.Pz.Jr (placed in any Potential Club Route hex within 10 hexes of the Frontline) KG Walther, Independent: KG Roestel (placed in hex ) KG Walther, Artillery: Leader KG Walther Art; I./Krause, 2./Krause (placed in hex ) Allied Guards Armored, Group Hot: 1/2 IrishGds (with 1/3 Irish- Gds piggybacked) (placed in hex ); 2/2 IrishGds (with 2/3 IrishGds piggybacked) (placed in hex ); 3/2 Irish- Gds (with 3/3 IrishGds piggybacked) (placed in hex ); Recce/2 IG (with 4/3 IrishGds piggybacked) (placed in hex ); S(Mtr)/3 IG (placed in hex ); S(AT)/3 IG (placed in hex ). Leader may be placed with any of the above. All Units are in column Guards Armored, Independent: B/2 HHC (placed in hex ); C/2 HHC (placed in hex ) 43 Infantry Division, 231st Brigade: All Units (placed anywhere behind the Frontline but north of the Meuse-Escaut Canal). XXX Corps Club Route Marker is placed in hex After the Allies have set their XXX Corps Units up, perform any plotted Artillery Strikes for the 1500 turn. The Allied Player may also attack with 6 Typhoon counters on any German Unit on the map. No Modifiers apply for this attack. He must place them all before he rolls for any results Multi Man Publishing, Inc.
31 The Allied Player may also attack with 8 Typhoon counters on any German Unit within 10 hexes of a XXX Corps Unit. No Modifiers apply for this attack. He must place them all before he rolls for any results. After all the Typhoon strikes have been completed, move to the Allied Air Drop placement. All Allied Units from the 101st Airborne Division are set-up as follows with each stick in its own hex: Drop One Stick One (arrives via Glider- DELAY): 101 Recon (LZ W) (Independent) Stick Two (arrives via Parachute): A/1/501; B/1/501; C/1/501; S(Mtr)/1/501 (DZ A1 0r DZ A2) (501 PIR) - see below Stick Three (arrives via Parachute): Leader/501; D/2/501; E/2/501; F/2/501; S(Mtr)/2/501 (DZ A) (501 PIR) Stick Four (arrives via Parachute): G/3/501; H/3/501; I/3/501; S(Mtr)/3/501 (DZ A) (501 PIR) Stick Five (arrives via Parachute): A/1/502; B/1/502; C/1/502; S(Mtr)/1/502 (DZ C) (502 PIR) Stick Six (arrives via Parachute): D/2/502; E/2/502; F/2/502; S(Mtr)/2/502 (DZ C) (502 PIR) Stick Seven (arrives via Parachute): Leader/502; G/3/502; H/3/502; I/3/502; S(Mtr)/3/502 (DZ C) (502 PIR) Stick Eight (arrives via Parachute): Leader/506; A/1/506; B/1/506; C/1/506; S(Mtr)/1/506 (DZ B) (506 PIR) Stick Nine (arrives via Parachute): D/2/506; E/2/506; F/2/506; S(Mtr)/2/506 (DZ B ) (506 PIR) Stick Ten (arrives via Parachute): G/3/506; H/3/506; I/3/506; S(Mtr)/3/506 (DZ B ) (506 PIR) Stick Eleven: C/326 Eng (DZ B) (Independent) Roll a die to determine if Stick Two arrives at DZ A1 or A2. Even roll - A1; odd roll - A2. Historically, they landed at A2. Resolve Airdrops The Allied player rolls to resolve the airdrops. Use the Airdrop/Glider Landing Table. Each time a stack is activated it can attempt to remove any remaining markers. All markers must be removed before the Unit can perform any other Action. Markers All the bridge markers are put in play on their unwired side except for Son Bridge. All bridges except Joe s Bridge start the game under German control. Joes Bridge starts Allied controlled, and not wired. In this scenario both players may build as many improved positions and entrenchments as the counter mix allows. The both players can build road blocks and the Allied player can deploy Rearguards, up to the limit of the counter mix. Place the XII Corps and the VIII Corps markers on the offmap display The German player places his Eindhoven Air Raid Markers on the Game Turn Track. Command Values For the 101st Airborne Division, the Command Rating is 7 and the Dispatch Rating is 3. The Division starts with 4 Command Points and 0 Dispatch Points. For the Guard Armored Division, the Command Rating is 4 and the Dispatch Rating is 1. The Division starts with 12 Command Points and 3 Dispatch Points. For the Eindhoven Regional Command, the Command Rating is 4 and the Dispatch Rating is 1. The Division starts with 6 Command Points and 0 Dispatch Points. For the Kampfgruppe Walther, the Command Rating is 3 and the Dispatch Rating is 0. The Division starts with 5 Command Points and 0 Dispatch Points. For 59th Infantry Division, the Command Rating is 6 and the Dispatch Rating is 3. The Division starts with 8 Command Points and 0 Dispatch Points. These values may change over time as detailed on the Divisional Charts. Chits The following chits are placed in the mug and randomized: 101st Division Activation, Group Hot Formation or 231st Brigade, Allied Direct Command, Eindhoven Regional Command Activation, German Direct Command, 501 PIR Formation Activation, and 59th Infantry Division Activation. The 231st Brigade Formation chit or the Group Hot Formation is not placed in the mug and is the first in play. The one not chosen is placed in the cup. The last chit in the cup is not played and will automatically become the first activation for the following turn. Allied Reinforcements Allied Airborne Reinforcements Drop Two (Day+1) 101st Airborne Division: (3 Divisional Jeeps are now available) Stick One (arrives via Glider): Leader/327; A/1/401; B/1/401; C/1/401; S(Mtr)/1/401 (LZ W) (327 GIR) Stick Two (arrives via Glider): D/2/327; E/2/327; F/2/327; S(Mtr)/2/327 (LZ W) (327 GIR) Stick Three (arrives via Glider - DELAY): AT/327 (LZ W) (327 GIR) Stick Four (arrives via Glider - DELAY): A/326 Eng (LZ W) (Independent) Stick Five (arrives via Glider - DELAY): B/326 Eng (LZ W) (Independent) Stick Six (arrives via Glider - DELAY): C/326 Eng (LZ W) (Independent) Version 1.1: February 8th,
 (Artillery) Stick Three (arrives via Glider - 2 DELAY): 907 Gldr Fld (LZ W) (Artillery) Stick Four (arrives via Glider - DELAY): A/81 AB AA/AT (LZ W)")
32 Drop Three (Day+2) 101st Airborne Division: (3 Divisional Jeeps are now available) Stick One (arrives via Glider- 2 DELAY): 321 Gldr Fld (LZ W) (Artillery) Stick Two (arrives via Parachute - DELAY): Leader/101 Artillery; 377 Para Fld (DZ C) (Artillery) Stick Three (arrives via Glider - 2 DELAY): 907 Gldr Fld (LZ W) (Artillery) Stick Four (arrives via Glider - DELAY): A/81 AB AA/AT (LZ W) (Independent) Stick Five (arrives via Glider - DELAY): B/81 AB AA/AT (LZ W) (Independent) Stick Six (arrives via Glider - DELAY): C/81 AB AA/AT (LZ W) (Independent) Stick Seven (arrives via Glider - DELAY): D/81 AB AA/AT (LZ W) (Independent) Stick Eight (arrives via Glider - DELAY): E/81 AB AA/AT (LZ W) (Independent) Stick Nine (arrives via Glider - DELAY): F/81 AB AA/AT (LZ W) (Independent) Stick Ten (arrives via Glider): A/1/327; B/1/327; C/1/327; S(Mtr)/1/327 (LZ W) (327 GIR) For the 101st Airborne Division, the Historical Supply DZ is LZ W. Conditional Reinforcements 101st Airborne Division: Independent: place 3 Glider Pilots on hex and 2 Glider Pilots on on the 3pm turn of any day after 9/17 (the first day of the game) in which there was a drop. They are removed from play at the conclusion of the next Night turn. Just pick them up where ever they are. Independent: A/15/19 KRH; B/15/19/ KRH; C/15/19 KRH; Recce/15/19 KRH (arrives via the Club Route release rule and are placed in hex when they are released regardless of the Club Route marker s actual position in the game). Independent: A/44 RTR; B/44 RTR; C/44 RTR; Recce/44 RTR (arrives via the Club Route release rule and are placed in hex when they are released regardless of the Club Route marker s actual position in the game). 101 Sea Tail: when released via the Club Route release rule, up to 6 steps of combat loses may be returned to the game. If replacing an eliminated Unit for 2 Steps, just place the Unit with it s Leader. Losses may be replaced only if not in an enemy Fire Zone. In addition, all Supply Drop Zone rules are no longer in force and this Division is always in supply. XXX Corps Reinforcements Illustration The XXX Corps Formation Reinforcement Markers are placed on the Guards Armored Division player aid chart as shown below Multi Man Publishing, Inc.
33 Allied XXX Corps Reinforcements All XXX Corps reinforcements arrive via the Club Route release rule. Group Hot and Guards Independent Units that are not placed on the map are released when the respective Formation is released. The current position of the Club Route marker is the Reinforcement Hex for placement (except for Auto release Units - they arrive on specific hexes as long as the Club Route marker has advanced to that marker or beyond). If the Club Route marker is off the map, no actual Units enter the game but track the released Formations for Victory Points. Remember, you don t roll for Formation release on the September 17th Turn. German Reinforcements: September th Infantry Division, Independent: 1./Erz 59; 2./Erz 59; 1./Pio 159 (placed in Entry Hex ) 59th Infantry Division, KG Dewitz: Leader KG Dewitz; 1./I/1036/59; 2./I/1036/59; 3./I/1036/59 (placed in Entry Hex ) th Infantry Division, Independent: 3./Erz 59; 1./PJ 159; 2./PJ 159; 2./Pio 159 (placed in Entry Hex ) 59th Infantry Division, KG Dewitz: GrW/I/1036/59; 5./ II/1036/59; 6./II/1036/59; 7./II/1036/59; GrW/II/1036/59 (placed in Entry Hex ) th Infantry Division, Artillery: Leader? ; II./159/59 (placed in any entry hex of Entry Area A or B) Night determine which Formation commands the KG Huber (see rule S5.5). September th Infantry Division, Artillery: I./159/59; III./159/59 (placed in any entry hex of Entry Area A or B) 59 Infantry Division, KG Klemm: all Units (placed in any entry hex of Entry Area A or B) 59 Infantry Division, KG Huber: all Units (placed together in any entry hex in Entry Area A or B - and rule S5.5) Eindhoven Regional Command, KG Jungwirth: Leader Jungwirth; 1./KG Ewald; 2./KG Ewald; 3./KG Ewald; Gr.W./KG Ewald (placed together in any entry hex in Entry Area C or D) 1100 Eindhoven Regional Command, KG Jungwirth: 1./KG Rink; 2./KG Rink; 3./KG Rink (placed together in any entry hex in Entry Area C or D - but not in the same entry area as the other KG Chill Units entering) September Eindhoven Regional Command, Artillery: Leader? ; 14./III/HG (placed in any entry hex in Entry Area C or D) 1300 KG Walther, Pz-Brig 107: Leader Pz-Brig. 107; 1./ Pz.2107; 4./Pz.2107; 1./I./FJ-Rgt 21; 2./I./FJ-Rgt 21; 3./I./ FJ-Rgt 21; 1./PG (placed together in any entry hex in Entry Area A, B or C) KG Walther, Independent: 1./1 Pionier; 2./1 Pionier (placed together with KG Walther, Pz-Brig 107 in either Entry Area A, B or C) September Replace the Eindhoven Regional Command Divisional Display with the Kampfgruppe Chill Divisional Display. KG Chill, Artillery: 9./III/185 (placed in any entry hex in Entry Area C or D) KG Chill, KG Jungwirth: 1./KG Tuckstein; 2./KG Tuckstein; 3./KG Tuckstein; Gr.W./KG Tuckstein (placed together in any entry hex in Entry Area C or D) 1300 KG Walther, Pz-Brig 107: 2./Pz. 2107; HQ/Pz-Brig.107; 2./PG (placed together in any entry hex in Entry Area A, B or C) September KG Chill, KG v.d. Heydte: Leader v.d. Heydte; AA KG vdh; 15.Pionier; 1./I; 2./I; 3./I; 4./I; 9./III; 10./III; 11./III; 12./ III; 13. PzJrg/IV; 14. Gr.W./IV; Flak/IV (placed in the off map area adjacent to the XII Corps Marker) KG Walther, KG Hoffman: 1./KG Stephan; 2./KG Stephan; 3./KG Stephan; Gr.W./KG Stephan (placed together in any off map area KG Walther, KG Heinke: Aukf./KG Hnke; PaK/KG Hnke; 1./I./Rgt.16; 2./I./Rgt 16; 3./I./Rgt.16 (placed together in any off map area KG Walther, Artillery: 1./Art-Ers; 2./Art-Ers; 3./Art-Ers (placed in any entry hex in Entry Area C or D) Night KG Chill, KG Huber: all Units (placed together in any entry hex in Entry Area C or D - see rule S5.5) September KG Chill, KG v.d. Heydte: 1./KG Finzel; 2./KG Finzel; 3./ KG Finzel; 4./KG Finzel (placed on or adjacent to the hex or the off-map area that Leader v.d. Heydte currently occupies) Version 1.1: February 8th,
34 KG Chill, Artillery: 17SS/II/185; 18SS/II/185 (placed in any entry hex in Entry Area C or D) KG Walther, Pz-Brig. 107: 3./Pz 2107; Pz.Pio.107; Gr.W./ PG. 2107; 3./PG 2107; 4./PG 2107; 5./PG 2107 (placedtogether in any entry hex in Entry Area B, C or D) 0900 KG Chill, KG Jungwirth: 1./I/2 FJ; 2./I/2 FJ; 3./I/2 FJ; Gr.W./H2 FJ (placed together in any entry hex in Entry Area C or D) KG Chill, Independent: 1./559 PzJgr; 2./559 PzJgr; 4./975; 2./III/185; 16./III/HG; Ers Pio/3 (placed with arriving Units of KG Jungwirth) September KG Chill, KG Jungwirth: 1./KG Zeditz; 2./KG Zeditz; 3./ KG Zeditz; Gr.W./KG Zeditz (placed together in any entry hex of Area C or D) KG Chill, KG v.d. Heydte: 1./III/HG; 2./III HG; 3./III/HG; 4./III/HG; Gr.W./III/HG (placed on or adjacent to the hex, or the off-map area, that Leader von Hoffman currently occupies) September KG Chill, KG Jungwirth: 1./KG Bloch; 2./KG Bloch; 3./ KG Bloch; Gr.W./KG Bloch (placed together in any entry hex of Area C or D) KG Walther, KG Erdmann: All units (placed together in any entry hex in Entry Area C or D) Special Rules: All Special Rules are in effect. Additionally: S7.1.0 German movement and attack restrictions No German Unit may ever move south of the Frontline marked on the map. No German Artillery may barrage any hex south of the Frontline marked on the map. S7.2.0 XXX Corps Units exit from the Where Eagles Dare map When the Club Route marker exits the map to the north, the Guards Division Activation remains in play as long as there are any Guards Units still on the map. No other Formation Chits may be purchased. Guards Armored Units exit the map by entering hex and immediately take them off the map. Once the last Guards Unit has exited, remove the Guards Division Activation from play and remove any accumulated Dispatch and Command Points. Note the values of each for Victory Points. S7.3.0 Emergency request for XXX Corps reinforcements On the Reinforcement Phase of 0700 turn of the 22nd of September or after, the Allied Player may call for reinforcements from Guards Armored Division. After he does this, roll a die - in that many turns (if a 0 is rolled, they enter this turn, 1 the next turn and so on). All of the Group Cold Units are placed on hex during the Reinforcement Phase on the rolled for turn. This roll is kept secret from the German Player. During that Reinforcement Phase, the Guards Division Display is back in play, add 10 Command Points and 2 Dispatch Points to the Guards Display and the Guards Division Activation is added to the cup. Once they have entered, they can never leave the Where Eagles Dare map and the Guards Division will stay in play for the remainder of the game. Any Guards Units that move off of Club Route are not counted for Victory in this case. S7.4.0 Voluntary German Rout Any German Unit with a Movement Allowance (on either side of the counter) may voluntarily rout. Just pick the Unit up and place it to the side. It will go in an applicable Off-Map space on the 0700 turn of the next day. If you Voluntarily Rout on the 1700, 1900 or Night turn, the Unit will reappear on Off-Map display two 0700 turns later (two days later - not one). Victory Conditions Victory in Where Eagles Dare is determined by accumulating Victory Points throughout play. At the end of any game day (the conclusion of the Night Turn) after the first day, players can stop and determine the victor for the game or they may play on. The end of day breaks are there only to mark your progress in the game or to determine victory should you decide to stop at that point. At the conclusion of the Night Turn of the 24th, the game is ended and victory is determined. The Allied Player gains Victory Points by: Advancing the Club Route Marker off the map: on the 9/18 turn: 30 Victory Points on the 9/19 turn: 20 Victory Points on the 9/20 turn: 10 Victory Points on the 9/21 turn: 0 Victory Points If the Club Route Marker is still on the Where Eagles Dare map after the 9/21 turn, the Germans win an immediate victory. Each non-auto Formation released (not including Sea Tails that missed their hex): 5 Victory Points Each 1900 turn that the status of Club Route is not cut: 8 Victory Points Each Command Point on the Guards Division Display when the the last Guards Unit exits the map: 3 Victory Points Each Dispatch Point on the Guards Division Display when the last Guards Unit exits the map: 4 Victory Points Multi Man Publishing, Inc.
35 The German Player gains Victory Points by: For each step of Guards Armored Division that is currently not on Club Route or a Potential Club Route hex when the Guards Division Activation is picked from the cup (not including any HHC Units or any Units of the 231st Brigade - or any Units that have come on by the emergency reinforcement call): 1 Victory Point. For each step of Guards Armored Division that is currently anywhere on the Where Eagles Dare map when the Guards Armored Division Activation is picked from the cup after the Club Route Marker has advanced off the map (except when emergency reinforcements have been called): 1 Victory Point. For each 1900 turn the status of Club Route is cut: 10 Victory Points. For each Club Route Attacked Marker: 1 Victory Point. For each Club Route Closed Marker: 2 Victory Points. If the Allied Player has called for emergency reinforcements: 10 Victory Points. Subtract the German total from the Allied total for a Victory Point number and consult the table below. If neither side achieves their total, the game ends in a draw. Night, September 18: 71 Points or more, the Allies win. -11 or less, the Germans win Night, September 19: 61 Points or more, the Allies win. -8 or less, the Germans win. Night, September 20: 51 Points or more, the Allies win. 15 or less, the Germans win. Night, September 21: 51 Points or more, the Allies win. 25 or less, the Germans win. Night September 22: 51 Points or more, the Allies win. 30 or less, the Germans win. Night September 23: 51 Points or more, the Allies win. 45 or less, the Germans win. Night September 24: 51 Points or more, the Allies win. 50 or less, the Germans win. Operation Market-Garden The Devil s Cauldron & Where Eagles Dare /17/44 Night 9/24/44 The following is the combined Where Eagles Dare and The Devil s Cauldron game. Set-up The game is played on all 9 maps and all map extensions. Play the Drive in the Country introductory scenario and if the Allies win the scenario, the bridge in hex is considered stable. If the Allies lose it, the bridge is considered unstable. The first turn is 1500, on September 17. On the first day steps 1 and 3 of the sequence of play are ignored. For the remaining turns all the steps in the game are used in this scenario. The weather is clear for September 17. It will be rolled for on the 0700 turn of the other days. The cup contents are the added total contents from both games. All values remain the same as in each game. Additionally, add the 43rd Infantry Division Activation to the cup. Also add 4 Command Points and 0 Dispatch Points to the 43rd Division Division Display. Subtract 3 Command Points from the Guards Armored Divisional Display to account for the addition of the 43rd Infantry Division Command Points. The 1st Para Formation is not placed in the cup and is the first activation for the turn. Additionally, after the 231st or Group Hot has been chosen per the Where Eagles Dare chit selection rule, it too isn t placed in the cup and will be the second activation of the turn. Players wanting a bit more wide open game can disregard this and place the 231st and Group Hot in the cup and see what happens. However, 1st Para is always the first chit in play. The last chit in the cup is not played and will be the first chit in play for the next turn. Follow the entire set-up for The Devil s Cauldron and then for Where Eagles Dare. Place Club Route Markers on the following hexes: 13.87, 36.86, 34.82, 30.76, 28.70, 28.71, 41.64, 38.63, 38.43, 49.30, 38.31, These are treated just as if they were printed on the map (as they are in Where Eagles Dare). Special Rules All special rules from Where Eagles Dare and all the special rules from The Devil s Cauldron still apply to those games unless specifically mentioned and altered in the following section. MG 1.0 Events The placed Events for The Devil s Cauldron are still placed per the setup but the Events rule from Where Eagles Dare is also added. There are new Event chits included for use in The Devil s Cauldron and they work the same way with the following exceptions: MG 1.1 The Germans now have an Air Strike counter. When this is drawn, the German Player may place three Air Strike markers on any Allied Units. More than one may be placed on a unit and all Air Strike markers must be placed before any are resolved. These attack with a strength of 3 (red) Fire Power. If it is currently Night or the Weather is currently Fog, treat as a no Event. No modifiers apply to this attack. MG 1.2 The Allies now have an Ambush Event. When this is drawn, the Allied Player may attack any German Unit within 3 hexes of any Allied Unit. This attack is performed as a 6 (white) Fire Power attack. Terrain modifiers do apply to this attack. MG 1.3 Rout: Rout: When this Event is picked, the enemy player picks Version 1.1: February 8th,
36 a Formation and declares that formation has routed. This Formation must have at least one Unit in an Enemy Fire Zone and at least one Step Lost must be lost from the entire formation to be chosen. He may choose either a friendly or an enemy formation. All units belonging to that Formation are considered routed. Consult the table below to determine what action to take. Any Independent Units that are stacked with the affected Formation are treated as Units of that Formation for this rule. Additionally, if a Unit must retreat by the rules below but cannot (i.e., it is in an enemy Fire Zone and can move one hex to a hex that isn t in an enemy Fire Zone), it is eliminated (a gun with no movement or * movement for example). If a 1st Airborne Division, 82nd Airborne Division, Guards Armored Division, 43rd Infantry Division, Hohenstaufen Division or Frundsberg Division is routed: If the Friendly Unit is not in an enemy Fire Zone, it is not moved and does nothing and nothing is placed on it. All affected units that are in an enemy Fire Zone must move one hex so that they are not in a Fire Zone. The enemy may not Opportunity Fire at the Units during this one hex move. If a Unit cannot leave a Fire Zone by moving one hex, the unit must stay in the hex it currently occupies. Place an Entrenched marker on it. The enemy may not Opportunity Fire on this unit when the marker is placed. Play continues normally after this is performed and the Rout Event is placed back in the Event Cup. If any German Formation that isn t part of any of the above is routed: Count up the current number of Step Losses that Formation has currently lost and roll a die. Should this modified roll be less than the current number of Step Losses, that Formation routs as listed below. The German Player may spend up to two Dispatch Points to add either one or two to his Die Roll number for each Dispatch Point spent. All German units that are routed are moved one hex so that they are not in an enemy Fire Zone. All of these units (including any losses but remove any Cohesion or Suppression markers) are then taken off the map and placed on on their Divisional Chart. These units may reenter play in any applicable off map Reinforcement Hex of the owning player s choosing on the following 0700 turn. Note that if a unit routs on the 1700, 1900 or Night turn, it will be the following two days (the second 0700 turn to come) before it may return to play. Any German Units remaining of the routed Formation on the map (those that couldn t retreat one hex and not be in an enemy Fire Zone) are now eliminated permanently from the game. After the effects of the Rout have been completed, return the Rout Chit to the Event Cup. 1.4 Reinforcements If the Reinf random event is drawn in the TDC half of the combined game, either an 82AB formation can be selected (and up to 2 steps of Lost 82AB arrive ) or a 1st AB formation can be selected (and up to 2 steps of Lost 1AB can arrive). MG 2.0 Club Route MG 2.1 The Club Route rule from Where Eagles Dare is now in full force in The Devil s Cauldron. Ignore all Club Route movement restrictions and reinforcement arrival times in The Devil s Cauldron. The Guards Armored Division enters play as per the Club Route Release rule and The 43rd Infantry Division may now enter play on The Devil s Cauldron map (although still may never enter play on the Where Eagles Dare map - except for the 231st Infantry Brigade) using the Club Route entry procedure. No 43rd Infantry Formation may enter play until the Club Route marker is on The Devils Cauldron map. Note that in The Devil s Cauldron, there are far more spurs and potential directions Club Route may go. Once the Allied Player has determined Club Route s current path, he may not change it later and all possible Club Route paths that have been bypassed are now disregarded. MG 2.2 The 82nd Division and the 1st Airborne Division Sea Tail: MG When these are successfully entered into play, check the current location of the XXX Corps Marker. If it is in Hex or or farther north, the 82nd Airborne Division Sea Tail enters play. If it is in Hex 49.30, or or farther north, the 1st Airborne Sea Tail enters play. Should these conditions not exist when the Sea Tail is released, it is disregarded and move to the next Formation to enter play. Unlike other Formations in which no other formations may be released until the conditions apply, you may release them and put them to the side, and then move to the next Formation. It may never enter play in the game if the Allied player can t meet the conditions for entry but he may move to the next Formation and attempt to release additional forces. MG If successfully released, up to 6 steps of combat loses for the applicable Formation may be returned to the game. If replacing an eliminated Unit for 2 Steps, just place the Unit with its Leader. Losses may be replaced only if not in an enemy Fire Zone. In addition, the respective Airborne Division is now always in supply and the Supply Drop zone rule no longer applies. MG 2.3 The 231st Brigade and the 43rd Infantry Division: The 43rd Infantry Division still gets the automatic -4 modifier for all release rolls from Club Route. They may pay additional Dispatch Points to get an additional benefit as well. The 43rd Infantry Division Display is set up at the start of play. Until the First 43rd Infantry Division Formation enters the game, the 43rd has a Command Rating of 3 and a Dispatch Rating of 0. After the first 43rd Formation enters the game, revert to the stated values in The Devil s Cauldron for value. MG The 43rd now pays for all 231st Brigade Command and Dispatch costs and it is treated as a 43rd Infantry Formation. It still may not move above the 231st Brigade line drawn on the map Multi Man Publishing, Inc.
37 MG 2.4 The Royal Dragoons and the Sherwood Foresters when released are placed on hex as long as the Club Route Marker has reached or beyond. If it hasn t, no Formations are released until the Club Route marker has reached MG 2.5 For players of just The Devil s Cauldron that would like to use the new Club Route rule, the Club Route Marker may advance onto the map on the 1900 turn of September 19th. Groups Hot, Cold and Guards Ind. have been released. All four Units of HHC enters the game at the XXX Corps Reinforcement Hex on the 1100 turn of September 19th. Group Cold enters at the XXX Corps Reinforcement Hex on the 1300 turn of September 19th. Group Hot enters the at the XXX Corps Reinforcement Hex on the 1500 turn of September 19th. The remainder of XXX Corps enters via the Club Route release rule. MG 3.0 Household Cavalry S5.17 now completely applies to the Household Cavalry. A/2 HHC, B/2 HHC, C/2 HHC and D/HHC are always considered in Command regardless of the proximity of a leader for both games. S5.18 no longer applies. MG 4.0 German Air Strikes German Airpower (S4.3) is now covered through the Random Events rule and should be disregarded. MG 5.0 Rout Rout (S4.4) is now covered through the Random Events and this rule should be disregarded. It is still used in the scenarios. MG 6.0 Guards Armored Disregard Special Rule S The German Player still receives Victory Points for lingering Guards Division Units but play continues normally for the Guards Division after the Club Route Marker is on The Devil s Cauldron map. The Division Display is not removed from the game and all Command and Dispatch Points remain with the Display. Note the values when the last Guards Unit leaves the Where Eagles Dare map and count those as Victory Points for the Where Eagles Dare game. Use the The Devil s Cauldron Guards Divisional Display Command and Dispatch values for the game. MG 7.0 Heroes There are several Heroes that are now available for use in The Devil s Cauldron. These are one use markers and must be used with their respective Formations. The Allied Player just declares that he is using a Hero and the effect is immediately performed. You may play after any die or dice roll. After use, put the Hero to the side and it may not be used again. PVT John Towle When played, immediately reduce any enemy armored unit (has a black box around its Defense Strength) by one step. The enemy armored unit must be adjacent to a 504 PIR Infantry Unit. LSgt Baskeyfield When played, immediately reduce any enemy armored unit (has a black box around its Defense Strength) by one step. If there is an enemy Step remaining, it is immediately Suppressed. The enemy armored unit must be in a Fire Zone of one of the S(AT) Units of the 1st Air Landing Brigade. Major Robert Cain When played, any just completed enemy fire combat (either opportunity, direct or assault) against a 2nd South Staffordshire Unit is immediately converted to a no effect (miss). Also, remove any Cohesion Hits and/ or Suppressions that are in the hex that was just fired upon. Cpt John Grayburn When played, any just completed enemy fire combat (either opportunity, direct or assault) against a 1st Parachute Brigade Unit is immediately converted to a no effect (miss). Also, remove any Cohesion Hits and/ or Suppressions that are in the hex that was just fired upon. Cpt Lionel Queripel When played, the Allied Player may immediately convert any failed Troop Quality check to a pass. You are allowed to know it has failed before you decide if you wish to use Queripel. MG 8.0 Additional Deployment Restrictions: No Unit of the 101st Airborne Division may enter The Devil s Cauldron map No Unit of the 43rd Infantry, 82nd Airborne or 1st Airborne may enter the Where Eagles Dare map (regardless of Restriction Level of play chosen). No German Unit from Where Eagles Dare may enter The Devil s Cauldron map or vice versa. The Emergency Reinforcement Call rule in Where Eagles Dare now is actually performed. You may move Group Cold off the map and onto the Where Eagles Dare map on the 0700 turn of September 21 or later. This is now performed by choice and not by rule as in The Devil s Cauldron. Piggyback rule is now available to all in the game. MG 9.0 Counter Limits The counter limits for the combined game are 3 Lost 82AB for the WED half of the game, and 2 Lost 82AB and 1AB (each) for the TDC half of the game. MG 10.0 Errata There are some counter errata replacements included in the game. Just swap out the misprinted counter for the new one and use it. For D/10/4, this Unit replaces C/10/4 completely. Just swap company D and all mention of company C now applies to company D. Version 1.1: February 8th,
38 MG 11.0 Victory Conditions There were only two playtests of the combined version so I m going to go with this for the Victory Conditions. I would like to combine the two games but need more data to do that. I hope that this section can evolve and become that with post-publication play. Let me know what happens and I ll start compiling data so that eventually, we have a more comprehensive way of tabulating victory. Until then, anyone that finishes a game of this size should consider themselves a victor in the game. Use the Standard Victory Conditions for both games and compare the two. If the Allies achieve Victory in Where Eagles Dare and a Major or Minor Victory in The Devil s Cauldron, the Allies win. If not, the Germans win Multi Man Publishing, Inc.


39 Historical Notes It s not Slicky Wicky A Guide to Pronouncing Market-Garden Locations By Dick Vohlers I ve been playing games about the Market-Garden operation for over 30 years now. During that time I had developed ways of pronouncing the names of the cities, towns, and rivers that formed the battlefield. The way I pronounced these names seemed consistent with their spellings and with the way I heard other (non-dutch) players pronounce them. However, I learned when I made my trip there in 2008 that Dutch orthography and pronunciation rules are not the same as they are in English. Both languages have the concepts of long and short vowel sounds, but the rules used for Dutch are different than those used for English. For instance, in Dutch a double-lettered vowel indicates a long vowel, but a single-letter letter vowel can be long, too, depending on its location on the word. In addition, other vowel diphthongs are pronounced differently than in English and there are several sounds that produce a guttural kh sound, including not only ch but g as well. There are many good pronunciation guides on the Internet if you re interested in learning more. Below is a table to help English speakers more accurately pronounce those location names found in The Devil s Cauldron and Where Eagles Dare that differ the most from standard English pronunciations. These are not absolutely accurate in all regards, but they will get you much closer to the way the Dutch pronounce each one. My thanks to Rian van Meeteren for assisting with this. Oosterbeek Ohs-ter-bake Toaster -bake Deelen Daylayn Westervoort Vestervort Driel Dreel Reel Huissen How-sen House-in Oosterhout Ohs-ter-howt Toaster-route Slijk-Ewijk Slike-a-vike Strike-a-bike Ewijk A-vike A-bike Weurt Vuert Viewer-t Location Heelsum Approximate Pronunciation Hail-sum Rhymes With / Sounds Like Wolfheze Volf-he-zay Heuman Hoe-man Hoeman combined with Herman Nijmegen Neye-mekh-en I-Megan Heveadorp Hay-fay-a-dorp Version 1.1: February 8th,


40 Ooijpolder Oh-eye-pol-der Oy-polder Groesbeek Khroos-bake Gross-bake Mook Mohk Poke Sint Oedenrode Sint Oo-den-rod-uh Sint Who-den Rhoda Eindhoven Eyend-hohv-in Mind-hoe-bin Grave Cuijk Veghel Schijndel Khrah-fay Koo-eyek Fekh-hel Skhine-dul Quake combined with Quite Fickle combined with Fake Scandal combined with Kind Eerde Air-duh Aalst Ahlst Valkenswaard Fal-kens-vahrd Falcons-bard Neder Rijn Nader-Rhine Multi Man Publishing, Inc.


41 Hell s Highway Today By Dick Vohlers Maas Mahs M-Oz Waal Vahl Wall Zuid Willemsvaart Saut Vil-lems-fahrt tion.01 In March of 2008, just a few days after I received my copy of The Devil s Cauldron, I was asked to go to the Netherlands on business. I took the opportunity to take an extra few days of personal vacation and I reserved a room in a bed and breakfast in Arnhem. Because I had helped edit the rules and notes for TDC, Adam asked if I would take some pictures while I was there and write up an article for Where Eagles Dare, similar to the one Hans Korting wrote for TDC. I told him I would do so, though I also told him that I doubted I could match the passion that Hans showed when writing about a battle that helped free his homeland. I tried to prepare as much as possible before I left. One book Version 1.1: February 8th,


42 8 years since the book was written. For that reason, many of the directions provided in the book no longer work, so some places were more difficult to find than others. that I brought with me was Major and Mrs. Holt s Battlefield Guide to Arnhem (ISBN ). That book provides descriptions of and directions to all of the major locations involved in the fighting as well as to memorials erected after the war. It was invaluable in helping me understand what was important to see and what was more minor. However, the road net in the area, especially around Eindhoven and between there and Uden, has changed quite a bit in the last In addition, I was not able to visit all the places I would have liked, especially those off the main highways, for two reasons. First of all, I had only one day to view the whole corridor between Joe s Bridge and the Grave Bridge, so I wanted to be sure to visit the major locations first. Also, it was raining the whole day I was there, sometimes quite heavily, and I didn t want to have any problems with a rental car on a muddy path in some woods somewhere Multi Man Publishing, Inc.


 However, the British had captured this bridge on September called the Airborne Trail. The flowers the day I was there were fresh even though there had been no recent events and it was still winter.")

43 I started the day by driving from Arnhem all the way into Belgium, and then I worked my way north along the corridor. This provided me a good feel for the progress of the campaign and allowed me to view the locations in more or less the order that XXX Corps encountered them. of the bridge. This monument is the start of a 200 km walking and bike path along the corridor all the way to Arnhem My first stop was at the main highway bridge over the Meuse-Escaut (Maas-Scheldt) Canal. The Dutch had destroyed the original bridge in 1940, but the Germans had built a wooden pontoon bridge at the site before As you can see, the canal at this point would have posed a substantial obstacle to the British troops. (This picture is looking towards the west in hex ) However, the British had captured this bridge on September called the Airborne Trail. The flowers the day I was there were fresh even though there had been no recent events and it was still winter. 10, 1944, and the Allied front line was slightly north of it when the Garden offensive started a week later. But while there was some infantry holding the bridgehead north of the bridge at the start of the offensive, the tanks of the Guards Armored and their accompanying infantry formed up south of About three kilometers north of the bridge is the border between Belgium and the Netherlands. There is a monument here called the Liberation Gate that commemorates the beginning of the Allied liberation of the Netherlands. This was the approximate front line along the road at the start of the battle (hex ). When the offensive started, the Germans were well emplaced in the woods just north of the border (hex ). This is where the Typhoons launched airstrikes to root them out. As you can see, these woods are dense even when the bridge. This bridge is now called Joe s Bridge. This apparently comes from the name of the commander, Lt. Col. J.O.E. Vandeleur, of the Irish Guards who captured the bridge, though some credit the name to the name of the Royal Engineer Squadron that repaired the bridge, who were called Joe s Troops. There is a monument to the Irish Guards at the base Version 1.1: February 8th,
.")
, is a there are no leaves on the trees. (In the picture, the pavement on the left is the Airborne Trail while the road is on the right.")

 Inscribed on the small cross was simply the word Remembrance.")
44 posed too big a problem to tracked vehicles trying to cross them laterally, but it would have been more difficult for such a vehicle to cross them when moving north parallel to them. This would have been the view a German unit would have had when looking out of the woods at the road (at about hex ). As you can tell by comparing this picture with the last one, there are both pine and deciduous trees in the area. Just a bit further north, next to a café (in hex ), is a there are no leaves on the trees. (In the picture, the pavement on the left is the Airborne Trail while the road is on the right.) Though the roads in this area are not as raised as they are closer to Nijmegen and Arnhem, there are still quite a few drainage ditches along the road. While these have undoubtedly changed in recent years due to the Airborne Trail and general development, there were likely similar ditches in the area at the time of the battle. It doesn t appear that these ditches (here, in approximately hex ) would have 44 memorial marking the entrance of the British Liberators into the Netherlands in (Note that this café has changed names since the Holt book was published. When I was there it bore the name Suykerbuyck.) Inscribed on the small cross was simply the word Remembrance. The German main line of resistance was in this area on September 17, 1944, and getting through it was not easy for the British. Many of those that fell that day are buried in the Valkenswaard Cemetery (hex ), just north of the café. This cemetery contains over 200 graves and is part of the Commonwealth War Grave Commission, which manages over two dozen cemeteries in the Market-Garden area. While they are responsible for them, it is often the local Dutch population that maintains them, always in pristine shape. As anyone who has studied this battle knows, It s all a matter of bridges. In the area depicted in Where Eagles Dare, there are three major canals and several rivers. One river, the Dommel, roughly parallels XXX Corps route between the Dutch-Belgian border north up to St. Oedenrode. The British had to cross this river three times, and in the area between Eindhoven and St. Oedenrode both the British and the American paratroopers used it to protect their eastern flank. The first crossing of the Dommel is just south of Valkenswaard (hexside /56.201). The bridge that is there today is called the Victory Bridge. While the Dommel at this point is not extremely wide, vehicular units would still have required a bridge to cross it. (This picture is looking towards the northwest.) As the XXX Corps progressed north, they passed through Valkenswaard and Eindhoven. In recent years this area has changed (and is changing) quite a bit, and is now very built up. On my trip, I passed through Eindhoven and continued north on the highway towards Son. In some areas, this is now a four-lane divided highway, which XXX Corps undoubt Multi Man Publishing, Inc.

45 edly would have appreciated sixty some years ago. On the north side of Eindhoven, between the highway and Neunen, is another bridge over the Dommel (hexside /70.166). This one was not on the main line of the Allied advance, but the Germans were aware of the bridge. On September 19, the 107th Panzer Brigade approached this bridge with the intention of crossing it and cutting the main highway about 2 kilometers away. A local gardener, Willem Hikspoor, convinced the German commander that the bridge would not hold the weight of his tanks, and as a result the Germans gave up their attempt to cross here. Today the bridge is named after that gardener. The next picture was taken from that bridge looking south. As you can see, the Dommel is wider here than it was near Valkenswaard. We now enter the area where the 101st Airborne did much of the fighting. The one major bridge along the main highway that the Germans managed to blow in 1944 was the Son Bridge over the Wilhelmina Canal. That bridge was rebuilt after the war as a lift bridge to allow canal traffic to flow under it. (This picture is looking towards the northwest in hex ) Looking east from that bridge, you can see that the canal is wide and poses an obstacle even to foot units. On September 19, 1944, just down on the right three Panthers and supporting infantry of the 107th Panzer Brigade were able to get within 200 meters of the bridge before the paratroopers were able to destroy one tank, forcing the others to withdraw. In Son itself (hex ) is a memorial to the 101st Airborne Division. The main drop and landing zone areas for the 101st were located just north of Son and the Son Forest. There is a housing development that has encroached on the south part of this area today, but even worse there is now a freeway going diagonally through much of it. However, from what areas are still clear (here, about hex ), you can see that it was an excellent field for airborne and glider troops. I drove out on to some of the farms roads until the pavement ended. I was pretty certain I found what I was looking for when I got to the intersection of these two lanes (hex ). This picture was from near that sign, and is looking generally southwest towards Best. In 1944 there was one other bridge heading north out of Eindhoven across the Wilhelmina Canal on the outskirts of Best. While not a primary objective of the 101st, a company was sent there on the first day to secure the bridge as a backup. However, the HQ of the German 15th Army was in Vught a few kilometers to the northwest, and there were many German troops in the area. With the Son Bridge destroyed, the Best Bridge increased in importance. Eventually, the fight for this bridge involved much of the 101st as well as some British units, even though the Germans blew the bridge on the 18th. It was during the fight for this bridge that Joe Mann lost his life, and the monument to him is near here. This is what the bridge looks like today, looking towards the west from hex From Son, the main highway that XXX Corps used goes north to St. Oedenrode before bearing to the northeast to head toward Veghel. Just outside of St. Oedenrode (hexside /62.140) is the last crossing over the Dommel. (This picture is looking towards the northwest.) Today, the route used by XXX Corps between St. Oedenrode and Veghel has been converted to a freeway, and it appears the terrain has changed quite a bit. In addition, Veghel has also grown south of the Zuid-Willems canal, further changing the landscape. For instance, before going I understood that there were some sand dunes in the Eerde area. However, when I was there I only saw car dealerships and office buildings in that area. Eerde (hex ) does contain the 501st Parachute Infantry Regiment Geronimo Memorial to commemorate the fighting of that unit in this area. It s hard today to stop close to the canal in Veghel to get a picture of the canal and bridge here. I crossed to the north side of the canal near Heeswijk and took a picture of the canal between that town and Veghel (about hex looking towards the northwest). From Veghel, the new freeway veers north so that between the outskirts of Veghel and Grave the road appears to be much the same as it was at the time of the battle. In many locations the road is tree-lined for kilometers on end, somewhat reducing line of sight for units along the road. This picture is from a stretch of the road between Uden and Zeeland (looking towards Uden from about hex ), and during the battle the Germans cut the road in this general area more than once. While Grave and its bridge are in The Devil s Cauldron and not Where Eagles Dare, there were no pictures of it in the TDC historical article. I thought, therefore, that I d throw in two bonus pictures of the bridge and the area around it. The first is a picture of a bunker just to the west of the bridge (in approximately hex 12.85) that the Holt book says was built as part of the bridge s defenses in WWII. The second is a picture of the bridge today, with a memorial to the 504th Parachute Infantry Regiment in the foreground. This picture was taken from hex The next day I spent some time looking at the area cover by The Devil s Cauldron, starting in the Groesbeek area and working my way north. I finished the day with a quick stop at the prize, the Arnhem Bridge. The last picture I thought I d share is of a boat docked about 300 meters upstream from the bridge. Now I know that the Dutch are concerned with global warming, given that much of their country is already below sea level. But I wonder if this guy knows something that the rest of us don t.. Credits Designer: Adam Starkweather Developer: Nick Richardson Graphic Artist: Niko Eskubi Rules Writer: Jon Gautier Cover Artist: Steve Paschal VASSAL Support: Brent Easton

46 Original System Design: Eric Lee Smith Initial OOB Research: Carl Fung and Frank van den Bergh Rules Proofreaders: Dick Vohlers, David Hoskins and Vincent Lefavrais Playtesters: Joseph Chacon, Denis Dorion, David Hoskins, Steve Hanzelman, David Hassler, Allen Hill, John Iverson, Scott Krutsch, Joe Linder, Tom Meier, Richard Pardoe, William Riley, and Andy Tromans Special thanks to: Brian Youse, Greg Blanchett, Neil Randall, John Kollar, Lou Manios, Hans Korting, John Hart, Alan Campbell, Jeff Newell, Allan Rothberg, Jim Lauffenburger, and John Clifford
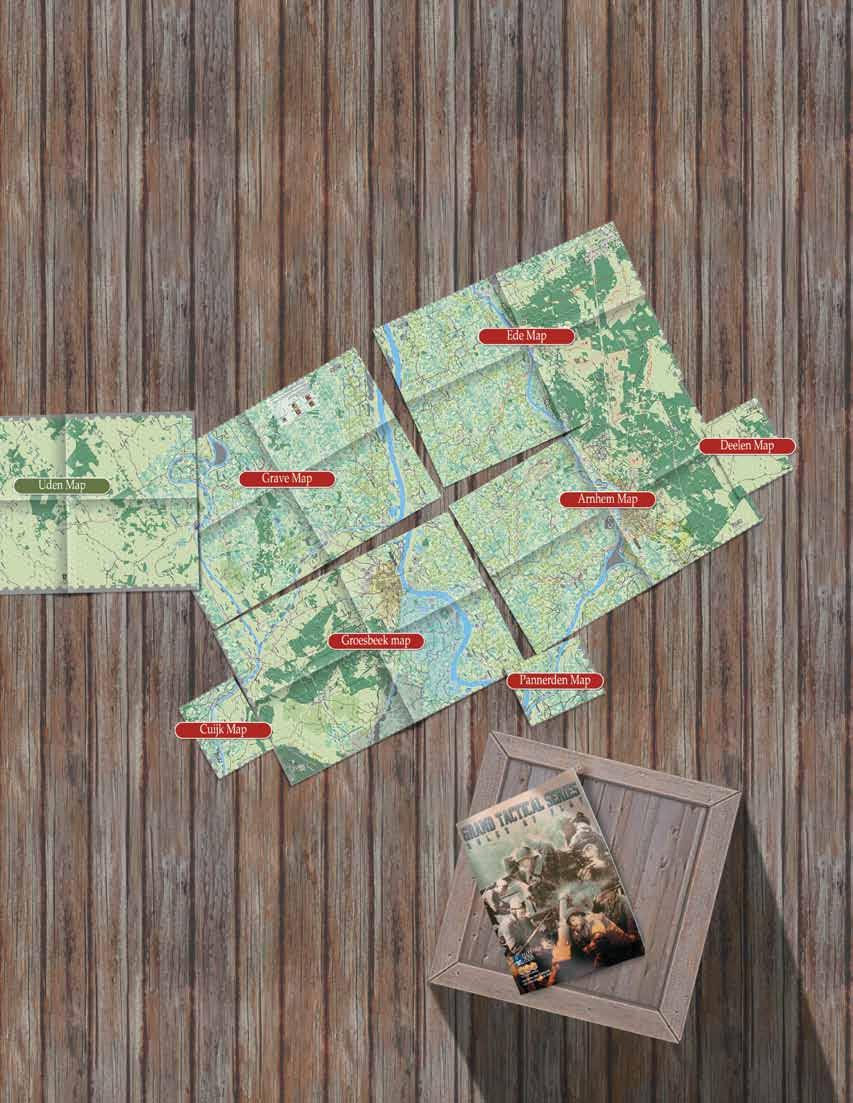
47
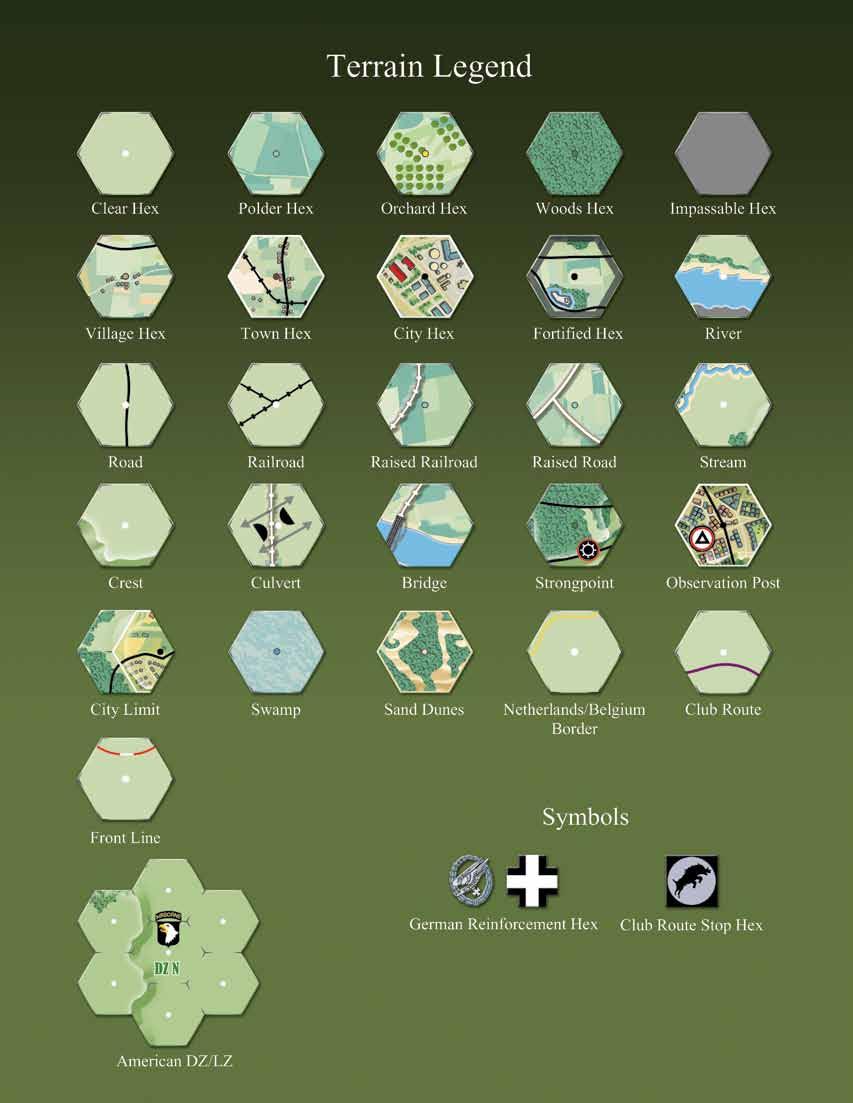
48
1.0 INTRODUCTION FORTRESSES COMPONENTS REPLACEMENTS GAME TERMS SEQUENCE OF PLAY VICTORY CONDITIONS
 RULES OF PLAY INDEX 1.0 INTRODUCTION... 2 2.0 COMPONENTS... 2 3.0 GAME TERMS... 3 4.0 SEQUENCE OF PLAY... 4 5.0 SET UP... 5 6.0 REINFORCEMENTS... 5 7.0 LOGISTICS AND INITIATIVE... 5 8.0 COMMAND... 5 9.0
Clash of Giants The Campaigns of Tannenberg and The Marne, 1914
 RULEBOOK -UPDATED 12/25/01 Clash of Giants The Campaigns of Tannenberg and The Marne, 1914 Table of Contents 1.0 Introduction............... 2 2.0 Game Components........... 2 3.0 Game Setup...............
CEDAR CREEK BY LAURENT MARTIN Translation: Roger Kaplan
 CEDAR CREEK BY LAURENT MARTIN Translation: Roger Kaplan Cedar Creek 1864 simulates the Civil War battle that took place on October 19, 1864 and resulted in a Union victory. It uses many of the rules of
A game by Wei Cheng Cheng. - Graphics: Olivier Revenu - Translation: Noël Haubry. Growling Tigers The Battle For
 BATTLES MAGAZINE #7 A game by Wei Cheng Cheng. - Graphics: Olivier Revenu - Translation: Noël Haubry Growling Tigers The Battle For Changde, 1943 is a two player wargame simulating the final stage of the
Game Turn 11 Soviet Reinforcements: 235 Rifle Div can enter at 3326 or 3426.
 General Errata Game Turn 11 Soviet Reinforcements: 235 Rifle Div can enter at 3326 or 3426. Game Turn 11 The turn sequence begins with the Axis Movement Phase, and the Axis player elects to be aggressive.
Sequence of Play This rulebook is organized according to this Sequence of Play.
 Introduction...1 Sequence of Play...2 Campaign Set-Up...2 Start of Week...10 Pre-Combat...11 Combat...14 Post-Combat...19 End of Week...20 End of Campaign...22 Optional Rules...22 Credits...22 Sample Game...23
Holland 44 Operation Market-Garden
 Holland 44: Operation Market-Garden Rev. May 2018 Holland 44 Operation Market-Garden 1 RULES OF PLAY Revised May, 2018 TABLE OF CONTENTS 1. Introduction... 2 19. Reinforcements and Entry Areas... 19 2.
RULE BOOK. Table of Contents. Game Design by Ted Raicer
 1 Game Design by Ted Raicer RULE BOOK Table of Contents 1. Introduction... 2 2. Game Components... 2 3. Game Setup... 3 4. How to Win... 3 5. Sequence of Play... 3 6. Stacking... 4 7. Zones of Control...
ARMY COMMANDER - GREAT WAR INDEX
 INDEX Section Introduction and Basic Concepts Page 1 1. The Game Turn 2 1.1 Orders 2 1.2 The Turn Sequence 2 2. Movement 3 2.1 Movement and Terrain Restrictions 3 2.2 Moving M status divisions 3 2.3 Moving
CONTENTS INTRODUCTION Compass Games, LLC. Don t fire unless fired upon, but if they mean to have a war, let it begin here.
 Revised 12-4-2018 Don t fire unless fired upon, but if they mean to have a war, let it begin here. - John Parker - INTRODUCTION By design, Commands & Colors Tricorne - American Revolution is not overly
2.0 game components support Units. color to make them easier to pick out. Each player has two types of game units: Combat Units Support units
 basic rules Somme 1918 - Bloody Spring is a wargame that simulates the German spring offensive of 1918 that was aimed at separating the British and French armies. Players will find themselves in the role
RULES OF PLAY Living Rules
 Ukraine 43 2nd Edition 2ND EDITION RULES OF PLAY Living Rules 7-4-5 TABLE OF CONTENTS. Introduction... 2 2. Contents... 2 3. Sequence of Play... 3 4. Stacking... 4 5. Movement... 4 6. Zones of Control...
I-95 GAMERS. Domination Missions
 I-95 GAMERS Domination Missions I-95 GAMERS Domination Missions Design notes Domination special rules Domination Frontline Domination Blind Domination Blitzkrieg Domination Early war Blitzkrieg Domination
SERIES RULEBOOK. Game Design by Mark S. Miklos. Version: June 2017 TABLE OF CONTENTS. Great Battles of the American Revolution
 1 SERIES RULEOOK Game Design by Mark S. Miklos Version: June 2017 TALE OF CONTENTS 1. Introduction... 2 2. Components... 2 3. Game Scale and Terminology... 2 4. How To Win... 3 5. Sequence of Play Outline...
Command Phase. Setup. Action Phase. Status Phase. Turn Sequence. Winning the Game. 1. Determine Control Over Objectives
 Setup Action Phase Command Phase Status Phase Setup the map boards, map overlay pieces, markers and figures according to the Scenario. Players choose their nations. Green bases are American and grey are
Montelimar: Anvil of Fate Scenario 1 -Opening Blows - The Feint
 Montelimar: Anvil of Fate Scenario 1 -Opening Blows - The Feint Introduction This is an after action report of a play test game of Monlimar: Anvil of Fate. Please note that the Vassal module and graphics
Components: Game Map. Unit Chart. Weather Effects. Terrain effects are listed in the rules. Turn Track
 Components: Game Map Unit Chart Weather Effects Terrain effects are listed in the rules. Turn Track Red Hex Line: Units may not move or attack across a red hex line. Fortress/Victory City: A fortified
Getting Started with Panzer Campaigns: Budapest 45
 Getting Started with Panzer Campaigns: Budapest 45 Welcome to Panzer Campaigns Budapest 45. In this, the seventeenth title in of the Panzer Campaigns series of operational combat in World War II, we are
Napoleon s Triumph. Rules of Play (draft) Table of Contents
 Table of Contents") Rules of Play (draft) Table of Contents 1. Game Equipment... 2 2. Introduction to Play... 2 3. Playing Pieces... 2 4. The Game Board... 2 5. Scenarios... 3 6. Setting up the Game... 3 7. Sequence of Play...
Rules of Play (draft) Table of Contents 1. Game Equipment... 2 2. Introduction to Play... 2 3. Playing Pieces... 2 4. The Game Board... 2 5. Scenarios... 3 6. Setting up the Game... 3 7. Sequence of Play...
Henry Bodenstedt s Game of the Franco-Prussian War
 Graveyard St. Privat Henry Bodenstedt s Game of the Franco-Prussian War Introduction and General Comments: The following rules describe Henry Bodenstedt s version of the Battle of Gravelotte-St.Privat
CONTENTS. A WWII tactical and operational strongpoint defense game. PAGE 1 Introduction. PAGE 2 Setup minutes ages: players
 CONTENTS A WWII tactical and operational strongpoint defense game PAGE 1 Introduction PAGE 2 Setup PAGE 3 Counters and Cards PAGE 4 Playing the Game PAGE 5 Soviet Card Phase PAGE 9 Wehrmacht Card Phase
RESERVES RESERVES CONTENTS TAKING OBJECTIVES WHICH MISSION? WHEN DO YOU WIN PICK A MISSION RANDOM MISSION RANDOM MISSIONS
 i The Flames Of War More Missions pack is an optional expansion for tournaments and players looking for quick pick-up games. It contains new versions of the missions from the rulebook that use a different
Bravery in the Sand. 1. Introduction. 2. Components. Units. Chits. Markers Markers
 1. Introduction Bravery in the Sand 2.1.2 Markers Bravery in the Sand is a two player game that covers the major part of the battle known as Operation Crusader in North Africa during World War Two. Covering
Gazala: The Cauldron Table of Contents
 Gazala: The Cauldron Table of Contents 1.0 Introduction... 1 2.0 Components... 1 2.1 Game Scale... 1 2.2 Playing Pieces... 1 2.2.1 Action Chits (see 4.0)... 1 2.2.2 Tactical Chits (see 4.0)... 1 2.2.3
RANDOM MISSION CONTENTS TAKING OBJECTIVES WHICH MISSION? WHEN DO YOU WIN THERE ARE NO DRAWS PICK A MISSION RANDOM MISSIONS
 i The 1 st Brigade would be hard pressed to hold another attack, the S-3 informed Bannon in a workman like manner. Intelligence indicates that the Soviet forces in front of 1 st Brigade had lost heavily
Nfejfwbm!Cbuumft!!! Mfhobop! 3:ui!Nbz!2287!
 NfejfwbmCbuumft Mfhobop 3:uiNbz2287 2008 1 Battles of the Middle Ages Battle of Legnano 1176 Rulebook version 1.0 1.0 Introduction Battles of the Middle Ages is an easy to learn wargaming system that tries
2.0 The Battlefield. 2.1 Terrain Hexes. 2.2 Terrain Types. 3.0 Command Cards (10 each) 3.1 Order Cards (7 each)
 3.1 Order Cards (7 each)") Advanced Vive l Empereur Introduction Advanced Vive l Empereur is a Histo Command Dice System Game and allows you to simulate on a grand-tactical level the battles of the Napoleonic era. The player is
Advanced Vive l Empereur Introduction Advanced Vive l Empereur is a Histo Command Dice System Game and allows you to simulate on a grand-tactical level the battles of the Napoleonic era. The player is
Red Parachutes. Extended Player Aid Sheet by Richard J. Vohlers. Includes advanced rules; optional rules in italics.
 Red Parachutes Extended Player Aid Sheet by Richard J. Vohlers Includes advanced rules; optional rules in italics. S = Soviet; G = German; B = Both; P = Phasing; NP = Non-phasing; OOS = Out of Supply;
Getting Started with Modern Campaigns: Danube Front 85
 Getting Started with Modern Campaigns: Danube Front 85 The Warsaw Pact forces have surged across the West German border. This game, the third in Germany and fifth of the Modern Campaigns series, represents
Airborne Landings For WWII MicroArmour :The Game
 Airborne Landings For WWII MicroArmour :The Game by Leif Edmondson. The WWII rulebook presents some parachute landing rules in scenario #3 A Costly Setback and in the Modern MicroArmour rule book as well.
Air Deck Rules and Use
 Air Deck Rules and Use Note: This is a first draft of the Air Deck rules. Any problems or suggestions can be posted in the forum thread or mailed to PanzerRunes on the Days of Wonder site. Suggestions
Game Journal 53 First fight Smolensk Blitzkrieg. Rules : updated 17/May/2016(see /4.0 /9.2.4 /12.1/14.0/ TERRAIN EFFECT TABLE)
") Game Journal 53 First fight Smolensk Blitzkrieg Rules : updated 17/May/2016(see 2.2.2 /4.0 /9.2.4 /12.1/14.0/ TERRAIN EFFECT TABLE) 1.0 INTRODUCTION This game simulates fighting in Baltic States and Leningrad
Game Journal 53 First fight Smolensk Blitzkrieg Rules : updated 17/May/2016(see 2.2.2 /4.0 /9.2.4 /12.1/14.0/ TERRAIN EFFECT TABLE) 1.0 INTRODUCTION This game simulates fighting in Baltic States and Leningrad
Getting Started with Panzer Campaigns: Stalingrad 42
 Getting Started with Panzer Campaigns: Stalingrad 42 Welcome to Panzer Campaigns Stalingrad 42. As winter began to close, the instruction came forward from OKH to von Paulus and the Sixth Army capture
Game Journal 47 Fierce Fight! Stalingrad Blitzkrieg
 Game Journal 47 Fierce Fight! Stalingrad Blitzkrieg Different point from MLB is indicated by red. Combat Results Table Ax : number of step attacking lose - : No effect R : All defending units retreat one
Recon 1 Air Power Counter Attack Counter Attack Recon 1 Air Power Recon 1 Recon 1 Air Strike Air Power Air Power Air Strike Memoir 44 FAQ
 VIII. COMMAND FAQ Q. If someone can use a Recon 1 card as an Air Power, can the other player Counter Attack the effect or just the card? A. The rule is that a Counter Attack is only allowed to counter
Gettysburg 77 Errata. 1 of 5 RULES CORRECTIONS. Advanced Union Order of Appearance
 RULES CORRECTIONS 1) p.1 Object of Game Culp s hill is U40 not U41. 2) p. 7 Combat Qualifications Rule 3 is (.see 5) not ( see 6) 3) p.8 Retreat rule 2. Change to read: If the retreating unit is adjacent
The Glory that was GREECE. Tanagra 457 BC
 The Glory that was GREECE Tanagra 457 BC TCSM 2009 The Glory that Was Vol. I: Greece Rulebook version 1.0 1.0 Introduction The Glory that was is a series of games depicting several different battles from
Introduction. Your Commanders gain Experience with every battle, but they also gain Stress. Each Week, you must decide how hard to push your men.
 Introduction...1 Sequence of Play...2 Campaign Set-Up...2 Start of Week...9 Pre-Combat...10 Combat...12 Post-Combat...16 End of Week...17 End of Campaign...19 Optional ules...19 Credits...19 Sample Game...20
22.0 Extended Examples of Play
 Last Hundred Yards ~ Playbook 11 22.0 Extended Examples of Play 22.1 Infantry and Mortars Situation: Early dawn, October 1944, southwest of Kohlscheid, Germany. A German outpost, dug-in on Hill 192, has
Frontier/Modern Wargames Rules
 Equipment: Frontier/Modern Wargames Rules For use with a chessboard battlefield By Bob Cordery Based on Joseph Morschauser s original ideas The following equipment is needed to fight battles with these
Game Rules. The Great Battles of the Napoleonic Era. Giovanni Crippa. version October v.1.1. A game by: GIOGAMES
 The Great Battles of the Napoleonic Era Game Rules v.1.1 version 1.2 - October 2013 GIOGAMES A game by: Giovanni Crippa 23900 LECCO (Italy) Introduction Advanced Vive l Empereur is a game system that allows
command efficiency table
 sequence of play 0. PRE-GAME ORGANIZATION PHASE. 1. POSTURE DETERMINATION PHASE 2D6 + Cohesion. Highest total has initiative in this phase. Mark required stands or groups in movement posture. [6.01.01]
When it comes to generic 25mm Science Fiction skirmish games, there are really only two choices.
 1 of 6 When it comes to generic 25mm Science Fiction skirmish games, there are really only two choices. Stargrunt II, which is a gritty, realistic simulation of near-future combat. And ShockForce, which
Table of Contents. basic rules. Advanced rules. Detailed Sequence of Play. 6 Movement phase 8. 1 Explanation of game terms 3.
 2 1 Explanation of game terms 3 1.1 Units 3 1.2 Command Radius (CR) 4 1.3 Step losses 4 1.4 Game markers 4 1.5 Supports 4 1.6 Theater of Operation markers (TO) 4 1.7 Nationality and borders 5 1.8 Hexes
The counters. BULL RUN VaeVictis 89 The first battle of the Civil War
 BULL RUN 1861 - VaeVictis 89 The first battle of the Civil War A game by Laurent MARTIN Bull Run, 1861 is a simulation of the First Battle of Bull Run (or the First Battle of Manassas for the Confederates),
Solitaire Rules Deck construction Setup Terrain Enemy Forces Friendly Troops
 Solitaire Rules Deck construction In the solitaire game, you take on the role of the commander of one side and battle against the enemy s forces. Construct a deck, both for yourself and the opposing side,
ARMOR DIAGRAM ARMOR DIAGRAM. Mech Data. Mech Data BATTLEMECH RECORD SHEET BATTLEMECH RECORD SHEET. Weapons Inventory.
 BATTLEMECH RECORD SHEET Left Torso Head Right Torso ARMOR DIAGRAM Type: HER-2S Hermes II Tonnage: 40 Points: Walking: 6 Running: 9 Weapons Inventory Mech Data Type Location Damage Short Med. Long 1 Autocannon
Moscow WB-95 system. Game and System author: Wojciech Zalewski Cover: Arkadiusz Wróbel Map: Wojciech Zalewski Translation: Roman Mękicki
 Moscow 1941 WB-95 system Game and System author: Wojciech Zalewski Cover: Arkadiusz Wróbel Map: Wojciech Zalewski Translation: Roman Mękicki Playtest: Roman Mękicki, Bartłomiej Batkowski, Szymon Kucharski,
11.6 Victory Conditions...10
 TABLE OF CONTENTS Introduction...4 Glossary...4 Support...4 1.0 Components...4 1.1 Anatomy of a Combat Unit...4 1.2 Organization of Brigades and Regiments...5 2.0 Impulse System...5 2.1 Activation Roll...5
Panzer Battles User Manual
 Page 1 Panzer Battles User Manual Table of Contents [1.0] Introduction... 9 [2.0] How to Play the Game... 10 Sides... 10 Hexes... 10 Time Scale... 10 End of Game... 10 [3.0] Game Equipment...11 [3.1] The
COMPONENT OVERVIEW Your copy of Modern Land Battles contains the following components. COUNTERS (54) ACTED COUNTERS (18) DAMAGE COUNTERS (24)
 ACTED COUNTERS (18) DAMAGE COUNTERS (24)") GAME OVERVIEW Modern Land Battles is a fast-paced card game depicting ground combat. You will command a force on a modern battlefield from the 1970 s to the modern day. The unique combat system ensures
GAME OVERVIEW Modern Land Battles is a fast-paced card game depicting ground combat. You will command a force on a modern battlefield from the 1970 s to the modern day. The unique combat system ensures
GREAT BATTLES OF ALEXANDER 4 th Edition Errata & Clarifications October, 2008
 GREAT BATTLES OF ALEXANDER 4 th Edition Errata & Clarifications October, 2008 GREAT BATTLES OF ALEXANDER Rulebook (2.25) Sample Persian Leader, Line Command Capability: Delete (Optional Rule) (4.21) 1
IV. TROOPS FAQ SPECIALIZED UNITS 2
 IV. TROOPS FAQ STANDARD UNITS 1 7 8 8 Infantry Move 0-1 and battle, or move 2 no battle May Take Ground on successful Close Assault Armor Move 0-3 and battle May Overrun on successful Close Assault Artillery
Angola! Rules of Play
 Angola! 1 Rules of Play 2 Angola! Table of Contents Errata 2 1 Introduction 3 1.1 Learning the Game 3 1.2 Definitions 3 1.3 Game Components 3 2 Game Overview 3 2.1 Factions 3 2.2 Playing the Game 3 2.3
Maida 1806: Stuart vs. Reynier
 Table of contents. 1.0 Introduction... 2.0 Components... 3.0 Gameplay... 4.0 Leaders... 5.0 Infantry in Column... 6.0 Infantry in Line... 7.0 Square... 8.0 Skirmish order... 9.0 Cavalry... 10.0 Artillery...
GMT Games, LLC P.O. Box 1308, Hanford, CA Game Design: Vance von Borries
 Game Design: Vance von Borries GMT Games, LLC P.O. Box 1308, Hanford, CA 93232-1308 www.gmtgames.com Rules of Play 2 Roads to Moscow ~ Rules of Play T a b l e o f C o n t e n t s 1.0 Introduction 1.1 Historical
Fleet Engagement. Mission Objective. Winning. Mission Special Rules. Set Up. Game Length
 Fleet Engagement Mission Objective Your forces have found the enemy and they are yours! Man battle stations, clear for action!!! Mission Special Rules None Set Up velocity up to three times their thrust
Under fire: If a unit or vehicle has been hit in the previous turn, whether the hit caused damage or not, that unit is under fire.
 Featherstone Like WW2 Rules These rules are very similar to the Featherstone/Bath mass combat rules you can find for Ancient and 18 th Century combat. They have been adapted for a massed skirmish game
9.3 Fresh/Spent HQs and Units Cadres AIR POWER Airfields Air Commitment Strategic Missions...
 Summary INTRODUCTION... 3 1.0 GLOSSARY... 3 2.0 GAME COMPONENTS... 5 2.1 Map... 5 2.2 Counters... 5 2.3 Charts and Tables... 9 3.0 SEQUENCE OF PLAY... 9 4.0 MOVEMENT... 10 4.1 General Rules... 10 4.2 Stacking...
Target: Leningrad Rules v1.0 1
 Target: Leningrad The Attack of Army Group North: June August, 1941 Table of Contents [1.0] INTRODUCTION...1 [2.0] GENERAL COURSE OF PLAY..1 [3.0] GAME EQUIPMENT...1 [4.0] SEQUENCE OF PLAY...2 [5.0] HOW
DIGITAL. Manual. Copyright 2017 Lock n Load Publishing, LLC. All Rights Reserved
 DIGITAL Manual Copyright 2017 Lock n Load Publishing, LLC. All Rights Reserved Introduction on, Digital edition is a low-complexity, Second World War armored combat game, modeled after the Lock n Load
R U L E B O O K L E T R U L E B O O K L E T
 R U L E B O O K L E T BARBAROSSA: Crimea R U L E B O O K L E T Game Design by Vance von Borries Table of Contents 1.0 Introduction... 2 2.0 Game Equipment... 2 3.0 Basic Concepts Terminology... 2 4.0 How
Portable Wargame. The. Rules. For use with a battlefield marked with a grid of hexes. Late 19 th Century Version. By Bob Cordery
 The Portable Wargame Rules Late 19 th Century Version For use with a battlefield marked with a grid of hexes By Bob Cordery Based on some of Joseph Morschauser s original ideas The Portable Wargame Rules
would cost 3 MP not 5 MP. If you had to cross a river not using a defending unit. Terrain combat effects are cumulative.
 Design & Development: Grant Wylie and Mike Wylie Creative Director: Sean Cooke 2015 Worthington Publishing Visit worthingtonpublishing.com for a short introductory video explaining how to play and more
Barbarossa: The War in the East, Second Edition "The Child's Game of Barbarossa" v 1.0
 Barbarossa: The War in the East, 1941-1945 Second Edition "The Child's Game of Barbarossa" v 1.0 Game Overview Barbarossa is a simple simulation representing the battles on the Eastern Front between the
FAQ a n d Er ra t a - Version Updated January 27, 2011
 TM TM FAQ a n d Er ra t a - Version 1.2.1 Updated January 27, 2011 Battles of Westeros Errata Text in red indicates a change since the last update. Although the specific rules found in this FAQ have not
Operation Blue Metal Event Outline. Participant Requirements. Patronage Card
 Operation Blue Metal Event Outline Operation Blue Metal is a Strategic event that allows players to create a story across connected games over the course of the event. Follow the instructions below in
Exclusive Rules & Scenarios
 2 2017 Multi Man Publishing, Inc. Contents 1.0 Weather and Time...4 2.0 Terrain...4 2.1 Clear...5 2.2 Orchard and Vineyard...5 2.3 Scrub...5 2.4 Village...5 2.5 Town...5 2.6 City...5 2.7 Fortified...5
UNITS Hidden Units Formed Units Fighter Commander
 COLONIAL ADVENTURE UNITS Each unit consists of 5 to 20 figures. Additionally units may contain leaders (maximum 2 per unit), musicians (maximum 1 per unit) and color bearers (maximum 1 per unit). Each
For 2 to 6 players / Ages 10 to adult
 For 2 to 6 players / Ages 10 to adult Rules 1959,1963,1975,1980,1990,1993 Parker Brothers, Division of Tonka Corporation, Beverly, MA 01915. Printed in U.S.A TABLE OF CONTENTS Introduction & Strategy Hints...
Campaign Introduction
 Campaign 1776 Introduction Campaign 1776 is a game that covers the American Revolutionary War. Just about every major battle of the war is covered in this game, plus several hypothetical and "what-if"
PROFILE. Jonathan Sherer 9/30/15 1
 Jonathan Sherer 9/30/15 1 PROFILE Each model in the game is represented by a profile. The profile is essentially a breakdown of the model s abilities and defines how the model functions in the game. The
2.2 Player Aid Cards. 2.3 The Playing Pieces
 1.0 Introduction...2 2.0 Game Equipment...2 3.0 Terminology...2 4.0 How to Play...3 5.0 Weather...3 6.0 Supply...4 7.0 Receiving Replacements... 6 8.0 Reinforcement/Withdrawal...8 9.0 Air Unit Readiness...9
Unit List Hot Spot Fixed
 Getting Started This file contains instructions on how to get started with the Fulda Gap 85 software. If it is not already running, you should run the Main Program by clicking on the Main Program entry
RULES of PLAY. Designer John Prados. Developer Lembit Tohver. Art Director Mark Mahaffey. Editing Jack Beckman. Playtesting
 1.0 INTRODUCTION 2.0 GAME EQUIPMENT 2.1 Game Map 2.2 Game Charts and Tables 2.3 Playing Pieces 2.4 Game Scale 2.5 Setting up the Game 3.0 SEQUENCE OF PLAY 3.1 Game Turn Summary 4.0 PARACHUTE/GLIDER LANDINGS
IWO JIMA RAGE AGAINST THE MARINES 1. INTRODUCTION 2. COMPONENTS 2.1 COUNTERS. Operations Special Issue #1
 1. INTRODUCTION Iwo Jima. The only battle of World War Two that saw the United States Marines suffer more casualties than they inflicted on the enemy. It was a battle that would define a war and would
Field of Glory - Napoleonic Quick Start Rules
 Field of Glory - Napoleonic Quick Start Rules Welcome to today s training mission. This exercise is designed to familiarize you with the basics of the Field if Glory Napoleonic rules and to give you experience
Highlanders A New Scenario for Vietnam:
 Overview This article contains a new scenario for Victory Games 1984 title Vietnam: 1965-1975. This scenario is not based on any historical Vietnam action or operation, but is meant to provide a fresh
FRIDAY APRIL 1 ST 8:00AM - 6:00PM
 FRIDAY APRIL 1 ST 8:00AM - 6:00PM Do not lose this packet! It contains all necessary missions and results sheets required for you to Participate in today s tournament. It is your responsibility to hold
Stargrunt II Campaign Rules v0.2
 1. Introduction Stargrunt II Campaign Rules v0.2 This document is a set of company level campaign rules for Stargrunt II. The intention is to provide players with the ability to lead their forces throughout
The Arduous Beginning
 The Arduous Beginning The Attack of Army Group Center: June August, 191 Table of Contents [1.0] INTRODUCTION...1 [2.0] GENERAL COURSE OF PLAY..1 [3.0] GAME EQUIPMENT...1 [.0] SEQUENCE OF PLAY...2 [5.0]
Buck Rogers Battle For The 25 th Century 1. 4 Turn Phases Complete each phase in order Definitions
 Buck Rogers Battle For The 25 th Century 1 OBJECT 1) Control 15 Territorial Zones at the end of any turn 2) Control the last Leader on the board at any time 3) Convince everyone else to surrender 4) Control
Designed by Uwe Eickert, Gunter Eickert, John Butterfield. v58
 Designed by Uwe Eickert, Gunter Eickert, John Butterfield v 'Solo Mission - Search and Destroy' Setup and Layout To assist you in learning the Solo System for Awakening the Bear, set up Solo Mission listed
1.0 INTRODUCTION. 2.0 COMPONENTS 2.1 The Game Map 2.2 Counters 3.0 IMPORTANT DEFINITIONS
 ORDER OF BATTLE: ARVN 18th Division (Dao) 43, 48, 52 Regiments 1st Airborne Brigade (Dinh) Four battalions 8th Regiment/5th Division 82nd, 81st Ranger Battalions 33rd Ranger Group 322 Armor Task Force
J U LY N O V E M B E R,
 J U LY N O V E M B E R, 1 9 4 2 1. Introduction............................. 2 2. Contents................................ 2 3. Sequence of Play Outline................... 4 4. The Initial Phase.........................
Rule Book. Table of Contents
 Rule Book Table of Contents 1.0 Introduction... 2 2.0 Components... 2 3.0 Sequence of Play... 3 4.0 Weather and Initiative... 3 5.0 Logistics... 4 6.0 Formations and HQs... 5 7.0 Activation... 6 8.0 Movement...
BATTLE FOR GALICIA, 1914
 BATTLE FOR GALICIA, 1914 Oregon ConSim Games 2006 TABLE OF CONTENTS 1.0 INTRODUCTION 1.1 Preparation for Play 1.2 Abbreviations 1.3 Game Map and Half-Hexes 2.0 THE PLAYING PIECES 2.1 How to read the Units
On the day you also need to bring :
 In this pack you will find everything you will need to do and know, to prepare for and play in the OMG Bolt Action Tournament. Tournament Organiser: Jeff Black Players Pack/ Tournament Rules writer: Jeff
TABLE OF CONTENTS. 1.0 INTRODUCTION 1.1 The Game 1.2 Equipment 1.3 Contacting Compass Games 1.4 Help HQ
 TABLE OF CONTENTS 1.0 INTRODUCTION 1.1 The Game 1.2 Equipment 1.3 Contacting Compass Games 1.4 Help HQ 2.0 GAME COMPONENTS 2.1 Map 2.2 Counters 2.3 Player Aid Cards 2.4 Rules 2.5 Game Scale 3.0 SCENARIOS,
Vive l Empereur! STANDARD RULES. Third edition. Didier ROUY. Foreword
 Didier ROUY Vive l Empereur! STANDARD RULES Third edition Foreword "Vive l Empereur!" is a series of simulation games using a standard rules system and a set of exclusive rules specific to each battle.
Pacific Battles: Malaya 1941
 Pacific Battles: Malaya 1941 CONTENTS 1.0 IntrodUctIon 2.0 GaMe components 3.0 HoW to Set UP the GaMe 4.0 SeQUence of PlaY 5.0 command MarKerS 6.0 reinforcements 7.0 logistics 8.0 SUPPreSSIon 9.0 reorganization
PRELUDE: THE ADVANCE TO THE VOLGA... 2 by Michael A. Rinella. THE BATTLE IN STALINGRAD... 6 by David M. Glantz and Jonathan M.
 PRELUDE: THE ADVANCE TO THE VOLGA..................... 2 by Michael A. Rinella THE BATTLE IN STALINGRAD.................................. 6 by David M. Glantz and Jonathan M. House AFTERMATH:THE DEATH
1 side. The Play Book provides specifics on map designations and alignments.
 Rules Book Barbarossa Standard Rules Draft: 4-8-18 Game Design by Vance von Borries Copyright 2018, Vance von Borries 1.0 Introduction The Barbarossa portion of GMT s East Front Series is a set of games
World at War. Blood and Bridges, Death of First Panzer, Eisenbach Gap COMBINED SCENARIO: A RACE FOR VICTORY. Robert Holzer, 2010
 World at War Blood and Bridges, Death of First Panzer, Eisenbach Gap Robert Holzer, 2010 COMBINED SCENARIO: A RACE FOR VICTORY In a sudden blitz attack a detachment of the 2 nd Soviet Airborne Division
Operational Combat Series: YUNNAN
 Yunnan Operational Combat Series: YUNNAN 2.0 Japanese Special Rules 3.1a Schedule: The YEF receive the following reinforcements turns: Operational Combat Series Game Number 04-06 supplemental 2.1 Reinforcements
TUTORIAL DOCUMENT. Contents. 2.0 GAME OBJECTIVE The Overall Objective of the game is to:
 TUTORIAL DOCUMENT Contents 1.0 INTRODUCTION 2.0 GAME OBJECTIVE 3.0 UNIT INFORMATION 4.0 CORE TURN BREAKDOWN 5.0 TURN DETAILS 5.1 AMERICAN MOVEMENT 5.2 US COMBAT 5.3 US MOBILE MOVEMENT 5.4 US MOBILE COMBAT
PROFILE. Jonathan Sherer 9/10/2015 1
 Jonathan Sherer 9/10/2015 1 PROFILE Each model in the game is represented by a profile. The profile is essentially a breakdown of the model s abilities and defines how the model functions in the game.
Rules Version 2.0 Dec. 18, Table of Contents
 Rules Version 2.0 Dec. 18, 2001 Table of Contents 1.0 Introduction... 2 2.0 Components... 2 2.1 The Maps... 2 2.2 The Counters... 2 2.3 The Die... 2 2.4 Definitions/Abbreviations... 3 2.5 Game Scale...
Operation Shingle The Battle for the Beachhead January 22 nd - March 1 st 1944
 Operation Shingle The Battle for the Beachhead January 22 nd - March 1 st 1944 Table of Contents 1.0 Introduction 2.0 Components 3.0 Sequence of Play 4.0 Weather Phase 5.0 Supply Phase 6.0 Reinforcement
IMPERIAL ASSAULT-CORE GAME RULES REFERENCE GUIDE
 STOP! This Rules Reference Guide does not teach players how to play the game. Players should first read the Learn to Play booklet, then use this Rules Reference Guide as needed when playing the game. INTRODUCTION